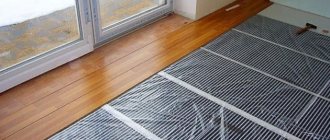
To be fair, it should be said that fungi for attaching insulation are not the only installation method. But in most designs they are used. Even in situations where, for example, polystyrene foam sits on adhesive foam, with a “wet facade” they additionally use fungus for insulation. Let's gradually understand the operating principles of this “miracle”, select the desired type of fastening and calculate the cost.
What is a dowel and what is it eaten with?
Dowels for thermal insulation are fastening elements consisting of several parts. Namely:
- The hat is its task to distribute the load over the surface of the material being fixed;
- Spacer element - it carries the load and creates a friction force that ensures that the insulation is held on the wall;
- Nail - hammered into the spacer element for tight fixation;
- Some types of insulation fungi have an anchor sleeve for additional fastening.
- Also, there are expansion washers - their task is to increase the contact area with thermal insulation and distribute the load over the surface. In practice, such washers are used for soft materials in order to avoid their deformation.
So, a disc dowel for fastening is a mechanical element with the help of which the insulation is attached to the wall.
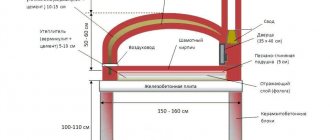
How to make a fungus from wood for a sandbox with your own hands
Just a fenced-in place for children to play with sand is not interesting. Parents are quite capable of making a sandbox with fungus for their children.
The design may be compact, but it must be stable and safe.
The place for the sandbox is chosen to be open - children should be supervised. The structure is positioned so that it is in partial shade, and in the heat of the day it is in the sun. The sand must dry out.
Site preparation:
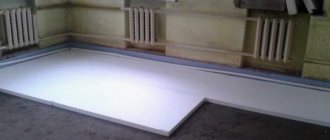
- The perimeter of the future building is marked on the ground, after which a layer of soil at least 30 cm thick is removed in this place.
- Then a drainage layer in the form of crushed stone and sand is poured. It will speed up the absorption of water and drying of the sandbox filler after rains.
- The drainage is covered with any material: plywood, paving slabs, polyethylene. It will serve as a base that prevents sand from mixing with the soil and prevents the penetration of insects and rodents.
Builders recommend forming the base for the sandbox from modern material - geotextiles. It does not retain moisture, does not deteriorate from precipitation, and will last a long time.
At the first stage, the sandbox itself is built. Before assembling the product, the wood is thoroughly cleaned, and the fastenings are chosen to be reliable and smooth - this will help to avoid splinters and injuries.
The sandbox box is made in a square or rectangular shape. The optimal size of one side is from 2 to 3 m. The boards are selected from treated wood, their thickness is at least 3 cm.
The timber for the box is pre-treated with an antiseptic or bitumen, since a third of the base will be buried in the ground
After the future sandbox has been marked on the soil, bars measuring 40x50 mm and 45-50 cm long are driven into the corners. They are dug into the ground 15 cm from the total length.
After installing the corner supports, they are sheathed with boards
Several narrow boards are placed on the timber one by one or one, but wide, is chosen. On each side of the square you will get a kind of shield. The average height of the side should be at least 30 cm.
As soon as the work with the sidewalls is completed, we begin making the seats. Simply nail the boards horizontally to the sides from above.
To prevent the child from being injured by sharp corners, it is better to round them, and sand the surface and sides of the seats well
After creating the base of the sandbox, they begin to make the canopy. The simplest and most commonly used form is in the form of a fungus.
The canopy can be with clear lines or fancy; at home it is easier to maintain strict forms
How to make and install a mushroom:
- A hole is dug exactly in the center of the sandbox, taking into account that the support of the fungus is deepened by at least 1 m.
- For the legs of the canopy, a thick beam with a cross section of 10x10 cm is used. The wood is pre-treated with bitumen or antiseptics.
- When making a roof for a sandbox in the form of a fungus with your own hands, choose a 40x40 mm beam and connect its segments in the form of triangles. Attach them to the base. From the inside, the product does not need to be sewn across the board; this can be easily done later on the outside using thin sheets of plywood
- As soon as the head and leg of the structure are connected, it is installed in the prepared hole. The part of the support that is in the recess is covered with crushed stone, after which the stone is filled with strong cement mortar.
As soon as the cement hardens, the fungus is firmly “rooted” in the sandbox, they begin to decorate it. Plywood sheets can be coated with bright paint, red and white, like a fly agaric. Some parents prefer to leave the wood's natural color and coat it with a clear varnish to protect it. The dim product will fit into any landscape and will not “compromise” its colors with other buildings. The sandbox in the shape of a mushroom is ready.
The canopy can also be attached to the trunk of a cut tree, so the structure looks natural and original
Fastening requirements
Insulation anchors are subject to high stress, function in alkaline environments and are exposed to extreme temperatures. This means they must meet several criteria.
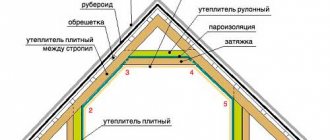
- Be resistant to destruction. Both the umbrella itself and the nail must be of very high strength. The nail must be made of galvanized steel so that its material does not react and begin to deteriorate. This is especially important when the material under the “wet facade” is attached with fungus. With this approach, the fungus is covered with a layer of plaster and becomes “immured” in alkali.
- When passing through thermal insulation, the fungus can become a “cold bridge.” This will not happen if the material from which the fastener is made has low thermal conductivity. A thermal conductivity index higher than 0.004 W/K is considered unacceptable.
- Ensure high adhesion. In the case of ventilated facades, fungus often serves as the only retaining factor for thermal insulation. “Wet” ones also contain foam adhesive, but the load is much higher. The fungus must provide sufficient adhesion to the surface of the insulation and the main material of the wall. In addition, if foam or fiberglass insulation is reinforced with an adhesive layer on top, the cap must become one with this wet compound, providing a layer of insulation.
How to make a polycarbonate mushroom for a sandbox
The plastic sandbox canopy is designed in the form of fungus segments. The main advantage of the material is that it can be bent, creating rounded shapes. Also, polycarbonate does not get wet; it can be used to make a fungus in a sandbox not only from the sun, but also from rain.
Plastic material is easy to cut and give it all kinds of shapes
Polycarbonate is also transparent, it allows the sun's rays to pass through, so the sand warms up and always remains dry. The material scatters ultraviolet radiation, which protects children from burns while playing.
One of the disadvantages is that it is difficult to attach this material to wood or metal; you need to purchase special thermal washers.
Using a thermal washer, plastic sheets can be connected to almost any base
The sandbox itself and the roof slopes are made of timber, similar to a wooden product according to the diagram below.
The design of the upper part of the fungus is gable; it is mounted on two racks
After creating and installing the base, building a mushroom umbrella in the sandbox is not difficult.
The distance between the slats is sewn up with polycarbonate sheets using special fasteners. Plastic can be plain or different colors.
The classic version of the fungus with a multi-colored roof is suitable for any area
For the winter, polycarbonate must be covered or cleared of snow and ice. If this option is not suitable, it is better to make a canopy in the form of a fungus on a wooden sandbox.
Often, shelter for sandboxes is made in the form of a canopy. In this case, polycarbonate is suitable like no other material. It is easy to bend it in an arc and attach it to a metal base with washers.
Dark plastic will protect from the sun, raindrops will not linger on it
Some of the walls of the sandbox are also covered with polycarbonate. This will protect it from winds and drafts if it is placed in an open area.
Multi-colored, bright walls perform not only a practical, but also a decorative function as a portable polycarbonate sandbox
Kinds
To put it simply, there are two main types of umbrellas.
Made from galvanized steel
The nail of such umbrellas in most cases is made of galvanized steel (sometimes polyamide).
And although this material resists corrosion more than other metal ones, it is still not completely protected from it. There is a second drawback. Metal conducts heat well, which means that cold bridges can form at the attachment point and condensation can accumulate. Over time, cracks may appear at the attachment points. This type of fasteners has a higher cost. Main characteristics:
- Dowel material: impact-resistant polypropylene.
- Anchor material: low carbon, galvanized steel;
- Temperature range: -55 – +60 degrees;
- Load: up to 750 kg per square meter.
As a conclusion: such fungi are used in the case of attaching heavy insulation, when the use of plastic is impossible.
Made of plastic
Dowel for thermal insulation with a plastic nail. They are used more often than metal ones, but they are less expensive and less durable. Although even their performance is quite impressive. The temperature ranges from -40 to + 80 degrees. Such umbrellas are also able to withstand loads from 20 to 380 kg per square meter. Nylon nails are also classified as plastic.
With thermal head
Thermal insulation dowels with thermal head are umbrellas with metal nails. A polymer head is placed on the end of the anchor. This approach is used for different types of walls, but is especially necessary for wooden ones. The purpose of the head is to reduce thermal conductivity. Such elements have a higher cost (the highest among dowels), but also the lowest thermal conductivity and strength.
In addition, fungi are distinguished by length. This is an important indicator that needs to be calculated correctly. The diameter of the rod for the anchor is also distinguished. Most often, rods with a diameter of 8-10 mm are used.
Characteristics
Each product item from the list above has its own unique properties and each has its own positive and negative qualities. Before purchasing a sufficient amount of fastening material, you need to familiarize yourself with the characteristics of each type of disc dowels:
- Disc-shaped dowel with plastic nail. It is made from nylon, low-density polyethylene or polypropylene. In terms of their properties, these materials are virtually identical, so they should not affect a positive decision when choosing fasteners. Since this fastening material is made entirely of plastic, it is very light, which allows it to be used in any structure without worrying about the load on the load-bearing wall. But there is also a downside to this - you shouldn’t use them to attach heavy insulation, they simply won’t withstand it.
The absence of metal in the composition of the expansion nail gives it additional advantages - immunity to moisture and poor thermal conductivity. The first advantage makes it impervious to corrosion and increases service life to 50 years, and the second allows it to minimize heat loss. At the same time, during installation, extreme care must be taken when working with a plastic expansion nail. Possessing low rigidity, it has the unpleasant feature of bending and breaking at the most inopportune moment.
- Disc-shaped dowel with metal nail. It differs from the previous model in that it uses a 6 mm thick galvanized steel metal nail as a fastening element. This significantly increases strength and allows you to withstand the weight of any structures and use them when working with any type of insulation. And unlike plastic, a metal expansion nail will not break or bend. But this type of disc dowels also has disadvantages. A metal expansion nail conducts heat better than a plastic one and can create areas where the wall can freeze, which will not happen with a dowel made entirely of plastic. The second drawback is corrosion. If the wall remains wet most of the year, then the rust will eat through the entire expansion nail through the unprotected head, which will lead to failure of the entire thermal insulation system.
We recommend: Do-it-yourself racks for growing seedlings with lighting
- Disc-shaped dowel with a metal rod and thermal cover. This is an improved version of the previous fastener, designed to work in conditions of high humidity. The main difference is the plastic plug that is attached to the dowel head. It prevents the penetration of moisture and reduces the outflow of heat, so such fasteners can be considered more airtight. There are two versions - with a removable plug, which you need to install yourself, and a plug installed at the manufacturer. The second option is more convenient to use, because the plugs are quite small and are stored separately. It is quite easy to lose them during work.
- Facade dowel with fiberglass rod . This species appeared on the market relatively recently. It is assembled from the following elements - a clamping part, a fiberglass rod, an anchor element with a spacer zone and an expansion washer, which fits onto the clamping part to create an additional area for fixing the insulation. Thanks to the fiberglass rod, the dowel has high strength and low thermal conductivity. All these elements can be selected separately, guided only by the required dimensions.
A quality certificate for thermal insulation panels must be present. Today, types such as fungi and umbrella are often used. The mushroom can be screw, IZL-T and IZM.
Price
The price of a fungus for attaching insulation depends on the type and length. Average cost:
| Metal | Plastic | With thermal head |
| 4-9 rubles per piece | 2-5 rubles | 9-30 rubles |
The difference in cost is mainly affected by length.
You can often find umbrellas in packages of 800-3000 pieces. In general, plastic ones are sold wholesale by the kilogram. But such options are not suitable for frequency construction. Insulating one small house may require up to 300 fasteners.
Planning and design
Playing with sand is not just a fun pastime. This activity improves fine motor skills, develops creative thinking and develops patience in the child. As you can see, there are many advantages, and therefore it is worth making an effort to ensure that the design of the sandbox is safe, practical and comfortable, especially since the child under the fungus will not overheat in the sun.
The simplest option would be to make a rectangular or square sandbox, and this will take no more than a couple of hours. But it will be possible to stay in such an ordinary sandbox for no more than two hours, since due to overheating the child may have a heat stroke. It is enough to make a fungus or a canopy, and this way you can solve several problems at once.
The main aspect is where the structure will be located - it must be in the visibility zone of the sites, including the house.
The second mandatory condition is that there should be no trees nearby that will pollute the sandbox with fallen branches and leaves, and caterpillars are not much fun. The planning stages include creating a sketch and calculating materials, and then you can move on to manufacturing.
Length calculation
If the fastening element is chosen incorrectly, it will not hold the thermal insulation. And you will have to tear it off along with the attached sheets. How not to make a mistake and calculate the required length right away?
The purpose of the dowel is to secure the insulation to the main wall. This is where you need to get to. On the way to a solid surface lie:
- The insulation itself;
- Thickness of the adhesive (if any).
In addition, it is worth considering that the dowel must go into the wall to a depth of 50 mm.
Thus, we calculate the required length using the formula:
L = H + I + K + W.
Here:
L – required final dowel length;
H – thickness of the heat-insulating layer;
K is the thickness of the old plaster or adhesive to which the insulation is attached;
I – fastening the dowel into the concrete/brick/wooden base of the wall (at least) 50 mm.
W – margin for wall curvature.
For example, if you use foam plastic with a thickness of 50 mm and use a thin layer of glue - 5-10 mm, a dowel 110 mm long will be enough for you. If the wall is smooth. But, if the wall distortion reaches 50 mm, it is worth adding this figure and then you will need a dowel of 160 mm or more. If we increase the thermal insulation layer to 100 mm, in the latter case we will need 210 mm of rod length.
When choosing fasteners: longer does not always mean better. If insulation occurs, for example, in an apartment, the thickness of the walls may be especially small and you need to correctly calculate the length.
Features of choosing dowels for insulation
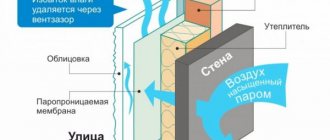
Thermal insulation is a heterogeneous material and, as a rule, multi-layered. It is impossible to hold it by friction, as happens in dense material. In addition, when fastening, you need to worry about its integrity, especially in cases where the insulation is combined with waterproofing and vapor barrier.
This video will tell you about umbrella dowels for attaching facade insulation:
Design
The high complexity of the insulation, or, more precisely, the combination of the heat- and waterproofing layer, has given rise to 2 main types of fastening, which are divided into groups according to their purpose.
- dowel for facade thermal insulation and wall insulation;
- fasteners for roofing thermal insulation.
The first has a well-known appearance: because of the wide pressure disk, it is called a disc or mushroom. This design can be one-piece - actually a dowel with a head, or it can be collapsible. The latter consists of several elements:
- sleeve with spacer part. When fastening, the smooth non-expanding part ends up in the thickness of the insulation, and the expansion part ends up in the durable material of the wall or ceiling;
- the head in the form of a pressure disk is integral with the dowel;
- rod - when driven, it bursts the sleeve.
In fact, except for the large volume of the head, the dowel for insulation is no different from a regular one.
The disc diameter ranges from 45 to 90 mm. In some cases, an additional disk is put on the dowel - a rondole, with a diameter of up to 140 mm.
Dowel device for fastening insulation
Advantages and disadvantages
In the vast majority of cases, plastic fasteners are used.
- Firstly, the insulation is a light and loose material, and does not create a high load.
- Secondly, the metal rod, while increasing the strength of the connection, unfortunately, creates a cold bridge. The thermal conductivity of metal is much lower than plastic and it literally conducts cold through the insulation. To avoid this, steel nails for dowels with a thermally insulated head are produced.
The second type of dowel for roof insulation is telescopic. It is a hollow plastic rod with a wide pressure disk. It is mounted somewhat unusually: it is installed in the body of a heat insulator, or, more accurately, a roofing pie, and a nail or anchor passes through the rod and is immersed in a dense material - concrete, corrugated sheeting.
Selection factors
When choosing a product, you need to pay attention to a number of factors.
- The main one is sufficient length . It consists of the thickness of the thermal insulation and other layers, the thickness of the adhesive composition, the amount of deviation of the wall from the vertical and the minimum possible recess.
- Pull-out load - no matter how light the heat insulator is, it still has weight, and each fastener is designed for a certain load. In this case, it is necessary to take into account the working load, and not the maximum. Thus, the maximum load for a polypropylene dowel is 60–150 kg. However, the working level can only reach 25%, which equates to 15–37 kg.
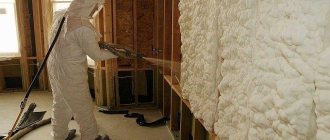
Installation
Using a dowel to attach insulation occurs in 3 stages:
- A hole is drilled corresponding to the diameter of the rod and exceeding its length by 10 mm;
- The dowel is inserted manually (its head should be flush with the insulation);
- The fixing anchor is inserted and hammered.
If you are using an extension cuff, it must be put on before inserting the fungus!
If available, cover the cap with a lid.
Installation can be considered complete.
Results
Dowels for thermal insulation come in three main types:
- A dowel with a plastic nail is inexpensive, but its strength will not always be sufficient.
- Using dowels for thermal insulation with a metal nail creates cold bridges, but this problem can be partly solved by using a thermal head.
The average cost of fasteners on the market and their dimensions were also given. Thanks to the given formula, any owner will be able to determine the consumption in advance and calculate how much the fasteners for thermal insulation will cost.
Types of dowels
All the needs of the construction market are met by three types of umbrella designs - their main difference is the anchor material.
Made from galvanized steel
Metal mushrooms
The metal dowel for fastening the insulation is characterized by increased strength compared to its polymer counterparts. But its use is limited by the high thermal conductivity of the metal, which negatively affects the efficiency of the heat-insulating layer.
We recommend: Shut-off valves and requirements for them
A steel dowel becomes a cold bridge, which reduces the overall thermal conductivity of the entire structure. Despite the presence of galvanization, models with a metal core are inevitably subject to corrosion, stains of which can appear even through the plaster on the facade, which spoils the entire exterior. The cost of a dowel with a metal nail is one and a half times more than a plastic one.
Made of plastic
Plastic umbrellas
Plastic elements for fastening insulation to the wall are made of polyamide, nylon and polypropylene. This determines their main advantage - their low price, while their strength characteristics are not up to par.
This type of fastener for thermal insulation can be used on concrete surfaces; alternatively, a plastic insulation fastener does a good job of fixing the mineral wool to a brick wall.
If the insulation is heavy enough and the wall is made of foamed concrete or has cavities, then it is better not to use plastic umbrellas.