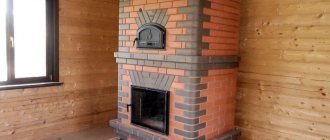
What are the advantages and features?
A fireplace stove, the arrangement of which is selected individually in each specific case and can be made by a stove designer from scratch, has its own exceptional features and advantages, which can be found in more detail below:
- A stove, the masonry of which is made according to a well-designed order by a professional in his field, will become a decoration of any interior and an advantageous addition to it. Such a unit will not take up much space and, depending on its original purpose, can be installed both to heat one room or the whole house. The stove, which contains a stove, is also intended not only for heating, but also for cooking. In this case, the total heat generated is used for cooking;
- A brick stove for a dacha running on solid fuel is very convenient and economical in terms of fuel consumption. One bookmark can last up to 9 hours of continuous operation of the unit at full power. The stove does not require liquid fuels such as gas and electricity to operate;
- Fireplace stoves can have low power and be used as an auxiliary heating source or have a purely decorative function.
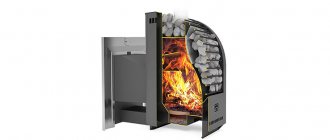
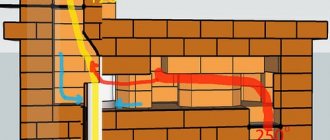
There are two main operating modes for the operation of the fireplace stove:
- If you close the damper completely, the smoke masses will be released almost immediately onto the street. In this case, the heating unit will not heat up too much and heat the room;
- Also, smoke masses can move through branches and bends provided by smoke channels. If you block only specific ones, heat and air will be retained and thereby heating the firebox and portal, transferring heat into the room itself.
A furnace, the foundation for which will allow it to achieve the necessary stability and minimal subsidence, is built for almost all brick structures, since the brick has a large total mass.
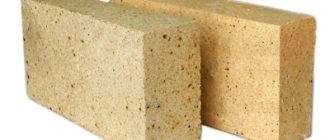
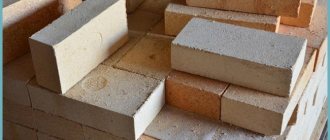
There are several varieties of bricks for the stove. For the main frame, it can be the simplest and most cost-effective. However, the firebox, its interior and the chimney are lined only with stove or fireclay bricks, which can withstand intense heat.
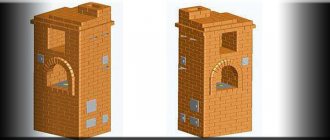
Construction of a Swedish stove with a small fireplace
Like any other brick structure, the Swedish stove begins with the construction of the foundation. It is the basis and must be carried out extremely conscientiously.
Foundation
Approximate diagram of the furnace foundation
The structure is quite massive, so the foundation must be built reliably. The depth of the pit is determined depending on the composition of the soil and its freezing, but it is better that it is deep enough and ranges from approximately 60 to 80 cm.
- The bottom of the pit is compacted, and a sand cushion 10-12 cm high is placed on it.
- The next step is backfilling with crushed stone; its layer should be at least 15-17 cm thick.
- After this, a monolithic foundation is installed. Before its installation, formwork from boards is installed on that part of it that will rise above the ground.
- A reinforcing mesh (reinforcement) is installed over the entire thickness of the monolithic base, which will give the foundation rigidity and reliability.
- Next, concrete solution is poured into the pit. This can be done in several stages, layer by layer, allowing each layer to set. Moreover, the lower layers can consist of cement and gravel, and the upper layers are a 3:1 sand-cement mixture.
- The foundation should rise above the floor by 5-7 cm.
- When the foundation is ready, a sheet of roofing material is laid on top of it - it will act as waterproofing.
Swedish masonry
Detailed diagram with dimensions and vertical sections
Detailed diagrams and plans clearly show where and how the elements of the fireplace stove are located, and a description of the process will help you avoid making mistakes during operation. A very important piece of advice that an experienced stove maker will give to a beginner is that you first need to lay the entire structure without mortar. This is a labor-intensive task, but such an event will help you understand the internal structure in all its details. Another trick of all masters who master the art of stoves is laying and adjusting each row of the order, also without mortar. When it is completed, the bricks are selected and, if necessary, hewn to the required size, they are immediately laid flat. The procedure will slow down the work a little, but you won’t have to completely redo the entire structure because of one incorrectly laid row.
By carefully following the developed scheme, you can easily install this amazingly useful structure for your home yourself.
Start of masonry. Rows 1 - 6
- The first row is mounted on roofing felt. In order for it to be laid evenly, since the entire harmony of the structure will depend on this factor, it is best to first make markings on the waterproofing sheet - for this you use chalk, a corner and a long ruler. Having an exact outline of the brick laying and strictly following it will make it easy to complete the job. The first row is completely laid out with bricks, according to the configuration and dimensions indicated in the diagram.
- The second row also follows the scheme, but here metal parts are already installed, onto which the fireplace grate will later be welded, or a ready-made decorative grate is mounted and secured.
- The third row is laid out according to the diagram, and the doors of the blower and cleaning chambers are installed on it. And they cover it with pieces of asbestos or wrap it with asbestos rope. To secure the metal elements in the right place, prepared pieces of wire are threaded into the door ears, and it is fixed with mortar and temporarily placed bricks on all sides.
Installation of blower doors
- The fourth row is laid out according to the scheme, and it is notable only for the fact that the bricks coming from both sides of the doors must be installed perfectly evenly, despite the interference that arises from the metal elements.
- On the fifth row, which is best laid out of fire-resistant sand-lime brick, like the entire firebox chamber, the grate bracket is laid on the mortar and the oven box is installed. It is also wrapped in some places with asbestos rope. This is clearly visible in the presented photo.
Metal parts must be covered with asbestos
- On the sixth row, a firebox door is installed - according to the same principle as the doors of the blower and cleaning chambers. It must be wrapped in asbestos and secured with wire.
Continuation of masonry - rows 7 - 12
- On the seventh row, you should work according to the scheme, but a metal strip is laid above the fireplace firebox, on which, in the next row, brickwork will be laid. Moreover, it can lie flat or be curved like a semi-arch.
- The eighth and ninth rows are laid according to the pattern without deviations.
- The tenth row is strengthened with a prepared metal corner in the part where the hob is then mounted. Pieces of asbestos are also placed under its edges. Another cleaning chamber door is placed on the same row.
- The eleventh and twelfth rows are placed according to the pattern without additional elements.
Complex internal channels - from 13 to 24 rows
- From the thirteenth to the fifteenth row, the masonry proceeds according to plan.
- On the sixteenth row, metal strips are installed above the cooking chamber - they will become the basis for the next continuous row of bricks.
- The seventeenth and eighteenth rows are laid following the diagram.
- On the nineteenth row, two doors of the cleaning chambers are placed, securing them in the same way as the previous ones.
- The twentieth and twenty-first have no additions and are placed according to the diagram.
- On the twenty-second row, two more cleaning chamber doors are installed.
- The twenty-third row is going according to plan.
This is how valves are installed
- On the twenty-fourth row, a metal valve is placed on the solution.
Rows 25 to 33 - valve system and transition to the chimney pipe
- On the twenty-fifth, another valve is being installed, next to the first.
- The last door of the cleaning chamber is located on the twenty-seventh row.
- From the twenty-eighth to the thirtieth row, the laying is carried out according to the diagram.
- On the thirty-first row, the last, third valve is installed on the chimney opening.
- The thirty-second and thirty-third rows are the exit to the pipe laying. The pipe is laid out according to the same principle as the last row in the diagram. It fits up to the ceiling.
- In the attic floor, the chimney must be insulated by pouring expanded clay around it for fire safety purposes.
- Next, the head of the pipe is brought out onto the roof and rises above the roof by at least half a meter.
- The passage of the pipe through the roof is sealed to prevent moisture and dust from entering the cracks.
- A special metal umbrella is placed on top of the pipe.
- Metal sheets are laid in front of the fireboxes, or this place can be decorated with fire-resistant ceramic tiles.
One more point is worth noting. If the stove will be plastered or finished with ceramic tiles after construction, then the masonry joints do not need to be aesthetically designed. But, if you plan to leave the brickwork as a decorative design, the jointing should be done immediately using fresh mortar that has not yet set.
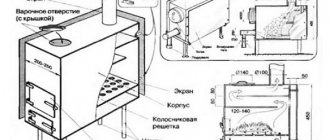
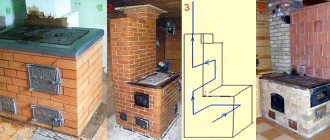
Device classification
Masonry, as a result of which the fireplace stove acquires a certain functionality and shape, is carried out only according to a special scheme or order on which the features of each row are displayed.
A brick stove for a home may fall into a certain category. Based on this, you can build it yourself:
- Kuznetsov fireplace stove;
- Dutch oven;
- Bake a Swedish oven;
- Fink;
- Bell structure;
- The unit according to Masyutin's order.
Kuznetsov, whose stove today has several modifications, can have different dimensions and functionality. It can consist of either one or two fireboxes. Especially popular today is the laying of brick ovens with a chamber for baking bread, an oven and a hob. It should be noted that the massiveness of such structures fully justifies itself, since they are ways to replace several devices at once in the kitchen and in the house.
a stove with a stove bench is also one of the popular and frequently erected structures today. You can not only relax on a bed, but also dry meat, fish, vegetables, berries and fruits. Also, having a sun lounger provides more warmth in the house. If necessary, the compartment with the stove bench can be covered with a special damper and thus, at the moment of lighting the stove, this area simply will not heat up.
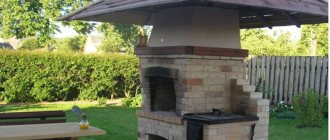
Arrangements for stoves, fireplaces and barbecues
By purchasing order you get:
Savings on materials.
As practice shows, correctly calculated material allows you to save significant money on the purchase and delivery of material.
Saving at work.
According to our rules, even an inexperienced stove maker who takes less pay for his work can build a stove.
Assistance in carrying out work.
We provide free consultation by phone or email.
Didn't find a suitable project?
— Order an individual project according to the required parameters (cost from 3 thousand rubles).
A small part of the projects is published on the website. Send us a letter describing the stove you need, and we will send you options in return.
| No. 2010 Stove "Shvedka" No. 5 Description: A cooking stove designed for heating a room up to 60m2. Oven dimensions: 1020 x 1020 x 2300 mm Project composition: 3D view of the oven, 3D arrangement of the oven, sections, consumables, explanations and diagrams. Price: 2800 rubles |
| No. 2021 Heating and cooking stove with a stove for a cauldron. Description: A cooking stove designed for heating a room up to 55m2. Oven dimensions: 1020 x 1530 x 2240 mm Project composition: 3D view of the oven, 3D arrangement of the oven, sections, consumables, explanations and diagrams. Price: 3200 rubles |
| No. 2030 Stove "Shvedka" No. 6 Description: A cooking stove designed for heating a room up to 50m2. Oven dimensions: 890 x 890 x 2170 mm Project composition: 3D view of the oven, 3D arrangement of the oven, sections, consumables, explanations and diagrams. Price: 2500 rubles |
| No. 2040 Stove "Shvedka" No. 5 Description: A cooking stove designed for heating a room up to 55m2. Oven dimensions: 1020 x 890 x 2170 mm Project composition: 3D view of the oven, 3D arrangement of the oven, sections, consumables, explanations and diagrams. Price: 2500 rubles |
| No. 2050 Stove "Shvedka" No. 14 Description: A cooking stove designed for heating a room up to 65m2. Oven dimensions: 1020 x 1270 x 1890 mm Project composition: 3D view of the oven, 3D arrangement of the oven, sections, consumables, explanations and diagrams. Price: 3000 rubles |
| No. 2060 Stove "Shvedka" No. 15 Description: A cooking stove designed for heating a room up to 45m2. Oven dimensions: 890 x 890 x 1960 mm Project composition: 3D view of the oven, 3D arrangement of the oven, sections, consumables, explanations and diagrams. Price: 2200 rubles |
| No. 2070 Stove "Shvedka" No. 8 Description: Heating and cooking stove for heating a room up to 55 m2 Oven dimensions: 1020 x 890 mm Project composition: 3D view of the oven, 3D order of the oven, 3D sections, consumables, explanations, diagrams. Price: 3200 rubles |
| No. 2080 Stove "Shvedka" No. 9 Description: A cooking stove designed for heating a room up to 50m2. Oven dimensions: 890 x 890 x 2170 mm Project composition: 3D view of the oven, 3D arrangement of the oven, sections, consumables, explanations and diagrams. Price: 2600 rubles |
| No. 2090 Swede with wide hob Description: Heating and cooking stove for heating a room up to 60 m2. Oven dimensions: 1270 x 1020 x 2240 mm Project composition: 3D view of the oven, 3D order of the oven, 3D sections, consumables, explanations, diagrams. Price: 2500 rubles |
| No. 2100-2 Swedish with a wide hob and oven. Description: Heating and cooking stove for heating a room up to 60 m2. Oven dimensions: 1270 x 1020 x 2240 mm Project composition: 3D view of the oven, 3D order of the oven, 3D sections, consumables, explanations, diagrams. Price: 2500 rubles |
| No. 2110 “Swedish” No. 10 Description: Heating and cooking stove for heating a room up to 55 m2. Oven dimensions: 770 x 1270 x 2170 mm Project composition: 3D view of the oven, 3D order of the oven, 3D sections, consumables, explanations, diagrams. Price: 3000 rubles |
| No. 2120 “Swedish” No. 11 Description: Heating and cooking stove for heating a room up to 55 m2. Oven dimensions: 770 x 1270 x 2170 mm Project composition: 3D view of the oven, 3D order of the oven, 3D sections, consumables, explanations, diagrams. Price: 3000 rubles |
| No. 2130 “Swedish” No. 12 Description: Heating and cooking stove for heating a room up to 50 m2. Oven dimensions: 770 x 1270 x 2170 mm Project composition: 3D view of the oven, 3D order of the oven, 3D sections, consumables, explanations, diagrams. Price: 3000 rubles |
| No. 2140 Cooking oven with 2 shields and a drying chamber Description: Heating and cooking stove for heating a room up to 75 m2. Oven dimensions: 1270 x 1020 x 2240 mm Project composition: 3D view of the oven, 3D order of the oven, 3D sections, consumables, explanations, diagrams. Price: 4200 rubles |
| No. 2150 Cooking oven with 2 shields, drying chamber and hood Description: Heating and cooking stove for heating a room up to 75 m2. Oven dimensions: 1270 x 1020 x 2100 mm Project composition: 3D view of the oven, 3D order of the oven, 3D sections, consumables, explanations, diagrams. Price: 4500 rubles |
| No. 2160 Cooking stove with bench Description: Heating and cooking stove for heating a room up to 75 m2. Oven dimensions: 1020 x 1790 x 1790 x 2240 mm Project composition: 3D view of the oven, 3D order of the oven, 3D sections, consumables, explanations, diagrams. Price: 3200 rubles |
| No. 2170 Cooking stove with bench Description: A heating and cooking stove with a compact bench and oven designed for heating a room up to 85 m2. Oven dimensions: 1270 x 1790 x 2030 mm Project composition: 3D view of the oven, 3D order of the oven, 3D sections, consumables, explanations, diagrams. Price: 4800 rubles |
| No. 2180 Cooking stove with bench 2 Description: A heating and cooking stove with a large bench and oven designed for heating a room up to 95 m2. Oven dimensions: 1270 x 2930 x 2030 mm Project composition: 3D view of the oven, 3D order of the oven, 3D sections, consumables, explanations, diagrams. Price: 5000 rubles |
| No. 2190 Compact cooking oven Description: Heating and cooking stove for heating a room up to 40 m2. Oven dimensions: 1140 x 640 mm Project composition: 3D view of the oven, 3D order of the oven, 3D sections, consumables, explanations, diagrams. Price: 2400 rubles |
| No. 2200 Cooking oven No. 1 Description: A multifunctional, inexpensive heating and cooking stove is designed to heat a room with an area of 40 m2. Fast heating due to the hob. Oven dimensions: 1145 x 640 x 2100 mm Project composition: 3D view of the oven, oven order, section, consumables, explanations and diagrams. Price: 1000 rubles |
| No. 2210 Cooking oven No. 2 Description: An inexpensive heating and cooking stove is designed to heat a room of 40 m2. Oven dimensions: 1145 x 640 x 2100 mm Project composition: 3D view of the oven, oven order, section, consumables, explanations and diagrams. Price: 1000 rubles |
| No. 2220 Swedish stove Description: The heating and cooking stove is designed for heating a room of up to sixty square meters, as well as for cooking. The lined firebox and oven, located at a distance from the firebox, allow the oven to be used for an unlimited period. Oven dimensions: 1020 x 890 x 1800 mm Project composition: 3D view of the oven, oven order, section, consumables, explanations and diagrams. Price: 1000 rubles |
| No. 2230 Double-panel cooking furnace (pipe on the right) Description: A powerful cooking stove designed to heat a room up to 75m2. Oven dimensions: 1020 x 1270 x 2240 mm Project composition: 3D view of the oven, 3D arrangement of the oven, sections, consumables, explanations and diagrams. Price: 3700 rubles |
| No. 2240 Double-panel cooking furnace (pipe on the left) Description: A powerful cooking stove designed to heat a room up to 75m2. Oven dimensions: 1020 x 1270 x 2240 mm Project composition: 3D view of the oven, 3D arrangement of the oven, sections, consumables, explanations and diagrams. Price: 3700 rubles |
| No. 2250 Heating panel No. 1 Description: Compact heating panel designed for heating a room up to 50m2. Oven dimensions: 1020 x 890 x 2170 mm Project composition: 3D view of the oven, 3D arrangement of the oven, sections, consumables, explanations and diagrams. Price: 2200 rubles |
| No. 2260 Heating panel No. 2 Description: Compact heating panel (with pipe - on the right), designed for heating a room up to 50m2 Oven dimensions: 1020 x 890 x 2170 mm Project composition: 3D view of the oven, 3D arrangement of the oven, sections, consumables, explanations and diagrams. Price: 2200 rubles |
| No. 2270 Heating panel No. 3 Description: Compact heating panel designed for heating a room up to 45m2 Oven dimensions: 890 x 890 x 2170 mm Project composition: 3D view of the oven, 3D arrangement of the oven, sections, consumables, explanations and diagrams. Price: 2200 rubles |
| No. 2280 Heating shield No. 4 Description: Heating panel with oven, designed for heating a room up to 60m2. Oven dimensions: 1270 x 1020 x 2030 mm Project composition: 3D view of the oven, 3D arrangement of the oven, sections, consumables, explanations and diagrams. Price: 2600 rubles |
| No. 2290 Heating shield No. 6 Description: Heating panel with oven, designed for heating a room up to 50m2. Oven dimensions: 1020 x 1020 x 2030 mm Project composition: 3D view of the oven, 3D arrangement of the oven, sections, consumables, explanations and diagrams. Price: 1800 rubles |
| No. 2300 Heating panel No. 5 Description: The heating panel is designed for heating a room up to 50 m2. Oven dimensions: 1020 x 1020 x 2030 mm Project composition: 3D view of the furnace, ordering of the furnace, cross-sections of the furnace, consumables, brief explanation, fire-prevention cutting diagrams, mounting options for fittings Price: 1000 rubles |
| No. 2310 Cooking oven with a closed stove. Description: Heating and cooking stove for heating a room up to 35 m2. Oven dimensions: 770 x 1020 x 2100 mm Project composition: 3D view of the oven, 3D order of the oven, 3D sections, consumables, explanations, diagrams. Price: 2800 rubles |
| No. 2320 Bell-type cooking furnace Description: Heating and cooking room with remote firebox Oven dimensions: 1140 x 890 mm Project composition: 3D view of the oven, 3D order of the oven, 3D sections, consumables, explanations, diagrams. Price: 4800 rubles |
| No. 2330 Compact stove with oven Description: Heating and cooking room with remote firebox Oven dimensions: 1020 x 890 mm Project composition: 3D view of the oven, 3D order of the oven, 3D sections, consumables, explanations, diagrams. Price: 3800 rubles |
| No. 2340 Cooking stove with oven Description: Compact Swedish, for heating a room up to 30 m2. Oven dimensions: 1140 x 640 x 840 mm Project composition: 3D view of the oven, 3D order of the oven, 3D sections, consumables, explanations, diagrams. Price: 500 rubles |
| No. 2350 Heating and cooking oven with dryer Oven dimensions: 1020 x 1020 x 2000 mm Project composition: 3D view of the oven, oven order, section, consumables, explanations and diagrams. Price: 1000 rubles |
| No. 2360 Russian stove with heating element, oven and hob Description: Russian stove for heating a room up to 90 m2. Oven dimensions: 1400 x 1655 x 2240 mm Project composition: 3D view of the oven, 3D order of the oven, 3D sections, consumables, explanations, diagrams. Price: 7500 rubles |
| No. 2370 Heating and cooking stove with stove bench Description: A heating and cooking stove with a stove bench serves both for heating a room with a total area of up to 80 square meters, and for relaxation. Possibility of firing the entire stove array, as well as a separate stove and a separate bed. Easy to manufacture, service life is designed for fifty years, the possibility of execution in several versions with a bed width from 50 cm to 80 cm. Oven dimensions: 1780 x 1530 x 2030 mm Project composition: 3D view of the oven, oven order, section, consumables, explanations and diagrams. Price: 2800 rubles |
| No. 2380 Heating and cooking furnace partition Description: The heating and cooking stove is used to heat a room with a total area of up to 25 square meters. Very easy to make. Thanks to the parallel arrangement of the chimneys, uniform heating of the entire stove mass is ensured. Oven dimensions: 1250 - 2400 x 750 x 2000 - 3000 mm Project composition: 3D view of the oven, oven order, section, consumables, explanations and diagrams. Price: 1800 rubles |
| No. 2390 Heating and cooking furnace 3 Description: Heating and cooking stove with a single burner stove, for heating a room up to 30 m2. Oven dimensions: 890 x 640 x 2000 mm Project composition: 3D view of the oven, oven order, section, consumables, explanations and diagrams. Price: 1000 rubles |
| No. 2400 Heating and cooking stove 890 x 640 mm for 2 floors Description: A heating and cooking stove on 2 floors, designed for heating a room with a total area of up to 70 m2. Oven dimensions: 890 x 640 x 3600 mm Project composition: 3D view of the oven, oven order, section, consumables, explanations and diagrams. Price: 1800 rubles |
| No. 2410 Heating and cooking stove 1270 x 1020 Description: Heating and cooking stove for heating a room up to 60 m2. Oven dimensions: 1270 x 1010 x 2100 mm Project composition: 3D view of the furnace, ordering of the furnace, cross-sections of the furnace, consumables, brief explanation, fire-prevention cutting diagrams, mounting options for fittings Price: 1800 rubles |
| No. 2420 Heating and cooking stove Description: Heating and cooking stove with a single burner stove, for heating a room up to 30 m2. Oven dimensions: 890 x 770 x 2100 mm Project composition: 3D view of the furnace, ordering of the furnace, cross-sections of the furnace, consumables, brief explanation, fire-prevention cutting diagrams, mounting options for fittings Price: 1000 rubles |
| No. 2430 Corner heating and cooking stove Description: Corner heating and cooking stove, used for cooking and heating a room up to 30 m2. Oven dimensions: 1145 x 1145 x 1750 mm Project composition: 3D view of the furnace, oven ordering, 3D oven ordering, oven cross-sections, consumables, brief explanation, fire-prevention cutting diagrams, fittings mounting options Price: 2800 rubles |
| No. 2440 Heating and cooking unit 1145 x 770 mm Description: A heating and cooking stove is used for cooking and heating a room up to 50 m2. Oven dimensions: 1145 x 770 x 2050 mm Project composition: 3D view of the furnace, oven ordering, 3D oven ordering, oven cross-sections, consumables, brief explanation, fire-prevention cutting diagrams, fittings mounting options Price: 1000 rubles |
| No. 2450 Stove with stove bench and heat exchanger Description: A stove with a stove bench is used for cooking and heating a room up to 80 m2. Oven dimensions: 1270 x 1010 x 1750 mm Project composition: 3D view of the furnace, oven ordering, 3D oven ordering, oven cross-sections, consumables, brief explanation, fire-prevention cutting diagrams, fittings mounting options Price: 3000 rubles |
| No. 2460 Stove "Shvedka-2" 890 x 890 mm Description: The stove is used for cooking and heating a room up to 40 m2. Oven dimensions: 890 x 890 x 1750 mm Project composition: 3D view of the furnace, oven ordering, 3D oven ordering, oven cross-sections, consumables, brief explanation, fire-prevention cutting diagrams, fittings mounting options Price: 1000 rubles |
| No. 2470 Stove "Shvedka-3" 890 x 890 mm Description: The stove is used for cooking and heating a room up to 45 m2. Oven dimensions: 890 x 890 x 1900 mm Project composition: 3D view of the furnace, oven ordering, 3D oven ordering, oven cross-sections, consumables, brief explanation, fire-prevention cutting diagrams, fittings mounting options Price: 1000 rubles |
| No. 2480 Stove "Shvedka-4" 890 x 890 mm Description: The stove is used for cooking and heating a room up to 45 m2. Oven dimensions: 890 x 890 x 2000 mm Project composition: 3D view of the furnace, furnace ordering, furnace ordering, furnace cross-sections, consumables, brief explanation, fire-prevention cutting diagrams, fittings mounting options Price: 1800 rubles |
| No. 2490 Cooking stove with 2 heating panels Description: The heating and cooking stove is used for cooking and heating a room with an area of up to 80 m2. Oven dimensions: 1020 x 1270 x 1820 mm Project composition: 3D view of the oven, 3D order of the oven, 3D sections, consumables, explanations, diagrams. Price: 4800 rubles |
Construction and preparation of materials
The stove, the order of which allows you to assemble a high-quality structure, is the basis and frame for such a heating unit. At the first stage, you need to decide on the room for installing the stove and select or implement the most suitable project for yourself, taking into account all the features of the house and your personal wishes and preferences.
Next, the amount of materials and accessories needed to assemble the fireplace stove is calculated. Also, to assemble the stove we will need certain materials and tools. So, we need to get:
- Fire brick and boiler;
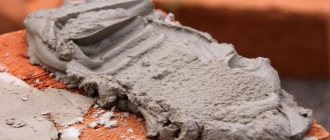
- Clay and mantel;
- Door, grate and smoke damper.
Since brick fireplace stoves have a large total mass, they will require the construction of an additional foundation. At the first stage, the formwork part is formed and a foundation pit is dug, the size and depth of which depends on the dimensions of the heating structure itself.
After assembling the formwork part, the bottom of the pit is filled with reinforcing bars, after which the whole thing is fixed with a concrete-based solution. Before complete drying, the surface of the foundation is covered with plastic film. This will allow the top layer to remain smooth, even and not crack.
After the top layer has completely hardened, we continue to form additional support for our fireplace. To do this, we lay another formwork on top and again form another layer for the foundation using concrete mortar and rubble stones.
Layout diagram with examples
A fireplace stove made of stone may have specific differences and features. The design can be corner, wall, island. The firebox and hearth can be open or closed at your discretion. It should be noted that an open firebox is less safe from a fire point of view.
Also, the heating structure may have certain dimensions and shape of the portal, firebox, based on which the order will be very different from the rest. The quantity and type of materials, fittings and cladding are also determined and calculated strictly individually.
The easiest to design and assemble in a house or country house are brick heating stoves, which do not have other functions and features. More difficult to build with your own hands are heating units complemented by a bread chamber, a stove bench, an oven or a stove.
Next, we will present to you the simplest, traditional design of a brick stove-fireplace with a minimum of functions and small dimensions. This option is suitable for placement and construction in small rooms:
- At the first stage of assembling the stove, it is necessary to lay out the base of the fireplace with bricks. To do this, lay out the first two rows. Next, on the third row we lay out the blower, smoke duct and cleaning door;
- On the fourth and fifth rows it is necessary to form a cleaning channel;
- Now let's start laying out the combustion chamber. This is done from the sixth to the ninth row. To assemble the firebox, we will use fireclay bricks, which can withstand the strong heat typical for this area. We install the grate on the last row;
- The combustion compartment is fully formed from the tenth to the twelfth row, and on the thirteenth and fourteenth the door and arch are formed. The fifteenth row is characterized by leveling the arch of the fireplace. From the seventeenth to eighteenth row, the combustion chamber is completely covered;
- The shutter for the channel on the left is formed on the nineteenth layer. The walls and chimney are formed and formed up to the twenty-seventh row inclusive. In order for such a massive and heavy device to be strong enough and stable enough, a special plate must be mounted on the twenty-seventh row. It will become a reliable support for your brick stove-fireplace;
- In order to complete the laying of a wood-burning solid fuel heating unit, it is necessary to form an overlapping part, which is formed from the twenty-eighth to the thirtieth row inclusive.
This visual arrangement is not a universal guide to action and may not be suitable for your specific home or premises. The finished fireplace, assembled according to this scheme, has simple functionality and only a heating function. If you want to assemble an outdoor barbecue with a barbecue or a home fireplace with a stove and oven with your own hands, the order for them will change greatly and become more complicated. This is why it is necessary to entrust all design and masonry work only to a professional stove maker.
To complete it, the fireplace stove is equipped with all the necessary auxiliary elements, such as: ash chamber, grate, grates, door (for closed fireboxes). You can complement the fireplace stove not only with a hob, barbecue, grill, barbecue, oven, but also with a mantelpiece, countertops, work area or washbasin.
To give the brick surface a unique and inimitable style, you can cover it. For these purposes, give preference only to high-quality, durable, environmentally friendly, heat-resistant and non-melting materials and compositions.
Among the budget options for facing a fireplace you can consider: artificial stone, porcelain stoneware, decorative plaster, paint. More expensive options for finishing a brick stove-fireplace include: natural stone (marble, granite, sandstone), tiles.
This video explains step by step how to lay a brick stove-fireplace with a power of 7 kW:
The simplest fireplaces. Orders
The fireplace designs we bring to your attention belong to the simplest group.
Even a person who does not have professional stove-maker skills can lay them out on their own. The first fireplace design does not have the traditional “smoke tooth” for fireplaces. The back wall of its firebox is placed without tilting. Typically, fireplaces of this design are placed in those rooms that have a main heating source other than this product. Its main purpose is a decorative element of the interior and providing the opportunity to relax while looking at an open fire. Therefore, they are trying to raise its firebox higher from the level of the clean floor, so that one can observe the dancing flames from anywhere in the room.
It is advisable to line the inside of the firebox using refractory bricks for this purpose. The fireplace cover can be made in any shape at your discretion. but we recommend starting with the horizontal one, as it is easier to implement. It is installed using metal jumpers. Do not forget that your design will last much longer. If the open flame does not come into direct contact with metal elements. The overlap can be done using refractory concrete.
It is recommended to place one brick at the bottom of the heating fireplace wall. This allows you to use almost any finishing option in the future.
In order to lay out a fireplace of this design, you will need the following material:
Bricks (fireproof and regular red) – 380 pieces;
Valve with dimensions 240*130 – one;
Reinforced concrete slab for the portal and fireboxes, made independently - 4 pieces;
Cleaning door with dimensions 130*130 – one;
Metal L-shaped pins - two;
There is one fireplace grate.
The design of this product is so simple that, in our opinion, a detailed description of the procedures is not required. For ease of use, all orders are shown here in black and white and the main orders in color. In order to be able to better navigate the work process.
The role of the missing smoke tooth is partially fulfilled by blocking the gas collector. It also plays the role of a spark arrestor. This reduces the likelihood of the rod tipping over.
Now let’s look at another design, it’s a little more complicated. The height of the masonry is 33 rows. Base area 5*2.5 bricks. It is better not to use finishing. Simply embroider the masonry seams with a semicircular joint to a depth of up to 10 millimeters. An option in which terracotta tiles are used for finishing will also look good. It is possible to carry out partial plastering of the structure (see picture).
Installation of a smoke door is not structurally provided for. This, firstly, simplifies the laying, and secondly, significantly reduces the cost of work (a door today costs 30 - 120 thousand rubles). To protect the room from smoke, in this case a through smoke channel is used, which makes it possible to achieve high draft (if the location for the fireplace is chosen correctly). The heat capacity of such a fireplace and its efficiency can be considered purely conditional. In order to slightly increase these indicators, proven technical solutions are used: empty channels with samovars are placed along the smoke channel and firebox.
The fireplace successfully performs its main task, to ensure the fastest possible heating of the room after lighting. Moreover, it is much better than fireplaces with fireboxes closed with doors.
Please note that it is prohibited to use wood to make your mantelpiece. It is better to use a marble slab or slab for these purposes. made independently.
This fireplace already requires a separate foundation. For fire safety purposes, there is a fire cut in front of it made of bricks, which are laid out on edge. The internal lining of the firebox is made of refractory (fireclay) bricks. The entire structure of the fireplace is made of solid ceramic bricks, the grade of which must be 125 or higher.
When laying, try to maintain the thickness of the seams within 5 -7 millimeters. Before starting masonry, smooth out the irregularities of the brick, rubbing one against the other, this will contribute to a thin and even seam.
Check each row for horizontal and vertical alignment using a level. If your masonry experience is limited, then it is better to do this on each laid brick.
The procedures of this design have been repeatedly tested in practice by experienced craftsmen. Therefore, it is not recommended to deviate from them if you do not have the proper experience for this.