Even in a house with gas heating, owners often design and install stoves, fireplace stoves, and fireplaces. The reasons for this are home comfort and hearth, color and tradition, open fire, design and decor... And backup heating in case of any outages will not hurt. One of the most popular heating devices in this case is a stove with a stove bench.
Not everyone knows what opportunities there are today for laying stoves with a stove bench. Even fewer stove makers directly admit the shortcomings of classic and modern stoves with stove benches... We are, of course, not talking about a Russian stove with a stove bench. That would be a completely different, separate topic.
But nothing compares to the warmth, comfort and chic of a bed covered with a blanket and pillows. She instantly gathers guests and children around her! But let's talk about everything in order...
Would Emelya take a ride on a modern stove with a stove bench?
I think that Emelya would not ride on modern stoves with a stove bench. The stoves are not right, the stove is low, it gets too hot - you can get burned, and it doesn’t work very well, it’s standing on a foundation. This is not a Russian stove with a stove bench...
Let's dot the T's right away. A modern stove with a stove bench and a Russian stove with a stove bench are different stoves.
Pragmatically choosing a good heating device for their home - a brick stove, many immediately dismiss the Russian classics with a stove bench. And in many ways they are right:
- Low efficiency compared to modern furnaces - once;
- A bulky design that will not fit into any interior - two;
- The high cost of masonry - three and much more.
But some stove makers now know how to make a Russian stove with a stove bench of a more efficient design. Namely, this is a Russian stove with a stove bench - with bottom heating. No flooding, no slab. But read about this in my other articles.
What materials do you need to have:
To construct a furnace, you must have the following materials:
red brick in the amount of 800 pcs.;
- sand-lime brick for the firebox 150 pcs.;
- cast iron doors for the firebox 25×21 cm, vent 25×13 cm, 1 pc. and 18×10 -5 pcs.;
- cast iron chimney valve 25×13 cm -2 pcs.;
- hob with two burners size 71×41 - 1 pc.;
- grate for firebox 25×25 cm - 1 pc.;
- oven measuring 31x37x28 cm;
- metal corner 5×5 or 4.5×4.5 cm;
- crushed stone and reinforcement for the foundation;
- steel wire for fastening doors;
- cement, sand, gravel, clay or a special dry mixture for laying fireplaces.
It is best to take all the materials with a small reserve, so that during the work it does not turn out that something is missing.
Modern stoves with a stove bench - what are they?
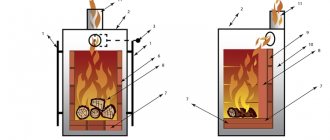
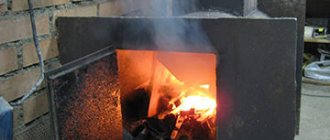
A modern stove with a stove bench, of course, is very different from the classics and has many advantages. The simplest stove with a stove bench today is a heating stove. But most often they make so-called “Russian heated cars” with a couch. Such ovens are equipped with a hob and a bread chamber (with a door).
The main difference between a modern oven and a classic oven is that it has a baking space with a door and is heated from the main firebox - you don’t need to heat the oven separately to cook - and there is no ash left in it. But this is not the most important thing. It is important that a properly folded stove with a stove bench heats up evenly and quickly enough.
Another feature of modern stoves with a stove bench is its height - it is made low, about 8-12 bricks, on average 11. The height of a brick row with a stove seam is 69-71 mm. The result is about 80 cm tall.
It should be noted that any stove with a stove bench will be more heat-intensive, if only because it contains approximately more bricks per pallet - that’s how many bricks are needed to lay a good - not small - stove bench. Although you can make a warm “chair”.
It is very convenient to heat the stove, oven and bed from one place - from the firebox. This is both economical in terms of wood consumption and time. But there are models with a separate firebox for the bed.
The design of modern stoves with a stove bench is usually laconic; “stoves” have disappeared - this is required by the design of the stove for maximum reliability and heating efficiency. And there is nowhere to “insert” them into such a low bed. There is no woodshed under the grain place, for obvious reasons. And in general, the modern design of stoves, especially double-bell stoves, allows you to save space. And when the oven is small, it’s difficult to come up with any kind of “architecture”. Moreover, all this can worsen its design reliability qualities.
Modern stoves with a hob often have a summer valve, and stoves with a stove bench also have a heating control valve. But does this valve always work and can it help us with the main problems of such furnaces?
Construction of a Russian stove
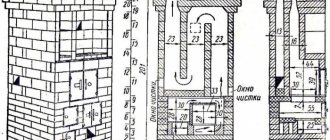
Russian stoves may differ in size, shape and design features.
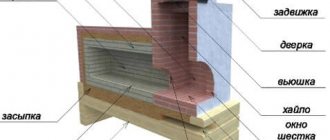
According to one definition, these are heating and cooking structures with 2 fireboxes, intended, in addition to heating functions, to also prepare typical dishes and bake bread. The process of burning firewood in the main firebox occurs as follows: the gases generated during the combustion of logs enter the 1st section of the hearth chamber, then through special holes - undercuts - enter the 2nd section. After this, they move to the upper cooking chamber, from where to the collection channel and into the pipe.
Diagram of the Russian stove. The main firebox is necessary for winter heating, the small one is used for cooking at any time of the year
When burning wood in a small firebox, combustion gases first enter the main firebox, and from it into the chimney. Here you can use not only dry logs, but also bark, wood chips, branches and other waste.
The Russian stove has a lot of advantages, but has one noticeable drawback: heat is released at the level of the hearth, that is, approximately 0.9 m from the floor, which prevents heating of the lower part of the room
The basis for the structure is a foundation, usually 0.1 m larger than the dimensions of the lower part of the Russian stove. Here, below, there is a storage area - free space for storing a poker, grip, spatula and other equipment.
The main part is considered to be the crucible - a cooking chamber with a hole (mouth) on the front side. The mouth can be rectangular or arched. Through it, fuel (logs) is placed inside the crucible and dishes with food are placed
For laying the cooking chamber, and in particular for the vault, the most fire-resistant, selected bricks are selected. The thickness of the walls determines how long the heat will last.
The thin walls of the cooking chamber heat up very quickly, but cool down just as quickly. Standard thickness is 1 or ¾ brick. The front wall is thinner - ½ brick, like the partition in front of the furnace.
At the bottom of the cooking chamber there is a floor for which a strong, smooth brick is suitable. Often it is laid dry, without using a solution, on a backfill of coarse sand, to which crushed stone, gravel or broken glass is added. The floor is laid with a slope of 3-5 cm towards the mouth.
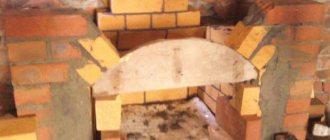
The shape of the vault affects the degree of heating and the complexity of the masonry.
For example, semi-circular vaults heat up slightly under and reflect gases unevenly, but are considered easier to construct with your own hands
Gentle vaults are more difficult to lay; steel ties must be used to distribute the load. However, with this design, the underfloor heats up more.
The technology for laying the roof of a Russian stove may differ, but the following rule is often followed: lay it out on both sides simultaneously and finish in the middle. A castle brick is laid in the center, and a clay solution is used to coat it.
The cooking chamber is arranged so that the fuel can be placed close to the mouth - in this case, combustion occurs more efficiently. Pots and baking trays are also placed on the underside near the mouth
If they are baking bread, then they clear the floor - they scoop out the ash, and sweep away its remains.
There is still a way to bake bread without baking sheets or molds, when it is placed on a special shovel, lightly sprinkled with flour, and then “put in the oven” - simply dumped with a sharp movement onto the floor.
No matter how bad the stove is, it is better with a stove bench.
Firstly, the list of disadvantages of a stove with a stove bench is by no means exhaustive.
Secondly, it, of course, can be taken into account and corrected. You need to keep all this in mind... or give up on it. After all, nothing compares to the warmth and comfort of a bed covered with a blanket and pillows.
The bed is like a magnet that brings together family and guests. It is better to provide a couple more armchairs and a coffee table next to it - mainly for tea. Or fit it into the interior in some other way - as one of the main gathering places, in addition to the places in front of the firebox with a glass door or fireplace. It is from such little things that the life and happiness of a family and children are built. Cozy moments with loved ones can be remembered for years, as often happens. They cannot be overestimated.
Cracks in the oven are generally difficult to completely remove; they appear like “hairs” when heated and disappear when cooled. Some stove makers fundamentally make only double-wall stoves - such stoves have completely fireclay interiors. Fully. Also, the stove bench is not connected to the main stove - only the fireclay core inside is single.
There are many advantages to such ovens, which can be discussed in another article. But, in my opinion, there are two main disadvantages:
- Labor-intensive and expensive masonry;
- They take a long time to get into “regime” - warming up.
I myself live in a house with a complex “Russian heater” - a stove with a stove and an oven. In addition, I made it a combination - with a couch and with a fireplace. I, like no one else, know all its disadvantages and would not trade either the bed or the fireplace for any other stove. Although I would be happy to correct some errors. And I do this, but not for myself, but for my readers and stove customers.
Varieties
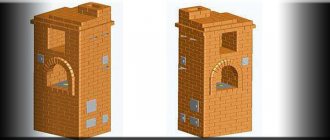
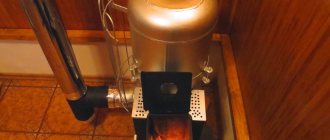
A do-it-yourself stove can be built with a shield built into the body (structure) of the stove, and then in appearance it is indistinguishable from the stove, pos. 1 in Fig. The rough-slab is compact, the least material-intensive, the lightest, and requires a minimum amount of additional construction work, but its thermal power is limited to 10-12 kW, and then with great effort. Therefore, rough slabs are installed mostly in seasonal dachas (spring-autumn) with occasional trips there in winter, hunting lodges, etc. An important advantage of a rough slab is that it can be built without a foundation directly on the floor, if its load-bearing capacity is at least 500 kgf/sq. m.
Types of rough ovens
A rough structure with an attached shield (item 2) is structurally more complex and heavier, although a simplified foundation (see below) is also suitable for it, but its thermal power is potentially greater. A wood-burning grub with an attached shield can develop up to 16-18 kW; on coal - up to 20-22 kW. The diagram of the flow of flue gases in the hood with a shield is given in pos. 3; This is how the popular Galanka stove was built. However, you need to know that there is no point in building a furnace with more than 3 revolutions: such a furnace with a single cycle will be simpler and cheaper. In addition, during construction it will be necessary to pay special attention to some of the features of rough stoves, the consideration of which is devoted to a significant part of the article.
Note: roughing on wood can also be done with a stove bench, see below. It is not advisable to heat such a stove with coal; the stove will overheat.
Why is it rude - rude
Visually, a rough stove can be distinguished from a stove with a later added shield due to the integrity of the structure (item 4), but in essence they are one and the same. The calculation of a heat-efficient furnace is very complex and requires fairly deep knowledge of heating engineering, and the development of a furnace design based on its results also requires solid practical experience. It is much easier to design and build a rough fire because its furnace (fire) part and the shield are calculated separately, and then “molded” together according to the rules for pairing building structures, taking into account the requirements of heating engineering. Naturally, the thermal efficiency of the resulting device will be lower, because the interaction of the thermal cycles of the fire part and the shield is not taken into account, and it is by taking it into account that it is possible to increase the efficiency of a single cycle furnace. Therefore, if you live in an area with a harsh climate, a rude stove may only make sense for you as a seasonal stove for temporary use.
Can you lay out the stove and stove bench yourself or do you need to contact a specialist?
You can lay out the stove with a stove bench yourself, just like any other stove. Of course, without knowledge, procedures or design, experience in construction (preferably masonry), it will be difficult to adapt to this business.
You can also contact a stove maker. But stove makers are different. There are such stove makers that it would be better for you to take on the masonry yourself, especially if you are concerned about the issue of saving money. Then the option of self-masonry is even more relevant. But it’s still better to turn to specialists - at least for advice. And we will always be happy to help you!
Leave comments on the article, rate it 5 stars and share with friends on social networks if the article was useful to you.
Rough foundation construction
Laying the foundation begins with preparing the foundation pit; it must have a depth of at least 50 cm, and sometimes even deeper. A very deep foundation is made in unstable heapy soils, where any building requires more serious strengthening.
The basis of the stove is a reliable foundation
- If the foundation is placed in a finished building, it is necessary to mark the floor and remove part of it in the place where the stove will be installed. The size of the foundation area should be 15-20 cm larger in each direction than the first row of rough masonry.
- The bottom of the pit is well compacted and lined with clay, its layer is from 10 to 15 cm.
- Then there is a layer of crushed stone of 10-12 cm.
- The next layer will be a layer of gravel.
- Wooden formwork is installed and reinforcing mesh is laid.
- The concrete mixture is poured; its thickness should be at least 20-25 cm. The concrete foundation must have a part deep into the ground and an above-ground part, also 20-25 cm.
- After the cement screed has hardened, a waterproofing material, such as roofing felt, is spread over its entire area. The first row of masonry will be laid on it.
Furnace construction procedure
The layout of the stove in question is carried out in accordance with the order. This, as already noted, is a special diagram on which the order of laying out each row of the structure is indicated. There are standard procedures. If you do not have the skills to lay out ovens, it is strongly recommended to use one of the standard schemes.
A well-designed order will allow you to significantly reduce the time and money spent on stove construction. The work will be carried out in a precise and easy to understand manner to ensure maximum efficiency.
Having figured out the order of the Swedish stove before the start of construction, you will be able to lay out the unit yourself, without involving third-party craftsmen in the work and without spending money on paying for their labor.
The detailed order additionally indicates which materials should be used and at what stage of the work.
Study the proposed order and additionally pay attention to the following points:
- The design of the Swedish stove includes a blower. This point must be remembered in the process of independently arranging the stove;
- The first row of bricks must be laid perfectly evenly. Any displacements will lead to various violations that will negatively affect the quality and reliability of the finished furnace unit. To check the evenness of the masonry, use a building level;
- The correctness of the angles must be checked - they must be strictly 90 degrees. Check the angles using a suitable tool called a square.
Do-it-yourself Swedish stove: order, materials and installation features
The key material for building a heating and cooking unit with your own hands is red ceramic brick. It is strictly forbidden to use previously used bricks for masonry, for example, from an old disassembled stove. For the firebox, use fireclay bricks.
Also prepare the following set of materials for work:
- combustion design;
- blower;
- cleaning doors;
- oven;
- grate bars and valves;
- strip of steel.
The quantity of these materials and their sizes should be selected depending on the type of the furnace itself, its dimensions and in accordance with the chosen order.
Like other types of brick ovens, the Swede should be laid on a foundation, which must first be prepared. Its installation does not differ from the installation of a similar one during the construction of other heating, cooking and other types of stove and heating structures.
Remember that the size of the foundation must exceed the size of the furnace. It is laid out on a base of crushed stone and broken brick, then filled with concrete in layers. The last layer of the foundation is subject to waterproofing and then bricks can be laid according to the order of the structure.
When laying, it is necessary to maintain the evenness of the surface and strength. The inside of the channels should have a smooth surface, and the seams should not contain voids or excess masonry mortar. The seams should be controlled using a level; they should not be too thick. If ceramic bricks are used, the permissible parameter in this case is half a centimeter, and if fireclay bricks are used, then 0.3 cm, respectively. They should be bandaged by half a brick.
Be sure to monitor the cross-section of the smoke channel so that it does not change during operation of the stove. If it begins to narrow even slightly, flue gases will not be able to escape properly and may enter the room, forming smoke.
The laying begins from the first row and it is very important to lay it out with maximum precision, because it is this that determines the reliability and strength of the entire stove. When laying it, use a level to check the evenness
After the first row is laid out, install the door for the blower. Next, follow the order when laying subsequent rows. To form the internal space of the blower, firebox and other internal elements of the furnace, the bricks should be slightly trimmed
It is very important that the upper masonry part and the height of the doors match. In the next row the doors overlap
Remember that bricks and metal have different configurations in terms of thermal expansion, when installing them next to each other, maintain a gap of one and a half centimeters. Fill the gaps with dry sand, and seal the space around the combustion chamber and the firebox itself with fireclay. Avoid deviations and distortions at this stage of work so that you can easily place a cast iron hob on the masonry for cooking.