Functions of a summer kitchen
Unlike a stationary stove in the house, a stove for a summer kitchen has several additional functions.
But, be that as it may, cooking remains the main function of this structure. The only difference from a stove in the house is that you can use the stove normally only during the warm season. In addition, if you choose the right project and build the stove as a multifunctional structure, then it can be used as a barbecue, as a barbecue, and even as a smokehouse. In this case, the time frame for using the building is not limited only to the summer period. However, if you install a panoramic door made of heat-resistant glass in the stove, it can also be used as a garden fireplace. And if the size of the firebox allows, then it can also be used as a place for burning garden waste - leaves and small branches.
Combined with living room
Often the kitchen in a private house is combined with a living room, especially if it has a fireplace. A room of this type allows you to cook in the presence of guests and is perfect for celebrations. In addition, some people like to watch TV while cooking or sit comfortably on the sofa, waiting for this or that dish to be cooked in the oven or microwave. In this case, it is also important to observe the correct zoning of the room.
It is better to turn the sofa with its back towards the work area, and hang the TV on the wall opposite the kitchen unit.
You can separate the kitchen work area from the living room using a ceiling box with built-in spotlights. If necessary, only this area can be illuminated, and soft, dim light will remain in the living room. You can also separate the living room from the kitchen with a bar counter, which will be used for its intended purpose for consuming ready-made snacks and drinks.
Ideas for a summer kitchen
There are a great many options for implementing the “stove for a summer kitchen” project. But even so, a classification can be made to decide on the final project.
First of all, stoves can be divided according to mobility:
- Portable;
- Stationary;
The first ones are usually made of metal and are intended for temporary outdoor placement. Stationary structures can be either metal, stone or brick. This type of furnace is usually installed permanently in a specially equipped place.
Furnaces are also divided according to their functional abilities:
- Ovens for cooking on a burner or burner;
- Grill ovens;
- Barbecue ovens;
- Smokehouse ovens;
Devices for complex use, in which there are several hearths and work areas united by a common body.
You can also classify furnaces according to additional equipment:
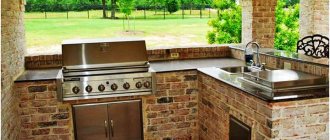
- Designs with additional sink and plumbing;
- Models covered with a roof;
- Structures with an awning or umbrella;
- Models installed inside open or partially open pavilions with a terrace.
In this case, the question of choosing a project depends only on the available funds and imagination.
However, ideas about which stove to choose for a summer kitchen would be incomplete without mentioning another important point - the type of fuel this stove will run on:
- Wood or solid fuel stoves;
- Devices using liquefied gas;
- Liquid fuel structures;
- Devices using alternative energy sources - solar ovens.
Rustic kitchen design with stove
Before you start arranging your kitchen, you should start with the rational use of space. Furniture should not take up much space, everything should be compactly arranged. At the same time, it is necessary to leave space for the installation of small and large household appliances.
Important! Equally important is the selection of lighting, which should be in the form of hanging or spotlights. Much attention is paid to lighting fixtures, since the light in the kitchen should be bright, not dim.
Here you can even choose beautiful curtains for the windows that fit well with the interior. The use of a hood that is easy to install is becoming popular. At the same time, it does not take up much space. You should pay close attention to the design of a kitchen with a stove, as this is the main thing you need to pay attention to.
Curtains for the windows serve as the final element of the interior. For a harmonious image, it is important to choose a color scheme and style.
A brick oven can take pride of place in your kitchen. For this you will also need firewood, which should be in a separate place. And on top you can decorate with a large number of designs and ornaments in the Russian style.
Stove in a summer cottage - purchase or DIY
The market for summer cottage accessories and services for equipping summer cottages today allows us to satisfy the most demanding requests. The only question is how reasonable it is to order from professionals what you can do yourself. In order to build a stove for a summer kitchen, it is not necessary to have an engineering education. Yes, and a project with an orderly plan for laying bricks can be found on the Internet or developed independently, picking up a ruler and pencil.
In ready-made summer kitchen projects, a lot of attention is paid to the external arrangement. Here we offer both open options with one or two blank walls, as well as options with closed stationary or mobile walls of the room. When ordering a ready-made project, usually the foundation, walls and roof make up the lion's share of the price, while the fireplace itself with a chimney and additional work surfaces will cost a third of the cost of the entire complex.
Choosing your kitchen style with wooden walls
One of the best options would be a classic style that never goes out of style. A kitchen with wooden walls will look very modern and stylish. Everything in the kitchen should be harmonious and beautiful.
Log walls and a stove are a great combination.
For this you need:
- color palette;
- doors and windows made of wood;
- white ceiling
- Decorate the walls with still lifes.
Note! A modern kitchen with a stove in a private home, the design of which may be different from others. In the kitchen, the walls can be decorated with floral patterns, and the furniture can be in light colors. The kitchen should be cozy and not cluttered with all sorts of unnecessary items. Everything should match your taste and unique style.
Folk or antique kitchen style
This style plays an important role for many owners. Antiques are especially important and can be passed down from generation to generation. These can be teapots, samovars, cauldrons, cast iron pots and much more. All this, to some extent, can take an important place in your kitchen.
Themed interior items will be the perfect completion of the image of a Russian hut.
Whenever you are trying to decorate the interior of a kitchen with a stove in a private home, choose something unusual that will give a unique look. Here it is important to show imagination and introduce some important details into the interior, namely, make the stove in light colors, and select suitable equipment for the stove.
Modern types of stoves are used to create fashionable interior images in the kitchen.
American version of the kitchen in a wooden house
One of the features of such a kitchen is the interior decoration. Everything in it can look modern and presentable. Kitchens are equipped with safety precautions in mind.
A spectacular composition in the form of a stylish kitchen and stove in the old Russian style.
In the kitchen, the installed stove can not only be decorated with Russian ornaments, but also covered with imitation brick. It would be a good idea to install a fire alarm. You can also make a powerful hood, which almost everyone has.
A non-standard solution - a snow-white kitchen and a red brick stove.
Even when arranging a kitchen in a simple country house with a stove, close attention should be paid to where the stove will be located. The presence of natural materials allows you to equip and decorate the room very beautifully and tastefully. In this case, you need to take into account the size of the room in which everything should be in its place.
The stove can serve as a place to relax after a busy day.
Country style decoration
This style emphasizes naturalness, a rustic style, with the help of which the kitchen will be cozy. This style is already loved by many people. There may be wooden furniture, a beautiful embroidered fabric on the bench, baskets with artificial vegetables and fruits. Handmade carpets can serve as a complement.
Rustic motifs for a country style kitchen. The fireplace stove is an excellent basis for the interior.
The stove can be painted in dark colors, and a beautiful, light handmade rug can be placed on the floor. Every detail will emphasize the elegance and at the same time simplicity of style. The table should be roomy and comfortable. The kitchen may have carved jugs, a cabinet with a high panel, handmade toys with carvings.
Complementing the look of the kitchen with stylish little details is a prerequisite for a cozy atmosphere.
Building a kitchen interior in a natural style
Using the modern styles available, you can create a unique design. A distinctive feature may be the presence of pots of herbs. The room should be decorated with modern environmentally friendly materials. The room will be spacious and cozy if there is good lighting. The kitchen can be equipped with additional lighting fixtures.
Natural materials in the kitchen decoration and imitation stove for a harmonious look.
For the design of a spacious small kitchen with a stove, you can choose the appropriate colors. These can be bright, refreshing shades. The stove in the kitchen will suit any interior and it will give the dining area a “zest”.
Advanced technologies in creating ovens for small kitchen spaces.
Simple rustic kitchen style
The dining area will look beautiful if the flooring is made of parquet, the countertop is finished with ceramic tiles, and the walls are upholstered in natural wood. A small stove will fit harmoniously into such a simple interior. Finishing materials can have a floral pattern that can be used to decorate the stove.
The exquisite painting of the stove adds a special charm and mood to the kitchen.
This style uses shades of white that are in harmony with the decorative elements. Make the covers for the chairs with bright embroidery, as well as the tablecloth for the table. It is good if the fabric is made of cotton or bamboo. Quality must be in everything, from small to large details.
The stove sets the main tone in the kitchen interior, and textiles help complete the look.
For the interior of a kitchen in a country house with a small stove, it is good to use decorative panels that will decorate the walls. Transparent vases filled with pebbles will also be an addition. You can put wildflowers in vases, and hay with dummies of vegetables in small wicker baskets.
Wooden toys, firewood, old photos are important little things for a unique interior.
How to build a stove for a summer kitchen yourself without special skills
In order to decide on the most suitable stove project for construction, you should carefully study 2-3 summer stove projects with serial masonry plans and study a little the technology of stove work. Experienced builders and seasoned summer residents advise choosing a small, simple project that, on the one hand, is easy to build yourself, and on the other hand, is also easy to modernize by dismantling the building and putting a new one together.
Selecting material for work
The simplest project for a free-standing summer stove consists of a foundation, a brick ash and firebox, and a chimney. In order for the structure to be stable and strong, it is recommended to make a monolithic foundation with a reinforced frame.
The project itself is not so important and responsible as to require the use of expensive materials and special tools, but for the work you will still need:
- Cement grade 400 or 500 - for preparing concrete for the foundation;
- Crushed stone;
- Sand;
- Boards for installing formwork under the foundation;
- Cast iron doors for the firebox and vent;
- Ferrous metal wire for tying doors;
- Steel sheet 4-5 mm thick, size 500x600 mm;
- Gate valve;
- Sheet iron oven;
- Cast iron hob;
- Grate bars;
- Solid red clay brick;
- Facing brick;
- Fireclay brick;
- Clay or a special ready-made dry clay mixture for masonry;
- Steel reinforcement with a diameter of 8 or 10 mm;
Attention!
For beginners, it is recommended to use a ready-made dry mixture for brickwork. Such mixtures already contain all the components and additives, which simplifies the work process. But natural clay for masonry is recommended for those who already have experience in laying stoves.
Sequence of construction of a summer kitchen
The first step is to select a place for construction. Depending on the soil on the site, a foundation pit is excavated. The depth of the foundation is about 1 meter, yet the brickwork has an impressive weight. A sand and gravel cushion is placed at the bottom, its height is 0.7-0.8 meters. Gravel, crushed stone, sand are compacted tightly and, if possible, spilled with water. After the top layer has dried, the foundation is poured in 1-2 days. First, a layer of waterproofing is laid, and it is recommended to do this using dense polyethylene and one sheet over the entire area of the foundation and the perimeter of the side walls.
After this, the reinforcement frame is installed. Filling is done with concrete grade M-200. It is prepared in the proportion of 1 measure of M400 cement – 4 measures of crushed stone, fraction 30 – 2 measures of sand. After pouring, the concrete must be compacted and its surface leveled. It is recommended to fill the foundation for a 1x1.4 m furnace 20 cm more on each side. The height of the foundation above the ground surface should not exceed 5-7 cm.
Pouring is done in one day, this is the only way to get monolithic concrete. After pouring, the slab is covered with a tarpaulin or film. A day later, the tarpaulin is removed and the surface is covered with a layer of sawdust 4-5 cm thick. In summer, the sawdust is moistened generously so that the concrete dries evenly and does not crack.
Making a simple stove with your own hands
A layer of waterproofing is laid on top of the foundation. To do this, it is recommended to use a layer of roofing felt or roofing felt.
The next step is marking the base. The first layer is first laid out dry with bricks. Here the dimensions of the sides must be checked and the diagonals are aligned.
The second row of the base is laid out using cement mortar.
The third row forms the bottom of the blower; the cleaning and blower doors are installed here.
The fourth row displays the walls of the blower and the walls of the working area.
On the fifth row, an overlap is made over the doors.
The sixth row is laying the grate.
On the seventh row, combustion doors are installed.
The eighth row forms the overlap of the niche.
The ninth - tenth row - the walls of the firebox and the overlap of the working area.
The eleventh row is the installation of a cast iron hob.
The twelfth - twentieth row is the output of the walls and the chimney channel.
The twenty-first row begins to form the arch above the hob. After 6 rows, the formation of a straight chimney channel begins.
After 3-4 days after the construction of the furnace, the canopy is arranged.
Under normal conditions and air temperatures above 20 degrees, the structure will be ready for use in 5-7 days. This is when you can start making a test fire.
Kitchen: small, but with a real stove
The story of Svetlana, Oleg and daughter Alina from Rudensk:
— We decided to take part in the competition, since no one else has a kitchen like ours. It is not only small in area, but also without windows, walk-through and with a stove. And so I wanted to show what we could do. We don’t expect to win, but perhaps someone will appreciate it.
I inherited half the house, built in the post-war period, after the death of my grandparents. And for 24 years now we have been constantly building, completing, rebuilding, and repairing something.
In order for everyone to have their own room, as well as a living room, the kitchen had to be located in a dark corridor. Then the doors were removed - all to make it lighter. And so, in 2012, we began a major renovation of the kitchen: we moved the gas stove, redid the water supply inlet into the kitchen, and removed the wall between the living room and the kitchen. We left the stove - we are all heat-loving people, and during the off-season we heat it every day.
Then we started finishing. The house is wooden, we do not live in the city, we are adherents of minimalism, practicality and simplicity. So we decided to do without “urban expensive European-quality renovations.” We spent a long time choosing what to cover the walls with. We settled on OSB boards. And since we always do everything ourselves (although we are far from construction specialties), the slabs turned out to be a “gift” - they are lightweight and do not require special rough finishing.
The walls were covered with white paint - it would be lighter and it would be easier to decide what to do with them next. In the end I liked it that way.
For reasons of practicality, the ceiling had to be lined with MDF panels. The lamp is a regular chandelier with a glass shade.
On the floor there are tiles produced by Keramin. As soon as they tried to style her, she didn’t like everything. And so such a solution was born - not in a checkerboard pattern, but in a ladder.
There are also Keramin tiles on the wall. My husband laid all the tiles himself.
And then the fun began. I had no idea what the kitchen should be like. And then on the Internet I saw a red sink made of artificial stone (made by Zhodino) and I wanted to buy it. I didn’t even think then what I would do next, having such a sink. Everyone supported me, and they bought a sink (by the way, it still makes me happy).
We went to the construction market to look at tiles for the stove. We've looked at everything and don't like anything. In the last pavilion we saw tiles and realized that this was what we needed. My husband drew the stove to scale, gave everyone a copy of the tile, and everyone drew their own vision of the layout. Then, from the three options, we assembled the final one, bought the required number of tiles, and the husband began to work according to the scheme. You see what happened. The tiles are made in Poland.
The set was made to order in calm classic shades.
The mixer is made in Lithuania. There is a 15 liter electric water heater under the sink.
We bought a gas hob and an electric oven “Hephaestus” because of the low price (compared to imported models). And we have no regrets about this.
When one side of the kitchen was ready, the other side remained - with a white refrigerator, a white microwave oven, an old kitchen table and stools. This side, naturally, did not fit into our idea. Therefore, I had to buy a red (I was categorically against the gray metallic color) Atlant refrigerator (the only one who offered red). We bought a microwave oven in metallic color, since red would have been too much.
The round table, which is more than 50 years old, was restored and covered with matte varnish. The chairs are also old, the seats were upholstered with new fabric.
This is the kitchen we love. And when the stove is lit, the wood is crackling, dinner is being prepared on the stove, no one wants to leave the kitchen, and we sit there in the evenings.
We recently started renovating the living room, and the second part of the stove, which goes into the living room, is still unfinished.
When we carry out repairs, I always write down the costs, so after three years I give the exact prices. The renovation lasted from March to November.
OSB sheets - $135. MDF panels - $43. Wall tiles - 35, stove - 50, floor - 88 dollars. Headset - $670. Hob and oven - $500 Sink - $90. Faucet - $90. Water heater - $70. Hood - $100. Refrigerator - $472. Microwave oven - $110.
Source
Photo gallery.
Method of decorating a stove in a kitchen interior
This stove can be finished with tiles. One of the advantages is that it warms up the entire house.
Tiles are a durable and unique material, resistant to high temperatures, and also have an aesthetic appearance.
At the same time, the air temperature in the house is always kept at a comfortable temperature. This is especially necessary in winter.
Additional Information! Here you can cook traditional Russian dishes and bake bread. It's very convenient and simple. The main thing is to do everything in accordance with safety rules. This is an important point that should never be overlooked.
Tile
To finish such a stove with tiles, you may need a small set of tools. You also need to take bulk materials in order to make the appropriate solution and much more.
The choice of tool must be approached responsibly. The quality and speed of work depends on this.
To do this, let's take:
- tile cutter;
- putty knife;
- level;
- Master OK;
- bucket with water;
- spray;
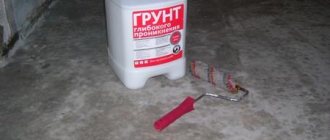
- primer;
- sponge to remove dirt.
Finishing the stove is an important and responsible stage. It is better to entrust the process to professionals.
Stone
To finish a stove with stone, you also need an appropriate set of tools. For the stove, you can choose an inexpensive stone with which you can quickly line the stove. Porcelain stoneware or concrete stone is used for finishing. For finishing, you should prepare the necessary solution in advance, observing all proportions.
Stone for finishing a stove is a win-win option; you can choose one that suits any style.
Plaster
A simple option would be to plaster the stove. It is necessary to plaster the stove so that there are no cracks. When plastering, you should follow the technology and use finishing mixtures in equal quantities.
The traditional solution for stove design is plaster. Simple and tasteful.
Peculiarities
A Russian stove in the kitchen interior creates coziness throughout the house, and besides, its use is much more economical than the use of gas. Of course, it requires more self-care, but this is compensated by its unique advantages and capabilities. But before we look at them, let's talk about the design features.
Modern brick stoves for the kitchen can be of the following types:
- Heating;
- Cooking;
- Combined (heating and cooking).
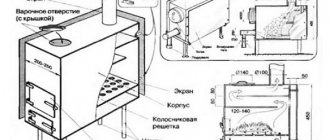
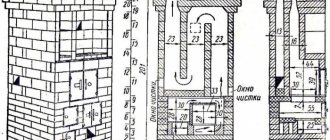
Combination ovens are designed to heat a home, cook food, bake bread and heat water. The cooking chamber in such stoves, as a rule, is located deep in the structure and has a gas threshold - a wall between the mouth and the cooking chamber. Thanks to this, fuel raw materials stay under the roof longer and burn more densely.
The stove usually has two dampers for smoke, and there must be a hog, which is also made of brick in the attic. The basis of the entire structure is guardianship. In addition, today it is not uncommon to find a kitchen stove with an oven, hob, fireplace, and numerous niches and shelves for storing kitchen utensils. Yes, you can see everything yourself by looking at the photo below.
Design with hob and oven
Stove with oven, hob and dome hood
Stove-fireplace
Usage
Even in the old days they said: “The oven is like our own mother” - without it it was impossible to imagine life in the village. It should be noted that to this day in many dilapidated houses it remains standing to delight with its comfort and soft warmth. Is a stove needed in a country or country house? Today, almost everyone has gas stoves and ultra-modern heaters, but even despite this, the Russian stove remains a unique and irreplaceable element in the house. Wooden kitchen shelves are perfect for this stove.
Luxurious finishing!
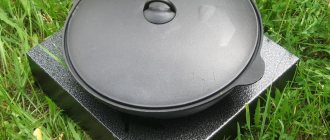
- Cooking food. Boil, fry, steam, simmer, bake, dry berries and mushrooms - everything is possible here! Moreover, the dishes turn out to be simply amazingly tasty and also healthy. The main thing is to stock up on suitable utensils, a poker for mixing coals and grips.
- Heating. A wood-burning stove for the kitchen heats the entire house evenly, accumulating heat and releasing it gradually, over quite a long time. Unlike other types of stoves, a wood stove produces a gentle heat, which creates a particularly pleasant climate in the house. This can be explained by the fact that brickwork does not heat up to very high temperatures, like steel or cast iron surfaces. You can snuggle up to the brick structure after a winter walk and quickly warm up.
- Treatment. A brick kitchen stove can not only feed and warm, but also heal. As you know, the heat coming from bricks has healing properties that are great for joint pain and colds. That is why in past times people, young and old, loved to warm themselves and sleep on stoves. By the way, today you can order or build a stove with a stove bench yourself.
- Other positive aspects. Wood heating is reliable, cheap and simple. A modern wood-burning kitchen stove takes up little space, consumes little wood and, if used carefully, can last 20-30 years. In addition, such a Russian work will certainly become the decoration and pride of the whole home!
Accommodation
As mentioned earlier, brick stoves can be heating, heating-cooking or combined. Therefore, the location for such a structure is selected based on its purpose.
- It is best to place the heating stove in the middle of the room - this way each of its walls will give off heat, which will better warm the room. And if the structure is adjacent to the street on one or both sides, then its effectiveness will be significantly reduced.
- Of course, it is better to place a combination oven in the kitchen.
Combined design
Advice! Before starting major masonry, it would be good to build some kind of model of the furnace, or, more simply, to practice. Then the masonry skills will be there, and the mistakes made can be seen.
Masonry
In this article we will not describe all the nuances of this labor-intensive, individual, but very interesting process. Let's consider only the general features during installation.
So, a little instruction:
- The distance between the roof slabs and the chimney pipe should not be less than 15 cm. After this aspect has been taken into account, it is necessary to mark the place for the foundation of the stove. It is better to make it a little larger than the rest of the structure.
Important! The foundation must be waterproofed.
- The masonry can be very different: for example, with empty seams, or undercut masonry.
- The brick is laid depending on the desired wall thickness. They can be laid out either in one brick, or in half or ¾.
- For the construction of the structure, it is recommended to choose a special stove brick (red brick or solid brick). Under no circumstances should you use bricks from dismantled buildings, expanded clay blocks and slotted bricks!
Kiln brick
- Laying begins with the first row, which is laid without mortar. At this stage, the bricks are aligned, the front wall and the location of each door are determined. Then the brick is already “set” on the mortar.
- During the installation process, you must constantly monitor the correctness of the masonry. It must go strictly vertically. Particular attention should be paid to the corners - all other work depends on the correctness of their layout.
Furnace structure
Reference! Old skilled craftsmen use twine as a vertical guide during the laying process - in their opinion, this is the most convenient way to avoid mistakes.
- Then, depending on the chosen design model, places for the combustion chamber, ash pan and ash pan are designated. It should be noted that usually the ash pan is placed after the third row of masonry, and after another row there is an ash pit. And only then the firebox is installed. But laying the furnace roof begins above the firebox, after the second row of bricks.
- When installing a chimney, it is necessary to provide a special valve, which should be adjusted without difficulty.
Finishing
When the oven heats up, the brick and finishing material expand. But the main problem is that they expand by different amounts. Why is this happening? First of all, due to the difference in the thermal expansion coefficients of these two materials. Secondly, due to the inertia of heating the kiln walls - that is, at the moment when the finishing layer is still completely cold, the brick is already actively expanding. Therefore, if the brick is in tight and even tight contact with the finishing layer, then deformation of the second cannot be avoided. There have been cases where tiles have broken in two when using very strong mortars. So keep that in mind.
Well, of all the existing types of finishing, we would like to highlight the following:
- The cheapest type of finishing that is used to decorate wood-burning kitchen stoves is daub (unevenly applied hand plaster with painting or whitewash). There may be small cracks in such decorative finishes, but they are only superficial and “temporary” in nature and do not cause any problems. You don't have to pay any attention to it at all. And in a modern kitchen, such a finish can become a real “highlight”, reminiscent of the good old days.
Example of a mud hut
- Tiles are another option for decorating the front surface of the structure. These ceramic products are attached to the brickwork using anchors. They can be plain white, painted or have a different relief surface. Perhaps, tiles are the most expensive type of stove finishing today (there are even sets of tiles, the price of which is several times higher than the cost of the stove itself). The kitchen couch will fit perfectly into the interior with a Russian stove.
Tiles finishing
Decorating with tiles is a real art!
Words will be superfluous here!
- A beautiful brick - it does not withstand direct flame, but is very suitable as a decoration. As a matter of fact, there is no finishing layer at all, which means there is simply nothing to fall off!
Please note - some parts of the stove are decorated with different bricks
- Wood-burning stoves for the kitchen can be finished with other materials: tiles, wallpaper over plaster, stone tiles. But in our opinion, all these options are impractical.
- Separately, it should be said about the modern solution to this issue - a separate frame structure with an indentation from the stove. Thus, around any stove you can build a metal frame with an indentation for convection, and then stick any decorative non-combustible material on it. Of course, the dimensions of the structure will be slightly increased, but in terms of design you will have no restrictions! In addition, the frame can be made collapsible.
Kitchen construction
Once the location for the kitchen has been chosen, you can begin pouring the foundation. To do this, the land on the site is cleared, leveled, and markings are made on it. The depth of the foundation depends on which version of the summer kitchen in the country with a barbecue and grill you decide to go with. For an open structure, a depth of 10-15 cm is sufficient. The pit is filled with sand, which is then compacted and covered with boards, bricks or paving slabs.
A closed kitchen requires a stronger foundation. The foundation pit for it is made to a depth of 55-75 cm, and then the type of foundation is selected. So, the foundation can be of the following types:
- Columnar - consists of stone or brick pillars located at the same distance from each other. Such a foundation is usually used in the construction of houses made of timber.
- Tape - made in the form of a trench, which is then filled with concrete. The trench runs along the perimeter of the structure and is capable of supporting quite heavy weight.
- Tile is the most reliable type of foundation, but also the most labor-intensive.
An open summer kitchen is usually built from wooden beams. Such designs look very beautiful and do not require large amounts of time and money. The wooden parts of the structure are fastened with screws and self-tapping screws, the beams are fastened with aluminum corners. The outside of the summer kitchen is finished with boards, and the inside with clapboard or plasterboard. All materials must be treated with an impregnation that prevents wood from rotting.
If the room is an extension of the house, then ideally it should have the same roofing. But if the veranda is added later, then its roof should be combined with the roof of the house both in design and technical performance.
The closed kitchen is built from brick, foam blocks, and natural stone. At the same time, stone walls look the most impressive and last quite a long time. This material has only one drawback - high cost. The thickness of the walls will depend on the climate zone and how often the summer kitchen will be used. Usually the walls are made of one brick, and the inside is lined with clapboard, plasterboard, plastic, or simply plastered. If you plan to install a stove, then the masonry must be carried out at the stage of erecting the walls of the structure. For closed premises it is necessary to provide window openings.
The next stage is the arrangement of the roof. It comes in two types: single-slope and gable. During the construction of the roof, you need to think about the exhaust pipe. The basis of the roof is made up of longitudinal and transverse beams. Most often, the roof is made of tiles, slate, and corrugated sheets. If the kitchen will be used in winter, then the roof should be insulated from the inside with mineral wool.
Once the kitchen is ready, you can begin finishing. Wooden parts need to be covered with a layer of drying oil, which will protect them from damage. In closed buildings, tiles, laminate, and parquet are most often used as flooring. For an open space, it is better to choose tiles, as they are not susceptible to moisture. It’s good if the summer kitchen matches the style of the country house and forms a single ensemble with it.
Recently, complex structures have become popular, which, together with the “summer house”, also include other buildings, for example, a bathhouse, a terrace, a hunting lodge, etc. The combination of such elements can be very different - it all depends on the desires of the owners, but all of them have one common foundation. This solution has obvious advantages: the amount of building materials is significantly less - thus, installing a common roof will cost much less than constructing roofs for several objects. In addition, there is no need to lay many paths on the site to connect all the buildings, since they will be in one place.