Installation of a ground heating system
The heating cable or heating mats for a greenhouse should have a power of 75–100 W/m kV.
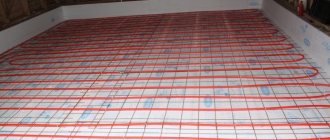
Cable floor
Installation of electric cable heating of soil in a greenhouse is carried out in the same way as a water circuit:
- A pit with a depth of 50 cm is prepared, insulation is laid on the bottom, but in this case, waterproofing made of thick PVC film must be laid.
- Then everything is exactly the same: a layer of sand, a mesh, a cable, another layer of sand and a protective mesh.
After installation, all that remains is to connect the cable and thermostat to the control unit and set the required heating parameters.
Basic Rules:
- It is permissible to install a stove or boiler both in the dressing room and in the greenhouse itself. However, the construction of a foundation is necessary. For a brick stove, a foundation is built from concrete, and for a metal stove, from a sheet of steel or an asbestos-cement mixture. The structure must be as stable as possible, and all fire safety measures must be observed;
- The seams between parts of the smoke exhaust pipe and the gaps at the junction with the stove or boiler must be sealed so that smoke does not enter the greenhouse.
A clay solution is used as a sealant because it is heat-resistant.
Regardless of the heating method, it is necessary to install an air ventilation system in the winter greenhouse:
- Only metal pipes with the same diameter are connected to the outlet and inlet openings of the boiler; the length may be different. Plastic pipes are installed at a distance of 1-1.5 meters from the boiler;
- Before installing the ground heating element, an expansion tank is installed. It is installed at the highest point of the building, close to the stove or boiler.
Instructions for installing an element for heating the ground:
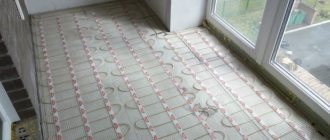
- Place heat-insulating material (foam plastic, insulators with foil, special mats) at the base of the greenhouse. The use of the material helps protect against heat and energy loss, as well as reliable fixation of hot water pipes;
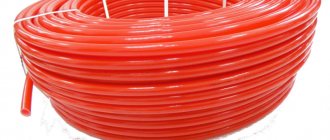
- Place plastic pipes on the film. The pipes begin to be laid from the walls to the center of the greenhouse. This arrangement promotes uniform cooling and energy transfer from the pipes to the ground throughout the greenhouse. It is not recommended to use steel ones, since wet soil will cause corrosion, the pipes will collapse and contaminate the soil. Also, you should not use pipes that have low heat transfer;
- Connect the pipes to the heating system. To automatically regulate the water temperature, it is necessary to install a thermostat on the heater. The optimal temperature regime for cultivated plants is from 35 to 40 ºС;
- Cover the water heating pipes with soil (40 to 50 cm thick).
This layer helps prevent thermal damage to the root system.
This option allows you to heat the greenhouse no worse than using water. Installation proceeds as follows:
- It is necessary to remove the fertile layer to a depth of 40-60 cm.
- The bottom is leveled so that there are no protruding elements, and then sand is poured in to act as a leveling bedding.
- Polyethylene film serves as waterproofing; it is laid overlapping or tape is used to connect the sheets.
- You need to lay thermal insulation on top, which does not have a reflective coating.
- Now you can start laying the heating elements. The material must be cut to fit the greenhouse configuration. Mounting plates are used to secure the cables. The conductors can be positioned arbitrarily, but a distance of at least 10 cm must be left between the threads.
- It is necessary to connect all the segments into a single chain, insulate the couplings and bring them out on one side. All that remains is to power the system and ring.
- Polyethylene must be laid on top of the infrared film.
- For heating elements you will need wet sand, which will serve as a covering layer.
- A metal mesh with small cells is placed on top of the sand.
- At the last stage, all that remains is to return the soil layer to its place and lay tubes equipped with a temperature sensor in its middle.
Electric cable heated floor
The heating cable or heating mats for a greenhouse should have a power of 75–100 W/m kV.
Technically, installing electric heating is simpler and cheaper than running a warm water floor in a greenhouse. But this type of heating is much more expensive to operate.
Cable floor
Installation of electric cable heating of soil in a greenhouse is carried out in the same way as a water circuit:
- A pit with a depth of 50 cm is prepared, insulation is laid on the bottom, but in this case, waterproofing made of thick PVC film must be laid.
- Then everything is exactly the same: a layer of sand, a mesh, a cable, another layer of sand and a protective mesh.
Important! The depth of the heating circuit is always calculated depending on how the soil will be processed while growing plants and how deep gardening tools will penetrate into the soil.
After installation, all that remains is to connect the cable and thermostat to the control unit and set the required heating parameters.
Features of the first launch
Installing a heated water floor with your own hands in a private house is only half the battle.
The heating system must be properly started and configured; its durability and efficiency depend on this:
- First of all, you should bleed the air. This is done gradually contour by contour. You cannot open all the hinges at once. The circulation pump is set to minimum speed.
- The boiler is started at a minimum temperature (30-40⁰С) with a gradual increase of no more than 1-2⁰С per day. At the same time, the supply and return temperatures on each loop are controlled, and the coolant flow is set.
Before the first start-up of the system, the screed must harden and dry. Additional gradual drying of the screed by starting the circuits will avoid temperature shock and cracking.
Knowing the basics of how to make a water heated floor yourself, it’s not difficult to bring the idea to life. If everything is done correctly, then the costs and efforts will more than pay off in just 2-3 years.
I made a website about homemade products myself.
Ground heating with cable
Heating the soil in a greenhouse with a cable differs significantly from other methods, since it provides heat not only to the air in the structure, but also to the soil. Moreover, its temperature can change at different stages of plant growth due to the presence of temperature sensors on the cable. This is an important feature that has a positive effect on the condition of fruit crops. It ensures their growth and development.
Since the cable is stationary, it is always ready for use. There is no need to dismantle it or do other work when the season is over. It is an integral part of the structure. If there is no need to use it, then just turn off the device.
The cable is located around the entire perimeter of the greenhouse. This allows him to evenly distribute heat in it. In addition, the cable is completely safe for human health, the environment and the plants themselves. Therefore, this heating method is used quite often.
Options for heating soil in a greenhouse
To heat the soil in greenhouse buildings, heated floors of various types are used. Equipment is selected depending on the operational features and area of the greenhouse.
Water system
Water-type underfloor heating is considered a fairly effective and quite economical option. But its installation requires the presence of a heating device and a pump group. It is not entirely reasonable to purchase such equipment specifically for heating a greenhouse, since its cost is quite high. Therefore, the installation of a water system is carried out mainly in greenhouses located at a distance of no more than fifteen meters from the boiler intended for heating the house.
Water heated floor is not very suitable for a greenhouse
Of no small importance when using heated floors for greenhouses with liquid coolant is the size of the heated area. Large areas still require a separate installation of a heating boiler
And to achieve the required temperature in the winter season, it becomes necessary to combine a heated floor with a radiator system.
Heating cable
Electrical cable equipment is widely used to heat the soil in greenhouses with a fairly large area. The layout of this floor is quite simple, so you can carry out the installation work yourself.
During operation, a cable-type heating system does not require manual temperature adjustment, since all control is carried out using a temperature sensor.
When choosing electric heating equipment for a greenhouse, special attention should be paid to the power of the device. To effectively heat the soil, this indicator must be at least 75 watts per square meter
The main condition for installing a cable system is the presence of an active electrical network.
Infrared heaters
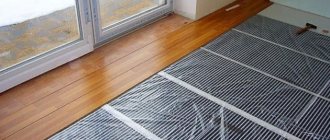
Film heated floors have a reliable waterproof coating. The infrared heat emitted by carbon heating elements has a beneficial effect on plants grown in greenhouses. But using it for large areas has significant disadvantages - low level of soil heating and low resistance to mechanical stress.
Film heated floors have a low level of ground heating
In this regard, infrared heaters are used in small greenhouses where seeds are germinated or seedlings are grown.
Underfloor heating options
There are the following basic options for heating the soil in a greenhouse:
- water;
- electric;
- infrared.
- mixed.
Water system
Water floors are the most versatile, since water flowing underground can be heated in various ways - electricity, a boiler, a boiler, a central heating water pipe system or from a hot water pipeline.
The water heating organization scheme is as follows:
- remove soil and clay to a depth of 50 cm;
- compact the soil;
- lay thermal insulation (foam plastic up to 10 cm);
- cover with plastic wrap;
- pour 50 mm of sand;
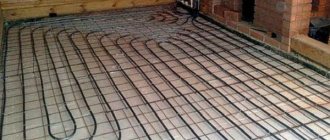
- a flexible heating pipe with a loop diameter of 200–300 mm is laid on the backfill;
- another layer of sand is poured on top of the pipes;
- the soil layer is laid back.
Pipes can be made of steel, rigid, braided or polymer. Plastic structures do not rust, but they transfer heat poorly, so it is better to use flexible metal pipes. The turns of pipes are connected to a common manifold using pipes.
Important! The water system requires the correct laying of pipes to uniformly heat the soil and eliminate unheated zones in places where plants grow.
There are several problems here, since solid fuel boilers are not able to maintain a temperature in the system of about 40°C for a long time. Recycled water from the heating system can solve this issue.
It is better to use a boiler-type water heating system with water temperature control at 35...40°C. In this case, the required heating level is adjusted quickly and conveniently.
Video: Water heating for a heifer
Electric heating system
Electric cables are rarely used to heat the soil, since such heating is expensive. Copper wires and the current cost of electricity will force you to pay a considerable amount.
Did you know? The Netherlands is a champion in the number of greenhouses - there are more than 10,500 hectares in this country. Local residents like to cover their greenhouses with glass, but they rarely use plastic and film.
You can heat the soil using electricity using the following methods:
- electric cable - the easiest to install;
- cable mats - the same wires. but are attached to a metal reinforcing mesh.
In principle, laying electric heating for greenhouse floors is no different from laying water heating. You just need to provide insulation, arrange grounding and connect a temperature sensor.
Infrared heaters
Infrared film based on coal heaters cannot be laid deep, since the thermal effect of this element is low. These earth warmers lie down to a depth of 20 cm, and such elements can be damaged by gardening tools. The benefit of infrared heaters is that they do not waste a lot of energy and distribute heat evenly.
Work order
At the first stage, it is necessary to remove fertile soil to a depth of half a meter. Then a layer of thermal insulation is laid, and you must not forget to compact the base. A film and a layer of sand of about 50 mm are applied on top of the insulation.
At the second stage, the pipe is laid; it will need to be covered with the same sand.
The greenhouse soil will warm up as follows:
- The mixing unit includes a pump and a three-way valve. If you run coolant onto a radiator, you will need to spend a lot of money.
- The water supply to the heated floors will be carried out through the return line from the radiators.
Thanks to this arrangement, a polycarbonate greenhouse with a heated floor is obtained.
As for the material for pipes, you can take different options: polymers or steel. When choosing a polymer option, you must be careful. A protective mesh is used to cover the pipes, and only fertile soil is poured on top of it. The pipes remaining outside must be connected to the collector located next to the greenhouse.
Water heated floor for greenhouses
The most reliable and effective way to heat the soil in a greenhouse is to install a water-heated floor. This heating method is universal, as it allows you to choose energy sources. When installing yourself, it is important to do everything carefully and correctly so that the system works smoothly.
One of the options for insulating a greenhouse is a water floor.
Methods for heating the coolant can be varied, which allows you to save on heating materials.
The beginning of work is marked by the removal of the top fertile layer of soil, and then clay. (depth should be 50 cm). Before laying the insulation layer, the base must be compacted. The insulation must be covered with film, and sand must be poured on top (the thickness should be 50 mm). A pipe is laid out on the sand, which is again covered with sand.
Methods for heating greenhouse soil:
- Assembly of the mixing unit, including a three-way valve and a second pump. In this case, part of the coolant is released onto the radiators. This method involves high costs.
- Water is directed to the heated floor through the return line from the radiators. This method allows you to equip a full-fledged greenhouse with heating of the floor and the entire room.
For installation, you can use pipes made of different materials: steel or polymers. When installing polymer pipes you need to be careful. The pipes should be covered with a protective mesh, and only then a layer of fertile soil should be poured. The external pipes are connected to the collector, which runs along the greenhouse.
How the temperature is maintained
The best option for maintaining temperature indicators is to use thermostats. The optimal indicator for most greenhouse crops is from +15 to +20 °C. Some gardeners use greenhouses to grow plants and then replant them, then the temperature in the room must be maintained at +30 ° C.
If we talk about calculating power and heating in a greenhouse with an electric floor, then by installing thermostats you can significantly reduce energy costs by up to 30%. All this is achieved due to the fact that electricity does not flow all the time. When the temperature drops to the set value, it will become a signal to turn on the heating. As soon as the desired temperature is reached, the thermostat will turn off.
Warm hollows are a win-win option not only for large agricultural enterprises, but also for a small greenhouse in a country house. Such systems allow you to maintain an optimal microclimate in the room, which has a beneficial effect on the quantity and quality of the crop.
Most gardeners give only positive reviews about heated floors in greenhouses. They help increase yield and promote comfortable plant growth.
Home comfort How to make a heated floor in a bathhouse with your own hands? Do-it-yourself water heated floor in a bathhouse
As an additional means of heating the bath, you can choose a heated floor system. The work involves several stages, including preparatory work. In order to lay a warm p…
Home and family Which is the best car air freshener: reviews. How to make a car air freshener with your own hands
How nice it is to get into a car, the interior of which, instead of the acrid smell of smoke, is fragrant with citrus or your favorite perfume. But not all air fresheners offered in stores cope with their task. Many...
Home comfort How to make a self-leveling floor for a garage with your own hands?
The self-leveling floor owes its name to the technology of the device. This is an option for making a screed using a self-leveling mixture. A distinctive feature of a cement-based self-leveling floor is the…
Home comfort Do-it-yourself wardrobe-bed. How to make a bed built into a closet with your own hands
One of the most stylish and ergonomic solutions for unusual bedrooms in private houses and apartments is the purchase of furniture such as a wardrobe bed. In appearance, it is no different from an ordinary bed,…
Home comfort By what principle do you assemble bath floors with your own hands?
Floor installation is one of the important aspects of bathhouse construction.
Making them with your own hands is quite simple. But it's worth knowing a couple of things. The floors in the bathhouse are in most cases made of wood, but there are also...
Computers How to make a cobblestone generator in Minecraft with your own hands
Today we will talk about how to make a cobblestone generator in Minecraft. Having a characteristic gray tint, this material can become the main material in the construction of most structures. In addition, he is required to…
Home comfort The size of the inspection hole. How to make a viewing hole in the garage with your own hands
An inspection hole in a garage is an invariable attribute for a car owner who independently maintains his own car. Therefore, the construction of a garage often begins with the construction of a pit. How to build it according to all...
Home comfort How to make floors in a bathhouse with your own hands: device, stages of work, photos
Setting up your own steam room is a multi-step process. The installation of a bathhouse floor is no exception. In order to ensure water drainage, arrange ventilation, and also provide the room with waterproofing, ...
Home comfort How to make a garage floor with your own hands?
Currently, the requirements for floors in…
Home comfort How to make a heated floor with your own hands: sequence of work
If you don’t know how to make a heated floor with your own hands, you can find some useful tips in this article. So, first let's figure out what it is like. The design can be water or electric...
Along with warming up the air, installing a heated floor in a greenhouse yourself will significantly increase productivity. The ground heating system in greenhouses is built on the same principle as underfloor heating in residential buildings, although there are some differences in installation.
Which boiler to use
Here again there are two approaches:
- Use metal (for example, corrugated stainless steel) with high heat transfer. In this case, the installation step is made larger - the heat is transferred well. But here you need to be careful not to burn the roots of the plants.
- Use plastic or metal-plastic pipes. Their heat dissipation is much lower than that of metal, but for some cases this is not bad. For example, pyrolysis boilers do not work well at low return temperatures. In the case of metal-plastic or polypropylene, the temperature difference will be more or less comfortable for such a unit. If you lay metal, then almost cold water will reach the boiler, which will immediately lower the temperature and may disrupt its operating mode. If this situation repeats constantly, expensive equipment (pyrolysis machine) will simply fail.
At low supply temperatures (40°C and below), ordinary black polyethylene pipes can be used. But the reviews here are different. For some they work, others are dissatisfied because they constantly leak from under the fittings. In general, the situation here is this: which pipes in the region are sold cheaper from suitable materials, those are the ones they take.
The length of the circuits for heating the soil in the greenhouse is quite large, so this approach is justified. All existing pipes for a warm water floor are also acceptable for heating the soil in a greenhouse (except copper ones, and only because of the price). The only question is cost and feasibility. Therefore, everyone chooses what they consider necessary.
You can use any pipes - the temperatures will obviously be low.
Most often they buy those that are cheaper in a particular region. The system can be organized in different ways. It all depends on volumes and needs. But it’s more rational to do it through a standard comb for a water floor with minimal bells and whistles. Just with shut-off valves and an air vent. Or make a similar design yourself.
We suggest you read: Growing cabbage in a greenhouse in winter
Since it is important to maintain a constant temperature in the greenhouse, the best option is automatically controlled boilers paired with a thermostat inside the greenhouse. But it's a matter of means. All these units are not cheap at all. However, if possible, buy automated ones. In addition to maintaining a stable temperature, they also save fuel. How?
They produce the amount of heat that is currently needed to maintain the set temperature. That is, they will not allow your plants to freeze (if there is fuel) when the temperature suddenly drops, delivering their maximum power. But they will not produce excess heat during an equally sudden warming.
If you are going to heat with wood or coal, pay attention to pyrolysis boilers. Although they are expensive, wood in them burns for up to 8 hours, and coal lasts for 24 hours. And you don’t need to “live” in a greenhouse or keep a stoker.
Boilers with automated controls performed best in the greenhouse, and you need to choose any fuel that is available and at the same time inexpensive
How to calculate the boiler power for a greenhouse? In general, the surface area of the greenhouse is multiplied by the heat loss coefficient for the material with which the greenhouse is covered, and all this by the required temperature difference.
For example, we will be heating from February to April. The lowest temperature, let it be -18°C, will be maintained inside at 20°C. Total delta (difference) 38°C. Now let’s calculate the boiler power for such conditions in a greenhouse 10 x 5 x 2.5 m. Covered with double film. The area of all “film” surfaces of the greenhouse is approximately 150 m2, the coefficient of heat loss through the double film is 3.5.
Options for underfloor heating in a greenhouse
Before you start organizing work and thinking about how to make a warm floor in greenhouses, you need to understand how the soil is heated. There are several options:
- Use of water. This system works on the same principle as heated water floors, where hot water flows through a system of pipes. In another way, this option can be called heating the soil using plastic pipes. The method is quite economical when it comes to the use of resources, but people often encounter problems during installation work. Experts recommend using water heating for large greenhouse spaces.
- Film heated floors in a greenhouse are equipped similarly to the technologies used for residential buildings.
- The use of heat guns also has its place. These devices are ideal for large greenhouses, but much depends on the cost of the equipment, and besides, the soil can only be heated superficially.
- The use of infrared lamps. They are mounted on greenhouse structures. The option is interesting because you can create several temperature zones in one greenhouse.
Warm floors in a greenhouse: tips and tricks
A greenhouse is used only for a limited period of time for subsequent planting of plants in the ground, since heating is carried out exclusively by solar heat, in greenhouses an electric underfloor heating system should be used - this will allow you to get a harvest even in winter.
Nowadays, some greenhouses are still heated the old fashioned way using solid fuel stoves, but this method is used only in very extreme cases. A much more common heating method is underfloor heating with hot water circulating through pipes. This system is successfully used on subsidiary farms of large enterprises, where it is possible to use free coolant with production capacity.
To solve this issue, you should use a heated floor system using a heating film or a heating system with electric cables. Ground heating systems in greenhouses that use electrical cables can be embedded in a cement screed or placed in a sand bed.
A big plus is that with the help of separate thermostats you can accurately control the temperature of the soil and air, and this is extremely important for creating the right microclimate. Such heating can lead to significant consumption of electrical energy. The most economical option today is to use a special heating film.
Tags: greenhouse, warm, electric
About the author: admin4ik
« Previous entry
How to make a warm floor in a greenhouse with your own hands, video and photo tips
Sand or slag can be used as a thermal insulation material. Before filling the sand, it is recommended to remove small debris: shells and pebbles. The area on which the insulation is poured is trampled down well and then filled with water so that the resulting layer is dense, without air bubbles.
The hose is laid according to the pattern, in the form of a snake. It is worth making sure that these elements are not too close to each other - then they will heat the same area, while the other will remain without heating. The optimal distance is about 80 cm.
To avoid drying out of the soil, install a temperature sensor. The system wires are routed outside. Then a layer of insulation of the same thickness (about 10 cm) is again filled in and watered with water.
A mesh is laid on a layer of thermal insulation (10 cm) (slate can also be used). It will help securely secure the system elements so that they do not change position during operation. In addition, it will protect the underfloor heating elements from damage by garden tools. The price of mesh can be quite high, but this is a material that you should not skimp on.
The mesh is covered with a layer of black soil. The optimal thickness is considered to be 25 cm. It is worth considering that after completion of the work, black soil must also be added to the beds, but the total thickness in any case should not be more than 30 cm.
The last step is connecting the temperature sensor to the thermostat. It will ensure that the temperature in the greenhouse is maintained at a comfortable temperature for the plants.
A traditional electric (cable) heated floor is connected in exactly the same way, with the exception of one important detail: an electric cable is installed instead of a hose. Installing infrared film with your own hands is very simple: on a sand screed (later the soil is covered) or simply in the soil
This material has a high efficiency (100%), as it converts electrical energy into heat without loss. In this case, the film does not burn oxygen, but ionizes the air in the greenhouse
Installing infrared film with your own hands is very simple: on a sand screed (later the soil is covered) or simply in the soil. This material has a high efficiency (100%), as it converts electrical energy into heat without loss. In this case, the film does not burn oxygen, but ionizes the air in the greenhouse.
Warm floors for a greenhouse: general rules
Rules for installing heated floors: Perform the installation yourself, while ensuring uninterrupted operation of the system. A prerequisite is the temporary removal of the top soil layer. Then a film with a waterproofing function should be laid.
Expanded polystyrene or foil polyethylene is used as a material for thermal insulation.
In order to quickly heat the floor in a greenhouse, you need to purchase special cables, thermal insulation film and other materials for the work in advance
Cables or mats are laid on the film. They are covered with hydro- and heat-insulating film on top. After this, they begin to lay the heating cable using mounting tape or mesh.
Tips for laying the floor:
- To protect the heated floor from mechanical damage, it is necessary to lay a reinforcing mesh.
- The fertile soil layer should be from 30 to 35 cm.
- After installation, it is necessary to level the soil and prepare the ground for planting seeds.
- Heating can be controlled using signals from a sensor that measures air temperature or soil temperature.
The application of each sensor depends on the requirements and conditions that must be maintained for successful plant growth. You can increase productivity by installing two temperature sensors. It is important to ensure that the root system of plants does not overheat - this can lead to stunted growth, reduced yield and even plant death. Underfloor heating allows you to grow plants all winter. However, it is important to choose the right underfloor heating system and ensure that the installation is carried out in accordance with all rules and regulations.
How the temperature is maintained
The best option for maintaining temperature indicators is to use thermostats. The optimal temperature for most greenhouse crops is from 15 to 20 °C. Some gardeners use greenhouses to grow plants and then replant them, then the temperature in the room must be maintained at 30 ° C.
If we talk about calculating power and heating in a greenhouse with an electric floor, then by installing thermostats you can significantly reduce energy costs by up to 30%. All this is achieved due to the fact that electricity does not flow all the time.
Warm hollows are a win-win option not only for large agricultural enterprises, but also for a small greenhouse in a country house. Such systems allow you to maintain an optimal microclimate in the room, which has a beneficial effect on the quantity and quality of the crop.
The most practical way to maintain temperature is a thermostat. For plant life, the best temperature is within 15-20 degrees. If you plan to use the greenhouse as a nursery, that is, to grow plants for subsequent replanting, it is better to set the temperature to 30 degrees.
Using a thermostat in automatic mode can significantly save energy - up to 30%. This efficiency is achieved due to the fact that the electricity is not constantly on: as soon as the temperature drops to a certain point, the regulator turns on and begins to heat the soil. When the specified temperature is reached, the thermostat turns off automatically.
The “warm floor” system is ideal not only for large greenhouses in agricultural complexes, but also for a small greenhouse on a summer cottage. Installing a soil heating system with a thermostat with your own hands allows you to ensure the optimal temperature for plants, and therefore the productivity and quality of products.
Arrangement of the floor in the greenhouse
According to their design and the principle of using the area of the greenhouse, there are two types: a greenhouse, which uses the main soil of the site, covered with a frame structure covered with polyethylene or polycarbonate, and greenhouses - greenhouses that have a full foundation and are intended for growing crops and seedlings in special containers on racks or floor.
The latter are often used for growing strawberries using Dutch technology, since they provide a harvest all year round.
The floor in a greenhouse should not be just soil, since every time after watering it will turn into dirt. You can make an embankment of crushed stone, sand and even pebbles, but moving, for example, a cart or large bags of soil over such a surface is quite difficult.
In order for such a greenhouse to be not only warm, clean, but also comfortable, the floor is screeded with concrete. If funds allow, and your soul demands beauty, you can lay out the floor of the greenhouse with paving slabs, but in the grooves between the tiles, due to dampness, fungus may form or ants may appear.
In European countries, the greenhouse floor is often finished with ceramic tiles. Agree, this is very beautiful, and if, for example, you are interested in growing tropical plants, such as palm trees and pineapples, in such a greenhouse you can even just relax while reading a book.
When choosing this material, it should be taken into account that classic tiles for the bathroom floor should not be used; equipment for transporting goods is often used in the greenhouse, and the floor covering must be quite durable.
The latest innovation in the technical equipment of greenhouses is the use of heated floor technology, which not only ensures cleanliness and warmth, but also directly heats the soil in the containers. Of course, many will immediately think: “How economical and safe is this?” As practice shows, the high cost of such a floor lies only in its arrangement. Here you will also need a screed, and many farm enterprises, in order to save money, purchase Birss dry mixtures at a wholesale price, which also provide waterproofing.
Whatever type of finishing you choose, when arranging the floor in the greenhouse, you need to remember about drainage channels and drainage systems, especially if you plan to install automatic watering in the greenhouse. To ensure that the floor level is level, the water drainage system can be made using a web of pipelines built into the floor screed.
Why do you need a warm floor in a greenhouse?
Heating a greenhouse is a necessary measure in winter. For this purpose, various types of heating equipment are used. But the most effective is a heated floor, which not only keeps the stems of cultivated crops warm, but also ensures uniform heating of the soil.
Installing the system in greenhouses has many advantages:
- makes it possible to grow plants regardless of the season;
- allows you to plant seedlings quite early, accelerates the process of seed germination;
- promotes rapid development of crops and early ripening of crops;
- provides a favorable climate for the most heat-loving plants.
When using a heated floor in a greenhouse, you can harvest a variety of crops all year round.