Winter greenhouses made of polycarbonate have long ceased to be a rarity: modern technologies make it possible to create the necessary microclimate in them and grow herbs, vegetables and even berries for your table or for sale. In heated greenhouses you can also make a greenhouse or winter garden. The main task when building a winter greenhouse is to choose the right design and equip the heating system.
Heating a polycarbonate greenhouse in winter
Winter greenhouse design
In many ways, design requirements depend on the region. In areas with a mild, warm climate, where the temperature in winter rarely drops below zero, a polycarbonate greenhouse does not need to be insulated; it is enough to install temporary heating sources in it and use them as needed. Polycarbonate itself retains heat quite well due to its internal cavities, and while heating up during the day, the greenhouse does not have time to cool down to critical temperatures for plants.
Thermal insulation properties of cellular polycarbonate
Important! To preserve the thermal insulation properties of polycarbonate, its ends must be closed with special plugs. This will prevent cold air from entering the cells.
End caps for polycarbonate
In areas with temperate and cold climates, the thermal insulation properties of polycarbonate are not enough to maintain a stable positive temperature in the greenhouse, and they have to be equipped with a constant heating source. In addition, to improve the thermal insulation characteristics, it is necessary to make a number of changes to the design of a standard greenhouse.
Heating a greenhouse using a gas burner
Insulation from cold winds
To do this, the greenhouse is located in the direction from north to south, a main wall is installed at its northern end, or, even better, a vestibule made of bricks, blocks or timber. The entrance to the greenhouse is made through the vestibule, and the southern end wall is made solid. The design of the vestibule makes it possible to prevent the greenhouse from blowing out through the cracks in the doors and vents. In addition, it acts as a thermal curtain: when the doors are opened, the plants will not be affected by the flow of cold air.
Insulated greenhouse wall
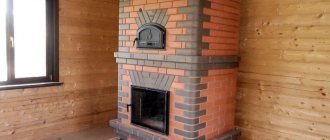
In the vestibule you can mark out heating equipment - a stove, a boiler. In this case, the chimney is brought out through the north wall, and the polycarbonate will be insulated from the hot chimney pipes and possible sparks. When heating with electricity, an electrical panel is placed in the vestibule. In addition, the vestibule can be used as a storage room.
Foundation and insulation of the blind area
The greenhouse is placed on a strip foundation, concrete or made of blocks, and an insulated blind area is made around it. This will protect the soil inside the greenhouse from freezing.
The blind area is made as follows.
- The turf around the foundation is removed to a width of 50 cm and formwork is made from boards.
- Cover with a leveling layer of sand.
- Insulation is laid - polystyrene.
- Fill the blind area with concrete over a reinforcing mesh or lay paving stones on a layer of sand.
Insulation scheme for the blind area
Soil insulation
Insulating the soil from below allows you to isolate the fertile layer in the greenhouse from the colder underlying layers. At the same time, heating will be more efficient and heating costs will be reduced.
A popular method of soil insulation.
Scheme for insulating beds in a greenhouse
Step 1. At the site of future ridges, make a pit with a depth of at least 60 cm, and pour a 5 cm thick layer of sand on the bottom.
Step 2. Lay the insulation boards, aligning the grooves at the joints.
Step 3. A layer of expanded clay about 10 cm thick is poured on top of the slabs. It acts as drainage and at the same time protects the polystyrene from damage when digging.
Step 4. Fertile soil is laid on top or a warm bed is arranged.
Note! In particularly cold regions with high levels of snow cover, the bottom of the greenhouse can be made of foam concrete, brick or wood for effective thermal insulation.
The bottom of the greenhouse is made of blocks
Types of structures
Before you build a winter greenhouse with heating, you need to decide on its type. There are 2 types of such premises:
- conditionally capital - a collapsible structure, which, if necessary, can be moved to another place, while it differs from the summer version in the presence of a pile foundation and a wooden floor;
- capital - a more reliable non-portable structure, which is located on a strip foundation.
In addition, all greenhouse premises are divided into several types according to location. Their main characteristics are presented in the table:
| Name | Description |
| Thermos (recessed) | The most common winter greenhouse, which is buried approximately half into the ground, thereby minimizing heat loss. Optimal solution for cold regions |
| Arched | The preferred option for plants grown in the ground. Most often it is made from polycarbonate sheets and purchased ready-made, since it is quite difficult to cover the frame with such material yourself. |
| Gable | One of the tallest greenhouse buildings, optimally suited for growing crops in boxes on racks. Another advantage is the presence of a sufficient slope of the roof slopes, due to which they self-clean from snow |
| Attached to the house | Usually erected for arranging a winter garden. Due to its connection to a warm wall, it retains the temperature inside well. The entrance from the house eliminates the need to get to a separate building in frost or snow |
| With attic | Most often it is intended for growing flowers in multi-tiered beds. The heating is predominantly stove, the transparency of the walls ensures the entry of more sunlight |
When choosing the type, design shape and location of the greenhouse, it is necessary to take into account the characteristics of a particular site, the characteristics of the crops planned for cultivation, the availability of financial resources and other individual circumstances.
Related article:
Why does the soil in a greenhouse turn green and how to deal with it
Greenhouse heating systems in different climates
The choice of heating in a greenhouse has a great influence on the region in which it is installed. So, in the south there is no point in installing an expensive heating system with a boiler - it will be used for several weeks a year, and the costs of its installation will not pay off soon. In the northern regions it is impossible to do without constant heating.
Winter greenhouses in warm climates
For the southern regions, it is often enough to build warm beds with bioheating and install a backup heating source in case of frost - for example, electric convectors.
How to make biological heating correctly
The main source of heat in such a greenhouse will be solar energy. Warming up during the day, the air and soil in the greenhouse gradually cool down overnight. When the minimum permissible temperature is reached, convectors are turned on, supplying warm air to the plants. The soil is additionally warmed due to the processes occurring in the warm bed: it is filled with organic residues, which actively release heat when decomposed.
Warm climate
The cost of installing such a greenhouse is not too high. It is important to correctly install polycarbonate and insulate the north side, especially in regions with strong winds. The greenhouse must be equipped with a ventilation system, since in bright sunshine, even in winter, the temperature in it can rise significantly.
Winter greenhouses in temperate climates
In regions with a temperate climate, solar energy in winter is not enough to warm up the greenhouse, so you have to resort to insulating the blind area and installing heating devices. A budget option is to stove with wood or other fuel. It is installed on the north side of the greenhouse or in the vestibule; heating of the entire area is carried out due to natural convection or air ducts laid along the ridges. Heat the stove in the evening and when the outside temperature drops.
Warm beds with manure or compost as biofuel are also effective for heating the soil. A properly laid warm bed warms the soil for 5-8 years, and heating costs are significantly reduced. Plant roots remain warm, and most crops tolerate even significant fluctuations in air temperature.
Temperate climate
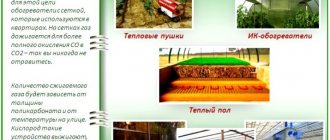
In case of peak temperature drops, additional heating can be installed. Infrared lamps or heaters are perfect for heating the soil: directed radiation warms the soil surface and the plants themselves, while the objective temperature in the greenhouse may be low. The air is heated using convectors or fan heaters.
Winter greenhouses in cold climates
In cold climates, winter daylight hours are short and the sun does not have a significant effect on the temperature in the greenhouse. Its heating must be continuous. This task is best accomplished by a water heating circuit laid around the perimeter of the greenhouse. It may consist of registers or radiators connected by pipes. At the same time, a curtain of warm air is created along the walls; the plants do not experience the effects of cold from the walls of the greenhouse.
How to make technical heating correctly
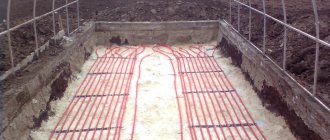
Heating the soil using biofuels in cold climates may be ineffective: when the beds freeze once, the activity of soil organisms stops and the release of heat stops. Therefore, beds in winter greenhouses in the northern regions are insulated and equipped with artificial heating using an electric cable or heating pipes, which are placed at the bottom of the beds and covered with soil.
Additionally, during peak frosts, infrared heaters can be used to heat the soil; convectors are more effective for quickly heating the air. With properly installed water heating, you usually don’t have to resort to them.
Cold climate
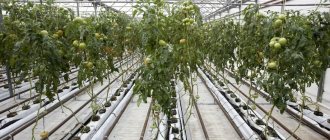
In addition to the region, the choice of heating system also depends on the crops that you plan to grow. If the winter greenhouse is intended for cold-resistant herbs and greens, you can get by with soil heating and backup electric heaters. Heat-loving tomatoes, peppers and cucumbers require a stable microclimate, constant heating and additional lighting.
Solar heating
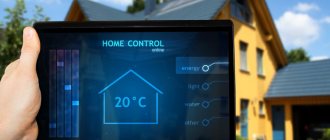
In order to maintain the required microclimate in the greenhouse, it is necessary to use special equipment. If the land plot is located in a region where the sun supplies the earth with enough heat almost all year round for normal plant growth, then the issue of heating the greenhouse can be resolved using natural solar heating .
But to use this method, it is necessary that the greenhouse roof be made of a transparent material, for example, polycarbonate. Then sunlight can freely penetrate through it. Thanks to the rays, the plants and soil in the heated greenhouse will begin to heat up, and from them the heat will be transferred to the air.
Moreover, the above requirement is not the only one in order to be able to use solar heating for a greenhouse in winter.
- For the greenhouse, it is recommended to choose a place that will be well lit during the day and not be blocked from sunlight by artificial shade;
- The greenhouse should be placed in such a place that the amount of air flow is minimized. This will avoid rapid cooling of the greenhouse wall material;
- when calculating the temperature, it should be borne in mind that the air temperature inside the greenhouse will rise to the maximum level only in the evening;
- the most suitable configuration for a greenhouse is an arched configuration;
- In order to more effectively warm the soil, it is advisable to limit the height of the greenhouse if possible.
Solar heating deserves attention primarily because this system is available to every gardener and requires much lower costs compared to other heating options.
However, this method has a serious disadvantage , which is the low heating efficiency. The fact is that this system is completely dependent on the sun, so in cloudy or cloudy weather this heating begins to work worse.
Heating a greenhouse with solar energy
The space inside the greenhouse is traditionally heated by solar energy. The walls of greenhouses are made of light-transmitting materials. The soil and air in the greenhouse heat up during the day under the influence of radiant energy and cool down at night. In spring and summer, this heating is quite enough to effectively heat greenhouses.
In autumn and winter, sunny days are shortened, and the sun is low above the horizon. As a result, the penetrating ability of the sun's rays decreases, they illuminate the soil at an angle and it heats up worse.
To increase the efficiency of solar heating of winter greenhouses, do the following.
- Create a slope for the greenhouse to the south. This will allow the sun's rays to better illuminate and warm the interior space.
Slope the greenhouse to the south
- Cover part of the walls with reflective material. The sun's rays will be reflected and further heat the soil and plants.
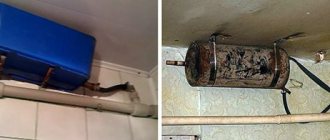
- Install heat accumulators in the greenhouse - barrels of water, painted black. During the day, the containers will actively heat up, and at night they will give off heat.
- Install solar collectors on the roof - this is a pipe system located in an insulated housing with a transparent cover, filled with water and connected to a water heating system. Heated by the sun, water circulates through the pipes and heats the interior of the greenhouse.
One of the walls of the greenhouse reflects sunlight
Heating barrel
solar collector
Solar heating is used both as an independent heating system and in combination with other systems. At the same time, the costs of artificial heating are significantly reduced.
Biological heating
The second type of natural heating of greenhouses is the arrangement of warm beds from organic components. Under the influence of soil microorganisms, organic matter begins to decompose with the release of heat.
Step 1. At the site of the future beds, trenches are made with a depth of 0.5-0.7 m. They are enclosed with walls made of boards, bricks, blocks or slate. A drainage made of stones or expanded clay or a layer of sand is placed at the bottom.
Trench in a greenhouse
Step 2. The first layer of the warm bed is made from large pieces of wood: logs, chocks, stumps. Between them fall branches, sawdust, and tree bark.
Bottom layer - wood and branches
Step 3. Lay a layer of manure or compost and spill it with water with biobacteria. Cover the bed with cardboard or several layers of paper.
The bed is covered with cardboard
Step 4. The next layer is a mixture of dry leaves, weeds, and mown grass. The thickness of this layer is at least 30 cm.
Filling with leaves
Step 5. Fill with fertile soil to the top of the fences, level and water with warm water.
Backfilling the soil
Step 6. Cover the beds with covering material or film for 3-7 days.
Covering material
Within a few days, soil bacteria begin to actively decompose organic matter, and the bed begins to generate heat.
Prices for covering material
covering material
Electric heating
Heating a greenhouse using electricity is available to every gardener.
Infrared lamps
Electric heating can be implemented in several ways:
Advantages of electric heating:
- availability of electricity;
- ease of installation and operation;
- low price of heating devices;
- rapid heating of air and soil;
- high level of automation.
Flaws:
- high price of electricity;
- It is not always possible to connect devices of the required power.
A special heating cable is laid inside heated ridges and is used to heat the soil and protect it from freezing in the northern regions. The cable laying diagram is shown in the figure.
Heating the soil with a heating cable
Convectors or radiators are placed along the main walls - the devices create protection from cold air currents. It is better not to install them in the immediate vicinity of polycarbonate - during operation, the body of the convectors heats up, so the material may melt.
Electric convector
Infrared heaters do not heat the air, but the surfaces on which the rays fall. As a result, the soil and the plants themselves, paths, ridge fences, equipment and irrigation systems heat up. Heaters are mounted on brackets or hangers to the greenhouse frame. The radiation spectrum of infrared heaters is close to that of the sun and is beneficial for plants.
Infrared heater
Electric boilers for heating greenhouses are quite convenient, but require the installation of a water circuit, which increases the cost of installation. At the same time, their efficiency does not exceed that of other types of electric heating.
Note! Despite the large list of advantages, due to the high price of electricity, electric heating is more often used as a backup source of heating.
Another option is a film heater
Film IR heaters in a greenhouse
Infrared film can be used to “bottom” heat the soil of a greenhouse or cover plants from above during very cold periods
Prices for infrared heated floors
infrared heated floors
Water heating
The most reliable way to create the necessary microclimate in winter greenhouses made of polycarbonate.
Scheme of arrangement of water heating of a greenhouse
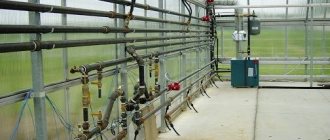
Water heating is a whole complex of equipment:
- boiler;
- heating circuit made of pipes, registers or radiators;
- expansion tank;
- circulation pump in case of using forced circulation;
- security group.
Installation of such a system is expensive, so it is usually installed in large greenhouses used for growing vegetables, berries or flowers for sale. If the greenhouse is attached to a house heated by a boiler, it can be connected to the home heating network. A separate building is usually connected to a separate boiler.
Scheme for heating a greenhouse using water heating
For water heating of greenhouses, you can use different boilers:
- gas;
- diesel;
- solid fuel;
- electric.
All of them have their advantages and disadvantages, they are described in Table 1.
Table 1. Comparison of different types of boilers for heating greenhouses.
| Boiler type | Advantages | Flaws |
| Gas | Low fuel cost. High efficiency. Safety. High level of automation. Compact dimensions of the boiler. Possibility of using a coaxial chimney. | Requires connection to a gas main. Most boilers are energy dependent. The cost of boilers is quite high. |
| Diesel | Independence from communications. Safety. High level of automation. High efficiency. | High cost of fuel. It is necessary to arrange a tank for diesel fuel. |
| Solid fuel | Independence from communications. Availability and low price of fuel. Low cost boilers. Energy independence. | Automation is only possible when using pellets. Efficiency depends on the fuel. A chimney installation is required. |
| Electric | Safety. High level of automation. High efficiency. No chimney needed. | High cost of electricity. Energy dependence. Over time, efficiency decreases due to scale. |
The choice of boiler type is made depending on resources and personal preferences. The installation of the heating system is not much different, the only difference is that gas, diesel and electric boilers are often equipped with a built-in circulation pump and a safety group, so when installing them, connecting these elements is not required.
Heating circulation pump
Basic devices included in the heating safety group
Step-by-step instructions for installing a water heating system are given in Table 2.
Table 2. Installation of water heating in a greenhouse.
| Stages, illustrations | Description of actions |
| Calculation of greenhouse volume | To calculate the required boiler power, you need to know the volume of the heated room. To calculate the volume of a greenhouse, you need to multiply its geometric dimensions: length, width and height. Dimensions are taken in meters, the result is obtained in cubic meters. Example: greenhouse with dimensions L=6 m; W=3 m; H=2.5 m. Volume V=6·3·2.5=45 m3 |
| Boiler power calculation | The boiler power is calculated using the given formula, based on the volume of the greenhouse. The specific power required for heating 1 m3 is taken equal to 50 W. The result is obtained in kW - it is in these units that the rated power of most boilers is indicated. Example: P=45·50/1000=2.25 W. The result obtained is rounded up to the nearest denomination, for example, 4 kW. |
| Radiator calculations | Radiators, depending on their design, have different thermal power. This indicator is usually indicated in the passport per 1 section for prefabricated models and for the entire radiator for soldered ones. Indicated in watts. The number of radiators is calculated based on the boiler power, taking into account losses - for this, a coefficient of 1.5 is introduced into the formula. The power of the radiator section is assumed to be 170 W. Example: n=4·1000/(1.5·170)=15.7 sections. The result is rounded to a larger integer and distributed over the required number of radiators. |
| Pouring the foundation | The foundation for floor-standing boilers is made of reinforced concrete 10-15 cm thick. To do this, soil from an area of about 1 m2 is removed to a depth of 15 cm and a 5 cm layer of sand is poured. The sand is watered and compacted. Install wooden formwork 10-15 cm high, assembling the boards with nails or self-tapping screws. Reinforcing mesh is placed inside, concrete is mixed and poured into the formwork. Dry for 1-2 weeks. |
| Boiler installation | The boiler, depending on its type and method of fastening, is installed on a pre-prepared foundation or hung on a solid wall. When installing, it is important to align it with the hydraulic level - misalignment can lead to the formation of air pockets in the heat exchanger. Volatile boilers are connected to the electrical network. Connect the expansion tank and, if necessary, a heat accumulator. If necessary, a hot water supply system is connected to the boiler. |
| Chimney installation | The type of chimney depends on the type of boiler. For gas and diesel engines, a coaxial chimney is used, which is discharged through the wall. The coaxial chimney has a channel inside for the flow of fresh air, so additional ventilation is not required. For solid fuel boilers, a stainless steel sandwich chimney is usually used. It is connected to the boiler smoke pipe and discharged through the roof or wall. The pipe must be secured. A spark arrestor is installed on the top of the pipe - if sparks hit the polycarbonate, it can melt. |
| Installation of the water circuit | The water circuit is connected to the boiler according to the diagram shown. Install a safety group at the boiler outlet. The circulation pump is installed at the entrance to the boiler on the return pipe. A bypass with a balancing valve is installed between the forward and return pipes. A coarse filter is installed in front of the three-way valve on the return pipe. |
| Radiator installation | Radiators are connected to pipes, shut-off valves and Mayevsky taps are installed on them to bleed air. If radiators are equipped with balancing valves, the latter are opened fully. Mayevsky's taps are turned on. Plugs are installed at free entrances. |
| Boiler pressure testing | Pressure testing is carried out with air from the compressor. The pressure test is usually indicated in the passports for the boiler and radiators. Apply pressure testing to the system. Joints and connections are sequentially lubricated with soap foam and checked for leaks, which can be detected by the bubbles that form. If air leaks are detected, the units are re-installed and sealed. |
Hand pumps for pressure testing of heating systems
After pressure testing, the boiler is ready to be filled with water and started. The first start-up is carried out in accordance with the instructions in the technical data sheet for the boiler - depending on the model, they vary.
Do-it-yourself drip irrigation from polypropylene pipes
In this article you will find detailed step-by-step instructions on how to make drip irrigation from PP pipes with your own hands! We also recommend reading the article on how to make beds in a polycarbonate greenhouse.
Circulation pump prices
circulation pump
Video - Water heating of a greenhouse. Part 1
Construction stages
Having decided what kind of greenhouse you need for the winter, you can begin construction. The work must be performed in the following sequence:
- choose a suitable place that will be protected from the winds;
- decide on the type and materials for all structural elements - from the foundation to the roof;
- choose the type of ventilation, heating, insulation and lighting;
- calculate the height of the building - for growing in the ground you can get by with the usual one, when using racks you will need a higher room;
- complete all the work, starting with laying the foundation and ending with interior finishing.
If you require a business premises of 100 sq.m. m or more, then it is better to buy it ready-made or order turnkey construction. A mini-greenhouse for growing produce for your own table in winter can easily be built on your own.
Related article:
Autumn treatment of greenhouses against pests
Selecting a location
A winter greenhouse with heating should be located in compliance with several recommendations:
- the place should be well lit and not exposed to strong winds;
- It would be optimal to attach such a structure to a house or outbuilding, but always on the south side;
- a separate building should be oriented from north to south, while the northern side should be solid and reliably insulated.
Below are instructions for building a gable greenhouse made of foam concrete. The entire process will take approximately 2 months, of which half the time will be spent drying the foundation. It should be calculated that there will be no severe cold during this entire period. For good drying, a temperature within +15 ... +23 ℃ is suitable.
Related article:
What kind of greenhouse to build at the dacha: 7 most convenient and functional types
Foundation
Under the specified structure, a shallowly buried strip foundation made of reinforced concrete will be required. The foundation is laid around the perimeter and along the line of the main partition between the vestibule and the greenhouse room.
The work algorithm will be as follows:
- clear and level the area, apply markings using pegs and rope;
- dig a 50 cm trench, cover the bottom with sand, compact it by pouring water;
- install formwork - for heavy soil only at the top, for loose soil - to the very bottom;
- lay the reinforcement, tying it at the intersections with wire;
- pour concrete, pierce it with a rod, level the surface;
- cover with plastic wrap.
Leave to dry for about 1 month. This period may vary depending on the weather - if it is very warm and dry, it may take 2-3 weeks. The drying process should be monitored and if it dries out, water the top layer with water. The formwork is removed after 7–10 days.
Related article:
Polycarbonate greenhouse: 10 advantages
Walls
A greenhouse will be comfortable and warm in winter conditions if the walls are made of foam blocks and fastened together with special glue. The use of such glue instead of cement mortar significantly reduces heat loss due to the minimal thickness of the seams, and also reduces labor costs.
The walls are erected according to the following scheme:
- a mixture of sand and cement (4:1) is applied to the dried foundation, roofing felt or other waterproofing material is overlapped and leveled;
- the foam blocks of the first row are laid out on cement mortar, all the rest are fastened with glue, tightly fitting and placed with dressing on half a block;
- every 3 rows are reinforced with steel mesh;
- doorways are formed from blocks cut to size;
- After finishing the masonry, the outer wall is insulated with polystyrene 3–15 cm thick, depending on the region;
- For exterior decoration, siding, plaster or tiles are used.
Related article:
How and with what to cover a greenhouse: 5 types of coatings and their features
You can use other thermal insulation, for example, polystyrene foam. It is not recommended to use only mineral wool, as it increases the humidity of the room.
Roof
The roof frame is made of 4x10 cm boards, the rafters are spaced at intervals of 50–70 cm (depending on the snow load).
The installation process will be like this:
- On the south side, a board is screwed to the foundation over the waterproofing layer with anchors. The side posts are fixed to the wall in the same way, and the intermediate and top frames are attached with self-tapping screws and corners.
- A board is laid over the entire upper surface of the laid walls and fastened with anchors at intervals of 60 cm.
- Racks are installed in the center of each transverse wall, secured with a corner and self-tapping screws, then struts are installed. Skates assembled from 2 boards are attached to both sides of the racks.
- Rafters are attached to the ridge and the top frame of the longitudinal wall.
- Cover with polycarbonate sheets, cutting them to the size of the wall and directing the stiffeners vertically.
- The sections are covered with a UP profile. For fastening, self-tapping screws with a thermal washer are used.
- The same work is carried out on the north side.
Related article:
How and with what to cover a greenhouse: 5 types of coatings and their features
After installation is completed, all cracks are sealed with polyurethane foam.
Final work
The list of final works includes the installation of doors, heating and other communications. Everything is done in this order:
- For a winter greenhouse, it is necessary to provide 2 doors: into the vestibule and from it - into the room. The outer door is insulated with polystyrene or any heat-insulating material. The boxes are attached with long (from 10 cm) anchors.
- The next stage is heating installation. The traditional solution is a boiler installed in the vestibule and registers in the form of large-section pipes stretched along the perimeter of the entire room.
- The best option for a mini-greenhouse would be drip irrigation. An electrically heated tank is installed in the vestibule; hoses are taken from it and extended to the plants. Hoses with holes are used for watering beds, and drippers are used for shelving.
- Lighting is done under the ceiling, taking into account heating (so as not to damage the polycarbonate coating). The electrical wiring is hidden in a tube made of plastic or metal corrugation, and then suspended from the top.
Finally, beds or shelving are installed. In the northern regions, it is recommended to heat them using biofuel, electric heating or water heating. In warm areas, the walls are lined with foil, the reflective properties of which will significantly increase the illumination of plants.