Connection procedure
After laying the heating elements and connecting the sensor wires and heat-generating cable to the installation site of the thermostat, as well as the electrical network, it is necessary to connect the Teplolux regulator.
Installation of Teplolux cable systems is carried out in the following order:
The connection is made through an RCD, that is, a residual current device, with a rated current of 30 mA. It is placed in the electrical panel. All work is carried out with the mains power turned off.
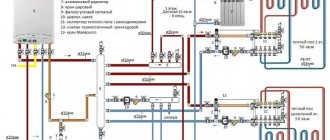
A mounting box for the thermostat is installed in the prepared hole. Then the front cover is removed. The housing shows a connection diagram for the Teplolux regulator, in accordance with which the connection is made. More detailed information can be found in the instructions.
The installation wires have different colors that indicate its purpose:
- brown (white, black) – phase (L);
- blue – zero (N);
- yellow-green – grounding.
For Teplolux devices, the connection is made as follows:
- A sensor is connected to terminals 1 and 2. It is not necessary to observe the principle of polarity here. Connections can be made in any order.
- A power cable with a voltage of 220 V is connected to terminals 5 and 6. The phase (an indicator is used to determine it) is supplied to 6, and zero to 5.
- The heating section or mat is connected depending on its type: single-core or double-core. In the first case, the insulated conductors are connected to terminals 3 and 4, the uninsulated conductor, that is, the shielding braid, to 5. In the second case, the phase (core in brown insulation) is supplied to pin 3, zero (blue insulation) is supplied to pin 4, screen output (yellow-green) – 5. If the network is three-wire, then the grounding conductors are connected to the common ground loop through the PE terminal.
Next, the back cover is inserted into the box and secured with two screws. The front panel is returned to its place. After this, the functionality of the system is checked. To do this, first turn on the electricity, and then the thermostat.
It sets the minimum heating level. Then it switches to maximum heating, and a characteristic click of the circuit closing should be heard. Within 1-2 minutes it is checked whether the section is heating up or not. Switching off is carried out in reverse order.
Installation of Teplolux heating mats is carried out in the following order:
Varieties
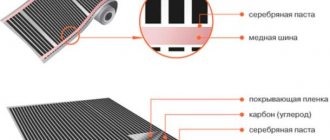
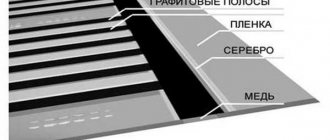
The modern market offers a wide range of heated floors. Each system has its own technological differences. The differences boil down to the fact that in different systems the number of wires inside the cable varies, as well as the thickness of the heating element.
So, on the market you can find the following brands of Teplolux underfloor heating:
- Warm floor Teplolux tropix. Warm floor Teplolux tropix is an ideal solution for rooms that have a small area. The heating element of the Teplolux tropix heated floor is about 3 mm. As for installation, installation of the Teplolux tropix heated floor is carried out using a special self-adhesive tape. Compared to other types of systems, Teplolux tropix heated floors have undeniable advantages.
- Teplolux pro. Great for rooms that have a large area. The heating mat itself has a thickness of up to 3.5 mm. The package includes a powerful cable. Thanks to this, the entire area of the room is heated evenly and efficiently. You won't find any cold spots on the floor.
- Mobile heated floor. It is presented in the form of a thin mat. It can be easily placed under any rug. This is what a mobile heated floor is all about. It is lightweight, so it can be easily moved from one room to another.
- Warm floors mini. This type of heating can be placed in a thick screed without any problems. The heating element is only 3 mm.
These are the main types of electric heating systems. With all this, it doesn’t matter whether you buy Teplolux express, mini, mobile, pro or tropics, choose a reliable supplier who guarantees high quality products.
What to pay attention to
One of the important points is the correct choice of heating control device. Its main characteristic is power (usually no more than 3 kW), that is, what maximum load the device can withstand. If the power of the heating element is higher than this value, then an additional relay is installed between it and the thermostat. It can be single-phase with the required power.
Installation is carried out in a hidden box or in a distribution panel. Additional wiring and power supply to the electrical floor are laid from the control unit to the relay.
If you plan to use the system as the main heating, then for its correct operation you need two sensors that monitor the temperature of the floor and air.
There are different types of thermostats. The simplest are mechanical types. They are ready for use immediately after installation, but the programmable Teplolux models need to be configured.
Depending on the installation method, they can be overhead or built-in. It is easier to attach overhead ones to the wall; there is no need to make a hole as for built-in models.
For safety reasons, the installation wires of the mat into the wall should be laid in a corrugated pipe. For the same reason, it is not recommended to install the thermostat in rooms with air humidity above 80%. The device is located where direct sunlight will not fall on it. At a height of no more than 150 cm and no lower than 30 cm.
Operating modes of heating boilers: summer mode, for heated floors, etc.
Modern gas boilers have convenient operating modes that allow you to optimize the operation of the heating and hot water supply systems at different times of the year. There are a lot of brands of boilers, but the operating modes of all models are similar. Let's figure out what settings exist and what benefits they can bring.
Heating boiler operation settings and why they are needed
Imagine you bought a gas boiler and successfully connected it. Winter is just around the corner, so you want to be prepared for the heating season. As soon as there is a need to warm up the room.
When there is a need for hot water, the boiler automatically switches to heating the water. In other cases, the boiler is in standby mode and performs other functions so as not to freeze itself.
The boiler operating modes allow the user to understand how the boiler operates, what tasks it performs, and how priority is structured. They help you understand concepts like cycling, temperature and warming up. Knowing these concepts, you can guess how to profitably save on resources for the boiler.
Basic settings of a gas boiler:
- work only for heating;
- hot water priority;
- summer operating hours;
- "warm floor" mode;
- frost protection.
Some boiler models have their own modes. Basically, they are focused on marketing and emphasize their “zest”. But the standard set is always the same.
To select a boiler, watch this video:
Winter mode
In winter mode, the gas boiler operates at full capacity. It can be roughly divided into “heating only” and “hot water priority” operating modes. In the first case, the device turns on and off independently, bringing the room to the desired air temperature level.
A cyclicity is created. It depends on the cooling rate of the room, square meters, and the power of the boiler itself. Set a comfortable temperature, paying attention to cycles. Adjust, reducing the load and saving on gas consumption.
In heating mode, adjust the temperature from 35 ºС to 85 ºС, gradually achieving optimal values. After adjusting the temperature, elements such as water pressure, pressure switches, NTC sensors and others are checked.
Hot water priority
In the hot water priority mode, we observe a clear sequence of actions and cyclic switching on for heating. If you want to turn on one of the hot water taps, the boiler will forget about heating and begin to heat the water. This is called hot water priority.
The heating works around the clock, the boiler knows when to turn on and off, maintaining the required temperature in the house. The need for hot water is much less frequent than the need to heat a house. When you turn on the water, the house is “already warm,” but the water is “still hot.” Therefore, priority for heating hot water is higher than for heating.
In most modern gas boilers, the water temperature can be adjusted separately in the range from 35 ºC to 55 ºC. The procedure is similar to the heating procedure. Set the appropriate temperature and use hot water.
Summer operating hours
At home, heating is not needed in summer. There is no desire to wash dishes in cold water or take a cold shower. For such purposes, a summer mode was invented, when the heating of the room is in hibernation mode (sleep mode). But when you open a hot tap, the water begins to heat up (for double-circuit boilers).
When summer comes, the heating circuit does not switch off automatically. There are three options for the development of events:
- let it be as it is;
- switch to hot water mode;
- turn off the boiler completely.
In the first case, the heating mode will be active. In this mode, the heating circuit will always be on and internal checks of the equipment will continue to be carried out. Don't waste resources just like that.
Switching to summer mode (hot water mode) is available if the boiler allows it. You will receive hot water, the heating will be turned off. The boiler performs a minimum of conservation procedures.
Warm floor mode
The heated floor mode does not exist in all heating boilers. Works only in winter mode. The floor heating mode involves heating the water under the floor, bringing the water to the temperature specified by the user.
There are no separate installations that work separately with the floor. By adjusting the temperature on the boiler, you limit its power. Power is consumed to heat the room or heat water.
Connection procedure
After laying the heating elements and connecting the sensor wires and heat-generating cable to the installation site of the thermostat, as well as the electrical network, it is necessary to connect the Teplolux regulator.
Installation of Teplolux cable systems is carried out in the following order:
The connection is made through an RCD, that is, a residual current device, with a rated current of 30 mA. It is placed in the electrical panel. All work is carried out with the mains power turned off.
A mounting box for the thermostat is installed in the prepared hole. Then the front cover is removed. The housing shows a connection diagram for the Teplolux regulator, in accordance with which the connection is made. More detailed information can be found in the instructions.
The installation wires have different colors that indicate its purpose:
- brown (white, black) – phase (L);
- blue – zero (N);
- yellow-green – grounding.
For Teplolux devices, the connection is made as follows:
- A sensor is connected to terminals 1 and 2. It is not necessary to observe the principle of polarity here. Connections can be made in any order.
- A power cable with a voltage of 220 V is connected to terminals 5 and 6. The phase (an indicator is used to determine it) is supplied to 6, and zero to 5.
- The heating section or mat is connected depending on its type: single-core or double-core. In the first case, the insulated conductors are connected to terminals 3 and 4, the uninsulated conductor, that is, the shielding braid, to 5. In the second case, the phase (core in brown insulation) is supplied to pin 3, zero (blue insulation) is supplied to pin 4, screen output (yellow-green) – 5. If the network is three-wire, then the grounding conductors are connected to the common ground loop through the PE terminal.
Next, the back cover is inserted into the box and secured with two screws. The front panel is returned to its place. After this, the functionality of the system is checked. To do this, first turn on the electricity, and then the thermostat.
It sets the minimum heating level. Then it switches to maximum heating, and a characteristic click of the circuit closing should be heard. Within 1-2 minutes it is checked whether the section is heating up or not. Switching off is carried out in reverse order.
Installation of Teplolux heating mats is carried out in the following order:
Final floor screed after installation
After the glue has dried, the surface is primed and the tiles are laid on the next layer of glue.
After testing the quality of the system, the finishing coating is laid. If there are materials with high thermal conductivity (tiles, stone), the mats are filled with tile adhesive. The layer should be from 5 to 8 mm. Bubbles are not allowed - the structure may rise.
After the adhesive layer has dried in a draft-free room, the surface is primed. Then the 5 mm thick floor tiles are laid on a 5-10 mm thick adhesive. In the presence of carpet, linoleum and laminate, a layer-by-layer scheme is used:
- The base is from below.
- Heating mats or cable sections.
- A mixture of cement and sand (thickness 3 cm).
- Substrate for the finishing version.
- Selected finishing material.
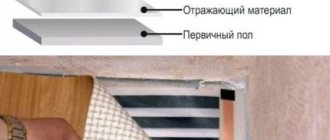
In apartments on the ground floor and country premises, the following scheme is used:
- Base for covering.
- A layer of thermal insulation.
- Sand-cement screed 3 cm thick.
- Heating cable.
- Repeated screed 3 cm thick.
- Substrate for finishing coating.
- Decorative floor surface.
When laying thermomats, no re-screed is required - tile adhesive and the coating itself are applied.
What to pay attention to
One of the important points is the correct choice of heating control device. Its main characteristic is power (usually no more than 3 kW), that is, what maximum load the device can withstand. If the power of the heating element is higher than this value, then an additional relay is installed between it and the thermostat. It can be single-phase with the required power.
Installation is carried out in a hidden box or in a distribution panel. Additional wiring and power supply to the electrical floor are laid from the control unit to the relay.
If you plan to use the system as the main heating, then for its correct operation you need two sensors that monitor the temperature of the floor and air.
There are different types of thermostats. The simplest are mechanical types. They are ready for use immediately after installation, but the programmable Teplolux models need to be configured.
Depending on the installation method, they can be overhead or built-in. It is easier to attach overhead ones to the wall; there is no need to make a hole as for built-in models.
For safety reasons, the installation wires of the mat into the wall should be laid in a corrugated pipe. For the same reason, it is not recommended to install the thermostat in rooms with air humidity above 80%. The device is located where direct sunlight will not fall on it. At a height of no more than 150 cm and no lower than 30 cm.
User manual
You can turn on the system after the tile adhesive has completely dried.
The Teplolux brand includes operating instructions for the heated floor. The document notes the following points:
- installation only when the voltage is off;
- turning off the system from the network in case of long-term departure;
- no additional coverings on tile or stone floors;
- heating mats rolled into a roll cannot be connected to the network;
- mats must be installed with tile adhesive;
- Initial switching on and heating takes 6-48 hours.
A test run is carried out only after the glue or screed has completely dried.
Teplolux brand floors provide additional and main heating of the room. The systems are low cost, energy efficient, heat up quickly and maintain a comfortable temperature in the off-season.