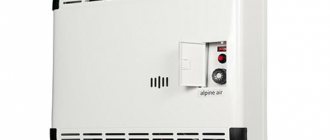
Gas convectors are becoming an increasingly common and sought-after device in a modern heating system. Currently there is a large assortment from different manufacturers. How to install it correctly is described in this article, we will also study the issue of the device.
As practice shows, gas convectors produced at one of the Ukrainian manufacturing enterprises, the price of which was set at 900 UAH, were able to achieve the following results. One of them was in operation for five months and then needed major repairs, which was completely impractical in this case.
The second device was scheduled to be turned off after the heating season, but when it came time to turn it back on for operation, it did not turn on.
In both the first and second cases, it was more cost-effective to simply buy two completely new heating devices than to repair those that had fallen into disrepair.
Specifications
If we talk about performance indicators made in Turkey (costing 200 and 300 US dollars depending on power), then both heating devices successfully worked the entire heating season. And after they were turned off for the summer, they were turned on again without problems with the onset of the new heating season.
Therefore, when purchasing this equipment, special attention should be paid to the manufacturer of this convector.
These heaters can differ greatly in appearance. However, the main difference between these heating devices is the absence or presence of a fan designed for special ventilation of the chamber, which, in turn, allows hot air to circulate faster.
The different capacities of gas convectors are determined according to the volume of the room that will be heated.
Practical gas convectors using natural gas
To heat the room, various heating devices and devices are used. Modern gas convectors running on natural gas are widely used.
They are considered:
- Functional;
- Practical;
- Reliable.
The heat that comes from this household appliance is transferred as quickly as possible to the surrounding space. It can be used to equip a house with a centralized or autonomous heating system. In this case, heat enters the room due to convection of the heater when warm air passes from the hot heater.
The convector is equipped with a special hermetically sealed combustion chamber, therefore, the surface of the chamber heats up when the gas burns.
The converter is based on the fact that warm air emanating from a heat source rises to the top. It runs on liquefied bottled gas and helps to heat the room very quickly. Some models are also equipped with a fan heater, which forcibly accelerates convection, and therefore reduces the time required to heat the room to the desired temperature. This is much more economical than conventional household heating batteries, since a natural gas device allows you to heat a room much faster.
How to install a convector?
We take the gas convector itself, a metal-plastic pipe with metal fittings, special plumbing silicone and a gas tap.
Tools you will need:
- pipe cutter,
- wrench for tightening fittings (threaded connections),
- perforator (with scapular crown),
- drill,
- drill,
- crosshead screwdriver.
We should not forget that when installing a gas convector you need: high-temperature silicone and foam for installation, plastic dowels and screws suitable for them.
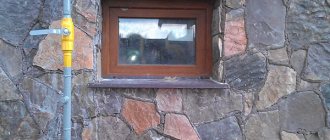
Before installation, you should clearly determine the location of the device. According to technical standards (GOSTs), the gas convector must be installed under the window opening. However, there are also options when it is impossible to install this device under a window. In this case, it is mounted in another place.
Installation process
Before installing the gas convector, you need to try it on to the already chosen location. This action can be performed in two ways: measure the distances using a tape measure or, directly, by placing the convector itself (marking the necessary holes for fastenings, etc.)
- One of the fundamental points during installation is determining the hole for the gas inlet. If this hole is located at the bottom of the heating device, then it is necessary to leave a distance that will be sufficient to bring a pipe with a clamp fitting to this inlet.
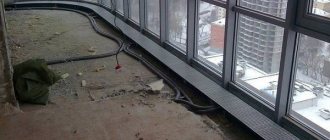
- Next, a through hole is made in the wall along the diameter of the exhaust pipe using a perforator. In fact, it is this process that becomes the most difficult. And, besides, as a result of this process, almost the entire room is contaminated with dust.
- Then they drill the holes that are needed for fastening the equipment and hammer the dowels there.
- An exhaust pipe is inserted into the opening of the heating device and the resulting joint is treated with silicone (high-temperature).
- As a result, it is fixed to the wall using dowels and self-tapping screws. Because The device weighs quite a kilogram, so this stage of its installation is also not easy.
At the final stages of installation, it is necessary to seal the resulting gaps (between the wall and the pipe) using high-temperature foam.
The gas convector kit necessarily includes a special cap on the end of the pipe, which is intended to prevent the burner from being blown out by air movement. This cap must be secured upon completion of installation work using the self-tapping screws included in the kit.
We supply gas to it
After the gas appliance has already been installed, gas should be supplied to it.
According to GOST requirements, the pipe that is supplied to the gas convector must be located on the street.
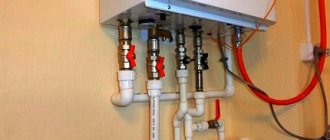
- In the case when the gas pipe is equipped with a special outlet, a threaded connection, then a gas tap is simply screwed onto it, which will prevent the supply of gas to the convector. When such a connection is missing, it must be established. It is very important that such a bend is installed by a specialist gas welder.
- It is even better that this professional is an employee of the official gas service. After installing the gas tap, you need to connect a metal-plastic pipe to the device. When purchasing fittings and pipes, you should carefully consider whether these materials have the appropriate certificates.
- When installing a pipe, it must be secured with clips after one meter, for which it is necessary to drill special holes in the wall. Before installing the fittings, both them and the pipe must be lubricated with silicone to facilitate installation and ensure sealing.
After this, you can carry out a test run of the convector.
Trial run
- Immediately before the test run, you should open the gas tap and go over all joints with a brush moistened with soapy water (you can also use shampoo).
- If bubbles are observed, you must immediately close the gas valve and begin correcting the gas leaks.
- Then, when the joints have been checked, you can start the convector, while holding down the gas supply button for one minute so that the gas enters the combustion chamber through the pipes.
- When a spark ignites the gas in the chamber, a blue flame will appear. To obtain optimal temperature indicators, you need to adjust its operation.
Perhaps for some time (for several hours) the smell of burning oil will be felt. Thus, the chamber burns out in the new heating device. However, if the smell does not go away for a long period of time, it is necessary to turn off the device and once again check the junction of the exhaust pipe with the gas convector outlet.
So I'm back.
I changed the gas tap at home, placing two blocks under the convector so that the pipe would not interfere. Indeed, at first glance, apart from the jets, I didn’t notice any differences. Spare parts won't hurt. To install the convector, I purchased the following components:
- Gas cylinder 50 l;
- Gearbox;
- Gaskets 1/2″;
- Gas hose;
- 1/4″ adapter to a fitting for a 9 mm hose (found on the market in a plumbing store, quite a rare thing);
- Screw clamps for the outer diameter of the hose;
- Heat-resistant sealant;
- Minerite sheet for wall insulation;
- A sheet of special insulation (with foil on one side);
- Galvanized sheet.
First of all, I drilled a hole in the wall with a diameter of 260 mm (with a pipe diameter of 127 mm).
To do this, I first drilled out a 7 mm drill in a circle, then carefully with a chisel. Afterwards, I cut out a sheet of mineralite horizontally equal to the outer size of the casing, vertically to the window sill (the top part is the hottest). In minerite, I also drilled and with a chisel a hole with a diameter equal to the diameter of the pipe (this material is soft, like very thick cardboard).The mineralite sheet was screwed to the wall (hole in the center). Next, the convector with the pipe in place was inserted into the resulting hole and screwed with self-tapping screws through washers. It turned out to be very difficult to keep this crap hanging (25 kg, after all, cast iron), I picked up the chocks and put them under the bottom.
Then I started connecting the gas (refueling, by the way, cost me 540 rubles). Everything is standard here - cylinder, reducer, hose. A separate issue was attaching the adapter to the convector. I couldn’t find a 1/4″ gasket anywhere, so I had to screw it on without a gasket - flax + sealant. Clamp, hose...
So, everything is ready for a test run. Turned on the gas, washed all the joints - clean.
At this point I decided to read the instructions for the first launch. Press the knob, turn it to the ignition, click - the fire burns! The knob must be held down for another 10 seconds so that the thermocouple heats up, otherwise the automation will shut off the gas. We release the handle - hurray! It's burning!
At first there was a slight smell of some kind of paint or something else. The heat exchanger burned out. Then it stopped, there is no smell at all in the room. It works completely silently, only the gearbox on the cylinder hisses a little (yes, the cylinder is still in the room, but very soon I will send it outside in an iron box).
Once again we wash everything thoroughly (I used liquid soap and an old toothbrush) - there is no smear anywhere. I then repeated the washing procedure two more times for the entire route.
In the third power mode, in half an hour the house felt like a bathhouse (it’s small, 20 m2). I ventilated it properly, turned it off for the night - it was warm and I wasn’t very confident in the safety of the system).
The next day, other problems suddenly arose that had to be resolved. During the day I turned on the convector 3 times for about 1.5 hours in the first mode. It was warm.
I spent a long time running around the convector and chimney with a thermometer.
The temperature of the heated heat exchanger is more than 200 degrees. Behind the back wall from 50 to 70 degrees. Behind the mineralite sheet no more than 50 degrees. The pipe at the very base is 100 degrees. Pipe in the center of the wall 60-70 degrees.
These are the numbers after hard heating at maximum mode for two hours.
There was no time left to properly complete the wall passage, so we had to spend the night just like that - there was a hole in the wall and the pipe was sticking out. Temperatures are not critical + good ventilation. At night from Sunday to Monday I tried to turn off the convector, but after an hour it began to freeze. Apparently it was cold outside. As a result, he warmed me until the morning on the unit. It was 26 degrees in the room.
There are photos of the process, but I left them at home, I’ll post them tomorrow.
I was pleased with the purchase! All that remains is to complete the normal passage through the wall and take the cylinder outside
This beast will warm up my room in any frost, so now it’s possible to go to the dacha even in winter
The modern range of heating devices is very wide. One such device is a gas convector. The heating systems market is saturated with gas convectors from various companies. In this article we will look in detail at the installation process of a gas convector.
How to turn on a gas convector
For normal and correct operation of the device, you need to know how to turn on the gas convector. It is better to entrust the first start-up of the unit to the specialist who installed it. After the technician carries out commissioning work, you can use the device yourself.
The algorithm for switching on a gas convector implies:
- checking for traction;
- opening the gas valve at the inlet to the heater;
- ignition of the igniter.
When lighting the igniter, you need to hold the adjusting holder-handle on the valve for several seconds. If the wick does not go out within this time, you need to slowly turn the handle and set the required temperature. The main burner will light automatically.
If the convector is additionally equipped with a blower fan, electric ignition, and a blower, it starts automatically. To do this, you just need to turn on the unit, open the gas supply tap and activate the corresponding button on the panel. The devices come with instructions for turning on the device, thanks to which you can also adjust the temperature. Many people wonder why the gas convector began to heat poorly. This may be due to its clogging, which is why you need to periodically call a technician to clean the nozzle and regulate the temperature.
Cost and quality of gas convector
Prices for gas convectors are determined depending on the manufacturer and power of the device. The cost of the device is also affected by its quality. Thus, a gas convector from one Ukrainian manufacturer, purchased last year for 900 hryvnia, functioned uninterruptedly for a year. There were a total of two such devices in use. One of them failed after working for 5 months. Further repair of the device turned out to be unprofitable. It was more expedient to buy a new gas convector than to repair the old one. The second such device worked for the entire heating season and was turned off. When the next heating season arrived, it was not possible to start the device. Its repair was also extremely unprofitable.
The same cannot be said about two Turkish-made gas convectors. These devices were purchased for 1000 and 1500 hryvnia (200 and 300 dollars at last year's exchange rate). Different in power, but from the same manufacturer, they successfully worked throughout the heating season, were turned off and put back into operation with the onset of cold weather without problems.
Thus, you see a striking difference in quality from different manufacturers.
Installation of a gas convector
Materials and tools:
- Gas convector
- Metal-plastic pipe with metal fittings
- Pipe cutter
- Wrench for tightening threaded connections of fittings
- Plumbing silicone
- Gas tap
- Hammer with crown blade
- Drill with drill
- crosshead screwdriver
- High temperature polyurethane foam
- High temperature silicone
- Plastic dowels and screws for them.
- The first and most important step is choosing a place to install the convector. According to GOST standards, the convector must be installed under the window. To be honest, I don’t know what this is connected with. And, in addition, I saw convectors installed at a great distance from the windows. Perhaps the principle is at work here: for money they will customize any GOST to suit you. We won't go into these details. We are interested in the process itself.
- So, having chosen a place for installation, you should try the convector on the place. This can be done using a tape measure with transferring dimensions, or simply by placing the convector against the wall and marking the holes.
- The next point is important - the gas inlet. If it is located at the bottom of the convector, sufficient distance should be left for connecting a pipe with a clamp fitting to it.
- After this, we use a perforator to punch a through hole in the wall along the diameter of the exhaust pipe. This is the most labor-intensive process. Get ready for dust in the room. Cover everything you can with plastic wrap or rags in advance.
- After this, drill holes for fasteners and hammer dowels into them.
- Insert the exhaust pipe into the hole in the convector. Treat the joint with high temperature silicone. Holding the convector in your hands, insert the pipe into the hole in the wall. Secure the convector to the dowels in the wall with self-tapping screws. This process is also quite difficult. The convector is quite heavy. In general, there are many opinions about the process I described. Here everyone acts as they see fit, but my recommendations have been tested many times in practice and are the most reliable. As a result of the work done, you will receive a convector screwed to the wall and an outlet pipe sticking out onto the street.
- Seal the gaps between the pipe and the wall with high-temperature foam.
- Place the special cap included in the kit on the end of the pipe. It serves to prevent the burner from being blown out by the wind. The cap is attached with self-tapping screws, also included in the kit.
The convector is installed, let's get started with the gas supply.
Gas convector installation errors
- a coaxial chimney protrudes from the wall (Fig. 2). This installation option leads to frequent shutdowns of the device due to the increased likelihood of wind blowing. In winter, when there is severe frost, the combustion products will be greatly cooled, which will lead to the formation and subsequent freezing of condensation inside the chimney;
- The coaxial chimney is not installed tightly. The consequences may be frequent malfunctions of the device;
- incorrect slope of the chimney. In addition to incorrect operation of the device, this leads to moisture getting inside and, as a result, to corrosion and destruction of the heat exchanger;
- narrowing the diameter of the gas supply. For stable operation of the convector, gas must be connected to a pipe whose diameter is indicated in the passport. Reducing this size can lead to loss of the pilot burner flame, failure of the main burner to ignite, spontaneous shutdown of the convector, and a decrease in power.
It is important that the gas convector is mounted on a non-combustible surface in accordance with DBN standards (insulation with roofing steel on an asbestos sheet with a thickness of at least 3 mm, plaster, etc.) at a distance of at least 30 mm from the wall. The insulation must extend beyond the dimensions of the housing. Violation of these standards can lead to damage to the wall material or even a fire.
From the author:
We welcome you, dear friends!
We suggest we talk about how to install a gas convector with your own hands .
These heating devices are less popular among consumers than their electric counterparts. The fact is that this type of heater implies the presence of a centralized gas supply or a gas cylinder. But such models are much cheaper to operate. They are usually installed in dachas or country cottages - that is, in those locations that do not require constant heating.
Gas supply to the convector
- GOST requires that the pipe leading to the convector run along the street. We will act in accordance with it. If the gas pipe has a pre-installed threaded connection, then screw a gas valve onto it, shutting off the gas supply to the convector. If the pipe does not have such a branch, you will need to make one. Such work should be carried out by a gas welder. Preferably a specialist from Gorgaz or a similar office.
- When the gas tap is installed, a metal-plastic pipe should be routed to the convector. Using a tape measure, we calculate the length of the pipe and determine the presence of fittings.
- We purchase pipe and fittings. When purchasing pipes and fittings, find out if these pipes and fittings have a certificate of conformity for this type of work.
- Now lay the pipe, attach it to clips every meter. To install the clips, drill holes in the wall.
- When installing fittings, lubricate the pipe and fitting with silicone. This will provide additional sealing. In addition, silicone will serve as a lubricant and will facilitate pipe installation.
The result of the work should be a convector hanging on the wall, an exhaust pipe with a hood and a gas pipe laid and connected to the convector.
Test run of a gas convector
- Before starting, you must open the gas tap and go over all fitting joints and threaded connections with a brush moistened with an aqueous solution of soap or shampoo. If you notice bubbles forming, turn off the faucet immediately and fix the leak.
- After checking the joints, start the convector. To do this, hold down the gas button for about a minute, allowing the gas to pass through the pipes and enter the combustion chamber.
- Click on the piezo igniter. The spark will ignite the gas and a cheerful, blue flame will flare up in the firebox.
- Adjust the operation of the convector to achieve a comfortable temperature.
During the first hours of operation, an unpleasant odor of burning oil may be present. The convector is new, the combustion chamber is burning out. If the smell does not disappear for a long time, you should turn off the gas and carefully inspect the junction of the exhaust pipe with the outlet of the convector.
Attention: It is advisable to carry out all of the above work by a specialist. After all, installing a convector yourself deprives you of the right to warranty repair of the device. In addition, the convector must be accepted by Gorgaz or another similar service. There must be a sidebar project. And all the necessary permits and conclusions of the commission for acceptance of the device into operation.
However, with this knowledge, you will be able to control the installation process of the gas convector by specialists from the operating office.
Warmth for your home.
From the author:
We welcome you, dear friends!
We suggest we talk about how to install a gas convector with your own hands .
These heating devices are less popular among consumers than their electric counterparts. The fact is that this type of heater implies the presence of a centralized gas supply or a gas cylinder. But such models are much cheaper to operate. They are usually installed in dachas or country cottages - that is, in those locations that do not require constant heating.
Design and principle of operation of a gas convector
A convector running on main gas is designed for individual heating of isolated objects. Functionally it is similar to an electric heater. The operating principle of such a heater is based on convective heat exchange of air masses, when cold air is heated in the heat exchanger of the convector, the heated layers rise to the top, and cold ones take their place. For these heaters, it is important to place them correctly. It is recommended to install in places with maximum heat loss under the window and as low as possible to the floor.
Gas convector in the living room interior
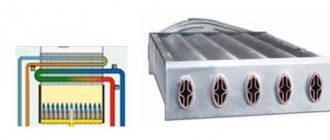
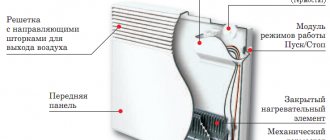
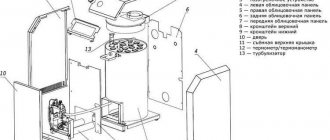
Gas convector device:
- A housing that performs a protective function. It is made of metal treated with heat-resistant enamel that can withstand the high temperature of gas combustion. Air circulation slots are installed at the bottom and top of the housing.
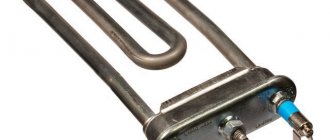
- An effective heat exchanger for heating air with a developed heating surface made of heat-resistant steel or cast iron, since it has constant contact with open fire.
- A gas burner is a device for burning gas, made of two parts: an igniter with electric ignition and a nozzle.
- A working gas valve-regulator that controls gas flow based on a signal from a protection system or temperature sensor.
- The gas exhaust system ensures the release of flue gases into the environment. It can be of two types with natural and forced draft.
- Thermostat is a device for automatically maintaining a given temperature in the house. It works in tandem with a gas shut-off valve.
- The protection system is a set of sensors for gas pressure and heated air temperature, working with a valve that closes the gas supply in the event of any emergency.
Design and principle of operation of a parapet gas convector
Device design and operating principle
Let's start with the definition of a gas convector. This heating device is not an analogue of a gas boiler. It works on a completely different principle - it heats not the coolant, but the air. installed in relatively small rooms, as they heat the air locally.
The design of this heating device is relatively simple. The gas convector consists of the following parts:
- heat exchanger
in which the air is heated; - programmer
- a device responsible for maintaining a certain temperature in the room; - control panel
, on which indicators are displayed; - gas valve
that controls the gas supply; - fan No. 1
, responsible for supplying air to the heat exchanger and valve; - fan No. 2
, which disperses heated air throughout the room.
How does a gas convector work? Everything is quite simple: it operates on the principle of a gas burner. Cold air from the outside, obeying the laws of physics, enters from below, heats up and exits through the hole at the top of the device. Note that gas models can function due to natural or forced convection. In the second case, air is pumped by fan No. 1.
What is a gas convector
It should be noted right away that a convector is not a type of boiler; it works not only on a different principle (it heats not the coolant, but the air in a certain room), but also has a slightly different area of application. Most often, gas heaters are used in small houses where there is no need for constant heating. They can only heat the room where they are installed.
What does a convector consist of?
The design of the device is not too complicated, it includes:
Diagram of a standard gas convector with a fan for forced convection.
- a heat exchanger that heats the air;
- programmer – a device for controlling and maintaining room temperature;
- control panel, which contains various indicators;
- gas valve to control gas supply;
- a fan supplying air to the valve and heat exchanger;
- a fan that provides forced supply of warm air into the room.
Gas convector - operating principle
As you can see from the diagram, everything is quite simple. The convector plays the role of a gas burner; cold air enters from below under the influence of convection, heats up and exits through the hole at the top.
The device works quite simply: the operating principle is based on the phenomenon of convection - warm air rises when heated and cold air falls . Gas models can operate using either natural or forced convection. In the latter case, a special fan is used to supply air.
Advantages and disadvantages
The quality of the device itself, as well as its performance, depend on the price. By choosing a cheap model, you will not save money, since the device may last you less than a year. Repairs in the current situation will not be cost-effective. Therefore, we will consider the advantages and disadvantages based only on high-quality devices. So, the pros:
- efficiency and quick heating of the room;
- easy installation of a gas convector with your own hands;
- there is no need to make a heating system (water);
- low price;
- unlike electric analogues, gas models do not burn oxygen;
- completely autonomous operation mode;
- not connected to electricity (except for convectors with forced circulation);
- It is possible to connect the heater to a gas cylinder.
But gas convectors are not without their disadvantages:
- if gas is used from a centralized system, then it is necessary to obtain permission to connect the device;
- it is necessary to punch holes in the wall outward where the heater will be mounted;
- considerable dimensions;
- if you decide to install several convectors, then gas will have to be supplied to each of them, and only from outside the building.
Choose models with a built-in fan. They are more efficient than their fanless counterparts.
Types of convectors
Devices can be classified by their power, as well as by design. If everything is clear with power: choose the one that can heat the room, then with the types of performance things are a little more complicated.
There are two types of heaters:
Wall-mounted models can fit very well into the interior.
- Floor-standing – devices are installed on the floor and do not require special installation skills. Such a convector can heat a fairly large room (even an industrial one), but it is heavy and requires a special base.
- Wall-mounted are more compact models that fit well into the interior of the house. Often, devices are mounted under a window to create a thermal curtain from cold air passing through the glass . Convectors of this type have low power, so they are only suitable for heating rooms in houses up to 100 square meters.
There is another subtype of heaters - built-in. They can be installed in the floor or wall, and not only do not spoil the interior, but also decorate it. In terms of parameters, such models do not differ from wall-mounted ones. But installing them is more difficult, since it is necessary to prepare a niche for the device in advance.
When choosing a convector, you should also pay attention to the material of the heat exchanger. The latter can be made of steel, cast iron or copper. Nowadays, models with a steel heat exchanger are more common, but cast iron ones have greater efficiency due to the properties of the alloy, and are also able to last longer. Their only drawback is their heavy weight. Copper analogues are effective and durable, but expensive.
All convectors under consideration are closed. Open ones also exist, but they take the air necessary for gas combustion from the room, and the waste enters the general ventilation. Due to these properties, it is highly not recommended to install open-type heaters in residential premises.
Pros and cons of individual gas heating
Please note that the quality of the device, as well as the duration of its successful operation, directly depend on the price of the gas convector. Is it possible to buy a cheap unit and connect it in the house? Yes, but keep in mind that an inexpensive model will last you no more than a year. At the same time, it is unlikely that such a convector will be repaired if it fails.
Let's consider the advantages of gas heating appliances, based on the fact that you did not save money when purchasing and purchased a high-quality unit.
Advantages of gas convectors:
- the room heats up quickly;
- economical use of fuel;
- the device can be easily installed indoors by yourself;
- reasonable price;
- a gas convector does not require installation of a heating system;
- does not destroy oxygen in the room;
- the heater can be mounted to a gas cylinder;
- the device operates in autonomous mode;
- If the convector operates on the principle of natural circulation, then it does not depend on the power supply.
Important: gas convectors with a closed combustion chamber can be installed safely in any room, including the bedroom.
Disadvantages of gas convectors:
- in order to correctly install a gas convector with a connection to a centralized system, it is necessary to obtain permission from the relevant municipal authorities;
- the connection diagram for a gas convector requires punching a through hole in the external wall of the building, in the place where the device is planned to be installed;
- impressive size;
- if you plan to use several gas convectors for heating an apartment or house, then each of them will have to be individually supplied with gas from outside the building.
Important: experts insist on choosing models with a built-in fan. They are more efficient than similar devices with natural convection.
Installation of gas stove and convectors
It is prohibited to install the convector at a distance of less than 4 meters from open sources of fire, including a gas stove. The hose suitable for the convector must have a dielectric insert, this will prevent a fire in the event of a short circuit in the wiring in a wooden house.
An important factor is the grounding of sockets located near the gas stove and convectors, although in a wooden house they should be grounded a priori.
There are three types of supply hoses that are allowed for a gas stove in a wooden house, namely:
- Rubber-fabric - its advantage is that it does not conduct electric current, but it is more susceptible to mechanical damage compared to analogues;
- Metal sleeve - when using it, a dielectric insert must be inserted from the gas stove to the main line, but otherwise it has the best performance among analogues. In addition, it is recommended by the latest approved standards. Its only drawback is the price, it bites;
- Rubber with metal braiding - it is more capable of withstanding serious impacts, and also, thanks to the rubber core, does not conduct current.
When purchasing a hose, pay attention to the color; its braid contains characteristic yellow colors, used only for marking gas equipment.
When purchasing a metal hose, you should pay attention to its coating; some manufacturers focused on other markets, with other standards, use yellow insulation, which does not perform its main functions. Always request supporting documents when purchasing, and keep them in a safe place.
Required tools and installation diagram
The next step after purchasing the device is preparation for installation. Make sure you have the following materials and tools on hand:
- pipe cutter;
- drill;
- drill;
- adjustable wrench;
- spanners;
- screwdrivers;
- perforator;
- shoulder blade;
- silicone (plumbing, high temperature);
- screws and dowels;
- gas tap.
Now you can move on to the next stage - choosing the installation location.
It is important to act in accordance with GOST! Before you begin installation, take careful measurements, markings and “trying on” the convector. Please note that the room in which you plan to install the heater must be prepared. Remove furniture from the room or cover furnishings with polyethylene, since working with a hammer drill is a rather dusty business.
Installation of a gas convector is carried out according to the following scheme.
- Decide where the hole for the gas pipe entry will be.
- Make a hole in the wall with a hammer drill, focusing on the diameter of the future pipe. This stage is the most labor-intensive.
- The next step is to drill holes for the heater mounts and hammer in the dowels.
- Connect the convector to the exhaust pipe. Be sure to seal the joint with silicone that can withstand high temperatures.
- The heater is attached to the wall with self-tapping screws. At this stage you will need help, because the unit has an impressive weight.
- The final stage of installation is to fill holes and cracks with foam to prevent cold air from entering the room.
We bring to your attention an educational video on editing.
Gas connection
Friends, at this stage it is important to be extremely careful! Let's say that you do not have the skills to work with gas appliances - then to perform the following work it is better to turn to specialists.
Installation of a gas heater to a gas supply source proceeds according to the following algorithm.
- Let's imagine that there is a special threaded outlet on the gas pipe. Then you just need to screw a gas valve onto this pipe. If there is no special allotment, then one will need to be made!
- The next step is to bring the gas pipe to the convector and connect them using a fitting. This process cannot be rushed.
- Secure the supplied pipe with special clips. The distance between them is 1 meter. To do this, you will need to drill holes on the outside wall of the building.
- Treat fittings and pipe joints with silicone to ensure a tight seal.
- Be sure to call your gas service representative to ensure proper installation and connections.
Equipment startup and performance check
Before you start using your new heating device, it is important to conduct a test run. You should proceed according to this scheme.
- Open the gas valve and check the system joints for leaks.
- After checking, you can turn on the convector. For the first time, you need to hold the start button for 1 minute and wait until the gas penetrates the combustion chamber.
- Do you see the burner lit? Now you can adjust the operation of the convector.
Important: installation of a gas convector in a wooden house is absolutely safe, because fire hazardous parts are located in the inside of the heater.
To summarize, we note: despite the fact that a gas heater is not a very popular heating device, it can be used to create a comfortable temperature in dachas and country houses. The unit quickly and efficiently heats the air in the room, and at the same time is much more economical than an electric radiator. Another obvious advantage is the ability to connect to a gas cylinder. One dubious circumstance can be considered that it heats only one room, and not the whole house, unlike a gas boiler connected to the heating system.
We hope that the article was useful and helped resolve the problem!
When designing a heating system in a private house, it is necessary to provide an additional heat source (in case of failure of the main heating equipment). One of these additional, backup heat sources can be a gas convector running on natural or liquefied gas.
The ideal conditions for installing such equipment is the presence of a main gas pipeline connected to the heated room. However, gas cylinders can also be used to operate gas heating radiators; this makes it possible to use them for heating cottages, garages, greenhouses, utility rooms, small workshops, warehouses and basements.
Important! However, the use of liquefied gas as a fuel will be beneficial only in those areas where there is no natural gas or where there are frequent power outages, because... the cost of bottled gas is approximately equal to the cost of electricity.
The main parts of the design of a gas heating convector are a heat exchanger and a gas burner. To remove combustion products, a “chimney” is installed.
Depending on the thermal power and manufacturer, prices for units range from 12 to 30 thousand rubles. + the cost of connection, which must be carried out by gas service specialists. There are several ways to calculate the power of heating equipment, the simplest and most universal of which is the following formula: for every 10 m² of room (with a ceiling height of no more than 3 m), 1 kW of thermal power is required.
Gas convectors in wooden houses
There is a lot of debate about the advisability of installing gas convectors in wooden houses. On the one hand, they are much easier to install than water systems. On the other hand, efficiency and safety are questionable.
gas convector is easy to install
Installation
The advantages are obvious: a gas convector can be installed in an already built house, the design of which did not include heating. Even a highway is not required. There are enough models that run on bottled gas.
Permission is required from fire services (if cylinders) or gas (if main). The design office usually asks to punch a 1 m2 hole in the wall. But according to the standards, the distance from the chimney to flammable (that is, wooden) structures should be 25 cm. It turns out that if the diameter of the chimney is 30 cm and it needs to be surrounded by the required 25 cm, then a hole with sides of 80 cm will do. In practice, gas service workers (especially in rural areas) simply require that the chimney opening be lined with galvanizing for half a meter. Why do codes require a large hole in a wooden wall? For coverings made of non-combustible material, bricks, for example.
So, you can completely get by with a hole cut for the pipe. How to insulate it and the wall? In addition to galvanized asbestos, basalt towels with a stainless steel screen and fiberglass have proven themselves very well. Basalt towels (cardboard) are convenient because they are simply nailed to the tree with staples.
Safety and convenience
Despite assurances from sellers of convectors about their absolute safety, many “lucky” owners have discovered that their operation can cause plastic window sills to melt. The solution can be a removable gypsum fiber box or a similar galvanized structure. It is advisable to make a galvanized box not solid, but in the form of plates at an angle (something like blinds). Of course, no long curtains over the convector!
if the convector is planned in advance, it is better to avoid protruding window sills altogether
Those who love hot rooms in the winter cold will either have to constantly sit next to the convector in shorts, or think about another type of heating. The device efficiently warms the air only next to it. The farther from the convector, the cooler it is.
Water heating in small houses is unprofitable, and in cottages with non-permanent occupancy there is still a danger of the system freezing. For many convectors, there is no point in encircling the house with gas pipes or cylinders placed in the corners. It turns out that if you install a convector, then there is only one. Moreover, the most optimal place for installation is the hallway if the layout of the rooms is through. With the help of such a thermal curtain next to the entrance doors, it is possible to warm up the back bedroom to 18 degrees. Of course, if the house itself is only two rooms + kitchen. And, of course, you will always have to keep the interior doors wide open.
Modern models are quite silent, but can make clicking noises. If this is critical, then you need to choose convectors with cast iron heat exchangers; they do not click when cooling.
Efficiency
For private wooden houses, the advantages of gas convectors are very questionable. Small but hot surfaces are dangerous for children and unwary adults. Therefore, it is advisable to opt for models that maintain low temperatures but have a large body. Also, a lot of heat simply escapes into the chimney. Literally, the chimney pipe can get very hot. But this heat could heat the house!
larger surface is more efficient
But a cylinder convector is a good solution for a wooden bathhouse (in the relaxation room). What if you want to take a steam bath in winter? Convectors in wooden churches have proven themselves very well - practically it is one large hall that does not need to be heated around the clock. And this option remains the only one for private and garden wooden houses with a small limit on electricity and the absence of main gas.
Flaws
- The device heats only one single room, the one in which it is installed. When the doors are open, the neighboring rooms will warm up slightly.
- Only air is heated; hot water supply (DHW) is not provided.
- Despite the beautiful appearance of modern gas radiators, which can fit into almost any interior, they cannot be “hidden” behind other interior items, because For safety reasons, it is prohibited to install any flammable materials near them.
Construction of a gas heating convector
Any convector running on gas consists of the following components:
- A gas burner in which a mixture of air and gas is burned;
- Cast iron or steel heat exchanger. It is located behind the grille in front of the gas radiator. The heat-resistant coating of the heat exchanger allows it to withstand high temperatures. A cast iron heat exchanger is more durable, its service life is more than 50 years, at the same time it is more expensive and heavier than its steel counterpart;
- Gas valve. Acts as an automatic device: turning on/off the burner; adjusting the volume of air-gas mixture supplied to the burner; temperature control in a heated room; gas supply pressure adjustment.
Important! It is not recommended to make changes to the gas valve settings yourself, because this may lead to damage to the convector or fire hazards. It is recommended that the factory settings be retained, or changes should only be made by qualified personnel familiar with similar gas equipment.
- Frame. Warm air enters the room through a heat-resistant grille, which is painted with heat-resistant paint. It is not allowed to use a gas heating convector without a grille;
- “Chimney”, which is a steel coaxial pipe (pipe-in-pipe system, which saves space and installation time). Through a galvanized steel pipe of larger diameter (15 cm in diameter and 60 cm in length), air is drawn in to operate the burner (a cap is also installed on this pipe to protect the structure from the wind), through another “internal” aluminum pipe (10 cm in diameter and 64 cm in length ) combustion products are released. Air for gas combustion comes only from outside (the air in the room is not used in the combustion process), because the air intake pipe is connected to a special closed chamber, which is separated from the room.
Homemade gas convectors
Among the developments of homemade convectors that convert gas into thermal energy, there are not too many different solutions. This is due to the danger of errors in the construction of devices operating on blue fuel. The slightest miscalculation can lead to an explosion, poisoning, or fire.
However, there are a few interesting designs worth considering. They can be useful in heating cottages, country houses, trailers, tourist tents, and garages.
Option 1. Heater based on IR burner
In fact, this is simply a modification of a conventional infrared gas burner of the Solarogaz brand. The device operates on bottled gas. The inventor and implementer of the idea used the GII-2.3 model, the working panel of which can be installed horizontally.
On this working panel, which normally heats the space by flameless processing of gaseous fuel, an original heat exchanger was simply welded and installed. It is a metal cube with metal tubes installed inside the body.
Image gallery
Photo from
Homemade mobile gas convector
Application of the gas infrared burner Salyarogaz
Heat exchanger of a homemade heater
Twelve-volt computer fans
The heat exchanger does not have a bottom; it would prevent the passage of heat waves. At the top there is a pipe for connecting the chimney. A pair of computer fans are installed at the back to speed up air flow.
Structurally, this model resembles a heater for air heating systems. By the principle of action - too. The air drawn into the tubes of the device is heated by a gas burner, then displaced from the tubes by a fresh portion of cold air.
A mobile gas convection heater is suitable for tourists, fishermen and hunters, and those who like to travel in a camper. You just need to connect it to the cylinder, and take the rigid or corrugated pipe installed on the pipe outside the tent
According to the owner of the invention, the modified burner heats the tent much faster than the same burner, but without a heat exchanger. All gaseous fuel processing products are discharged through a pipe connected to the pipe. It does not burn oxygen and uses gas sparingly. This is a real find for fishermen, hunting enthusiasts and tourists.
Option #2. Using a decommissioned heater
This option is generally extremely simple, it was invented to save money on heating the garage. The entire modification consisted of repairing a decommissioned convector and removing the casing. The result made it possible to significantly increase heat transfer and heating rate, but it has safety problems.
Image gallery
Photo from
Securing the convector with anchor bolts
Heating a garage with a gas appliance
Fastening the gas cylinder hose
Installation of anti-vandal devices
Firstly, the seal is broken. If it accidentally goes out, the heater gas valve will, of course, stop supplying.
However, with constant combustion, oxygen from the air mass in a confined space will be burned out, so it will be necessary to regularly ventilate the garage in one gulp or construct fresh ventilation.
Secondly, an open heat exchanger can easily cause a burn. But where children don’t run, this can’t be considered a minus. An adult is unlikely to forget that the casing has been removed from the heater and that if you move carelessly near the device, you can get burned.
The following video will introduce you to a similar solution, but used for heating a trailer:
A convector without a casing heats a garage of 30 m² in about five minutes. Gas consumption amounts to no more than 500 rubles per winter month. In autumn and spring he works less often, which means that expenses are further reduced.
Option #3. Modernization with a duct fan
The essence of the modification is to install an air duct with an exhaust fan on the front grille. The heat generated by the convector is directed into the owner’s work area. There are no special tricks, but there is a significant reduction in heating costs.
Features of the design and operation of the modernized gas convector are presented in the video:
Combustion products are removed outside the facility as usual - through a coaxial pipe, through which fresh air is supplied to the burner to maintain the flame. This homemade product is significantly safer than the previous model, but you will still need to periodically ventilate the room being treated. After all, without a doubt, it will “drive” clouds of dust.
Installation
During installation, the following recommendations must be observed:
The lower part of the gas heating radiator must be at least 10 cm from the floor.
If the device is placed under a window sill, then the distance from the window sill to the top of the convector must be at least 25 cm.
It is prohibited to install any flammable materials and objects (interior items, furniture, etc.) near the heating device.
The hole in the wall for the “chimney pipe” should be at an angle of 2-3° towards the street, or strictly horizontal. It is prohibited to install a pipe with a slope towards the room, because in this case, rain and snow will flow into the gas convector.
If the device is installed in a wooden house, then special attention must be paid to the fire safety of the “chimney”, the diameter of the hole for which must be at least 17 cm. The pipe should also be completely insulated with thermal insulation.
The wooden wall behind the gas heating convector must also be insulated with thermal insulation and aluminum sheets, which must protrude from the sides of the convector by 1 cm on each side, and rise above it by 15 cm.
Rules for installing and using gas convectors in wooden houses
In order for gas heating with convectors in a wooden house to be effective and safe, it is necessary to carry out installation work in accordance with the following rules. First, the pipe insertion location is first determined. It depends on the type of convector, which can be wall-mounted or floor-mounted.
Secondly, a through hole is made in the wall, the diameter of which is equal to the same parameter as the exhaust pipe. At the third stage of installation, the dowels necessary for fastening the convector are installed. Naturally, this also requires making several holes in the wall or floor.
Fourthly, the gas convector is connected to the exhaust pipe. The connection unit is sealed using silicone sealants. At the end of the work, the convector itself is mounted on the wall or floor, and all remaining holes are carefully sealed with polyurethane foam.