Advantages of using IR radiation to heat a room
Infrared floor heating attracts the attention of consumers for many reasons. Despite the fact that there are many alternative types of heating devices on sale, the choice is often in favor of an infrared warm source.
All types of IR floors have the following advantages, which have already been tested during their operation:
- IR radiation has a beneficial effect on the body;
- do not dry the air, unlike water heating;
- reduce heating costs;
- allow you to quickly warm up the room (in 5-10 minutes);
- you can install them yourself;
- possibility of local installation.
In addition, infrared heat sources are convenient to connect in emergency cases when central heating is not enough, or when it has already been turned off. IR floors are indispensable for insulating loggias and balconies.
Unlike the convection type of water heating, the heat from the IR source is felt immediately, even when the minimum temperature is set.
Effect of IR heat source on the body
Not many people know about such an advantage as a beneficial effect on the body. The secret is that human heat is emitted in the same range as infrared. This means that an infrared heated floor is perceived by a person as a natural source of heat and therefore more pleasant. For example, if with water heating a person needs 22-25 degrees of heat for comfort in a room, then when using IR heating the same feeling will be already at 18 degrees.
IR radiation ionizes the air, destroys harmful bacteria and viruses, and removes unpleasant odors.
IR rays treat many diseases. Under their influence, nervous tension goes away. In our age of constant stress, this is a great opportunity to strengthen the nervous system without leaving home.
Many people find it difficult to tolerate dry air in their apartments, which is caused by central heating radiators. You have to use humidifiers. IR heated floors do not dry out the air, so it is easy to breathe in such a room.
IR radiation does not heat the air itself, but objects. Therefore, walking on such a floor is a pleasure and a state close to relaxation arises.
Calculation of underfloor heating as the main type of heating
When using these systems as the main source of heat in a house or apartment, it must be remembered that the area that the heated floor should occupy must be at least 70% of the total space of any room.
If this parameter is not observed , there is a high probability that the heated floor will not cope with its function.
The total power of heat loss is calculated . Heat loss is present in all buildings without exception. They depend on:
- Climatic conditions in which the premises are operated.
- Availability and size of windows.
- Degrees of insulation of walls, floors and ceilings.
- Orientation of the building to the cardinal points, etc.
The exact amount of heat loss can be calculated using a special program , and very accurate ones are carried out by special organizations.
When constructing buildings in compliance with all requirements for thermal insulation of structures, the approximate heat loss rate is calculated to be 100-130 W/m2 for various rooms in new houses and 150-170 W/m2 in old dilapidated buildings.
When using a heated floor as the main heat source , its power should exceed heat loss by 1.5 times. That is, in the case of the kitchen described above, in which the heat loss is, for example, 1000 W, the power of the heat source, in our case, the heated floor should be: P = 1000 W * 1.5 = 1500 W.
Taking into account the fact that the heating elements will occupy only 6 m2 of area, we get: 1500 W / 6 m2 = 250 W/m. This is the specific power that a square meter of underfloor heating should have. When purchasing materials, you must take this into account .
Important: if the power of the heated floor exceeds 200 W/m2, it is recommended to consider the option of using an additional heating system.
Features of different types of infrared floors
The production of infrared floors is constantly being improved. Manufacturers are trying to take into account consumer preferences. According to the type of construction, IR floors are:
- film;
- rod-shaped.
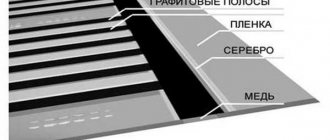
Film, in turn, are divided into solid and striped, according to the type of carbon fiber applied, which is the source of infrared radiation. The film with continuous carbon fiber coating is easy to install and easy to cut. It transfers heat from the entire area, the heating dynamics are higher than when applying carbon in strips.
The carbon strips are arranged in groups, between which cuts can be made. Since the connection to the power source is parallel, if any unit fails, the remaining area of the “stripe IR film” will remain operational.
In this case, a film with a continuous coating is more advanced, since only the places where there is a tear or a cut fail. The service life and price of solid carbon film are higher than that of striped film.
The IR rod floor looks like a rope ladder. Many rods, which are filled with carbon, copper and silver, are connected to each other by wires. The rod mat has the ability to self-regulate. Its installation differs from the film type in that installation requires a “wet” cement screed. However, the service life is even higher than that of solid film, and it is not afraid of heavy mechanical loads.
IR film floors: design, advantages and disadvantages
The mechanism of action of IR thermal film can be considered using the example of the construction of carbon strips grouped into sections.
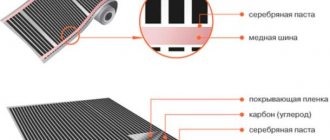
Carbon paste is sealed in polyester or polypropylene film. Electricity is supplied to the carbon fiber via conductive copper and silver buses located at the edges of the film. When current passes through the carbon strip, heat is released.
Sections can be cut along dividing strips. Typically the width of the rolls is from 0.5 to 1 meter. The film is available in different thicknesses. Minimum - 0.2 mm, maximum - 2 mm.
The characteristics of film heated floors make it possible to combine it with almost all floor coverings. It is enough to roll out a plastic film for insulation, and you can lay parquet, laminate, or lay tiles on top using adhesive for heated floors.
IR floors are ideal for wood floors. The wood heats up evenly, which means it does not deform or crack.
Experts have different opinions when it comes to the possibility of laying IR film under cement screed or tile adhesive. Most masters claim that it will collapse. Rather, the question here is about the different quality of the film.
If you need to roll out carpet on top, then the construction “sandwich” will look like this: IR film, plastic film, plywood, or any other rigid sheet material, carpet.
As for linoleum, the design will look the same, but you need to take into account the manufacturer's recommendations. Not all linoleum is suitable for heated floors, as there is a high risk of deformation.
What to consider when installing heated floors
- Heating cables are not installed under furniture or stationary objects
- It is necessary to observe the installation interval within the design limits and the minimum bending radius
- Heating cables must not be allowed to cross each other.
- The cable must be in a uniform and homogeneous environment along its entire length
- To avoid overheating, the cable must not be installed inside the thermal insulation layer
- To avoid physical damage, the cable should only be laid on a clean surface.
- The heating cable should not pass through a moving seam, kinks or be installed in areas of possible overheating. Distance to heat sources, such as a fireplace, sauna stove, etc. must be at least 0.5 m
- The possibility of using a heating cable with flooring materials is regulated by their manufacturers
- Resistive heating cable must not be shortened or extended
- A 30 mA residual current device must be used in all zones
- The angle of installation of the corrugated tube under the sensor on the wall should be such that the sensor can be easily removed in the event of its failure. The sensor is installed in the middle between the turns of the cable
- The installation interval may be smaller in areas of maximum heat loss, for example, windows, but not less than 2 bending radii
- Do not turn on the cable until the screed or leveling solution has completely dried. The exact timing is regulated by the manufacturers. For concrete screed this period is about 30 days, for leveling mortar or glue - up to 14 days.
Important points you need to know about IR film floors
With many undeniable advantages of IR film floors, there are also some negative aspects that need to be taken into account. For example, they are afraid of overheating. Therefore, they cannot be laid where you plan to install furniture that does not have legs. The space above the floor should be left at least 3 cm. You should not be afraid of this, because the free area that remains for installation will be quite enough. In addition, the design capabilities of the equipment allow, if necessary, to disconnect from the power supply the area of the floor that does not need to be heated.
The second drawback is the still fairly high price of the heating material. This is partly compensated by the fact that for IR film floors there is no need to make an expensive and labor-intensive cement screed.
Manufacturers pay attention to observing the correct procedure for connecting the carbon film to the power source, as well as proper insulation with special adhesive plates. Consumables for assembly - electrical wiring and contact clamps - are included in the kit.
The following warning applies to any heating structures that require electricity to operate. The base for the heating element must be clean and completely dry.
Preliminary calculations for floor heating
To calculate an infrared heated floor, you need to draw a floor plan on a piece of paper. Mark the places that will be filled with furniture or household appliances. Be sure to consider a convenient location for the heat regulator. It is to this that the power supply, wiring from the heating element, and also the temperature sensor are supplied.
Then you need to distribute the strips of film without overlapping them, but at the same time you need to fill the entire required area as much as possible.
Owners of IR warm film floors claim that this type of room heating can be installed independently in a very short time. And this depends not on the level of skill, but on the installation area. For example, a balcony can be insulated in 1 hour. If the floor is not in “potholes”, then no concrete work will be required.
The power of an infrared heated floor is calculated taking into account whether it will remain the only heating device or will play an additional function.
In the first case, you need products with a power of 250 W/sq.m. m. If you plan to use infrared film as a support, then it is quite possible to choose a model of about 150 W/sq. m. Before starting work, you must carefully study the instructions for installation and operation of the product.
How to calculate infrared heated floors if you need to lay tiles on top? Porcelain tiles intensively absorb heat. To keep it from being cold, the film model must be of sufficiently high power, at least 220 W/sq. m.
Types of heated floors
If you decide to purchase an additional kitchen heating scheme, you need to decide on the appropriate type. Heated floors are divided into electric, infrared and water.
Cable (electrical system)
This type is considered outdated, but it does not lose its relevance. Cable flooring has several varieties:
- self-regulating and resistive;
- single-core and double-core;
- unshielded and shielded;
- with low or high power;
- in the form of a separate cable or mats.
For the kitchen, in most cases, a resistive option with a two-wire design is chosen. This system has low power and is available in the form of mats. But there is enough power for the kitchen space, since this room is already well heated due to the operation of the stove.
However, if the kitchen is connected to a cold loggia, it is advisable to purchase a more powerful system.
When choosing a coating, you need to build on individual preferences. Teflon is more reliable and thinner than PVC. But such a system will cost about 20% more.
The cable floor consists of a kind of cake - a rough screed, an insulating element, and aluminum foil. The cable must also be covered with cement screed on top. After this, you can lay the top covering.
Cable underfloor heating is the only option that can be laid under any surface, even tiles.
Flaws:
- The installation is carried out during a major overhaul, since the system is placed under a concrete solution.
- If one section of the cable fails, the entire system will stop functioning.
- It is prohibited to install heavy objects such as kitchen units or furniture on the heated floor. Otherwise, the cable will overheat at the point of higher pressure.
- When compared with infrared heated floors, this type loses more thermal energy.
- Consumes a large amount of electricity, which affects the increase in energy charges.
Film (infrared)
Film systems are divided into bimetallic and carbon, depending on the material of manufacture.
Pros:
- You can spread it under parquet, linoleum or laminate, and therefore there is no need to use concrete screeds.
- The floor level will not rise much and there is no major renovation required for installation.
- Less heat loss compared to cable type.
- Saves 20% electrical energy.
- If one block fails, the others will continue to work, since the materials are connected in parallel.
Minuses:
- Can't install under tiles.
- Do not place under heavy furniture as there is a risk of overheating.
Rod
This is a type of infrared heated floor. Consists of several mats with carbon rods inside. They are connected to each other by copper cables. Available in high or standard power options. A circuit with powerful heat transfer is used for rooms connected to a loggia.
Pros:
- Heat is distributed evenly throughout the kitchen, saving 60% of energy.
- Self-regulating, which also contributes to savings.
- Durability. Manufacturers provide a 20-year warranty.
- Heating inside the room occurs from zero to a comfortable temperature in 2 minutes.
- When laying the system, the floor thickens by 3 mm, which is almost imperceptible.
- The only option on which heavy furniture can be installed.
Flaws:
- The concrete screed is being poured, and therefore it is necessary to wait for major repairs before installation.
- It is difficult to install the system yourself because the rods are fragile.
Water type
There is also the possibility of using a water-heated floor, which is divided into concrete and floor. As the name implies, the first option must be covered with a concrete screed, and the second option is covered with ready-made finishing materials.
Advantages:
- You don’t have to spend a lot of money for installation if it is installed on the floor.
- Connects to an existing heating system.
- You won't have to spend extra money on electricity.
Flaws:
- In most cases, they are installed only in private houses, since installation in apartments is difficult. It is convenient to connect to the boiler, and not to the central water system of the apartment.
- It is impossible to regulate the temperature in a multi-storey building if the connection was to central heating. Hot water will flow through the system, as throughout the entire apartment.
- If the system is damaged, there is a risk of flooding the apartment.
The procedure for performing installation work
The first step is to lay insulating tape made of any suitable material (for example, polystyrene foam) around the perimeter of the room. This measure will prevent heat loss.
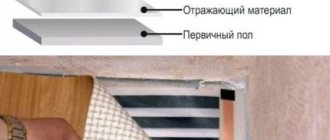
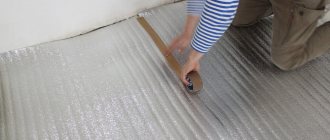
Thermal insulation material is laid out on the subfloor, which has been previously cleared of debris, with the foil facing up. This is a very important point: the foil will help the heat move upward and thereby improve the quality of heating.
Thermal insulation - in rolls or plates, attached to the floor with staples of a mounting gun, double-sided tape or glue.
Then roll out the IR thermal film, always with the copper strip down. The matte side of the film should be at the top. In this case, it is necessary to exclude the accumulation of air.
In the necessary places, the roll is cut according to the applied markings. The width of the infrared heated floor can be different; it is enough to cover about 80 percent of the heated area.
It is advisable to turn the heating elements of the film with their contacts in the direction where the thermostat will be. The strips are laid out tightly, at a distance of 10 mm, but in no case overlap.
The next stage is the parallel connection of the strips using a cable. A contact is made on the copper strip, which plays the role of a current-carrying strip, with one part under the core and the other at the top. Then you need to crimp the contact with pliers. Do this for all sections. They should be laid towards the thermostat. The remaining open areas of the copper conductor are covered with special bitumen insulating tape.
When all the contacts are connected, the insulators are installed, the IR film must be attached with tape to the heat insulator. Scotch tape is also used to connect strips together. The contact clamps are hidden in recesses cut to size in the insulating material.
Materials for heated water floors
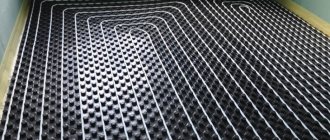
Most often they make a water heated floor in a screed. We will talk about its structure and necessary materials. The diagram of a warm water floor is shown in the photo below.
Scheme of a warm water floor with screed
All work begins with leveling the base: without insulation, heating costs will be too high, and insulation can only be laid on a flat surface. Therefore, the first thing to do is prepare the base - make a rough screed. Next, we will describe step by step the order of work and the materials used in the process:
- A damper tape is also rolled out around the perimeter of the room. This is a strip of thermal insulation material, no more than 1 cm thick. It prevents heat loss from heating the walls. Its second task is to compensate for the thermal expansion that occurs when materials are heated. The tape can be special, or you can also lay thin foam plastic cut into strips (no more than 1 cm thick) or other insulation of the same thickness.
- A layer of heat-insulating materials is laid on the rough screed. For underfloor heating, the best choice is polystyrene foam. Extruded is best. Its density must be at least 35 kg/m2. It is dense enough to withstand the weight of the screed and operating loads, has excellent characteristics and a long service life. Its disadvantage is that it is expensive. Other, cheaper materials (foam plastic, mineral wool, expanded clay) have a lot of disadvantages. If possible, use polystyrene foam. The thickness of thermal insulation depends on many parameters - on the region, characteristics of the foundation material and insulation, and the method of organizing the subfloor. Therefore, it must be calculated in relation to each case.
- Next, a reinforcing mesh is often placed in increments of 5 cm. Pipes are also tied to it - with wire or plastic clamps. If expanded polystyrene was used, you can do without reinforcement - you can fasten it with special plastic brackets, which are driven into the material. For other insulation materials, reinforcing mesh is required.
- Beacons are installed on top, after which the screed is poured. Its thickness is less than 3 cm above the level of the pipes.
- Next, the finished floor covering is laid. Any suitable for use in a heated floor system.
These are all the main layers that need to be laid when you make a water-heated floor with your own hands.
Pipes for heated floors and installation schemes
The main element of the system is pipes. Most often they use polymer ones - made of cross-linked polyethylene or metal-plastic. They bend well and have a long service life. Their only obvious drawback is their not very high thermal conductivity. The recently introduced corrugated stainless steel pipes do not have this disadvantage. They bend better, cost no more, but due to their lack of popularity, they are not yet used often.
The diameter of the pipes for heated floors depends on the material, but usually it is 16-20 mm. They are stacked according to several schemes. The most common are spiral and snake; there are several modifications that take into account some of the features of the premises.
Schemes for laying pipes for a warm water floor
Laying with a snake is the simplest, but as the coolant passes through the pipes it gradually cools down and reaches the end of the circuit much colder than it was at the beginning. Therefore, the zone where the coolant enters will be the warmest. This feature is used - installation begins from the coldest zone - along the external walls or under the window.
The double snake and spiral are almost free of this drawback, but they are more difficult to install - you need to draw a diagram on paper so as not to get confused during installation.
Screed
You can use a regular cement-sand mortar based on Portland cement to fill a water-heated floor. The grade of Portland cement should be high - M-400, or better yet M-500. Concrete grade - not lower than M-350.
Semi-dry screed for heated floors
But ordinary “wet” screeds take a very long time to gain their design strength: at least 28 days. You can’t turn on the heated floor all this time: cracks will appear that can even break the pipes. Therefore, so-called semi-dry screeds are increasingly being used - with additives that increase the plasticity of the solution, significantly reducing the amount of water and the time for “aging”. You can add them yourself or look for dry mixtures with the appropriate properties. They cost more, but there is less hassle with them: according to the instructions, add the required amount of water and mix.
It’s possible to make a heated water floor with your own hands, but it will take a decent amount of time and a lot of money.
The principle of connecting infrared film to a thermostat
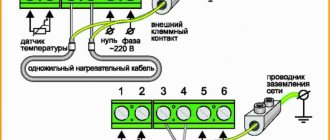
A very important stage begins when the IR film is connected to a thermostat, which is installed on the wall. You need to connect the cables from the film to it. Under one of the strips, a recess is made in the heat-insulating material for the temperature sensor. The wires from it are also extended to the thermostat. The connection diagram for the infrared floor is included in the product instructions.
Wires need to be connected to the contacts. To do this, the bare conductor is inserted into the contact connector and carefully crimped. After the strength of the connection has been checked, it must be insulated on both sides with two pieces of bitumen insulation.
The wires are connected to the thermostat according to the diagram shown on its reverse side.
Manufacturers of IR heating devices warn that connecting the thermostat to the electrical network must be carried out by specialists in accordance with the rules and regulations for electrical installations and other technical requirements.
After this, you can carry out a test switch-on by setting the regulator to 30 degrees. After making sure that all the strips are heated and there are no sparks anywhere, you can begin installing the finished floor.
Last stage: finishing coat
Plastic film is spread under tiles, laminate or parquet on top of infrared floors. This will protect the heating elements from possible moisture and mechanical damage when installing the finished floor. When using laminate, you can get by with an underlay.
For tiles, glue and grout intended for heated floors are used.
The solid base under the carpet must be carefully attached to the floor with self-tapping screws. Sometimes dowels are used. It is important to be careful not to snag the electrically conductive strips.
Before laying the finishing floor, you need to make sure that it is compatible with the IR heating film and once again check the functionality of the temperature sensor.
If necessary, IR heat sources can be mounted not only on the floor. They produce models for walls and also ceilings.
Operation of infrared film heated floor
Recommendations:
- if a significant amount of water gets on the film floor, it must be turned off immediately and dried (naturally);
- you cannot turn on the system in order, for example, to dry the carpet after wet cleaning);
- It is not allowed to fasten anything (for example, a door stop or baseboard) using hardware. They will damage sections of the film;
- It is prohibited to spread carpets, blankets, metallized films (foil) on the floor, or to rearrange furniture. This may cause the system to overheat.
Mobile solution: infrared mat
IR sources also create comfort when used locally. Manufacturers demonstrated the strength, elasticity and compactness of infrared floors when creating a mobile heated floor. These are small heating mats with a thermostat and an electrical plug.
They are successfully used in cases where it is necessary to warm up a small area of the room. These rugs are easy to carry. In addition to heating, they also have a healing function. They can be laid on a chair, directly under your feet, if the central heating system is not enough or in other extreme cases.
It’s quite possible to make such an IR mat yourself. To do this, you need to connect the section of film remaining from installation to the wires, not forgetting to insulate the contacts.
The disadvantage of a homemade product is that there will be no thermostat. Therefore, you must always ensure that it does not overheat.
The difference between rod-based IR heated floors
The self-regulating IR floor rod system is attractive due to its longer service life and resistance to damage.
The connection of the rods with copper insulated wires is parallel. Therefore, the system will continue to heat the room, even if for some reason some section fails.
The width of the infrared rod floor rolls varies from 70 to 150 cm, and the length reaches 25 meters. The rated power of carbon rods is from 110 to 250 W/linear m. The peculiarity of the design is that the maximum power is turned on first, and after the floor warms up, it decreases. Furniture is not scary for such a system. Rod floors are rightfully considered economical in energy consumption and reliable sources of heat.
Cost of heating systems
To give an idea of the price of electric heated floors, the table shows several system models:
| Model | Short description | Specific power W/linear m | Mat width | Price |
| "National Comfort" NK-250 | Single-core heating cable, 10 m | 25 | – | 1920 |
| Arnold Rak PHS-CT | Two-core heating cable, 9 m | 20 | – | 2100 |
| "Teplolux" ECO 5-100 | Two-core heating cable, 5 m | 20 | – | 1600 |
| DEVI DTIR-150 69 / 75 | Mesh two-core mat | 75 | 0.5 m | 3900 per lin. m. |
| Veria Quickmat-150 | Single core mesh mat | 75 | 0,5 | 2835 per sq.m. |
Installation of rod infrared heated floor
Installation is very simple. The floor surface must be smooth and clean. The maximum allowed height difference is no more than 10 mm per 1 sq.m.
A thermal insulation layer is made around the perimeter and throughout the entire area. The best choice is metallized materials that will reflect heat. The heat insulator must be attached to the base with staples, glue or tape. Thermal insulation material with a foil surface is useless in this case, since it will gradually collapse when it gets under the concrete screed. The thickness of the thermal insulation layer depends on what is located under the floor. If it’s another apartment, then thin material is enough, but those who are on the first floor will have to use more serious thermal insulation.
Then a roll of warm infrared floor is rolled out over the surface. This is done carefully so that the wires do not cross or touch each other. The layout algorithm is as follows:
- the rod mat is rolled out to the opposite wall, not reaching it by 15-20 cm;
- at the turning point, scissors or special side cutters cut the connecting wire, which is located between the two rods;
- rotate the roll 180 degrees;
- roll it out in the opposite direction.
This is done until the entire required area is covered with an infrared rod floor. After this, the conductors and rods are attached to the thermal insulation with tape.
The second option is to buy not rolls, but a rod floor immediately in pieces of the required length. Then you don't need to cut anything.
After laying the warm infrared floor, you need to cut out small “windows” in the thermal insulation in a checkerboard pattern between the rods. Thanks to them, the cement screed will be bonded to the subfloor. It is recommended to make from 20 to 25 percent of the “windows” of the total area.
Calculation methods
First of all, you need to decide whether your heated floor will be your main heating (without radiators or other heat sources) or additional (to increase comfort). Depending on this, the calculation of the electric heated floor changes. If floor heating is only additional heating, the only requirement is that the power must be enough to heat the floor to a comfortable 28.5-29°C. There are no other requirements. In this situation, feel free to use average numbers that are determined empirically (in the table below). When using underfloor heating as the main heating, the approach is different: there should be enough heat to compensate for heat loss. Here everything is somewhat more complicated - calculations are needed.
Calculation of electric heated floors based on heat loss
There are two ways to calculate an electric heated floor. The first is precisely calculation. When using this technique, the heat loss of the room is first determined. This takes into account the region in which the building is located, the material and thickness of the walls, the thickness and type of insulation, the size of windows and type of glazing, the presence and area of walls facing the street, the orientation of the room (south, north, etc.). All these factors affect the amount of heat that leaves the room and which will have to be replenished.
Heat loss for each type of building material can be found in specialized literature; there are separate methods. This calculation is a tedious task, but it allows you to obtain accurate data. This is in case you want to count yourself. If not, you can order a thermal engineering calculation from specialists. And, if large areas for underfloor heating are planned, it is better to order it. Sometimes, self-determined heat losses are several times higher than those that specialists will give you. And excess power is wasted money.
An example of calculating heat loss in premises
The resulting figure will be the power of the electric heated floor, which is necessary to compensate for the heat loss of a given room. The entire calculation of an electric heated floor consists in selecting heating elements in such a quantity and in such a power that they collectively produce the required amount of heat (with a small margin possible). If these are heating cables, you will have to develop a laying scheme so that the entire required cable footage can be accommodated in a given area. If you decide to use a film heated floor, you need to look for a film of the required power. In any case, keep in mind that in order to avoid feeling cold and hot heating spots with your feet, the distance between adjacent heating elements should not be more than 30 cm. And for normal heat redistribution (not in stripes), the minimum height of the screed should be 3 cm, better about 5 cm.
Note! Electric heated floors are installed only in the area that is not occupied by furniture and large household appliances. This is due to the fact that, for the most part, heating elements of a heated floor do not tolerate overheating (except for a self-regulating heating cable). Therefore, the calculation of an electric heated floor begins with the location of furniture and equipment on the room plan (to scale). Having determined the area not occupied by the furnishings, you can begin the calculation. Another important point: if a warm floor is the main source of heat, then the heated surface should not be less than 70% of the total area of the room.
First you need to determine the area where there will be no furniture.
Determining the required power depending on the purpose of the room
The second way is to count according to average statistical data. The amount of materials used in the construction of residential buildings is limited. This made it possible to derive average figures for the required underfloor heating capacity for heating premises for various purposes. (see table).
| Type of heating | name of the property | Required power |
| Additional heating | Kitchen, living rooms on the ground floor | 140-150 W/m2 |
| Additional heating | Kitchen, living rooms on the second floor and above | 120-130 W/m2 |
| Additional heating | Bathroom | 140-150 W/m2 |
| Additional heating | Balcony, loggia | 180 W/m2 |
| Main heating | All premises, regardless of purpose | 180 W/m2 |
When calculating an electric heated floor, the found unoccupied area is multiplied by the norm taken from the table. They get the number that an electric heated floor can produce. In principle, this will also be the maximum power consumption required for floor heating.
The required floor heating power can be determined based on its purpose
For example, if 10 square meters in a living room on the first floor are heated, then the heating element can output/consume 140 W/m2 * 10 m2 = 1400 W. This is the power consumption per hour. Don't be afraid. In reality, such a flow rate can only occur immediately after switching on and until the floor reaches the set temperature. During this period of time, the heaters operate continuously. Then the heating is turned on/off by a thermostat, which maintains the set temperature with an accuracy of 1°C. The amount of electricity consumed during this period depends on the weather (the colder it is, the more often it will turn on) and the degree of insulation of the floor and the room as a whole.
Connection of power wires
The connection of the cut supply wires into a single system is carried out using a VVGng installation wire, connecting sleeves in a heat-shrinkable tube and insulating material (heat-shrinkable tubes or bitumen strips), which come complete with the core floor.
The wires are fastened together using sleeves in a heat-shrinkable tube and heat-shrinkable tubes as follows:
- remove the insulation from the cut wire by about 1 cm;
- put a sleeve in a heat-shrinkable tube onto the wire;
- crimp the sleeve with pliers;
- put a heat-shrinkable casing on the installation wire;
- insert the bare end of the mounting wire into the sleeve on the other side and crimp it with pliers;
- use a construction hairdryer to heat the sleeve until it shrinks completely;
- check the strength of the connection by tugging lightly;
- slide the heat-shrinkable casing onto the sleeve;
- shrink the cambric using a hair dryer.
Sometimes, instead of heat-shrinkable casing, bitumen strips are used, and instead of sleeves in a heat-shrinkable tube, metal clips/contacts are used.
After assembling all the contacts, the IR rod floor is connected to the thermostat. A temperature sensor is also connected to it, which manufacturers recommend installing inside the corrugated hose, hidden in the grooved recess of the screed. This is done to access the sensor if it needs to be replaced.
After a positive test, construction of the flooring begins.
Taking into account nuances when choosing
Some criteria are still worth considering. The first factor, and sometimes the most important, is the price of the wire for the heated floor. Cities such as Moscow or St. Petersburg have large construction hypermarkets.
Having so many choices confuses people, not to mention sales assistants. The ideal option would be to contact installation companies. They have experience and knowledge.
Based on which you can draw your own conclusions. After all, a proven manufacturer does not always give the necessary results.
We recommend: What is National Comfort underfloor heating?
A resistive electric cable for underfloor heating operates only with the help of a regulator. This is a special device responsible for setting a specific temperature. This set is 100% mounted on medium and higher areas.
That is, 20 square meters and beyond. Self-regulating works without such equipment. Plus, it is more suitable for some finishing coatings followed by the placement of decorative elements.
The final choice still occurs after counting all the pros and cons. A person needs to set expectations so as not to have problems with implementation in the future. Sometimes it is possible to use mats instead of both cables.
In all cases, it will have to be covered with a concrete screed. Its thickness should not exceed 5 cm. This is enough to warm up in a short time.
