But before moving on to their detailed study, it is worth paying attention to the minimum requirements that generally apply to heated floors. They can influence the choice of scheme in one way or another.
Restrictions and regulations
Let's start with the fact that water heated floors do not belong to high-temperature heating systems. According to the standards, the coolant temperature cannot be exceeded or heated above 55C.
In practice, heating occurs to a maximum of 35 or 45 degrees.
However, do not confuse the temperature of the coolant and the temperature of the floor surface. It can range from 26 to 31 degrees maximum.
- where you are constantly (living room, bedroom, kitchen) - it’s 26C
- in rooms with temporary stay (bathroom, separate hallway, loggia) - 31C
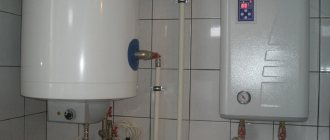
Also, don't forget about the circulation pump. A warm floor is still a separate independent circuit. The pump can be either built into the boiler or mounted outside it.
With the help of a pump, it is easier to fulfill another requirement regarding temperature differences. For example, between supply and return, the difference should be no more than 10 degrees.
But when choosing a pump, do not overdo it with the flow rate of the coolant. The maximum permissible value here is 0.6 m/s.
Knowing all these limitations and recommendations, let's move on directly to the schemes themselves.
Radiator heating
Radiator heating is traditionally installed in city apartments. It is effective and reliable. Heating devices are in plain sight, allowing for quick repair work.
Manufacturers offer radiators of various modifications to suit any room design. If necessary, use protective panels to hide batteries. What are the advantages and disadvantages of radiator heating?
- The air heats up quickly, which is important for cottages that are not used every day.
- Any covering can be laid on the floor, including wood, laminate or parquet. Overheating is undesirable for cladding made of wood. The material is warm and has low thermal conductivity. It is not recommended to install wood cladding for underfloor heating. Laminate or parquet floors do not transfer heat well.
- If the floor is not insulated well enough, then radiator heating will be the optimal solution.
Along with the positive characteristics, heating has some disadvantages. Heat from heating devices rises. The temperature on the floor is lower than in the ceiling area. Carpets and carpets are used to insulate the floor.
We recommend: What kind of base can be used for underfloor heating?
Warm air from radiators causes turbulence that raises dust in the room, which is undesirable for allergy sufferers. Batteries dry out the air a lot. To maintain normal indoor humidity at 55%, humidifiers are installed.
Radiator heating involves 2 schemes: one-pipe and two-pipe. The single-pipe system is called “Leningradka”. Hot and cooled coolant circulate through one pipe. "Leningradka" is intended for heating small houses, with 3-5 radiators. The latest appliances do not heat up well enough.
With a two-pipe system, hot and cooled water circulate in separate pipes. The batteries are connected to the return circuit via bypasses. A two-pipe system can be installed in large houses, with up to 8-10 radiators.
The pipeline is led from the boiler. The coolant temperature reaches 95 0C. The normal thermal regime of batteries is 80 0C.
To increase the speed of movement of hot and cold water along the circuits, a circulation pump is installed. It is connected to the return pipe. It pumps coolant into the boiler. A sump tank, an air tube and an expansion tank are installed in front of the pump. Some of the liquid enters it; the pressure in the pipes is maintained.
In small houses, a circulation pump is not installed. The pipeline is laid at an angle. The supply circuit is located at an angle to the radiators. The coolant enters the batteries under the influence of gravity. Cooled water is returned through the main line, which is inclined towards the boiler.
If you connect a heated floor to one of the radiators, the amount of hot water will decrease. Other appliances will not heat up well enough. It is necessary to calculate the heating system. Usually the boiler power is increased.
It is recommended to install a floor main from the last battery in private houses. The “warm floor” is connected to the return pipe. The temperature of the coolant in it is 45 0C. This is the optimal thermal mode for water underfloor heating.
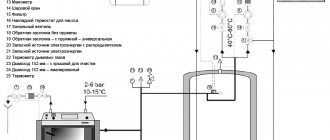
Direct connection diagram
You have a boiler, after which all safety fittings + a circulation pump are installed. In some wall-mounted boiler versions, the pump is initially built into its body.
For floor-standing units you will have to install it separately. From this boiler, the water is first directed to the distribution manifold, and then disperses through the loops. After which, having completed the passage, it returns through the return line to the heat generator.
Specification of materials and equipment using the example of Valtec
With this scheme, the boiler is directly adjusted to the desired temperature of the TPs themselves. You don't have any additional radiators or radiators here.
What are the main features worth paying attention to here? Firstly, with such a direct connection, it is advisable to install a condensing boiler.
In such schemes, operation at relatively low temperatures is quite optimal for the condenser. In this mode it will achieve its highest efficiency.
If you use a regular gas boiler, you will soon say goodbye to your heat exchanger.
The second nuance concerns solid fuel boilers. When you have it installed, for direct connection to heated floors, you will also need a buffer tank.
It is needed to limit the temperature. It is very difficult to directly regulate the temperature with solid fuel boilers.
Underfloor heating
The “warm floor” heating system is installed quickly. If plastic pipes are used, installation takes place in a few hours. During operation, a lot of dirt does not form. The system has its advantages.
- Efficient room heating. Warm air rises from the floor covering and from interior items. The temperature on the floor is higher than near the ceiling. There is no need to lay carpets or wear warm house shoes.
- There are no air turbulences, dust does not rise, and for people who suffer from bronchial diseases, a “warm floor” is a more favorable heating system.
- The floor temperature does not exceed 25 0C. Air humidity remains normal.
- No radiators in the room.
Among the disadvantages of an underfloor heating system is the prolonged heating of the room. The liquid line is hidden in the screed. If there are leaks, it will be difficult to carry out repair work.
However, underfloor heating is used both as a main and additional means of heating. The owner of the cottage independently decides which system to choose, warm floors or radiators.
We recommend: How are pipes for heated floors made of cross-linked polyethylene laid?
The floor water line is removed from the boiler. The circuit is connected to the supply and return manifolds. The comb is connected to the outlets in the boiler.
A circulation pump with three-way or two-way valves is connected to the return circuit. They are equipped with thermostats with temperature sensors. The heating system operates automatically.
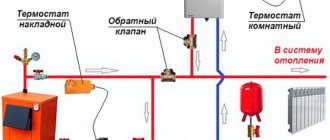
Three-way valve circuit
In the vast majority of houses, this combined underfloor heating system is installed.
Specification of materials and equipment
It includes:
- presence of heating radiators with heating up to 70-80C
- separate TP circuit with an average water temperature of 40C
The main question here is how to get a flow of water for heated floors from the 80 degrees going to the batteries at half the temperature.
The problem is solved using a three-way thermostatic valve.
It is mounted on the supply pipe. At the same time, do not forget to install a circulation pump after it.
Colder water is taken from the return of the heated floor. Mixing with hot water coming from the boiler, the coolant acquires the lower temperature necessary for underfloor heating.
The disadvantage of this scheme is that you will not be able to accurately limit and regulate the flow of cooled water from the return. What does this mean?
The fact is that both water that is too cool and, vice versa, water that is overheated beyond normal will periodically enter the pipes of heated floors.
The efficiency and comfort of the entire system suffers because of this.
An unprincipled person may not notice this, however, these temperature differences are present in this circuit, and there is no escape from them. Of course, time periods of supply of hot and unheated coolant can be compensated by the thermal inertia of the screed concrete.
But this is all relative. You can never accurately calculate the optimal thickness with such heating.
The advantages of such a combined scheme with a three-way valve:
- easy installation
- affordable price of equipment
This installation method justifies itself if you have a small apartment or house. And you don’t suffer from excessive demands for super-comfortable living conditions.
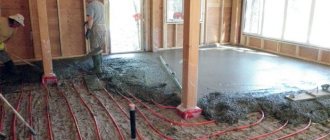
Installation of heated floors
Once you have decided on the layout and connection of the water floor, you need to start installation.
- Prepare the base of the heated floor. It should be level with a minimum difference in height.
- Install waterproofing if required by local codes
- Lay polystyrene 10 cm thick on the first floor and 5 cm on the subsequent ones.
- Lay polyethylene so that less screed comes into contact with the insulation.
- If your method of fastening is a reinforcing mesh, then lay it on polyethylene
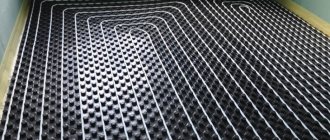
- Lay out the heated floor pipe according to the approved diagram
- Pressure test the system
- Fill the screed
Scheme with pump-mixing unit
This scheme also applies to combined systems, when you have both radiators and heated floors at the same time.
However, here, instead of a 3-way valve, a more expensive pumping and mixing unit is used.
Specification of materials
In fact, the cooled return flow is also mixed into the main boiler feed here. But thanks to the balancing valve, cooled water can be mixed in in certain doses and given proportions.
This will ensure the precisely specified temperature of the coolant entering the TP tubes through the manifold.
This is the most effective and most comfortable scheme. The pumping and mixing unit itself can be assembled in various variations.
Depending on your needs and financial capabilities, the following components may be included:
Installation and connection of the electrical system
As mentioned above, there are several types of electrical systems for heating a room. Therefore, installation of heated floors and connection of heated floors will directly depend on the selected model. But as consumer reviews have shown, not every beginner knows how to properly carry out this work with their own hands.
Let's look at the most frequently asked questions about installation and try to answer them in more detail.
How to connect a cable floor
To answer the question of how to connect a heated floor consisting of a cable, you first need to understand how this system is located under the floor covering.
Cable diagram for connecting an electric heated floor:
- A special metal strip is laid on the prepared red floor.
- With a certain step, the electrical cable is laid and secured on the metal surface.
- A temperature sensor is installed between the turns of the electrical wire, the wire of which is laid in a corrugation.
- The underfloor heating cable, sensor wire and electrical network wires are connected to the thermostat.
https://youtube.com/watch?v=d5jDC2m7lYA
After checking the resistance of electricity in the circuit with a tester, the electric heated floors are filled with concrete screed.
How to connect a matte floor correctly
The matte heated floor connection diagram is identical to the cable system. There are only some small differences.
So, let's look at how to properly connect a heated floor on a matte base:
- Using a specially designed grid, the mats are cut onto specific canvases so that they cover the entire area of the room.
- Heat-reflecting material is laid on the prepared floor surface.
- Heated floor panels are laid out parallel to each other on the thermal insulation.
- Each mat is secured between itself and the floor with tape.
- From the first mat the electric heated floor is connected to the thermostat.
- A temperature sensor is installed in the middle, between the cable sheets.
- Wires are drawn from the temperature sensor and the electrical network and secured to the thermostat.
After checking the connection of the heated floor, the electrical system is filled with either a concrete screed or construction adhesive under the ceramic tiles.