Installation of the Vesuvius Legend stove. Video.
Assembly of the Smoke Channel "TM VESUVIUS"
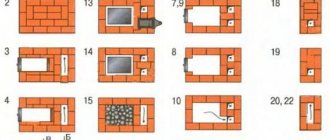
4.1. Prepare all chimney elements for assembly, clean them of protective film, and prepare the required tools. 4.2. In accordance with the Manual for the assembly and operation of the heating apparatus, the fire resistance of the building materials used, their protection against fire, determine the vertical axis of the passage of the assembled chimney. When installing the stove, take into account the location of the ceiling beams and roof rafters. 4.3. Install ceiling groove 4.4 in the ceiling section. Install one of the chimney elements on the outlet pipe of the stove: a single-circuit pipe, a starting pipe or a tank on a pipe. When installing the nozzle, seal the gap between the pipe and this element using heat-resistant sealant or clay.
ATTENTION! It is strictly forbidden to use “sandwiches” as the first element of a chimney installed directly on the outlet pipe of the heating apparatus.
4.5. All subsequent chimney elements are installed on the previous ones until the nozzle is completely filled by lightly tapping it with a wooden mallet or a metal hammer through a board. 4.6. When assembling the chimney, fill the gaps at the junction of the elements with heat-resistant sealant and fasten the connections with clamps). 4.7. Install a throttle valve on the first element of the chimney, pointing the control handle in a convenient direction. The length of the chimney element that fits onto the throttle valve should be determined in advance, taking into account to prevent the starting “sandwich” from joining with both the lower and the upper element in the section of the ceiling cut. Pass the starting “sandwich” through the hole in the metal sheet of the ceiling cutting and put it on the assembled section of the chimney. 4.8. In order to reduce vertical loads, both on the chimney and on the heating apparatus, install a support clamp in the ceiling groove on the starting “sandwich”. 4.9. Fill the free space in the ceiling groove with heat-resistant heat-insulating material (basalt wool, mineral wool, etc.). 4.10. All further assembly up to the intersection with the roof is carried out with the same type of elements - “sandwiches”. The joining of “sandwiches” is carried out using “condensate”. 4.11. The passage of the chimney through the roof is carried out by cutting the roof, which guarantees both the fire safety of the roof and its waterproofing at the point where the chimney passes. First, a hole must be made in the roof, in accordance with the axis of the chimney, to ensure that all flammable elements of the roof are at least 130 mm away from the outer surface of the “sandwich”. The angle of inclination of the installed groove must correspond to the angle of inclination of the roof. Depending on the type of roofing material used, perform work to interface it with the installed roof section. ATTENTION! The quality of this work is a guarantee against possible roof leaks in the area where the chimney passes. 4.12. Place a cone-shaped clamp on the chimney, press it firmly against the groove and tighten. In accordance with the above requirements for smoke exhaust ducts of this Manual, determine the height of the chimney that guarantees draft stability. Finish the assembly by installing the last “sandwich” and the umbrella-head on it. 4.13. Check the quality of work by external inspection, paying special attention to the tightness of the joints of the chimney elements. Wipe the contaminated areas of the chimney with a clean, dry rag. Remove foreign objects and tools from the chimney area.
4.14. At least once a year it is necessary to inspect the chimney, clean it of soot, replace faulty elements if necessary, remove foreign objects: cobwebs, bird nests, etc. from the chimney passage area.
Test firing of the furnace.
5.1. It is necessary to make sure that the joints of the furnace elements and the smoke channel are tight, as well as the presence of draft. To do this, you need to bring a strip of thin paper or a candle flame to the open firebox door (the valve on the smoke channel is open). The deviation of the strip or flame towards the firebox indicates the presence of draft. Then place paper, wood chips, and a piece of roofing material into the furnace firebox and light it. The absence of soot on the outer surface of the seams and joints indicates their tightness. If there is soot, it is necessary to make a more thorough joining of the corresponding elements. 5.2. Place the stones in the stone container. Large stones go down, smaller stones go up. The stones must be clean and durable. 5.3. If you have a tank, fill it with water.
ATTENTION! The tank must be checked for leaks before installation on the stove.
5.4. Place kindling material (chips, paper) into the furnace firebox. If it is difficult to ignite the fuel, you should leave the firebox door ajar for a while. When the flame is fully ignited, you can add more fuel. 5.5. Pay attention to the color of the flame. When there is a lack of air, the flame is red with dark stripes. When there is excess air, the flame has a bright white color, and combustion is accompanied by a humming sound. Optimal combustion mode is achieved using a damper on the firebox door. By adjusting the air supply with the damper, achieve a normal golden-yellow flame. 5.6. To reload fuel, slowly open the firebox door for a short time, and then also slowly open it completely. This will avoid the occurrence of reverse draft, accompanied by smoke escaping into the room.
Installation of the Vesuvius Legend Russian Steam 18 (240) sauna stove and Vesuvius chimney
Vesuvius Legend Russian Steam 18 (240) and Vesuvius chimney, this stove is installed in a wooden bathhouse. The stove has a remote firebox and is heated from the adjacent room; the “passage” in the wall separating the steam room and the dressing room is decorated using a stove portal. The Vesuvius stainless steel chimney system was installed as a smoke removal system. The chimney is mounted vertically and has access to the street through the roof.
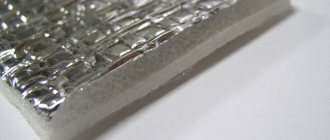
Arrangement of thermal protection of walls. Following the principles of fire safety technology, thermal protection was carried out on the walls of the steam room located in the immediate vicinity of the sauna stove. In this case, the walls adjacent to the stove are lined with foil and fire-resistant Faspan Antiflame boards.
Installation of a chimney system. The first chimney element installed on the sauna stove is a Vesuvius single-circuit chimney pipe made of AISI 430 stainless steel.
The next element of the chimney is the Vesuvius start-sandwich, with the help of which a transition is made to a double-circuit chimney system, represented by the Vesuvius sandwich pipe, also made of AISI 430 stainless steel. The use of a double-circuit chimney pipe increases the fire safety of the chimney system, especially in places of “passage” through interfloor coverings.
Installation of a “passage” through the roof, arrangement of a protective box for passage through the interfloor ceiling. When installing a chimney system and “passing” through interfloor ceilings or walls, it is important to follow fire safety precautions. As a rule, for this purpose a protective “box” is installed, which performs the function of thermal insulation of ceilings and walls located in the immediate vicinity of the chimney. In this case, the thermal protective “box” is made using a fire-resistant calcium silicate board “Promasil”, all free space is filled with non-flammable basalt wool.
External work on installing a chimney At the final stage of installation work on arranging the chimney system, external installation of the chimney pipe was carried out - a Vesuvius sandwich pipe was used. To waterproof the roof, at the outlet of the chimney pipe, a special “roofing penetration” (master flush) was used. To increase the stability of the structure, the chimney pipe is secured to the roof using special braces.
Installation of the stove portal Since the Vesuvius Legend Russian Par 18 (240) sauna stove has a “remote” firebox (it is heated from the adjacent room), the stove firebox was “moved out” from the steam room to the adjacent room. For this purpose, a special “passage” was made in the wall, and a thermal protection box was installed to thermally insulate the walls from the combustion tunnel.
Features of the Lava-14 furnace
Among the features of this model, it should be noted the high-quality ceiling, which is made of stainless steel. The blower in the device is installed as usual. In this case, a high roof is used in the furnace. If you believe the opinion of buyers, it rarely gets dirty. There is no gate in this case. Among the shortcomings, it is important to mention the valve. If used for a long time, it may become deformed.
Another disadvantage is the small dispenser. The combustion chamber is small in size. The grate in the device is located above the converter. The external tunnel has a diameter of 2.4 cm. The lower frame is made of steel. The Vesuvius sauna stove will cost the buyer about 42 thousand rubles.
Cast iron stove for bath Vesuvius
The Vesuvius sauna stove is produced by the domestic enterprise Litkom in the Moscow region. Experts studied global trends in the production of bath equipment: types of stoves, quality, design. Marketing research has been carried out. The basis for the production of our own line of stoves was taken from models of heating equipment for baths from Finnish manufacturers and domestic craftsmen. The products had to be of high quality, practical and functional. In addition to heating equipment under the Vesuvius brand, the company produces chimneys, heat exchangers, tanks, accessories, and components. If any component breaks down, you can replace it with “original” parts, make changes to the design, or add to the package.
Model range of Vesuvius stoves
To do this, it is worth carefully considering the range of products and some of them in detail. All products related to sauna stoves can be divided into steel and cast iron. The differences between these two metals naturally give the stoves certain qualities, and it is worth understanding what to expect in one case or another.
In addition, the average person cannot check the qualitative composition of alloys of iron with carbon and other metals, and this should also be kept in mind. Steel, as is known, is a more ductile metal and, unlike cast iron, loss of shape or burnout of the metal can occur under constant extreme temperature loads.
Features of Vesuvius stoves
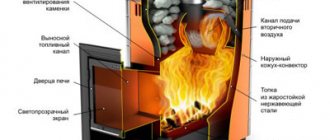
Vesuvius models are distinguished by the complete absence of sharp corners. The design of the stove has a round shape, which allows thermal radiation to be evenly distributed throughout the room, warming the air to the specified temperatures. The outer casing of the unit is made of all-welded steel plates. The metal thickness is 8 mm. The plates are secured with bolts. Fastening provides increased strength of products.
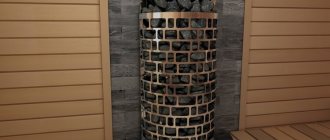
Thanks to the outer mesh, the stones in the oven are heated evenly. They dampen the infrared radiation of hot metal. The disadvantage of the outer mesh is dry steam. You won't be able to get a light, damp cloud without additional devices. For lovers of Russian steam rooms, it is better to give preference to models with a closed heater. Full use of an open-type heater in a Russian bath requires the additional installation of a steam generator.
The body of the Vesuvius furnace is coated with a protective silicone compound. The coating protects it from exposure to high temperatures and humidity. Some models are decorated with forged parts. Typical for models with a fireplace function. If necessary, you can hide the equipment behind a brick screen; models without complex decor are purchased.
All Vesuvius models have a standard chimney diameter of 115 mm and a combustion tunnel depth of 290 mm. This is convenient when replacing components.
The warranty period for cast iron models is 35 years.
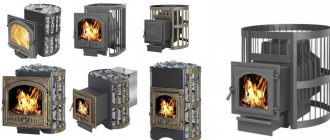
Bath stove Vesuvius Legend
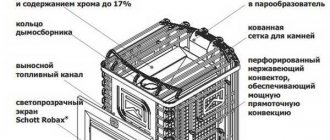
The Vesuvius Legend stove model is constructed of 3 cast iron parts. The thickness of the material is 12 mm. The joints of the fragments are sealed with ceramic cord. The operating temperature that the cord can withstand is 1200 degrees. This is enough for a sauna stove. All parts are secured with bolts. The pipe from the chimney firebox is separated by a bumper. The design allows for rotation of the flame in the firebox. This increases the efficiency of heating equipment four times. Cast iron maintains a high temperature in the steam room for a long time.
The stone net is installed outside. When heated, the stones provide uniform heat and shield the radiation from the firebox. The large mass of stones provides light steam. The humidity of the vapor cloud depends on the heating temperature and the amount of water in the tank. You can add water to the stones from above. In this case, the steam will turn out heavy and watery. The steam room warms up within an hour.
In the “Legend” series, the manufacturer produces models of stoves with forged elements.
The manufacturer provides a 30-year guarantee for the Vesuvius Legend model. The model from the “Forging” series has an external firebox. The element makes it possible to heat the steam room from the adjacent room.
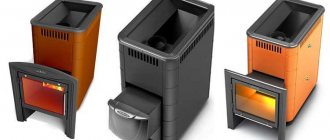
Furnace Vesuvius Skif
The Vesuvius Skif model series is a budget line of the manufacturer. They are made from engineered steel. The thickness of the sheets is 12 mm. This type of steel lasts a long time. The walls do not bend outward or become deformed. The stove is made using Finnish technology. The joints are laid with heat-resistant cord. The part can withstand temperatures up to 1200 degrees. The parts are connected to each other with bolts. The firebox is remote. The steam room is heated from the adjacent room.
The stone net is installed outside. The steam turns out to be dispersed. Due to the design of the stove, it is suitable for a Finnish steam room. For a classic Russian steam room, the unit does not have enough humidity. This is compensated by the additional installation of a steam generator or pipe system. The volume of the steam room for the standard model ranges from 8 to 18 square meters.
The advantage of the Skif stove is considered to be its price. It is cheaper than a cast iron product. Warranty period 2.5 – 3 years.
Vesuvius 16
“Vesuvius” 16 – closed heater. Consists of three elements: body, firebox, pipe. The parts are secured with a bolted connection. It increases the strength of the structure. A ceramic cord is laid at the joints. The operating temperature of the wire is 1200 degrees.
Popular furnaces with heat exchangers
Cast iron stoves are deservedly popular among lovers of Russian baths, but how are they combined with heat exchangers? As it turns out, they combine perfectly.
Cast iron stove
To get started, we recommend visiting the Petrozavodsk website. Among the products offered to visitors are components, among which there is a disk-shaped heat exchanger, apparently attached to one of the walls of the furnace. Thus, you can purchase both a stove and an exchanger at once. As an option, they also sell mounted tanks for the chimney.
Cast iron stove with heat exchanger for a bath. Photo source
Vesuvius stove
Vesuvius stove with heat exchanger for a bath
also provides the opportunity to simultaneously purchase a stove (and in its catalog you will find both steel and cast iron stoves) and a heat exchanger. The buyer is given a choice of three models - two “samovars” for the chimney, differing in capacity, and one rectangular heat exchanger, which takes heat from the stove wall.
photo of heat exchangers on the Vesuvius website
Stoves for baths "Termofor"
There is a message on the Termofor website that the manufacturer took into account customer preferences and produces the most popular models - Tunguska 16 and Tunguska 24 - with already installed heat exchangers, which require an external location of the storage tank. The material of the exchangers is high-quality food grade stainless steel, 2 mm thick. Depending on the buyer’s choice, the placement can be varied by installing it either on the right or on the left wall of the stove.
Useful video
Termofor sauna stoves with a heat exchanger may be built well, but there are negative reviews. Watch the video and see what it looks like:
Installation of the Vesuvius furnace
Installing a stove is the most important undertaking. The equipment interacts with flammable materials indoors. Fire safety standards must be strictly observed during installation. But before describing the installation process, a few words should be said about choosing a model.
The market offers the installation of metal heaters in bathhouses and stone ones. Metal models benefit from their practicality and safety. The choice of model depends on factors:
- volume of the steam room;
- type of thermal insulation;
- area of the entire bath;
- desired temperature and humidity levels in the steam room;
- heating time.
The first step is to prepare the floor. The furnace installation area is covered with a metal sheet, or brickwork is installed. Indentations are made by 15-20 centimeters on all sides. The top is covered with a steel sheet or a cement screed is poured.
The oven is installed on the surface, observing the indentations. They are specified in the installation instructions for a specific model.
It is possible to reduce the distance by several centimeters if there is additional protection in the form of a metal sheet.
When installing the stove, you should take into account the direction of the heating chamber. Models may involve loading fuel from adjacent rooms. This condition complicates installation, but provides more advantages when operating the furnace.
The next step is the installation of a mounted tank. It is installed in an adjacent room, or, in accordance with the instructions, for a specific stove model.
The heat exchange system consists of the following parts:
- heat exchanger;
- fittings;
- remote tank;
- connection elements.
When installing a heat exchange system, you should not use flexible plastic or rubber liners. In order to avoid freezing of water in the system in winter, a drain valve is built into the lower part of the fitting.
The last step is to install the pipe. It must be at least 5 meters. It is worth paying attention to the chimney pipe. It is made from fire-resistant materials. The height of the pipe must exceed the roof level of the nearest houses.
Start the oven only after thoroughly checking all connections and fasteners. During the first heating, an unpleasant smell of burning and chemical industry products may be felt. These are burning oils that got into the unit during the manufacturing process. It should be heated for an hour. During this time, the tank, heat exchange system and other parts of the furnace are checked.
DIY making
Despite the availability of different options for sale, you can try your hand at making a heat exchanger yourself. It's not that difficult if you have welding experience. In any case, it’s easier than making a stove from scratch.
But before you get started, you need to do a little calculation.
Calculation of heat exchanger power and area
It was already mentioned above that heat exchangers connected to the body take away part of the furnace power. Therefore, the first rule will be the following:
IMPORTANT! The heat exchanger power should not be more than 1/10 of the furnace power.
The second rule is related to the length of the pipes: if the system is gravity-fed, then you should not extend the pipes further than three meters. The pump in the system eliminates such restrictions. But the pump is installed more often when the coolant is used to heat rooms. However, if the storage tank is not located too high, you can only wash with a hose. If this is inconvenient, then you need to either take the tank into the attic and insulate it, or install the same pump.
The third rule concerns the volume of the heat exchanger (if it is a small flow-through tank and not a coil). The water in it should heat up within a couple of hours. If it’s longer, then the volume is too big. If it is faster, then it is better only at first glance - the water should not boil, this will cause scale, steam, testing the expansion tank, and other problems.
Now, actually, the calculation itself:
The power of the heat exchanger depends on its area: 9 kW for each square meter of the exchanger. The area is quite simple to calculate: if it is a coil, then multiply the circumference (3.14 * diameter) by the length of the pipe. If this is a “samovar” heat exchanger, then take the diameter of the inner pipe, multiply it by the number Pi, and multiply it again by the height of the “samovar”.
If the exchanger hangs on the chimney, you can ignore the rule of deducting its power from the power of the stove. Only if he is on or in her body.
You can calculate the power required to heat a room using the same principle as for a steam room, that is, based on the volume of the room. In the steam room, a kilowatt per cubic meter is taken, but the adjacent ones do not need high temperature, so focus on half the value.
Knowing how many kilowatts are needed to heat a washing room, you get the area of the heat exchanger, and from it the length of the pipe for the “samovar” or coil.
Let's consider a couple of options for self-manufacturing heat exchangers.
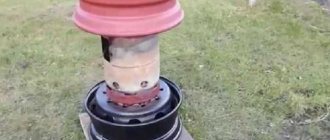
Let's assume that you decide to increase the efficiency of the stove by installing a heat exchanger on the chimney.
- The thickness of the steel required for this is 2.5 mm.
- In addition to the sheet material, you will need two pipes with different diameters.
- The smaller one should be adjacent to the chimney pipe, the larger one should be 5-10 cm wider than the first one.
- Two circles are cut out of sheet metal to fit the diameter of the larger pipe, then a hole is cut in the center to fit the diameter of the smaller one and everything is carefully welded.
- You also need to make holes for the pipes through which water will come and go.
- The pipes are threaded and must match the diameter of the connecting pipes.
ADVICE! After checking the tightness of the seams, installation on the chimney and routing of pipes, it is recommended to insulate the heat exchanger using mineral wool and foil - this will dramatically increase the rate of water heating.
Another option for a heat exchanger for a chimney is a coil made of a copper tube with a diameter of 10 mm, which is made to tightly wrap around the chimney pipe. 1.5-2 meters of pipe is enough. The ends of the coil are inserted into the nuts, flared under the fittings, and then the fittings are screwed to the nuts.
Note! The copper tube must be flared exactly under the cone of the fitting so that they eventually fit tightly against each other. Be careful, because this is where leaks are possible in the future if you flare with an uneven thickness.. Here are a couple of videos on the topic:
Here are a couple of videos on the topic:
Video
How to bend a copper tube yourself with a pipe bender.
Without pipe bender.
Heat exchanger for Vesuvius furnace
The heat exchanger for the Vesuvius stove looks like a geometric stainless steel container. Material thickness 1 mm. It is designed to heat water in rooms adjacent to the steam room. The heat exchanger is attached to heating and water supply systems using a fitting. To prevent depressurization of welding seams, water is poured into the heat exchanger before starting the system.
Plastic pipes must not be placed close to the heat exchanger. The material is not able to withstand high temperatures. A metal corrugated pipe is used for the tank.
Recommendations for use
The manufacturer of equipment for Vesuvius steam rooms prescribes recommendations for operating the device in the instructions for the models. You should familiarize yourself with them in advance and strictly follow them. This affects the service life of the device and the company’s warranty obligations. When working with company equipment, it is prohibited:
- Use peat, coke, gaseous and liquid materials as fuel. This does not comply with fire safety regulations. The combustion temperature may exceed that for which the device is designed.
- Firewood must not exceed the permissible dimensions of the firebox.
- Do not use the device if the tank is not filled with water.
- Install in residential areas for heating.
- The chimney can only be closed when the fire has completely gone out.
- Do not burn soot from the smoke duct.
- Make changes to the original design of the furnace.
If these simple requirements are met, the company undertakes to eliminate all defects during the entire warranty period or replace the device free of charge.