Sooner or later, developers or future homeowners have to face one of the most troubling issues: how to choose the right heating system. There are quite a lot of options for arranging a heating system, but increasingly, owners of new buildings deliberately choose electric infrared heaters and convectors for heating. Unlike bulky water and gas heaters, using electrical appliances is much easier and cheaper. You just need to choose the right layout and install an infrared heater in each room of the house. Nothing complicated at first glance, but there are certain nuances in installation and use.
How does an infrared indoor heater work?
Most radiant infrared heaters have a universal mount on the body that can hold light weight on any surface - on the wall, on the ceiling, and even on remote ceiling rods and consoles. The power of a radiant heater, depending on the design, model and heating element used, can range from 0.8 kW to 2.5 kW.
The main problem that arises when choosing a scheme, where and how to install an infrared heater, is associated with the high concentration of radiant energy in the flow. It's like being near a fire - the closer you are to the hot surface, the stronger the thermal effect. True, the density of the radiant flux produced by an infrared heater decreases quadratically. At a distance of three meters, the thermal effect is four times less than at a distance of a meter from an infrared coil or ceramic panel.
When installing the heater, we observe the following restrictions:
- The distance of maximum comfort from the heater for low-power devices of 700-800 W is only 70 cm; for 1300-2000 W, the distance from the heater radiation surface to the face, as the most sensitive part of the body, should be at least 130-150 cm;
- If you need to use an infrared heater to warm a room in which people spend quite a long time in almost one position, the distance from the plane of installation of the device to open parts of the body - hands and face - should be at least 2 m for a 1.5 kilowatt heater;
- For cases where it is planned to install several infrared heating devices in a room, each heater should be directed to its own blind zone, without crossing flows or directing radiating elements on the same directory.
For powerful heaters, they traditionally choose to install them in a corner on swivel brackets, which allow you to adjust the angle of inclination of the reflective mirror of the infrared heater. The best effect is achieved when radiant heaters are installed on the ceiling. It turns out to be the antipode of a warm floor. The ceiling scheme allows you to maximally level the heat flow in the room, just as fluorescent lamps create uniform lighting.
Important! The thermal energy of an infrared emitter of several hundred watts in concentrated form can heat objects to a high temperature, so there should be no plastic, paper or fabric objects in the immediate vicinity, at a distance of 60-70 cm from the heater.
Otherwise, warping or burning out of the surface is possible, and in case of very close proximity or contact, partial destruction of the material is possible.
Principle of operation and varieties
A characteristic feature of such products is the release of heat, which helps to heat various surfaces - walls, floors, ceilings, etc. It should be noted that the air is heated partially, because the main flux of radiation is directed towards objects, which subsequently give off heat from themselves.
Infrared radiation is not afraid of wind, drafts and can warm you up even on a windy day
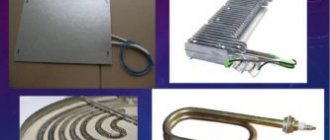
The device consists of a reflector and an emitter. The latter is responsible for the transmission of radiation during the heating process. The reflective element is a reflector, which is made from heat-resistant materials with high reflectivity. The heating elements can be:
Infrared equipment differs in several ways: purpose, installation method, energy source. According to the last parameter, they are divided into stationary and mobile. Devices can be for domestic and industrial needs.
According to energy sources, all heaters are divided into several types:
- Electrical. The most popular type of devices that are installed in any premises. A mandatory element in the system is a mirror reflector for transmitting radiation in the required direction.
- Gas. Best suited for open areas or industrial buildings. Due to their high power, they are rarely found in residential areas. The fuel is a gas-air mixture.
- Diesel. They are in demand in rooms where wiring is weak. Such devices are often found on the street or in garages. The device does not require chimneys; cleaning is carried out through several filters.
- Film - often used in residential areas.
Optimal location of the heater
Of course, radiation alone, even from the most powerful heater, cannot guarantee to warm up every corner of the room; you still cannot do without convection. Only warm air moving under the influence of the ventilation flow is able to equalize the temperature and evenly warm the entire room.
Different rooms use their own, most optimal heater installation scheme:
- For a bedroom, the most convenient and effective would be to place the infrared heater at the maximum height above the head of the sofa or bed, so that 2/3 of the surface is located in the shadow of the heat flow;
- For the kitchen and living room, the heater is installed so that the heat flow of infrared radiation is directed to the window sill, the place where cold air flows into the room;
- In hallways and corridors, the heater is installed on the ceiling with the vertical direction of infrared radiation down to the floor. The heat emitter has a truly unique ability to quickly dry the floor and remove drops and residual moisture brought into the room from the street on shoes and outerwear. To avoid damaging shoes, they must be removed from the heat flow of the heater in a timely manner.
In addition, it is necessary to correctly calculate the height of the heater ceiling suspension. For the ceiling in the hallway, the best option would be to place the heater in the center; with a standard ceiling height of 250 cm, only people 170-175 cm tall will feel comfortable under an infrared heater with a power of 700 W.
Therefore, when planning the installation of infrared heaters, you will need to make the ceilings in the hallway 260-270 cm high, or instead of one device, use two low-power 500 W heaters so that it doesn’t get too hot. You can see the features of this installation in the video:
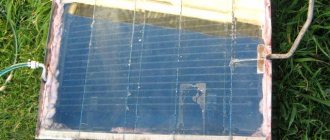
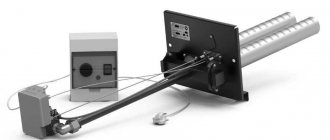
IR heater made of plastic and graphite glue
To make such a heater you will need the following materials:
- two sheets of multilayer plastic, the dimensions of which should be 1 * 2 m;
- graphite powder;
- epoxy adhesive;
- wooden frame;
- plug connecting to a 12 volt outlet.
The first step is to make an adhesive solution, the basis of which will be a small amount of graphite powder and epoxy glue in a 1:1 ratio. After preparation, it should be applied in a zigzag motion to the plastic sheet, on the side where the surface is rougher. The deposited graphite treatment serves as a high resistance conductor.
We install the heater ourselves
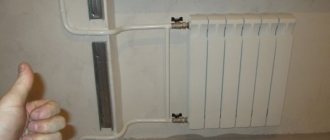
The simplest and most effective installation method involves placing the heating device on the ceiling of the room. The chassis is suspended in the following order:
- At the short ends of the case, it is necessary to unscrew the screws and remove the covers; the suspension brackets are inserted into the slots and secured with a latch;
- The installation locations of anchor hooks are marked according to the distance between the brackets on the ceiling;
- Using the markings, holes are drilled in the ceiling slab, plugs are hammered in and the suspension hooks are screwed in.
Before fixing the infrared heater, you will need to lay the wiring from the electrical input panel to the thermostat installation location and then to the heater. Ceiling structures are rarely equipped with built-in thermostats, so the box responsible for controlling the heating process is placed at a height of 1.6-1.7 m near the entrance to the room according to the above diagram.
To connect an infrared heater, you will need to strip the ends of the wires and secure them in the chips according to the diagram given in the product passport or pasted on the inside of the cover. All that remains is to connect the wiring to a separate package on the panel, and you can put the infrared heater into action.
Digital thermostats allow you to control the temperature in your room with high precision. But in practice, infrared devices have a slight heating inertia. For example, by setting the room temperature at 22°C on the device, the heater will actually raise it half a degree or a degree higher, since the hot radiating coil or heater panel continues to heat the air by inertia for another 5-7 minutes after the thermostat cuts off the power.
Making an IR heater from an old reflector
To make such a device you will need the following materials:
- old reflector;
- fireproof dielectric (if it is missing, then a regular plate of any diameter made of glazed ceramic will do as a replacement);
- steel rod;
- nichrome thread.
Work must be performed in the following order:
- Initially, you should clean the old reflector from adhering dirt and dust.
- Inspect the power cord and plug for mechanical damage, and also check the integrity of the terminals connecting to the spiral.
- Measure the length of the old spiral (wound onto the ceramic body) and take a steel pin equal in length.
- A nichrome thread must be wound onto the rod with a distance between turns of 2 mm.
- Upon completion of winding, you should remove the spiral from the base and lay it (the main thing is that the turns do not touch each other) on the dielectric.
- The ends of the spiral should be connected to electric power from an outlet and checked for functionality.
- A heated spiral of nichrome thread should be placed in a recess in the ceramic cone of the future heater and connected to the power terminals.
These are the steps you need to take to make your own version of an IR heater from an old Soviet reflector.
Does it make sense to get involved with infrared heaters?
There are approximately the same number of fans and ardent critics of heating residential premises using infrared radiation installations. It is worth recognizing that, despite the fierce criticism of fans of water heating, the idea of using electric infrared heaters is becoming increasingly popular.
Radiant electric heaters have their own rather interesting advantages:
- Versatility. The infrared heater can be installed on any surface, at any angle, without restrictions on height and method of fastening;
- Locality of heating. An infrared emitter allows you to organize heating of part of the room, even if it is not possible to limit the loss of warm air;
- Easy to install. It is enough to correctly lay the electrical wiring to the places where the heaters are installed, connect the input to the house and a meter designed for increased power consumption of electricity;
- Low inertia of infrared heaters. Heating of the room stops 10 minutes after the electric heater is turned off;
- Possibility of smooth adjustment and precise dosage of room heating.
For your information! Due to the very small thermal inertia of infrared heaters, the air temperature in the room can be adjusted with an accuracy of half a degree; it is enough to install digital or even mechanical thermostats.
Of course, similar options for maintaining the air temperature in a house or apartment at a given level can be implemented using heated floors or electric convectors, but in both cases, good results can only be achieved in closed rooms, when there are no drafts or passage rooms.
Practice once again proves that the use of radiant devices makes it possible to heat a room no less efficiently than using convectors or water and oil radiators. In this case, it is important to choose the right scheme and method of installing the infrared heater.
Conventional electric water-oil heaters and radiators, regardless of the installation scheme, heat the air by convection:
- Most of the heat-transfer surface is covered with a casing or screen to improve, according to the developers, the flow of air to the spirals or tubular sections;
- In some designs, convection electric heaters simply unsuccessfully copy the shape of cast-iron central heating radiators;
- Such heater designs are designed for installation in window sill niches, where warm air mixes with the flow of cold air from the ventilation valve and spreads well throughout the room. In all other cases, the efficiency and economy of air heaters is significantly lower than that of infrared heaters.
Important! There are quite a few comparison tests that measure heating performance, but the most reliable data shows a difference between infrared heaters and convectors by almost 18%.
In addition, infrared heaters are practically insensitive to the position of the housing, whereas for a convector, manufacturers require installation only in a vertical position, with an inclination angle of at least 4-7o.
Low temperature infrared heaters
The most frequently criticized disadvantage of an infrared heater is related to the high temperature of the radiating surface. Most often, a spiral or ceramic panel heats up to 300-500°C, which can cause dry air in the room.
Relatively recently, so-called cold or low-temperature heaters began to be used for heating. New infrared heaters look like ordinary square facing slabs measuring 60 cm or 50 cm. The smooth heating surface is made of polymer ceramics; on the reverse side there may be a protective grille or a plastic panel covering the heating element.
Such heaters heat up to a temperature of 90-95°C, so even with prolonged contact with fabric, curtains or furniture there is no damage. Installation of such an infrared heater can be done almost anywhere, but preferably no closer than 40-50 cm to open parts of the body, you can use the advice in the video:
The most important thing is that the room heating efficiency of such a heater is approximately 20-25% higher than in comparison with vaunted convectors and oil radiators.
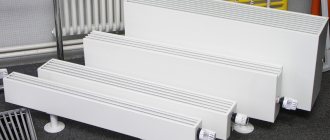
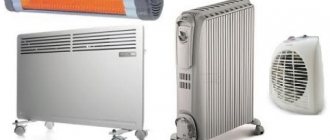
Advantages and disadvantages of wall heaters
It is fair to immediately note that an electric wall heater has much more advantages than disadvantages. Even skeptics have to admit that using them is a pleasure.
Another thing is that not all dachas are located in areas where civilization has reached, or they have power outages, which makes the use of such devices impossible.
If the dacha is located in a comfortable area, then purchasing a wall-mounted electric heater will certainly please its owners with many advantages. This is especially true for dachas, where the owners make pilgrimages only on weekends and holidays. Wiring batteries throughout the house is time-consuming and expensive, and not everyone will want to build a stove.
Electric wall heaters look stylish and can be placed even in small rooms. They are easy to install, so if necessary, you can purchase the required number of heaters to increase heat transfer in the house.
Such devices can be of different shapes and designs. Innovative technologies allow them to be made light and compact. Placing it on the wall in a corner allows you to significantly save space, while guaranteeing safety in case of accidental contact with the body.
Regardless of the technology used to produce the heater, each of them operates from a regular electrical outlet. This allows you to organize efficient autonomous heating in the house even in the absence of the owners.
Thin and light wall heater in the form of a picture
In addition, they are extremely safe. Unlike underfloor heating units of any type, they will not tip over, which is especially important in homes with children and pets.
Compared to gas appliances and boilers, they also guarantee 100% fire protection. There is simply nothing to explode in them, and an accidental short circuit is excluded, since all devices are equipped with an automatic overheating relay.
Many people planning to purchase such a heater are interested in the issue of cost-effectiveness, because with current utility rates, they don’t want to acquire such a large expense item. We will try to choose the most economical option!
An electric wall heater is very economical, since the energy expended here is converted into heat, as a result of which a high efficiency is achieved - at least 90%.
But this fact is more relative, because electrical energy still remains one of the most expensive, so calling such a device a budget option would not be correct.
Stylish wall heater
If to install a gas boiler the owner will need to go through many authorities to obtain permission, then everything is simple here. You decide for yourself how many and where to install such devices.
A stylish convector will effectively heat a small cottage
So, briefly about the advantages:
- stylish and compact appearance;
- the ability to work in houses where gasification has not been carried out;
- operational safety;
- do not burn oxygen;
- maintaining an optimal microclimate in the house;
- possibility of use as an auxiliary heat source;
- ease of installation;
- versatility of use (the device can be placed in any room);
- reliable fastening;
- large power range;
- high efficiency;
- automatic temperature control.
But speaking about the advantages of electric heaters, it would be unfair to mention some of the disadvantages of this type of heating for the home:
- High price.
- Heaters must be grounded when connected to avoid electric shock.
- High energy consumption.
To understand the principle on which the device operates and how such a high efficiency is achieved, you should consider the basic classification of wall heaters.
Required tools and materials
In order to quickly and easily install an infrared heater on the ceiling, you will need the following tools:
- Drill or screwdriver (drill holes for fastenings).
- Pliers (for shortening wires).
- Indicator screwdriver (determine phase and zero).
- Metal detector (optional, used to search for wiring and metal objects in the wall, so as not to accidentally hit these objects when drilling holes. You can make your own metal detector from improvised means.
- A simple pencil and a construction tape (mark the mounting points on the wall).
As for additional materials, to install and connect an infrared heater you may need:
- Demountable electrical plug.
- Three-core copper cable, cross-section 2.5 mm2.
- Wall mounts (purchased as needed, as only ceiling brackets are included in the kit).
Having collected all the necessary list of materials and tools, you can proceed to mounting and connecting the heater..