Infrared film floor
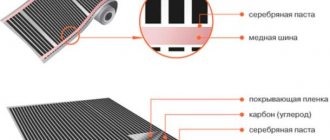
IR floor film is a roll material. It is a carbon paste sealed in polypropylene or polyester film. Conductive busbars (stripes) made of silver and copper run along the edges. These tires supply an electrical current to a carbon material (usually carbon fiber). When electric current passes through carbon fiber, a large amount of heat is generated. The strips are collected in sections of several pieces in one. They can be cut along the dividing strip between sections, which is convenient during installation. This structure is also good because if one or more strips are damaged, the rest of the strip remains operational. Since the distance between the strips is very small, even the failure of several elements in a row will not affect the sensations in any way: the floor will remain uniformly warm. The width of the rolls is from 50cm to 100cm, the thickness of the film is from 0.2mm to 2mm.
Structure of IR floor film
Advantages
Film infrared flooring is compatible with most floor coverings. When laying hard surfaces - tiles, parquet and laminate, no additional protective layers are required. Manufacturers recommend rolling out plastic film on top, and then you can immediately lay the tiles on a special adhesive for underfloor heating or a suitable laminate, parquet or floor board. For wood products, infrared film floors are good because they create a uniform heat flow, which is why zones with different temperatures do not form in the wood, they crack and warp less.
It’s easy to make an infrared heated floor under a laminate with your own hands
There is one nuance here. Some manufacturers say that the film can be hidden in a screed or under tile adhesive, others do not advise. Most practitioners say that the film in cement is destroyed. Perhaps it's the film itself? After all, it is also different, as are the different ways of connecting it.
For laying other soft coverings such as linoleum, carpet, etc. a rigid base is required. To do this, plywood, OSB or any similar sheet material is laid on top of the same polyethylene film. After fixing, roll out and secure the floor covering. That's all. Easier and several times faster than installing cable heated floors.
Flaws
The first is that films are afraid of overheating. And although they have a significant safety margin in terms of temperature (melt at 200°C and higher, depending on the material of the insulating film), they can still burn out. Therefore, in those places where there is or will be furniture, large equipment, film is not laid. Second disadvantage: high price. On average, one square meter of film will cost $25. The high price of IR film is partially compensated by the absence of a screed and a long service life: if all recommendations are followed, more than 10 years. The third disadvantage is the need for painstaking and correct electrical connection of the film strips. The connection is made using contact clamps and an electrical wiring kit, which are supplied with the film, but require correct application. It is also necessary to seal well with adhesive insulating plates those parts of the contact bars that are not in use. Here, in fact, are all the shortcomings.
Infrared film for heated floors does not fit under furniture and appliances
Advantages and disadvantages of film heated floors
Like other types of underfloor heating, infrared floor heating systems have their pros and cons, which are important to consider before installing them in a room.
The main advantages of infrared heated floors are as follows:
- easy to install, no need for special tools;
- the thin thickness of the film allows it to be laid not only under parquet or flooring, but also under linoleum, carpet, etc.;
- natural heating of the room without drying out the air;
- versatility for all types of apartments, private houses and premises;
- ease of use;
- possibility of heating local zones;
- bactericidal effect on indoor air;
- no fading or deformation of the carpet;
- neutralization of odors in the room due to air ionization;
- efficiency, low energy consumption;
- low cost, which is significantly lower compared to other heating systems;
- rapid heating of the room with minimal heat loss;
- possibility of quick dismantling;
- long service life.
The disadvantages of infrared heated floors are much smaller, but they also exist:
- dependence on electrical energy, which is especially significant during power outages in winter;
- heating objects and furniture tightly adjacent to the floor (this disadvantage is common to all types of heated floors, but it can be avoided by placing furniture on legs);
- a relatively low degree of protection from moisture, as a result of which infrared heated floors should not be laid in places with high humidity;
- increased energy consumption when it is necessary to heat large areas, when infrared film has to be laid separately for each room;
- the possibility of problems with electrical equipment due to strong power surges.
With a comprehensive comparison of the pros and cons of infrared floor heating, we can conclude that the advantages significantly outweigh the disadvantages. In addition, most of the disadvantages can be eliminated in one way or another, for example, by using electricity generators, installing a relay after the meter, etc. Therefore, heating with infrared heated floors is very popular both in private homes and in city apartments, especially in last years.
Rules for laying IR heated floors
You need to follow a few simple rules for installing infrared heated floors:
- The first line of film should be located at a distance of at least 100 mm to the wall and no further than 400 mm.
- The pitch of the film cutting line is 250 mm; the film cannot be cut in other places.
- The distance between adjacent film strips should be 10 mm or higher.
- The permissible length of the floor strip is 8 m.
Under laminate
When laying film heated floors under laminate, follow the rules:
- To prevent infrared film from overheating, it must be distributed in areas where there is no furniture.
- In order for the room to be heated with maximum efficiency, the film floor must cover at least 70% of the area.
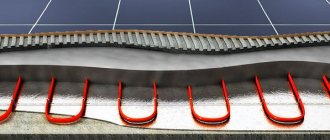
Installation diagram of IR heated floors for various types of finishing floor coverings
Next you need to draw a plan for the location of the heating elements. On paper, reflect the locations of the furniture and heating film.
Laying is done on a surface that has been leveled beforehand.
The concrete screed should not have any differences. To prevent heat from escaping from the thermal film through the floor slabs into neighboring apartments, a thermal insulating substrate (polypropylene) must be laid on the floor, the thickness of which is 3-4 mm and covered with foil on one side.
Thermal insulation strips are secured with thermal insulation tape, and they also need to be carefully trimmed around the perimeter of the room.
The heating film can only be cut in the places marked on it. They are highlighted with a dotted line and a scissors symbol.
If you cut the film diagonally, you will simply ruin it.
The distance of the film from the wall should be 10 cm.
The heating film strips are laid on the substrate one next to the other with a gap of at least 5 mm, but not more than 1 cm.
You cannot bend the heating element at an angle of 90 degrees or more, as it will stop functioning.
Connection diagram for IR heated floor
In places where the thermal film is cut and the conductive busbars are cut, it is necessary to install bitumen insulation, which is included in the heated floor kit. The contact must be installed in the center of the end of the conductive busbar and pressed well with pliers. Using a sharp knife, it is necessary to strip the current-carrying wires by 5-8 mm and clamp them with pliers in the contact terminal, then the entire contact is insulated with bitumen insulation. The infrared heated floor is connected in parallel with copper stranded wires with a cross-section of at least 1.5 mm². It is also recommended to install a temperature sensor so that the automatic floor heating works correctly.
At a distance of 20-25 cm from the wall on which you will install the thermostat, use a hammer drill to perform a groove. Place the temperature sensor into the hole formed under the heating film.
In order for the sensor to show the correct temperature, it must be placed on a heat-insulating substrate.
After all the above manipulations, the thermostat is connected.
Upon completion of installation, check the functioning of the IR heated floor. All thermal films should heat up when turned on. Only after making sure can you lay the laminate on heating elements.
Under linoleum
Laying under linoleum is similar, but has its own characteristics:
- At the first stage, prepare the base, because... The floor can only be installed on a flat and stable surface.
- The mats can be cut into 25 cm pieces. The edge is insulated with a special tape. The gap to the heating system pipes should be 30 cm.
- The film must be laid with the copper bars facing up; overlapping joints is strictly prohibited. The remaining steps are carried out in accordance with the instructions. A prerequisite for high-quality heating is the connection of a thermostat.
- Then linoleum is laid. In small rooms, the coating is laid and left for a couple of days, after which the edges are pressed against the baseboards.
There are different ways to install linoleum
When carrying out work, take into account the fact whether it will be necessary to disassemble and move the system in the future, and also pay attention to the technical characteristics of heated floors
As you can see, infrared film heated floors are an excellent option for a heating system, and its installation is not that complicated. Therefore, everything can be done with your own hands.
Warm floor with infrared heating - what is the principle, how is it done
With the least effort and as quickly as possible, you can create a warm floor with electric infrared heating. It is enough to place a thin heating film under the floor covering, which emits thermal energy in the infrared range with a wavelength of 6 - 20 microns.
Such radiation will heat all dense objects (the denser, the greater the absorption), primarily the floor covering, and from them the air in the room.
Installing a film infrared emitter will not be difficult with your own hands, since there are no complicated or wet installation processes.
But it is important to correctly determine the required amount of film, the area and configuration of its installation, the power consumption and the correct electrical connection. The creation of a film heated floor will be discussed further.
Heating film design
Copper conductors are rolled into plastic, which are connected by many heating plates of a special composition, more often they are called “coal”.
When electric current passes through them, heating occurs, but not more than 50 degrees. C and radiation of thermal energy in the infrared range.
This film is supplied in rolls up to 10 meters long.
The roll consists of the same type of heating elements with the same power. Any number of elements can be separated from a single piece for installation, since they are all connected in parallel.
Characteristics
The film width is usually 0.5, 0.8 or 1.0 meters.
The power of the heating element may vary; it is necessary to study the technical specifications. characteristics of a specific model, but usually no more than 0.2 kW per 1 sq. meters.
The thickness of the film does not exceed 2 mm (usually less) and therefore the heater can be laid under the floor covering without disturbing its structure.
Power, thickness, dimensions may vary from different manufacturers, as well as the composition of the heating elements, for the production of which oxygen-free copper, silver, and carbon are mainly used.
How much power of underfloor heating is required?
It is necessary to decide whether the infrared heated floor will be the only heating or only auxiliary.
To heat a room in a central climate, a normally insulated building requires a power of 1 kW per 10 square meters. area. But this is a conditional meaning.
It all depends on the specific heat loss, i.e. on the thermal insulation of enclosing structures, ceiling heights, the presence of windows and doors and their heat-saving properties, room ventilation, as well as the climate where the building is located.
More information about the required power for heating can be found, for example, here, and here about heat loss with ventilation
How much area and film is needed for heating
In this way, the required number of heating elements for each room is selected according to the required power, and the power is selected with a 20% margin. The operating mode, and therefore the power output during the day, is always regulated automatically according to the set temperature.
But due to the fact that heating with electricity today is not profitable, since electricity is the most expensive source of energy, it is more often used as auxiliary heating.
In this case, the floor area covered by the heater is usually within 0.4 - 0.6 of the entire area of the room, and the total maximum power does not exceed 0.7 of the required one.
Is there enough power in the electrical network?
Also, the maximum power is limited by the capabilities of the electrical network. For a conventional 220 V connection, the maximum power consumption does not exceed 5.0 kW, therefore 2.0 - 3.0 kW can be allocated for heating, which is clearly not enough to heat the entire building with electricity.
To fully heat a house with electricity, you need a three-phase connection of 380 V and an allowed power of more than 10 kW. In this case, by the way, the optimal heating is an electric boiler with liquid radiators and a water heated floor. More information about heating with electricity - boiler or convector
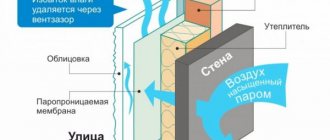
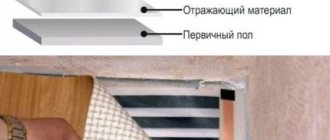
The need to use insulation
Infrared heating film for heated floors can only be laid on foil insulation. The film itself heats up somewhat and this heat needs to be isolated from the base of the floor. But the main thing is to reflect the radiation back into the room.
At points of sale of film, the backing is often included. Aluminum foil should not be used.
The thickness of effective insulation for interfloor ceilings can be 1 cm. And floors above an unheated underground or above passages must be insulated in accordance with the requirements of the regulations. For example, Features of insulation of floors with joists
In any case, it is recommended to lay a vapor barrier membrane (polyethylene film) under the foil backing for the film to prevent steam from escaping from the room into cold areas and condensing at the dew point.
How the film itself is laid
Heating temperature sensors are placed under the heating film in recesses made in the insulation.
In order not to damage the heating elements during installation, they are usually covered with an additional thin vinyl (polyethylene) gasket.
The infrared emitter should not be placed under furniture, as it may overheat and be damaged. If the room is filled with furniture, this can significantly limit the heating power.
Restrictions on the use of infrared heating
Entangling a room with live electrical conductors, through which significant current flows (high power consumption), entails an increase in the level of electric and magnetic fields in the room.
Quite a lot of experts recommend, if possible, to avoid being near sources of electromagnetic waves, since there is evidence that they are harmful to living organisms.
Film manufacturers talk about the harmlessness of their products and thermal radiation of 5 - 20 microns. But here it is recommended, if possible, to change electric heating to harmless and environmentally friendly water heating, and also to prevent children from being in rooms and areas with a high electromagnetic background.
Connection
If the wiring is old, then it is most likely not designed for power above 2 kW. In many cases, for infrared heating of a room, it will be necessary to lay a separate line from the shield with separate protections. Usually the cable is laid under the baseboard.
The film itself is unrolled with connecting terminals to a 220 V source, individual fragments of the film are connected in parallel to a common conductor.
The heater is equipped with a power regulator (thermostat) and a temperature sensor, which is installed according to the diagram recommended by the manufacturer.
It is recommended to invite a qualified electrician to carry out the installation of the electrical part. It is important to make connections of power contacts in accordance with the requirements of the Rules, in order to avoid overheating and fire.
More information (from one of the manufacturers) - how to make infrared floor heating
Flooring
The infrared emitter is a heating film, very durable and can be laid on a heat-insulating reflector substrate directly under a hard floor covering - boards, laminate, screed with tiles, hard linoleum.
All flooring materials must be designed for a heated floor system and the possibility of heating. When heated, ordinary floor coverings can become deformed, crack, or release harmful substances.
As a rule, installing an infrared heated floor also entails changing the floor covering.
Under soft carpet or linoleum, it is better to protect the film with a hard coating, which will also become the main heat absorber. The same laminate or thin board made of non-resinous wood (not pine) can be used. Plywood is not recommended due to the risk of increased formaldehyde emissions when heated.
When laying film under a screed, it is unacceptable to turn on the heater until it dries completely.
Cement-sand screed with ceramic tiles is the optimal coating for the accumulation and transfer of heat for any source of heating in the floor - both water and electric.
But here a dry screed made from double sheets of gypsum fiber board can also be used. (In any case, you need to look at the characteristics of the film and the manufacturer’s recommendations regarding possible compression and the possibility of laying under various coatings).
Advantages, why do you like film heated floors?
The laid and connected film infrared emitter must be tested in operation for several hours before laying the floor covering.
Despite significant disadvantages - the high cost of energy and the emitter itself and questionable environmental friendliness - film infrared heating is popular.
Users first of all want to get a heated floor as quickly as possible and with minimal labor costs, as well as ease of use - to control it, you just need to set the desired temperature.
And the advantages of any floor heating are known - better temperature comfort in the room and optimal temperature distribution to save heat. The service life of the system is usually at least 15 years.
Infrared heated floor under tiles: installation features
Installing infrared floors under tiles is not as complicated as it might seem at first glance
But there are several nuances that are important to take into account. First you need to worry about the materials and tools that you may need for the job.
This can be a heat-reflecting substrate, the IR film itself in the required quantity, tape for insulating wires, tiles and glue for it, tape, corrugated tube, drywall, contact clamps, polyethylene, connection wires, scissors, etc.
Infrared floor - installation
To lay both the tiles and the infrared heating system, you need a flat base. Therefore, it must be cleared of debris and inspected for damage and protrusions. There should not be any relief on it - all cracks are sealed, and it is recommended to sand off any bulges.
Also, preliminary work on the installation of an IR floor system includes the creation of a diagram for laying IR film and the placement of various elements such as a thermostat. In this case, the location of large-sized furniture and places where the film will not be installed should be taken into account.
It is important to remember that all wires running from the heating system to the thermostat must be laid in a corrugation and groove cut into the wall. However, it is not always necessary to dabble walls
Sometimes the wires are laid in a narrow plastic channel that is attached to the wall surface.
How to cut infrared heating film
All installation work must be carried out at air temperatures above 0 degrees, as well as at a humidity of no more than 60%
It is also important to ground the entire system.
Particular attention is paid to contact insulation, as well as possible places where the film is damaged.
Table. Types of installation of IR film.
| View | Description |
| Dry | It is used when installing on the surface of IR film of laminate or carpet. It is used for installing tiles, but rarely. It involves carefully leveling the surface, laying thermal insulation material and the film itself, then installing a protective film layer (polyethylene), sheets of drywall and the tile itself, which is secured with glue. In this case, the film is not exposed to contact with caustic substances and will last a long time. But the height of the base in this case turns out to be quite significant, which is not always relevant. In addition, this method of carrying out work will be more expensive. |
| Wet | Used for laying tiles, stone, etc. The so-called classic method. The work will cost less than with a dry type of installation, but it is much more complex. In this case, the surface is also prepared, then a heat reflector is laid on which the IR film is mounted. Next, it is covered with polyethylene film, reinforced and filled with a mixture for self-leveling floors. Ceramic tiles are mounted using the classical method (with glue) on top of this layer after it has dried. The heated floor system can be put into operation approximately a week after laying the tiles. |
Advantages of IR floors and their inherent disadvantages
We have already written above about the abundance of advantages of this type of heating, so be patient to read the following voluminous list:
- the atmosphere created by the floors is comfortable for humans and completely safe for their health;
- the heat produced is almost identical to natural solar heat;
- the installation does not dry out the air;
- IR floors provide the possibility of zone heating;
- the system can be installed in any room of any size;
- in terms of cost, IR flooring is more affordable than cable or water systems;
- the almost complete absence of thermal inertia makes it possible to achieve the desired temperature as quickly as possible with a high degree of uniformity in height;
- Installation of IR floors is very quick and quite easy.
As we promised and as required by objectivity, we will list the disadvantages of infrared floors:
- the impossibility of installing furniture where this heating system is installed;
- heating of all interior items by the system;
- presence of some probability of electrical shock;
- less economical than a water floor;
- When laying the system under any soft surface, it is necessary to have a sufficiently durable intermediate layer.
So, we hope that with the above we were able to confirm our positive assessment of this heating system and that we can count you among our supporters. If this is indeed the case and if you have a desire to purchase and install an infrared floor, do not fail to read our article dedicated to its selection and installation.
The best film IR floors
Heating a home using infrared film has a number of advantages over other types of heating. The presented rating of high-quality models of film floors will help you decide on the right purchase.
Caleo GOLD
| Options | Description |
| Power consumption | 170 W |
| Power density | 170 W/m² |
| Heating area | 1 m² |
| Film Width(cm) | 50 |
| Film length(cm) | 200 |
| overheat protection | There is |
The popular thermal film of the Caleo brand, combined with an anti-spark silver mesh, ensures fast heating of the elements with less electricity consumption. Suitable for standard living rooms with any type of flooring.
Caleo GOLD Advantages:
- with the function of partial self-regulation;
- fireproof and economical;
- installation without screed and tile adhesive;
- anti-allergenic effect;
- step-by-step instructions included.
Flaws:
not identified.
Price – 2300 rubles.
IR film Q-Term
| Options | Characteristics |
| Power consumption | 240 W |
| Power density | 220 W/m² |
| Roll size | 0.5 m |
| Thickness | 0.33 mm |
| Rated voltage | 220V |
| Grounding | No |
Budget models are not inferior in quality and service life. Powerful infrared film is suitable for any finishing surface, both in the playroom and in the office. You can install the heating system yourself.
IR film Q-Term Advantages:
- high power;
- low price - only 250 rubles;
- easy installation at home.
Flaws:
The heating area is not specified.
EASTEC Energy Save
| Options | Description |
| Power consumption | 22000 W |
| Power density | 220 W/m² |
| Heating area | up to 100 m² |
| Film Width(cm) | 100 |
| Film length(cm) | 10000 |
| overheat protection | There is |
| Application | linoleum, parquet board, laminate, carpet |
The thermal film has a homogeneous structure, high insulation and mechanical strength of the heating elements. Installation does not require special skills or additional equipment. How to install is described in the user manual. Suitable for damp and cold areas.
EASTEC Energy Save Advantages:
- self-regulation technology;
- easy installation;
- prevents fungus;
- suitable as the main heating method;
- possibility to order online.
Flaws:
It is recommended to use a heat-reflective backing.
Cost – from 700 rubles.
RexVa XicA XM305
| Options | Characteristics |
| Max. heating size | 1 m² |
| Power consumption | 220 W |
| Power density | 220 W/m² |
| Film size | 200 x 50 cm |
| Thickness | 0.338 mm |
| Operating current | 1 A |
| Fire resistance | There is |
Inexpensive models of film floors from a well-known manufacturer are compatible with different types of surfaces. The design has increased fire resistance and moisture resistance. What are the characteristics of thermal films and what is included in the package, you can find out from the seller.
RexVa XicA XM305 Advantages:
- heating the entire room in 5-40 minutes;
- optimal ratio of quality and price - 250 rubles;
- energy saving;
- stable and durable;
- keeps you warm and healthy.
Flaws:
not identified.
Electrolux ETS-220-2
| Options | Description |
| Heating area | 2 m² |
| Power consumption | 481 W |
| Average power | 220 W/m² |
| Mat size (lxw) | 400 x 50 CM |
| Rated voltage | 220V |
| Shielded | No |
| Application | under linoleum, laminate, parquet, carpet |
The entire surface of the thin film evenly warms the area in a short time and maintains warmth and comfort. Installation of the material is carried out simply, without significant work that occurs during construction. You can use local heating zones - only under the table, sofa, etc.
Electrolux ETS-220-2 Advantages:
- high-quality and safe material;
- quick and simple layout;
- a complete set of necessary elements.
Flaws:
not identified.
The cost of a heated floor is from 2500 to 5000 rubles.
For heating systems, water or antifreeze fluid is most often used. It is a well-known fact: the more efficient heating technologies are, the more expensive they are. The development of modern floor structures has destroyed this myth, and the presented review of the best infrared heated floors for 2021 confirmed the information.
What is it made of
It is based on a sprayed graphite (carbon) heating element applied to a polymer base. It is graphite that heats the floor covering when heated to a temperature of 40-45 degrees. The conversion rate of electrical energy into thermal energy is close to 100 percent. The electrical connection of the carbon emitters is made using copper foil and low current resistance silver plating to reduce transient resistance. The result is a sealed heating structure laminated on both sides with electrical wear-resistant polyester, providing waterproofness of the film floor and increased protection against electrical breakdown.
Installation of infrared floor from rods
This electric floor heating system is easy to install. The subfloor must be level. The maximum permissible height difference is 1cm per 1m2
As with a film heater, it is important to ensure a good level of thermal insulation. Therefore, we lay thermal insulation along the walls and on the floor.
As with other heated floors, the best option is a metalized material that is attached to the base with double-sided tape, glue or staples.
Installation and connection diagram for a rod infrared heated floor
Having laid the thermal insulation and taped its joints, roll out the mat on top, not reaching the opposite wall 15-20 cm. At the turning point, cut one of the side connecting cables in the middle between the rods and turn the roll in the desired direction. Repeat this operation until you finish laying. When rolling out the roll, make sure that the wires do not touch or intersect. Attach the rods and conductors to the thermal insulation with tape and fasten them together. Until now, the process has been the same as when installing an infrared film floor. Then the differences begin.
Now we cut out windows in some places between the rods in the heat insulator. They will “connect” the screed laid on the IR core floor to the subfloor. They are arranged in a checkerboard pattern. The total area of “holes” is 20-25% of the thermal insulation area. It is better to cut out many small pieces - this way there will be less heat loss through them. Now it's the turn of the electrical part.
Connecting rods
Using the wire and contact clamps included in the kit, you need to connect the cut supply wires to one system. We remove the insulation from the wire by about 1 cm in the place where it was cut when turning the mat. We take the clamp/contact and put it on the bare conductor, crimp it with pliers or pliers. We put a piece of heat-shrink tubing of a slightly larger diameter on the wire from the kit. We insert the stripped end of this wire on the other side into the contact. We crimp it too. After checking the strength of the connection (tug), using a hair dryer, we achieve shrinkage of the tube on the contact. We got a well-insulated contact. Some companies use bitumen instead of heat-shrinkable pipes for insulation. Strips of this material attach very well to any surface and do not conduct current. In this case, take a piece of bitumen insulation and, having laid the contact, crimp it well. So we connect all the contacts. The connection diagram is shown in the figure.
This is what a rod infrared heated floor looks like before laying the tiles
Having collected everything, we connect it to the thermostat installed on the wall. We also connect a temperature sensor to it, which we place in the middle between the rods (you can fix it with tape). Having completed the connection, turn on the system, set it to 30°C and carefully observe. If there is no sparking or strange smell, all the strips are heating up, then everything has been done correctly and you can proceed to the final stage of installation.
https://youtube.com/watch?v=PGp-rrP0EjM
Laying flooring on an infrared rod floor
This option is an ideal choice for heated floors under tiles. In this case, installation is very simple. Just take tile adhesive and tiles and lay them. The only condition is that the thickness of the glue + tile must be more than 2 cm for uniform heating and a normal level of heat transfer. This is the best heated floor for tiles or porcelain stoneware.
Installation of infrared rod floor under tiles
All other types of coating require a screed. Its thickness is at least 2cm. Laying the flooring only after the composition has completely dried. Please note that you absolutely cannot turn on the underfloor heating system to speed up drying: cracks will appear, and they will lead to a decrease in heating efficiency.
Infrared radiation is not the only way to organize electric floor heating. You can lay heating cables or make a water heated floor from heating
High user comfort and precise regulation
Infrared heated floors are an ideal system for direct heating of floors with uniform heat distribution over the entire surface. Compared, for example, with heating with water-heating radiators, the film contributes to the creation of general thermal comfort and a cozy atmosphere at a low temperature of the heating surface, in addition, it does not take up space and does not spoil the overall appearance of the room. The operating temperature of the heating film is very well regulated, as a result of which it is possible to flexibly, and most importantly accurately (up to 0.1 degrees) adjust the required temperature depending on time. Accuracy of regulation and speed of heating are the main factors for saving heating costs (a decrease in temperature by 1 degree reduces total heating costs by up to 6%) and creating a stable comfortable environment. Varieties of film with PTC effect are self-regulating and reduce their power when overheated locally. As a result, the risk of overheating the floor covering and energy consumption are reduced.
Installation of a heating system: features of laying tiles on a heated floor
Before laying a warm floor under the tiles with your own hands, you should clear the surface of foreign objects. It is recommended to inspect the floor for defects and unevenness; if necessary, you will have to level the surface.
You should also determine the distribution locations of the system, indicating the distance between the wires or heating elements.
Basic Rules
- you need to leave a gap of about 10 cm between the wall and the heating system;
- It is necessary to think in advance about the placement of furniture and equipment without legs. In the area where they are placed, according to the instructions, laying electric heated floors under tiles is prohibited;
- You should not place the heating in a straight line. The system allows you to trim the mesh and direct the path in the desired direction, which reduces the use of electricity by directing heat to the desired areas.
Laying tiles on a warm electric floor is carried out only after checking the functionality of the heating system
Before you begin installing electric floors under tiles with your own hands, you should make sure that the existing electrical wiring will be able to withstand higher voltages. To do this, a certain calculation is carried out to determine whether the diameter of the cores is suitable. If a discrepancy is detected, it is worth replacing the electrical wiring with a more powerful one.
Laying warm electric floors under tiles step by step instructions
There are several stages of laying electric heated floors with your own hands:
- Surface thermal insulation.
- Installation and connection of elements.
- Installing a temperature sensor.
- Heating control testing.
- Laying tiles using a special solution.
After thermal insulation of the surface, installation and connection of heating elements is carried out
Thermal insulation system can improve the efficiency of underfloor heating. Penofol is the most suitable material for insulation. The insulation is easy to attach due to the presence of self-adhesive elements, and the foil on the surface perfectly reflects heat. The material must be laid end-to-end, additionally secured with tape and leaving a slight overlap on the walls.
It is also worth gluing the perimeter of the room with damper tape, and then placing a metal mesh on penofol. This will allow installation to be carried out quickly enough and will compensate for the expansion of the coating when heated.
After completing these steps, you need to start connecting the temperature sensor. To make it easy to set the required temperature, the thermostat is mounted in the wall next to the power connectors. The temperature sensor itself is installed in the floor.
After control testing of the system, laying of tiles using an adhesive mixture begins.
The laying of the cable itself begins after measuring the resistance. It may differ from that stated by the manufacturers. Secure the cable using mounting tape. In order for the system to work, it is necessary to correctly spread the material and correctly connect the elements to the thermostat. The price of laying heated floors under tiles by professionals ranges from 550 to 650 rubles per square meter.
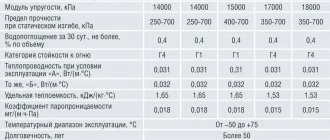
Technical characteristics of infrared floor
The main technical characteristics of this room heating system are the following:
- power supply;
- Film coating dimensions:
- energy consumption level per square meter;
- film heating principle;
- maximum permissible degree of heating of the film coating;
- melting temperature of the film coating.
Technical characteristics of infrared floor.
The power supply is an ordinary household electrical network with single-phase alternating current voltage of 220 V. The dimensions of the film that the manufacturer offers to the consumer are 0.4 mm thick, 0.5 or 0.8 m wide. The energy consumption of one square meter of such coverage ranges from 140 to 150 W. The energy consumption per square meter depends on the width of the film coating. Graphite emitters are used as a heater in the film coating. During heating, the maximum permissible temperature is 55°C. The melting point of the material from which the polymer coating is made is 210°C.
Based on the given technical characteristics, we can conclude that this type of room heater is the most economical and takes up virtually no space in the room under the floor covering. After installation, the film coating is not felt even when it is laid under soft linoleum. In addition to being practical and economical, this heating system has a high degree of safety for humans. During operation of the device, a weak magnetic field is generated, which does not have a negative effect on the body.
What is IR underfloor heating?
Infrared heated floors can make a home more comfortable for its inhabitants thanks to the correctly selected temperature conditions.
Moreover, it can become the main type of heating if about 60% of the area of each room where heating is required is covered with carbon material.
If the system is planned to be used as an additional source of comfort, then it is sufficient to install it on 40% of the usable area
Operating principle of IR heating
IR heated floors made of carbon heating elements pass current through them. As a result of this process, infrared radiation occurs in the range of 5-20 microns. It transfers its energy to objects in the room, bypassing the air. The decorative flooring and all the furniture will heat up from the radiant heat, warming the air.
In a room with infrared heated floors, first of all, the objects located below are heated. Therefore, at the level of a person’s head, the air will be slightly cooler, which will prevent headaches.
Moreover, the floor will always be warm thanks to the film or system of rods laid underneath it. If this is the only source of heating, then you don’t have to worry about dry air. And infrared rays are not capable of burning oxygen.
An article is devoted to the actual benefits and imaginary harms of infrared radiation, which we advise site visitors to read.
Types and characteristics of infrared heated floors for heating
There are several types of infrared heated floors, differing in their structure, installation methods and performance characteristics.
- Infrared film flooring is the most popular type due to its affordability, ease of installation and ability to be installed under linoleum, carpet, laminate, etc.
- Carbon IR underfloor heating is an innovative development based on graphite-silver rods. Carbon infrared coatings are characterized by high efficiency and are used for heating not only indoor spaces, but sometimes also open spaces and streets.
- Rod infrared floor , the heating elements of which are flexible rods connected to each other via a cable. It is highly reliable and durable, however, its installation must be carried out when laying the floor, in the screed and in tile adhesive.
The great popularity of film infrared floors is the reason that sometimes, when talking about infrared coatings, they only mean them. However, this is not entirely true, given the presence of other types of such equipment. Another common mistake that can often be encountered is the incorrect spelling of “infrared heated floor”.
As you can see, each of the listed varieties has its own characteristics and preferential scope of application. For example, for installation under tiles, an infrared rod floor is best suited; for installation under a laminate or carpet, a film floor is best suited. For balconies and loggias, both film and carbon varieties can be used.
Regulating the temperature of heated floors
To create comfortable conditions, as well as to control the consumption of electricity and other resources, users resort to adjusting the temperature of heated floors.
Adjusting water floors
On water systems, a thermostatic valve or pumping and mixing groups with automation are usually installed.
They prevent overheating of the system and the floor covering, respond to changes in room temperature and open or close valves, maintaining specified modes.
The advantage of such regulators is the simplicity and ease of assembly of the structure.
Regulation of electric and infrared floors
For electric floors, electromechanical, digital and programmable thermostats are used. They are connected in parallel to the circuit and use special sensors that analyze changes in surface heating modes. When the maximum set heating thresholds are reached, they turn off the coolants. When the temperature drops a couple of degrees, they re-energize the electric heaters. Such thermostats allow you to save from 30 to 60% of electricity, significantly reducing the cost of utility bills.