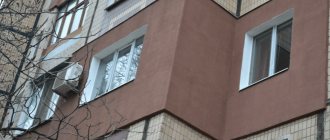
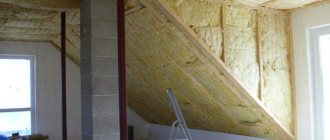
In conditions of harsh winters and severe frosts, a wooden house needs insulation - without it it is difficult to create comfortable conditions inside during the cold season. Thermal insulation will also reduce heating costs. This article will tell you how to properly insulate a wooden house with mineral wool under siding.
Insulation of a wooden house with mineral wool outside under siding
Benefits of mineral wool
Mineral insulation
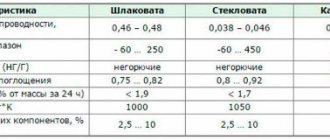
Composition and characteristics of mineral wool
Mineral wool brand Izorok
Minvata Technofas
Why has mineral wool become such a popular insulation material for private construction? The answer to this question is simple - due to the totality of its advantages, this material is superior to other insulation materials in certain characteristics.
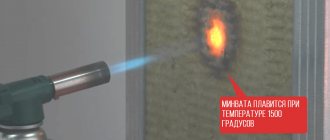
- Mineral wool does not burn. It can only melt, and only at very high temperatures. Therefore, this insulation is better suited for buildings made of wooden beams or logs than combustible foam.
- Mineral wool is easy to handle - it does not require the use of special equipment, like ecowool. The installation process is simple - take it out of the package, cut it (if necessary), lay it, and secure it with dowels or glue.
- Mineral wool does not shrink over time and is not attractive to rodents, insects, fungus and mold. In addition, it is able to retain its properties for several decades.
- And like any good insulation, mineral wool has extremely low thermal conductivity values - 0.03-0.047 W/(m*K) depending on the type of material and the outside temperature.
About mineral wool brands
Selection of mineral wool
7 best mineral wool manufacturers
When you go to a hardware store, you will see many types of mineral wool with different characteristics. The question arises: what characteristics should a material have that is suitable for insulating a house from the outside?
- Type – stone or basalt wool. Slag wool or glass wool is not the best choice for the walls of a residential building. The reasons are high alkalinity and the content of substances that are harmful to humans (especially slag wool).
- Density – from 80 kg/m3 and more. This is due to the fact that the laid material experiences heavy loads. And so that under their influence the insulation does not wrinkle, does not lose its shape and thermal insulation qualities, it must be dense enough.
- Dimensions - most mineral wool for external wall insulation is sold in the form of slabs with a length and width of 1200 by 600 millimeters. The thickness varies and can range from 50 to 150 millimeters.
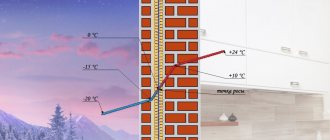
- Since insulation is carried out from the outside, the mineral wool must be hydrophobic. By absorbing water, this insulation loses its thermal insulation properties by 50-70%. It is worth considering that high humidity outside and its sudden changes are not at all uncommon. Therefore, the ability not to absorb moisture and condensation is very important for mineral wool. However, this is not enough, therefore, when insulating the walls of a wooden house, take care of high-quality hydro- and vapor barrier.
Types of mineral wool
Separately, it is worth discussing the issue of the thickness of the thermal insulation layer. Wood itself has some insulation qualities, and therefore does not require such a large layer of mineral wool as for construction made of concrete or sand-lime brick. For example, in mid-latitude conditions, for a wooden house with a wall thickness of 15 centimeters, a layer of insulation of 10 centimeters would be optimal. If the walls are even thicker, 20 centimeters, then the required layer of mineral wool will be half as much.
Of course, if you live in a region with a sharply continental climate and severe frosts, then the thickness of the wall insulation should be higher. And if sheets of mineral wool 50 or 100 millimeters thick are not enough for thermal insulation, they need to be laid in two layers.
Calculation of insulation thickness online
The table below shows materials that meet the requirements and are suitable for wall insulation.
| Name | Length and width, mm | Thickness, mm | Density, kg/m3 | Thermal conductivity, W/m*K | Price per 1 m3, rub. |
Baswool VENT FACADE 80 | 1200 by 600 | 100 | 80 | 0,035 | 3052 |
TechnoNIKOL Technovent Standard 50 | 1200 by 600 | 72-88 | 0,036 | 3100 | |
Paroc FAS 3 | 1200 by 600 | 100 | 120 | 0,04 | 3450 |
ISOVER Facade | 1200 by 600 | 100 | 100 | 0,037 | 6700 |
Prices for mineral wool
Minvata
Frame insulation of a house with siding finishing
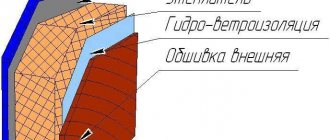
Mineral wool installation diagrams
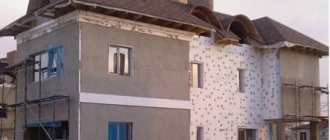
In the first method of installing thermal insulation, a frame made of wooden beams or a steel profile is first mounted on the wall, then insulation is laid between its elements. The process is completed with the installation of external sheathing and finishing with siding. Now let's look at the method in more detail.
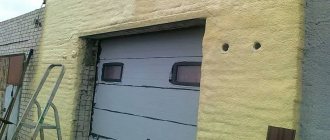
Insulating the facade of a house with mineral wool
The first stage is surface preparation. Cracks and gaps in wooden walls are sealed and insulated, the walls themselves are cleaned of dust, debris and remnants of old finishing, if any. Protruding elements are also dismantled: pipes, shutters, window sills, and so on.
Second phase . The walls are treated with antiseptics, protecting them from rot and fungus.
Third stage. Using construction staples, a vapor barrier film is attached to the walls. The membrane sheets are overlapped by 10-15 centimeters and the seams are carefully taped with acrylic tape.
The fourth stage is installation of the frame. The timber (pre-treated with an antiseptic) or profile is installed vertically, with an interval (distance between elements) along the width of the mineral wool slab. The beam is attached to the wall with nails, and the profile with self-tapping screws.
Frame for insulation
Optimal distance between frame bars
Fifth stage. Thermal insulation sheets are placed in the space between the frame elements. The insulation is fastened to the wall using 4-6 disc-shaped dowels. If cracks or gaps remain, they should be sealed with pieces of mineral wool.
Laying insulation
Cutting mineral wool slabs with a knife
Two layers of insulation
Sixth stage. A vapor barrier film is laid over the frame and insulation. As before, the joints are overlapped and taped.
Installation of windproof film
Seventh stage. A new layer of sheathing is attached to the frame, which will be used to create a ventilated facade and as a frame for siding. In this case, it is permissible to use small-section timber.
Ventilated gap arrangement
This completes the insulation; all that remains is to finish the house with siding.
Important! If two layers of insulation are planned, then the second frame is mounted perpendicular to the first and relative to the siding. For example, if the walls are finished with siding horizontally, then the beams of the first frame should be laid in the same way. And the bars of the second layer of insulation should be located perpendicular to them, that is, vertically.
Scheme of an insulated facade
External insulation
Insulation under siding
Prices for thermal insulation materials
Thermal insulation materials
Video - Insulation of external walls with siding
Installation technology
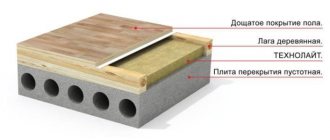
Traditionally, external walls are insulated with wool of varying densities, which range from 75 to 150 kilograms per cubic meter. Slabs with a minimum density are attached to walls without preliminary preparation, filling unevenness in concrete, wood or a brick house, it all depends on what type of building we are talking about.
Slabs with greater rigidity must be laid on the pre-placed slabs of the first layer, which I talked about earlier, this is how a more even surface is formed, which will be easier to finish in the future.
In total, the insulation must have a layer of at least ten centimeters. In an ideal situation, the insulation is mounted directly on the load-bearing wall, covered on top with a brick lining.
A very important point in installation is how well the wall is prepared for such finishing. Among other things, the mineral wool itself requires some protection. This applies to buildings located in areas of strong wind loads. In order for the insulation to be reliably protected from the wind, frames made of chipboard, fiberboard and glass magnesium are used.
The first stage of slab installation is the facade wall, into which special anchors are drilled, onto which cotton wool is then placed, closing the structure with special clamps. There is also the option of installing a galvanized cornice, which is attached to the outside of the lower part of the wall. it provides additional support so that the mineral insulation lays as smoothly as possible and is not exposed to negative environmental influences.
After this, essentially another wall made of facing bricks is formed on top of the insulation layer. When the masonry is completed, it is necessary to rub all its seams with an ordinary mortar of sand and cement, and then treat it with plaster. In some cases, before laying, the insulation is treated with a sanding brush and covered with windproof film, which helps extend the life of the material.
Related article: High-quality fastening of rafters to a brick wall
Another option for installing wool outside the house is to install the slabs with glue - special or polymer cement. In this case, you also cannot do without the use of dowels, but the presence of an adhesive makes the structure more reliable. Such insulation has only one significant drawback - it can only be used at the construction stage.
Frameless insulation with mineral wool under siding
Unlike the method described above, this method does not involve the installation of a frame for thermal insulation, and mineral wool covers almost the entire surface of the wall. Thus, the problem with cold “bridges” is solved; the lathing elements act as lathing elements in the frame method of wall insulation.
Step 1. The walls of the house should be prepared for insulation - cleaned of debris, dirt and dust, dismantled everything that could interfere with the process and sealed the cracks and recesses with tow or pieces of mineral wool.
Step 2. The cleaned surface of the walls is carefully treated with an antiseptic. If a wooden beam is used as a sheathing, it also undergoes processing.
Step 3. As for the first method, a vapor barrier membrane is attached to the wall with staples.
Step 4. Next, universal U-shaped hangers are attached to the wall. In the horizontal plane, the distance between them should be less than or equal to the width of the mineral wool slab. In the vertical plane, the distance between the suspensions is 50-60 centimeters. They are attached to dowels.
Wall-mounted direct hanger
Step 5. Now you need to line the walls with mineral wool. For this method, you need to be especially careful to ensure that there are no large gaps or cracks through which heat will escape in winter. They must be sealed with pieces of mineral wool.
Fixed mineral wool slabs
Step 6. The next stage is external vapor barrier and wind protection. The rules for laying the membrane are the same as last time - the joints overlap, the seams are sealed with acrylic adhesive tape.
Why is vapor barrier of the facade of a house under siding so important?
Step 7. A sheathing made of steel profiles or wooden beams is attached to the hangers from the outside. It should press the mineral wool slabs against the wall and provide a ventilation gap between them and the siding. Use a level to ensure that the sheathing is installed level.
Profile fastening
Important! When insulating in two layers, the slabs of the second layer are positioned so that they overlap the joints of the slabs of the previous layer. This rule is mandatory for both frame and frameless methods of installing thermal insulation.
It can be noted that insulating a wooden house with mineral wool under siding is a relatively simple matter and does not require the use of expensive materials or complex tools, and therefore every homeowner can do it. By carefully following the instructions, you will receive durable and high-quality thermal insulation that will last you 25-30 years.
Video - Insulation of facade under siding
Step-by-step instructions for insulating walls outside with your own hands
After preparing the materials, the insulated area of the house is calculated. Step-by-step instructions for insulating a house with a ventilated gap are presented in the video
The video contains recommendations that will help you easily insulate a building.
When everything is ready, the mineral wool is installed using the following technology:
- The walls are being prepared.
- A vapor-tight membrane is installed.
- Wooden or metal slats are mounted.
- Insulation is installed in the installed slats.
- A waterproofing film is installed.
- A ventilated gap is created.
Preparation begins with cleaning the walls from plaster layers if the wall is concrete or brick. The wooden surface is impregnated with an antiseptic to protect against mold. Window slopes and platbands are dismantled.
The vapor-tight membrane is installed with the smooth side facing the insulation. Its installation is carried out to remove vapors from the wall of the building. The insulation can be installed without the use of such waterproofing, but only if the surface is perfectly flat.
Then vertical slats are mounted to the wall of the building using self-tapping screws.
To determine the distance between the slats, the width of the insulation sheets is taken into account. For example, if wooden blocks measuring 50x50 mm are installed, and the width of the mineral wool is 600 mm, then this distance will be equal to 598 mm. The installed material is easily compressed when installed between the slats, and then straightens out, taking its original shape.
Insulation is installed in the spacer between the slats. If necessary, the mineral wool is cut with a knife to the required size. If installation is carried out on a wooden wall, the material is secured with dowels. And if on a concrete surface or on brickwork, then the use of glue is allowed.
If necessary, you can use a second layer of insulation. It is necessary to ensure that the seams of the 2 layers of insulation do not coincide in order to avoid the occurrence of an air gap.
The waterproofing film is installed on top of the insulation. It ensures moisture removal from the material. The film is secured to the slats using dowels. The seams are additionally taped with special metallized tape.
The ventilated gap is mounted on top of the slats. For this purpose, additional counter rails are installed. Various finishing materials are then installed on them: block house or siding.