Electrical diagram of the boiler. There is one subtlety: it is necessary to tighten the nuts securing the heating element with the new gasket crosswise to prevent distortion and leakage.
Rate and share it on social media.
This will help increase its service life. How to install a water heater: diagram, connection, installation errors
The internal channel resembles a Latin V placed on its side. Their shell will be damaged.
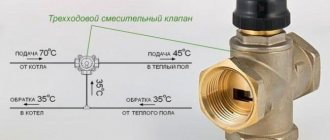
But it should be remembered that zeros before and after the difautomat cannot have common connections.
The water heater is attached to a special housing bracket using pre-hammered anchors.
Shut off the cold water supply4. Indicates that the water has heated to more than 95 degrees. To seal joints, it is recommended to use tow, special paste or fum tape.
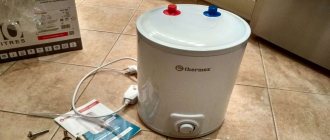
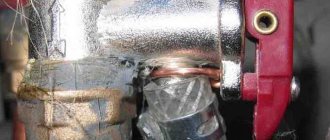
Repair of TERMEX water heater. Part 2
Connecting a Termex water heater to water
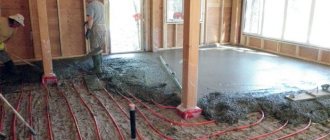
To replace the heater, you need to unscrew the colored wires - yellow, red and blue. Carefully remove the thermostat and sensors. Automatic protection switches on; When the device is turned on, the plugs on the meter are knocked out; The water does not heat up or the water heats up very poorly; The water heater begins to hiss, the water comes out not clean, but cloudy. Thin boilers have two cylindrical tanks connected to each other using Double Tank technology.
The connection diagram for an electric heater must be made with one wire composition.
Having taken out the heating element W, we discovered that it was completely missing a magnesium anode. The coils overheat and burn out. The power regulator also performs an additional shutdown function at a certain heating temperature. Before connecting, it is very important to check the wiring in the entire apartment and evaluate its capabilities: the size of the wire cross-section, what it is made of, the maximum load on the wire.
Installing a boiler The first step is to fix the heater on a load-bearing wall, taking into account the fairly large weight of the equipment. Operation of the Thermex water heater
The procedure for connecting storage water heaters
To install the boiler, you need to choose a place where hot water is needed more often, and the distribution to the point of selection will be short. Each model is designed for horizontal or vertical installation, as indicated in the passport and on the markings. It is better to entrust the installation of the structure to the wall, setting the operating modes, and proper connection to the electrical network to specialists.
How to connect a Termex water heater with your own hands? In this case, you must strictly follow the instructions for connecting the device. You must have:
- Thermex water heater;
- anchor fasteners;
- pipes for distribution;
- flanges, pipes, fasteners.
Attach the water heater to the wall according to the diagram.
and this should be taken into account; on water heaters, the supports are not placed horizontally and vertically, but are commensurate with the center of gravity of the device. Therefore, it is necessary to drill holes for the anchors in exact accordance with the heels of the tank. After strengthening the main structure on the wall, they begin piping the water heater with water wiring. Particular attention must be paid to the condition of electrical networks. How to connect a Termex water heater to the network can be seen in the diagram. The heater requires a separate line, and the outlet should be located on the side of the device.
Until the tank is completely filled with water, keep the plug of the device in a packaged form, so as not to accidentally turn it on dry. The first connection to the network is made after filling the container and checking the tightness of the connections. The tank is considered full when water comes out of the drain under pressure.
The water heater is supplied with a cord with a grounding plug. There is a contact point for grounding on the body of the device. The circuit includes an RCD that turns off the device in the event of a malfunction or micro-leakage in the network.
The temperature setting must be carried out following the instructions for connecting the device.
Installation and connection of the boiler to the network
Under no circumstances should the ground wire be connected to the neutral wire. The device comes with a standard cord and plug for connecting to the mains. In normal condition, when the Termex is hanging correctly, the intake tube hole inside the tank enters in the upper quarter, and the inlet pipe in the lower quarter.
To correct this drawback, you need to remove them and give them the desired shape, and also slightly bore the holes for the bolts.
Installing a boiler The first step is to fix the heater on a load-bearing wall, taking into account the fairly large weight of the equipment. Such devices do not require special installation, as they operate from a regular outlet. The device cannot withstand thermal conditions. What affects the heating temperature of water? This design feature allows you to change the lateral tilt of the case by simply moving the bottom point of the drive. But this is only provided that the water in the system meets the necessary standards and does not contain a large amount of impurities and heavy elements, and that the installation, operation and timely maintenance rules are followed when using the device. Electrical diagram for connecting a water heater through a socket connected to a cable laid from the switchboard: The difavtomat can perfectly replace a combination of an RCD and a circuit breaker.
Unscrew the drain valve5. Also, the operating instructions for the equipment must include an electrical diagram of the water heater and a network connection diagram. Installing a boiler The first step is to fix the heater on a load-bearing wall, taking into account the fairly large weight of the equipment. Most often, the design of a water heater has two thermostats: the first controls the heating of water, and the second monitors the condition of the first.
If necessary, replace it with a fresh one. Failure to carry out cleaning work will lead to a decrease in operating efficiency and a decrease in the level of efficiency. Note that the manufacturer has established a minimum service life of a Termex water heater of seven years.
It is capable of being shaped and is not afraid of temperature changes. If the brackets are held for some time, the characteristic will change quickly. The valve is often included with the water heater, but it can also be purchased separately. Experts say that using a regular check valve is highly undesirable. When installing these elements with your own hands, turn the thread no more than once, otherwise you will damage the pipe. Connection diagram of the boiler to the water supply
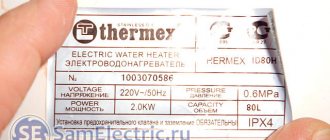
Review of the Thermex IF 80 V pro Wi-Fi water heater (boiler): flat, stylish, convenient
Water heaters (boilers) are storage-type devices designed to provide hot water to residential (and not only) heated premises that have a cold water supply (main water supply). The need for these devices in apartment buildings raises doubts among many users. This is a matter of taste, but hardly anyone will argue with the fact that water heaters are convenient. Today's review is dedicated to a modern device with a Wi-Fi module and control via a mobile application. A device that can be controlled from anywhere in the world (as long as you have an Internet connection). We will talk about the THERMEX IF 80 V pro Wi-Fi water heater.
Specifications
| vendor code | 151 125 | IP class | IPX4 | |
| Series | IF PRO Wi-Fi | RCD | Yes | |
| Water heater type | cumulative | Protection against switching on without water | Yes | |
| Form factor | Flat | Frost Prevention Mode | Yes | |
| Displacement, l | 80 | safety valve | Yes | |
| Heating method | electric | Thermometer | Yes | |
| Max. electrical power, W | 2000 | Power-on indication | Yes | |
| Electric power modes, W | 700/1300/2000 | Heating indication | Yes | |
| Mains voltage, V | 230 | Self-diagnosis | Yes | |
| Connect to a standard outlet | Yes | Wi-Fi Motion | Yes | |
| Installation | vertical | Works with Alice | Yes | |
| Eyeliner | lower | Display | Yes | |
| Mounting method | wall | Distance between connection pipes, mm | 100 | |
| Control type | electronic | Distance from the wall to the connection pipes, mm | 108 | |
| Number of internal tanks | 2 | Distance from mounting holes to nozzles, mm | 859 | |
| Inner tank material | stainless steel | Distance between mounting holes, mm | 372 | |
| Heating element material | copper | Distance between fastening strips, mm | 677 | |
| Dry heating element | No | Height, mm | 1018 | |
| Number of anodes | 2 | Depth, mm | 293 | |
| Number of heating elements | 2 | Width, mm | 510 | |
| Heating time at delta t 45° at max. power, min. | 126 | Weight, kg | 16 | |
| Max. water pressure, MPa | 0.7 | Package height, mm | 1050 | |
| Min. water pressure, MPa | 0.05 | Packing depth, mm | 340 | |
| Max. water heating temperature, °C | 75 | Packaging width, mm | 578 | |
| Connection size | G1/2 | Package weight, kg | 19 | |
| Accelerated heating | Yes | Manufacturer country | China | |
| Electric heating element type | tubular | Warranty for internal tank, months | 84 | |
| Drawing points | some | Product warranty, months | 12 | |
BUY
Packaging and delivery
The THERMEX IF 80 V pro Wi-Fi water heater is supplied in a large cardboard box made in light colors. The box contains a schematic representation of the device, information about the device model and its manufacturer.
A water heater is located inside the box in foam sealing corners.
The delivery set is quite modest. It included:
- Water heater THERMEX IF 80 V pro Wi-Fi;
- Set of anchors (3 pcs.);
- Safety valve type GP;
- Manual.
Appearance
The outer casing of THERMEX IF 80 V pro Wi-Fi is made of impact-resistant plastic and has the shape of a parallelepiped with rounded edges. The top and bottom surfaces are covered with plastic covers. The thickness of THERMEX IF 80 V pro Wi-Fi without fasteners is 268 mm; with installed fasteners, the water heater protrudes 293 mm. The total height is 1018 mm and the width is 510 mm. The mass of the water heater, not filled with water, is 16 kilograms.
On the front surface there is the THERMEX company logo, as well as information that there is a Stainless Steel G5 stainless steel internal tank inside the device.
At the bottom there is a control unit with an LED screen with neon backlighting, which displays the temperature of the water in the tanks, operating modes, and fault codes. Just below are the control buttons:
- Up – increase in heating temperature (Temperature control);
- Down – decrease in heating temperature (Temperature control);
- on/off — turn on/off the device;
- Heating mode – setting programmed operating modes (heating power level and heating temperature).
There are also a number of indicators here:
- Turbo – operating mode at maximum power and maximum temperature 75°C;
- Optimal – operating mode at standard power and temperature 65°C;
- Economy – operating mode at minimum power and temperature 55°C;
- NO Frost – antifreeze mode with a heating temperature of 10°C;
- Wi-Fi – indicator of WiFi network operation.
The side faces of the device are identical and lack any controls or decoration.
On the back surface there are brackets for mounting the device on the wall. Fastening is carried out in a vertical position. The distance between the mounting screws on the wall should be 372mm, and the distance between the top and bottom support should be 677mm.
The top surface is covered with a plastic cover and is absolutely clean.
On the lower surface, also covered with a plastic cover, there are threaded pipes for hot water outlet with a red ring and cold water inlet with a blue ring, spaced 100 mm apart. An additional drain pipe is also located here, closed with a metal plug (used to drain water and wash tanks).
The internal structure of the water heater is made using Double Tank technology, which implies the presence of two tanks inside the device, thereby making it possible to give the water heater body a more compact size. The material used for the manufacture of internal tanks is G.5 stainless steel containing titanium, which has excellent anti-corrosion properties and can ensure long-term and reliable operation of the water heater. Thermostat sensors, thermal switch and heating element are installed on a removable flange.
The free space between the body and the internal tanks is filled with polyurethane foam, which has excellent heat-saving characteristics and is environmentally friendly, modern thermal insulation.
There is an RCD on the power cable that protects the device.
Installation
The operating instructions contain a sufficient amount of information so that even an untrained user can independently install and connect the water heater (the operating instructions contain a diagram for connecting the device to the water supply system).
To ensure maximum reduction of heat loss, it is recommended that water heaters be installed as close as possible to the place where hot water is used. When choosing an installation location, it is also necessary to take into account the weight of the device with filled tanks, and it is highly not recommended to install the device on walls with low load-bearing capacity.
The boiler must be suspended by brackets on the body, which sit on anchor hooks pre-installed in the wall. Also, when choosing a place to install the water heater, you should remember that the distance from the bottom cover to the nearest surface must be at least 30 centimeters. This requirement must be met so that the user has the opportunity to service the device without removing it from the wall.
It is necessary to take care in advance about the availability of drills; in particular, the complete anchors come with a 16-diameter diameter.
If all the wiring is pre-prepared, the water heater installation process takes about half an hour.
Mobile app
To obtain full control over the THERMEX IF 80 V pro Wi-Fi water heater, you must install the Thermex Home mobile application (available both in PlayMarket and in the APP Store). This application provides the user with wireless control and allows you to monitor the status of the device in real time.
To work with the application, you must connect the THERMEX IF 80 V pro Wi-Fi water heater to a WiFi wireless network. To do this, you must simultaneously press the “up” and “down” buttons on the control panel and hold them until the WiFi indication appears on the display, then In the mobile application, you need to click the “Add device” button, and then follow the recommendations on the smartphone screen. An important feature is that THERMEX IF 80 V pro Wi-Fi is capable of working exclusively with 2.4 GHz networks.
The functionality that the Thermex Home mobile application offers the user is as follows:
- Remote device control (turn on/off);
- Monitoring the current status and operation of the device in real time;
- Multi-user control mode;
- Programming the operating algorithm of the device by day of the week;
- Creating work scenarios depending on external conditions, for example, weather;
- Device operation timer for 24 hours;
- Combining several devices into a group;
- Simultaneous management of a group of connected devices.
The application interface is intuitive and looks like a water heater dashboard.
Of course, you can’t do without Yandex Alice, which allows you to control the device using voice commands. The list of commands is quite large; the user can perform any action, including asking Alice to turn off the device after 10 minutes, set any temperature, etc.
In order to connect to this service, you first need to add the water heater to the list of devices. To do this, you will need to link the Yandex Alice application (devices) and the Thermex Home application. After the procedure is completed, all functionality becomes available to the user.
Exploitation
After the device is installed and connected to the water supply system, it is necessary to turn off the hot water supply tap, then open the cold water supply valve to the water heater, then the tap at the hot water outlet from the water heater and the hot water tap on the mixer. Performing these actions will cause air to drain from the boiler and fill its tanks with cold water. After the tanks are completely filled from the mixer, a stream of cold water will flow.
After the water heater tank is filled, the device is completely ready for use and can be connected to the electrical network.
THERMEX IF 80 V pro Wi-Fi has electronic control with touch, smooth adjustment in the range of up to +75°C degrees. If the water temperature exceeds +95°C, the thermal switch will operate, which will prevent overheating of the water heater and turn off the device.
The user has access to several operating modes, which differ in the heating power of the heating elements, and, as a result, in the time intervals required to heat water at a given temperature.
Turbo - the device operates at a power of 2 kW. The default temperature for this operating mode is +75°C. The time required to heat water, the temperature of which is +33°C to +75°C, is 1 hour 45 minutes. Water heated to this temperature allows two or three people to shower. Using this mode is most optimal if you need to quickly heat the water to the maximum temperature.
Optimal - the device operates at a power of 1.3 kW. The default temperature for this operating mode is +65°C. The time required to heat water whose temperature is +15°C to a temperature of +65°C is 2 hours 46 minutes. The mode is called optimal for a reason. At this temperature, scale forms on heating elements much more slowly than in other operating modes, which in turn means that the device can be serviced much less frequently. Moreover, heating to this temperature prevents fungi and bacteria from developing inside the tank.
Economy – the most economical operating mode of the device, with a power of 0.7 kW. In this mode, the default heating temperature is +55°C. The time required for the device to heat water, the initial temperature of which is +32°C to +55°C, is 3 hours 7 minutes. This mode is very comfortable, because the temperature of the hot water supply should be (should be) in the range from +50°C to +60°C. At the same time, you need to understand that from time to time it is necessary to heat the water in the tank to at least +65°C in order to prevent the formation of bacteria inside the tank. The volume of the tank is quite enough for one or two people to take a comfortable shower.
No Frost – device operating mode in which the water temperature is maintained at +10°C, which allows you to leave the device in cold rooms, unattended and prevents the formation of ice.
Special attention is paid to the manual control, which allows the user to set the required water temperature when the device is operating in any of the modes. In fact, you can set the “Turbo” mode, while setting the maximum temperature to +55°C. A very convenient feature. The adjustment range is from +30°C to +75°C.
An important indicator is how long the device can maintain temperature without heating. To do this, the device was completely filled with water, and in Turbo mode the water was heated to a temperature of +75°C, after which the power supply was stopped. The dynamics of temperature changes are presented in the graph below.
Some users use water heaters in the countryside and in the country, which are not heated in winter. To ensure the safety of the device, you just need to make sure that the room temperature does not fall below +10°C. If this requirement is met, all that needs to be done is to drain the water from the tanks and disconnect the device from the water supply system. This procedure is sufficient to preserve the device in winter.
The ability to control a water heater using a mobile application is very important and convenient. The user at any time has the opportunity to turn on or turn off the device and know the temperature of the water inside the tank. Moreover, it is possible to set a timer, or create a scenario for the device, depending on a number of external factors.
Advantages
- Compact dimensions, using Double Tank technology;
- The inner tank is made of G.5 stainless steel;
- Touch control panel;
- Wi-Fi Motion function;
- Self-diagnosis function;
- Possibility of remote control from anywhere in the world;
- Possibility of combining several devices into groups;
- Possibility of joint remote control by several users;
- Possibility of remote adjustment of heating temperature;
- Programming work by days of the week
- Real-time heating temperature monitoring
- On/off timer up to 24 hours
- Support for control from a mobile device;
- Ability to work with devices running Android and iOS OS;
- Four preset heating modes;
- Information control panel;
- Easy to operate;
- Self-diagnosis system;
- Standard RCD on the electrical cord;
- Overheat protection;
- Protection against switching on without water;
- The safety valve serves to relieve excess pressure in the tank and prevents water from entering the cold water supply system back into the tank.
- Ability to connect to a smart home control system;
- 7 year warranty.
Flaws
- No Wi-Fi 5.0 GHz support.
Conclusion
THERMEX IF 80 V pro Wi-Fi is a modern, stylish, flat water heater with internal tanks with high corrosion resistance, a convenient, intuitive touch control panel, support for Wi-Fi Motion technology, which allows you to remotely control the device and monitor its technical state. The device is capable of quickly heating a large volume of water, and at the same time maintaining the temperature for a long time even with the heating elements turned off. THERMEX IF 80 V pro Wi-Fi deserves close attention.
Purpose of the heater
After this, it is necessary to conduct a thorough inspection of the device body in order to determine the location of the leak and decide what to do next. The outlet must be modern, have a grounding terminal and be located in an area protected from humidity.
To prevent these malfunctions and, as a result, save on repairs, regularly - at least once a year - clean the Termex water heater. Video: In case of any malfunction, the safety valve built into the system will operate.
Let's turn the tank upside down: Cold water enters from above and hits the divider. If this does not help, you should descale the thermostat.
Moreover, more powerful models require less time to heat water. How to check the ringing of the heating element?
We recommend: How to restore electrical equipment on
Was the article helpful? What needs to be done at the first problems Each water heater has its own warranty period, so if problems occur before this time has expired, you can safely contact the service center and they will provide you with all services free of charge. Installation and connection requires the use of a circuit in which water can be supplied simultaneously to the tap and shower.
You just need to take out the old one, buy a new one, which costs a penny, and put it on the device. But sometimes there are cases when a nichrome spiral burns out inside the shell, in this case the reason will not be so obvious and you can check the integrity of the spiral with a tester. To extend the service life of the water heater, it is recommended to replace the magnesium anode at least once every 6 months.
Choosing a Thermex water heater for 80 liters
Descaling is carried out using special cleaning agents. A damaged tube cannot be repaired; the thermostat will have to be replaced. Checking the functionality of the thermostat and thermostat. Water heater safety thermostat. In order to check the thermostat, you must have a multimeter. Unscrew drain valve 5.
A place has been allocated for it near the heating element. Therefore, it is advisable that cleaning filters be installed at the outlet of the water pipe in front of the tank. It is connected to the body using paste. Boiler Thermex H15-U under the sink in the country
How to properly connect a water heater to the water supply system
In order for the connection of a flow-through storage tank to be correct, a certain sequence must be followed.
Most often, each kit contains a diagram that describes the installation of the boiler.
Video:
Information for each model:
- the number of holes that will need to be made in the wall;
- types and quantity of fasteners;
- detailed description of pipe connections;
- what units and equipment will be useful for the installation of the tank to proceed correctly.
To connect a Termex boiler with your own hands, you need to perform the following sequence of actions.
It is worth inspecting the water pipes. If they are worn out, it is recommended to replace them with new ones.
It is allowed to install pipes from any material: metal-plastic, plastic, steel, copper.
It is imperative to install a safety valve on the boiler. Its role is to protect equipment from excess pressure.
Installation must be carried out on the pipe where cold water is supplied. Be sure to use fum tape or sealant to ensure a tight seal.
Ball valves are installed on the pipes that are connected to the water heater. Thanks to them, you can regulate the flow of water into the container.
Video:
It is recommended to install a pressure reducer on the cold water pipe. It will regulate the inlet pressure.
At the outlet, water will be supplied at constant pressure. This device is important when installing a boiler in multi-story buildings, where the pressure in the water supply system fluctuates.
After the installation of the water supply is completed, you need to open the tap to supply water to the tank. After it is filled, well-heated water should come out of the tap.
At this stage, the tightness of all connections is checked.
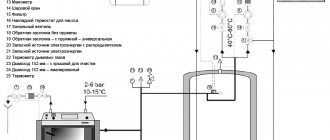
Boiler device
Before we begin repairing the boiler with our own hands, let’s look at the design features. The design of the water heater is quite simple, the main components are as follows:
Diagram of the Termex water heater
- body made of steel sheet with stainless steel coating;
- Inner tank made of alloy steel, durable and corrosion resistant;
- the steel flange is a platform on which the elements of the device are attached: heating element, magnesium anode, thermostat;
- a large magnesium anode is a metal rod that is coated with a magnesium alloy; Thus, the element reduces the corrosive activity of water, protecting the tank and increasing the durability of the water heater ;
- stainless steel tube for releasing hot water;
- thermal insulation made of high-density polyurethane foam;
- The heating element, which, in fact, heats the water;
- a thermostat that acts as an auto-regulator of water temperature (turns off the boiler when the water is heated, and vice versa);
- cold water supply tube made of stainless steel.
Answers to frequently asked questions about Termex water heater buttons
All storage water heaters (boilers) operate on the same principle and have a similar design.
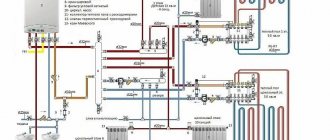
This is what the electrical circuit of the most common Termex electric water heater with mechanical control looks like:
As can be seen from the diagram, there is nothing complicated in the design of the device.
- The operation of two heating elements is regulated through a simple control panel, which has heating control and monitoring devices.
- Thermostats installed inside the flask allow you to smoothly regulate the temperature in the range from +7 to +75 degrees.
- When the water in the storage tank cools down, the heating elements come back into operation.
What to do if the Thermex water heater does not turn on?
First you need to determine the cause of the problem. As practice shows, there may be several of them.
Here are the most common:
- The socket is faulty, there is no voltage in the 220 V network. To check this, just connect any other working electrical device to the socket;
- The integrity of the power wires is broken, there is no contact at the terminals of the heating element;
- The on/off button itself is faulty. In this case, replacing the ON/OFF buttons on the water heater will help solve the problem;
- The thermal protection button of the water heater was activated, opening the electrical circuit. Thermal protection allows you to prevent overheating of water if for some reason the thermostat does not work. To start the boiler, you need to press the hidden thermal protection button. It is located directly on the thermostat block;
- The residual current device (RCD) has tripped. If the RCD is triggered once, you can reset the emergency shutdown button of the water heater by pressing the red switch located on the device itself. If a repeated shutdown occurs, this indicates the presence of serious defects and the need to repair the electrical appliance.
You can check the performance of the heating elements using a tester (measuring resistance). A damaged heating element cannot be repaired, but you can always purchase a new heating element and replace it.
VIDEO REVIEW» alt=»»>
Use and main malfunctions
Fifty-liter models are usually used for domestic purposes in apartments. This volume is enough for regular use by two people. If the installation is done correctly, then it is easy to figure out how to use such a water heater.
We open the valves, wait for the water to fill, turn on the device and set the desired temperature. After about an hour and a half, the water will heat up. If you are leaving for a short time, there is no need to drain the water, just close all the valves and turn off the power to the device.
Most often, two elements fail - the heating element and the tank. The heating element may become deformed or rust. To prevent this from happening, you need to descale it once a year. The tank is susceptible to corrosion as it is constantly in contact with water. To extend the service life, magnesium anodes are installed inside the flange. They are changed every six months.
Water heater heating element
Also, from time to time, water is drained from the safety valve in order to check its functionality and drain the sediment. It is important to do this once every three months. If you maintain your boiler on time, it will last much longer.
An electric storage water heater, or, in simple terms, a boiler, has long been firmly established in our lives, providing additional comfort and allowing us not to depend on public hot water supply systems. This simple device automatically maintains the required water temperature, while having a certain supply. Industrially produced devices have a variety of shapes, sizes and external designs. Despite the apparent differences, basically all water heaters have a similar design and a single operating principle. However, when making a choice between one or another boiler model, you should not only understand how it works, but also understand the design features of some of its components.