Advantages and types of material
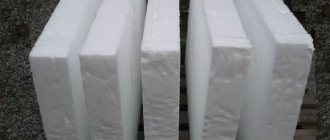
Extruded polystyrene foam is used to make penoplex. The latter is based on foam plastic, which, thanks to additional heat treatment, acquires higher performance properties. The popularity of penoplex is due to the fact that it:
- lasting;
- does not absorb moisture;
- dense;
- does not harm the body;
- vapor permeable;
- does not react with wood and other finishing materials;
- has a long service life.
The solution to the question of whether it is possible to insulate a wooden house with penoplex depends on the desire of the home owner. The type of materials used in the construction of the structure does not affect the performance characteristics of polystyrene foam. They can be used to cover the facades of brick, wood and other buildings.
Penoplex is used for finishing “wet” and “dry” facades. It retains its original properties at temperatures from -50 to +75 degrees. Among the disadvantages of insulation, its flammability and high price attract attention.
Attention! If a wooden house is insulated from the outside with a double layer of penoplex, the sheets of material should be laid in a checkerboard pattern. This organization allows you to prevent the formation of cold bridges.
There are 5 types of material on the market. One of them is used in road construction, the others are used for finishing houses. The latter include:
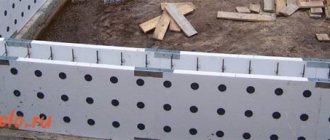
- Penoplex Foundation. It is produced without fire retardants and is used to insulate parts of the house that bear the maximum load (foundation, basement floors).
- Penoplex Wall. Used in finishing facades and plinths.
- Penoplex Roofing. Mounted on any type of roof.
- Penoplex Comfort. It is mainly used for insulating private apartments and balconies.
The material is relatively easy to install. It does not decompose over time.
Tools and materials:
- Penoplex slabs - insulation for interior decoration,
- Deep penetration primer to strengthen the base,
- Dowels for foam plastic, as additional fasteners,
- Adhesive for foam plastic - foam or dry mixture,
- Reinforced mesh - for strengthening before decorative finishing,
- Cement-based plaster - used before finishing work,
- Maklovitsa brush - used when applying primer, you can also use a roller,
- Perforated corner to give clarity to corner bends (internal or external),
- Notched trowel for applying and spreading glue,
- Plaster spatula 300 - 400mm wide,
- Decorative finishing.
Following the rules of economy, craftsmen use a mixture for gluing, which can be glue or glue-plaster.
Why is external insulation used?
Penoplex is a universal material. They can be used to insulate a wooden house from the outside or from the inside. But the latter finishing option is less preferable. The appearance of an additional thermal insulation layer inside the house leads to a shift in the dew point. As a result, this contributes to:
- increasing indoor humidity levels;
- fungal development;
- the appearance of condensation on the walls.
Due to the additional layer of thermal insulation, the size of the usable area indoors is reduced. In addition, the constant temperature difference that occurs for this reason negatively affects the condition of the material, which leads to a reduction in service life.
Therefore, it is recommended to insulate the outside of the house with penoplex. When working with thermal insulation material, you must follow a number of rules:
- The minimum thickness of thermal insulation is 12.4 cm.
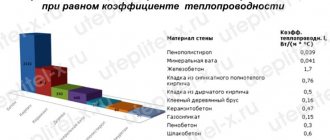
- When choosing a material, you need to pay attention to the thermal conductivity index.
- During the installation process, each sheet must be leaned tightly against its neighbors and the wall (frame).
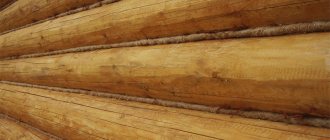
It is equally important to know how to properly insulate a wooden house with penoplex. If the material is mounted on the walls of log buildings, the crowns of the external joints must not be cut off. This will lead to freezing of the corners of the house in winter.
Advice! To achieve the maximum effect from insulating wood or other material with polystyrene foam, it is necessary to sheathe all external elements of the building, including the foundation and roof.
Wall insulation with Penoplex
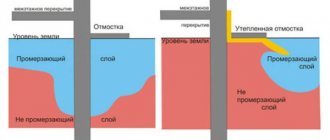
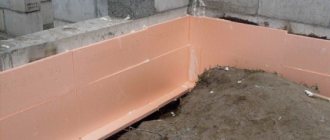
The main purpose of Penoplex is to insulate the basement floor, blind area and foundation.
Penoplex cannot be used to insulate the walls of above-ground wooden structures. Insulating a frame house is theoretically possible, but in practice, the inter-wall voids are filled with either liquid thermal insulation or mineral wool, and polystyrene foam is used in SIP panels. Insulation of a house made of timber with Penoplex is allowed only for its underground elements, these include:
- blind area;
- foundation;
- base
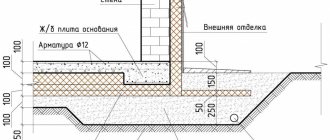
In this case, insulating a timber house with Penoplex can be defined as a technical necessity. Extruded polystyrene foam, unlike conventional polystyrene foam, does not collapse when exposed to moisture. You can safely bury it in the ground and nothing will happen to it there for half a century - that’s for sure. The insulation of the foundation is carried out from the outside, so as to protect the concrete from moisture, which is always abundant in the ground. Despite the low vapor permeability of EPS, concrete must additionally be protected with a layer of vapor barrier. It is applied directly to the wall before installing thermal insulation.
"Wet" facade
There are many rumors surrounding the “wet” façade. This version of external cladding is more often used to decorate the walls of apartments from the outside. With this installation method, polystyrene foam is not additionally covered with a decorative layer.
Important! A “wet” façade is not suitable for wooden houses.
To create a “wet” facade, you will need to purchase the necessary list of materials in advance:
- specialized glue for fixing foam boards;
- glue for applying plaster;
- reinforced fiberglass section intended for outdoor use;
- perforated corners;
- decorative plaster and paint intended for finishing facades;
- high adhesion primer;
- high permeability primer.
Important! In order to insulate a house from the outside with penoplex, you will need sheets at least 5 cm thick.
After purchasing the specified materials, you can begin preparing the walls for applying a thermal insulation layer.
Facade preparation
It is possible to properly insulate a facade provided that the walls of the building have been prepared for the installation of foam foam. At the initial stage, it is necessary to remove from them all elements that interfere with the work. This applies equally to peeling plaster. The base on which the polystyrene foam will be attached must be strong and reliable.
Upon completion of the first stage, you need to clean the wall of fine dirt. To do this, wipe the façade with a wet cloth.
Next, a high-permeability primer is applied to the façade. To treat walls, it is more convenient to use a roller or brush. The primer must be applied in a thin layer. After the wall has dried, the procedure is repeated.
Installation of thermal insulation
To level the first (bottom) layer of insulation, you need to install a profile along the wall. It is attached to bricks with dowels, and to wood with self-tapping screws. When installing the profile, you should use a building level.
Adhesive foam, used to fix penoplex to the facades of buildings, is applied along the perimeter of the sheet and its center. The first slab is installed in the lower corner of the wall. Penoplex is placed on the guide profile and lightly pressed so that the glue securely fixes the insulation. Next, the position of the insulation is checked using a building level.
The first row of penoplex is laid using a similar principle. It is important that the sheets are mounted as close to each other as possible. Subsequent rows are installed in a checkerboard pattern.
When the work on the walls is completed, you need to move on to covering the slopes. To do this, it is necessary to cut the foam boards in accordance with the size of the window and door openings.
At the end, the polystyrene foam sheets are additionally fixed with special dowels. For them, you need to drill holes in the wall directly through the insulation sheets. Its length should exceed the same parameter of the dowel by 10-15 mm.
Advice! It is recommended to place dowels at the joints of insulation sheets. This way their caps will be able to fix several slabs at once.
When working with slopes, dowels are not used.
Preparing insulation for finishing
Before applying finishing material to polystyrene foam, its surface must be roughened. The problem can be solved by treating the penoplex with a metal brush, sandpaper or a special grater designed for such work.
After completing this stage, an adhesive primer is applied to the surface of the penoplex. The gaps between the sheets are filled with the same glue that was used to fix the material to the wall.
Next, perforated corners are fixed on all external corners (including slopes). To fix them, Ceresit CT 83 glue is used. When installing the corners, you must use a level.
Before finishing the penoplex, its surface is covered with a reinforced mesh. The material is first laid on the slopes. The mesh should be cut so that it extends to the corners. Next, the slopes are treated with Ceresit ST 83 glue (a layer 4-5 mm thick should be obtained), after which it is necessary to walk over the surface with a notched trowel.
At the end of the work, a mesh is applied to the slope and embedded in glue. A notched trowel is used to level the reinforcement.
Attention! After the surface has dried, it is re-treated with glue.
The facades are reinforced according to a similar scheme.
Polystyrene foam finishing
Before finishing, expanded polystyrene sheets are pre-treated with a primer. The plaster is applied according to the instructions attached to it.
After about 5-7 minutes, the finishing material is additionally rubbed using a grinder. Once the plaster has completely set, it can be painted. It is recommended to use a roller for this. The paint is applied in 2 layers, avoiding drips.
Features of insulating the basement ceiling of an apartment building
All of the above is true for a private cottage.
How realistic is it to insulate the floor from the basement side of an apartment, so as not to spoil the newly renovated floor and not limit yourself in the thickness of the insulation layer (especially important for apartments with low ceilings)? A basement in an apartment building is not your personal property. In some cases, even entering there is problematic: it is locked with a key, and the technician-caretaker has the key. To carry out work there, you will need permission from the housing administration. Responsible housing and communal services officials will tell you which documents to collect.
The list will likely include a permit from the fire inspector.
note
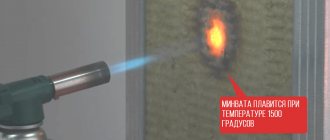
Therefore, do not rush to purchase PPS or PPU - they are flammable, the likelihood of getting the go-ahead from firefighters is minimal.
Pay attention to basalt wool and foam glass in slabs: both materials belong to the NG group. Serious disadvantages of mineral wool:
Serious disadvantages of mineral wool:
- hygroscopicity;
- when wet, cotton wool loses more than half of its heat-shielding properties;
- vapor permeability.
This is not critical if the basement is dry and well ventilated.
Mineral wool insulation of a basement ceiling from the inside can be done in two ways, frameless and framed. In the first case, installation is carried out similarly to the PPS:
secure the slabs to the ceiling with glue;
secure with “umbrellas”;
plaster with façade plaster reinforced with fiberglass mesh.
This option is feasible only with rigid facade slabs and only in a dry basement. In other cases, a frame one is used:
1. The ceiling is sheathed with plasterboard profiles.
2. Cotton wool is placed between the profiles.
3. Cover with a vapor barrier membrane.
4. Sew up with waterproof plasterboard, fiberboard sheets or other similar material.
Sometimes mineral wool blanks are hermetically packaged in plastic or vapor-proof film before being placed in the frame and the seams are sealed with mounting tape.
The option is energy-intensive, but provides 100% protection of the insulation from getting wet.
Another option is to insulate the ceiling in the basement of the house with foam glass slabs.
This material does not absorb moisture and is alkali-resistant - an important property when used in combination with plaster.
Its disadvantages:
- the weight is on average three times greater than that of mineral wool;
- much higher price.
The maximum permissible thickness of thermal insulation is 10 cm. Within these limits, you can fasten the slabs with glue and dowels with nails in increments of 20 cm. If it is more, you will need a frame, but it should be taken into account that foam glass will create a large load on the floor.
When installing with glue, the slabs are treated from the outside with plaster and fiberglass mesh; when using the frame method, they are sewn up with waterproof sheets.
"Dry" facade
The “dry” (hinged) facade is more popular than the “wet” one due to the fact that it can be installed at any time of the year, and the finishing will last longer.
To insulate a house using this method you will need:
- metal profiles and brackets (wooden slats are also suitable);
- vapor barrier film;
- impregnation for wood;
- glue foam;
- material for finishing the facade (lining, siding, etc.).
Preparing walls for insulating a brick house with penoplex from the outside is carried out according to the scheme described above. Wooden structures are additionally treated with protective impregnation, and the inter-crown cracks are filled with a suitable thermal insulation composition.
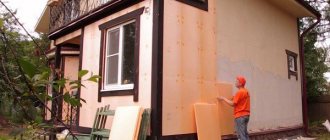
Installation of insulation
Insulating a wooden house from the outside with penoplex begins with installing the frame. First, you need to apply vertical markings along the walls for future racks. The distance between them is 50 cm. The brackets are installed according to the markings. A distance of 50 cm is also maintained between them.
Penoplex sheets are strung directly onto the brackets. That is, the metal must pass through the material. If penoplex insulation is carried out on the outside of a wooden house, then the gaps between the sheets of expanded polystyrene are not filled with foam. This is necessary in order to maintain the vapor permeability of the insulation. When work is carried out on brick and other walls, the cracks must be filled with foam.
After stringing the penoplex, the material is covered with a vapor barrier film if the installation is carried out in a wooden house.
At the end, vertical posts are fixed to the brackets. They must be kept in the same plane.
Attention! You do not need to use glue to fix the penoplex to the wall.
Working with expanded polystyrene does not require special knowledge and skills from the installer. To understand the process of applying the material to the walls, just watch the video below before insulating the outside of the house with penoplex with your own hands:
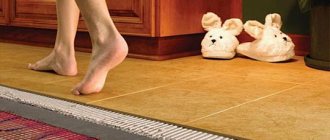
Sequence of work on insulation with penoplex from the inside
Insulating the balcony wall from the inside
As we have already found out, if necessary, you can insulate the walls from the inside, you can do it yourself, but for this it is advisable to use penoplex, which has better properties than the foam traditionally used for this. Just before you start insulation work, you need to familiarize yourself with the technology of insulating walls with penoplex and follow the sequence of work. In this case, special attention should be paid to issues related to the waterproofing of the material and the wall surface. This will help avoid problems associated with condensation. The work must be performed in the following sequence:
- Preparing the wall surface. To obtain maximum effect, it is very important that the wall surface is perfectly flat. Therefore, before gluing penoplex, it is necessary to clean the wall surface of old wallpaper and other facing materials. After this, you need to very carefully examine the wall for dents and protruding fragments, which will have to be cleaned out and the dents plastered over.
- In order to improve the adhesion of penoplex to the wall surface, it must be primed; this can be done twice in succession. A special primer is used for this.
- Considering the waterproof properties of penoplex, you can skip this step, although it doesn’t hurt to be on the safe side. We are talking about the construction of a waterproofing layer. For this, a waterproofing film is used, which is attached to the wall.
- Let's start attaching the penoplex. Previously, disc dowels were widely used for this, which are still used today. However, progress does not stand still, and today the building materials market offers special adhesive mixtures that can be used for this, although better results can be achieved by using dowels and glue at the same time. In this case, you are guaranteed to get a tight and durable connection, which is very important from the point of view of tightness. As for applying the adhesive base, in this case it should be done on the wall and directly on the penoplex.
- Having secured the penoplex to the wall, you can begin finishing work, but first you need to worry about the tightness of the structure, because even a small gap or crack will contribute to the formation of a cold bridge, and this will mean that your work and financial costs were in vain. It is necessary to check all joints and abutments of the insulation to windows and doorways, and if problem areas are found, they must be sealed using sealant, and in particularly problematic areas, polyurethane foam can be used for this.
- The next step may be vapor barrier, which is not necessary in the case of penoplex. For this, a vapor-proof film is used, which is applied on top.
- Finishing work can be done in different ways. Most often, a reinforcing mesh is glued on top of the foam, which is also leveled on top using a layer of adhesive solution. After this, the wall surface is ready for cladding. Sometimes, in order to avoid such difficulties, plasterboard is used to finish walls, where particularly good results can be obtained using plasterboard with insulation.
Attaching foam to the wall
Thus, for those who are familiar with the technology of insulating building facades using the “wet facade” technology, this method of insulation is not something unusual. It’s just that all the work is done indoors. Based on this, the main features and limitations regarding the insulation of walls from the inside emerge. In particular, to insulate walls from the inside, it is not advisable to use slabs made from mineral wool, as they have high vapor permeability. If you have to insulate the walls of apartments and houses built a long time ago, then the layer of penoplex or polystyrene foam should not be less than 70 mm.
Finishing work
The procedure for finishing a “dry” facade depends on the material used for these purposes. For example, if the walls are finally sheathed with vinyl, then before starting work along the perimeter of the building, a starting profile is installed in its lower part. Next, vinyl siding is installed, which is fixed to the frame with self-tapping screws.
Fires should not be lit near walls insulated with penoplex. Otherwise, polystyrene foam does not have any special maintenance requirements.
Recommended Posts
Decorating a house with clapboard
How to decorate the walls in the kitchen
Interior finishing of aerated concrete walls
How to lay laminate on a wall + video
Interesting design of wall shelves
Finishing panels for external walls
Carrying out work:
- Any surface can be treated with a deep penetration primer to strengthen, compact the dust layer and make moisture neutral.
- The adhesive solution should be prepared immediately before starting insulation, completely following the factory instructions on the packaging.
- Using a notched trowel, level the adhesive base and lay the foam on the walls, pressing firmly over the entire surface. Use a level for leveling.
- After 12 hours of drying, you can begin installing additional fasteners - dowels for foam plastic. It is better to buy them a few centimeters longer - for reliability. Using a drill and a pobedit-tipped drill, you need to make holes along the length of the nails and the width of the dowel.
- First, a fungus is placed in the hole (just below the surface of the polystyrene foam), and then a metal or plastic nail is driven in (it is better to use plastic, since it does not rust).
- Next, the insulation is covered with a thin layer of cement plaster (you can use an adhesive mixture) and the mesh is embedded into it. The mesh can also be attached with dowels directly to the slabs, and then plastered.
- The finishing touch can be any type of plaster, wallpaper or tile.
The insulation layer conceals the usable area of the home, but will be very important when dampness and mold appear in the corners of rooms located on the ground or upper floors, which is a strong argument for insulating the house using this method.