How to caulk correctly
The caulking process involves insulating the seams between logs using fiber tape. Practice shows that only if the joints are sealed, high-quality thermal insulation can be guaranteed. The tape, in turn, should be knocked into a tight roller. It is necessary to ensure that the fiber ribbon does not twist, because... twisted fibers have significantly lower thermal protection efficiency.
“Warm seam” with sealant
Another insulation technology is a “warm seam” using sealing compounds. Acrylic rubber compounds are most often used. This is explained by their ability to stretch with temperature changes, maintaining reliable protection against cold air and moisture. In addition, working with such sealants is not difficult.
Comparison of methods
The “Warm seam” technology is a new solution in wooden construction. Most craftsmen with extensive experience continue to give preference to traditional methods using tow or jute, pointing, among other things, to the lower cost of such work.
In turn, do not forget that you will need to caulk the log house at least twice, and when using sealants, a single treatment of all seams and joints is sufficient. The caulking process is longer and more labor intensive. In comparison, the use of sealants is much simpler and does not require much time and physical effort. No hammering into the seams, just apply the sealant using a gun to the top of the seam, and the excess compound is carefully removed.
Why is it cold in a wooden house?
Insulating log buildings does not require reinventing the wheel. This technology is very simple and accessible to most citizens.
Therefore, first you should try standard methods that will block the access of cold air inside the premises:
- First of all, you should deal with the floor and ceiling, where it most often comes from.
- If this method does not bring the desired results, drastic measures should be taken - use the outer cladding of the structure. Although this method is not only simple, but also very effective.
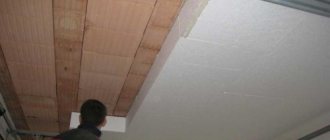
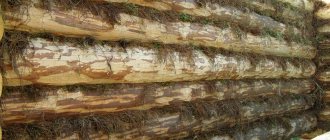
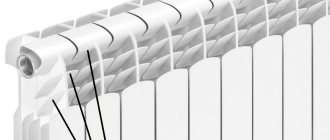
In the photo - this is how caulking of the crowns of a log house is done
Advice: before complaining about the cold in the house and starting to insulate it, you should wait until it goes through the entire drying process. As a rule, you should move into a wooden house made of logs and carry out any work no earlier than a year after construction.
Caulk
Start the process of insulating your home by caulking it yourself. All large cracks should be sealed, carefully filling all the free space between the crowns. In most cases this is enough.
All that remains is to find all the large cracks. As a rule, looking around the house with just one glance, it is unlikely that you will be able to find them.
| Candle | A simple method that requires a lot of time and effort. Light a candle and bring it to the walls; if the flame deviates, it means you have found a gap. |
| Frost | Wait until it freezes and then start inspecting the house. If frost has fallen on any part of the wall, that’s where you need to look for the main reason for the leakage of warm air. |
Now that the scope of work has been determined, you can begin to caulk it.
Why should you prepare the following tool:
- caulk or spatula;
- roll insulation, tow or jute.
The insulation process itself is extremely simple and consists in the fact that using a special tool (caulk) and insulation, the cracks are plugged from the outside of the house.
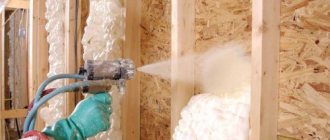
Insulating a log house with mineral wool from the outside and creating a ventilated facade
The facade must be ventilated
The outer wall of a wooden house must be ventilated, otherwise the material will begin to deteriorate under the influence of various microorganisms, including rot and mold. Only a ventilated façade can ensure unhindered air circulation. Thanks to it, the house can continue to release water vapor through the walls and “breathe” without turning into a clogged vessel.
The instructions for its manufacture are as follows:
- Treat the walls with an antiseptic - a special solution that protects the building material from the negative effects of microorganisms and the environment. The building must be processed along the entire perimeter, excluding possible gaps. Antiseptics can be completely transparent, but some of them have color pigments added, which allows not only to protect the wooden structure, but also to give its walls the desired shade.
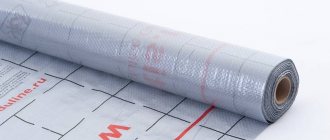
- Attach a layer of waterproofing to the wall of the house. In this case, the membrane one has proven itself best. Its price is low and you can buy it at almost any hardware store.
- Attach the sheathing of wooden blocks to the walls. At the same time, they should also be treated with an antiseptic, which will make the facade more durable. Nail all the bars vertically. Select the latter longer than the bars, which will give rigidity to the entire structure.
Insulation of a house made of rounded logs from the outside with block-house cladding
4. Place the sheathing elements opposite each other at a distance that is slightly larger than the width of the insulation. In this case, additional space is needed for attaching heat-insulating mats to it.
Advice: any material that can perform its intended function can act as insulation. But the most effective and safest will be the use of stone wool, since this material is fire-resistant and does not allow moisture to pass through.
Basic rules for insulating a log house
The construction of a log house involves laying logs with inter-crown insulation, and in some cases without it. At the same time, it is impossible for the logs to fit together as completely as possible, which leads to drafts and penetration of cold. The situation gets worse after one year, when the house begins to shrink, forming new cracks. Not only cold air penetrates through them, but also moisture, leading to rotting of the wood.
The caulking procedure is carried out several times. The first procedure is carried out after 12-18 months from the date of construction, when the house has given the necessary shrinkage. A repeat procedure will be organized after another 24-36 months, depending on the condition of the structure. It is possible that the procedure will have to be repeated in the future. This depends not only on the quality of the materials used, but also on the quality of work.
Caulking is not so easy; you need tools and practical experience, so in most cases specialists are invited. To achieve maximum effect, the log house must be insulated on both sides, both inside and outside. In general, the amount of work turns out to be quite significant, requiring significant effort and time.
It is worth taking into account such an important point as increasing the height of the house. On average, it will add about 50-70mm after the first caulking, so it is not recommended to carry out interior finishing work before insulation.
The cost of work depends on several factors:
- Dimensions of the log house;
- The quality of its construction;
- Type of inter-crown insulation.
Materials for caulking seams
Today, the most widely used methods for insulating wooden log houses are:
- Tow. Material with low thermal conductivity, not conducive to the formation of bacteria. Working with it is difficult, and the resulting result cannot boast of aesthetic appearance;
- Linen. Elastic and durable material at an affordable price. Its weakness is its poor resistance to insects and love from birds, pecking the fiber from the seams;
- Jute. The breathable material is practically impervious to rotting, reliably retains heat inside the building, and is not of interest to birds. Being an imported product, it has a fairly high cost;
- Moss. An outdated type of insulation originally used. Its use is possible only during the construction of a house, and it is impossible to insulate it for an already finished structure.
Using caulking can significantly increase the thermal efficiency of a building, make it more comfortable, and reduce monthly heating costs. In turn, work must be carried out after the log frame has shrinked, but before finishing work is completed.
You can caulk a house in one of two ways:
- Stretch. Used for small gaps by filling the seams.
- To the set. The material is formed into a ball and then sealed with loops. Suitable for cases with large gaps between logs.
Selection of material for insulation
Primary requirements
To insulate a log house from the outside, the materials used must meet the following requirements:
- High level of thermal insulation.
- Environmentally friendly.
- Hygiene.
- Breathability.
- Moisture resistance.
- Fire safety.
Important! For a wooden house it is better to use only natural materials.
Natural materials such as moss, tow, hemp, felt, jute and tape insulation based on flax or jute have proven themselves to be excellent for caulking.
The properties of these materials are given below:
- Moss is rot-resistant and has antibacterial properties.
- Felt requires special treatment, otherwise moth larvae will infest it.
- Jute and flax wool are durable, dense, rot-resistant materials with low hygroscopicity.
Insulation from outside
Mineral wool or ecowool is suitable for external insulation, especially if a ventilated façade is planned.
Expanded polystyrene (foam) or basalt slabs are used when installing a “wet facade”.
Important! Penoplex is not suitable for insulating a log house from the outside, as it has very low vapor permeability.
Sealants for insulating a log house
Today, the market offers a huge range of sealants, varying in both quality and price range. Among the representatives of the mid-price segment, combining affordability and high performance, it is necessary to highlight Remmers products. Sealants from American brands are more expensive, but their properties have minimal advantages.
Benefits of caulking
- Reduced heating costs;
- Use of environmentally friendly, natural material;
- Protection against gaps during shrinkage;
- Low cost.
Advantages of sealant
- Simplicity and high processing speed;
- No need for re-processing;
- Immunity to insects and birds in the absence of toxins in the composition;
- Attractive appearance with the ability to select colors;
- Great versatility of the material.
Each type provides its own advantages, and the maximum effect can be achieved through double use: caulking the seams and covering them with sealant on top. Such protection will ensure complete impermeability to cold outside air and moisture, providing long-lasting protection without the need for re-treatment. At the same time, the appearance of cracks in cases of further shrinkage of the log house will be excluded.
Insulation of a log house
The photo report “Repair of the wall of a log house” shows the progress of the work immediately preceding the insulation of the wall.
Along the way, the need arose to partially strengthen the old foundation. I hope that all the moments of our work reflected in the photographs will help the owners of such houses in carrying out repairs.
The house was built in 1902. The foundation was made of old red brick at the same time, and the external “piping” of the foundation was done in the 90s. Now we use masonry mesh, exactly where it is needed.
The ratio of cement to sand is 1:2.5, but you can also use a ratio of 1:3. Mix the solution and pour concrete.
The board is pressed against the foundation wall with birch blocks so that the mortar lies evenly and does not leak out. The pothole here is very minor.
But here is the main problem area, namely along the wall.
Using a metal rod, the solution is lowered to the very bottom.
Three batches - three wheelbarrows were required for everything.
It was April 9, it started to rain heavily in the evening, and the concrete was covered with cardboard. The next day was also cloudy and cold with rain.
And on April 11, the sun warmed us.
Spring in the river floodplain. A short walk is a lyrical digression.
Today we started insulating the wall. The bars attached with self-tapping screws to the wall must be aligned vertically in the same plane, and their width must match the thickness of the insulation board.
We decided to lay the insulation boards horizontally; it will be easier to insulate the remaining surface near the window openings. But this is more convenient in this particular case; it is not at all necessary to follow such advice.
The plastic “fungi” for attaching the insulation boards must be shortened.
We used different self-tapping screws, they were needed “for wood”. But the glasses bought by mistake a year ago, in the absence of glasses at the right time, were not at all from that “opera”, and also came in handy.
We gradually move up, attaching slab after slab.
We even use small pieces of insulation, which, by the way, can be cut perfectly with a sharp knife.
They inserted the frame into the false opening... They secured it with self-tapping screws...
Then we looked at the geese in the sky, they were flying and screaming. And why only four?
And then we noticed a defect in the previous work. The false window opening will be raised by 5 centimeters.
I had to redo it, lowering the top and bottom bars. They didn't understand whose fault it was. I didn’t take a photo, but everything was fixed and prepared for further work tomorrow morning.
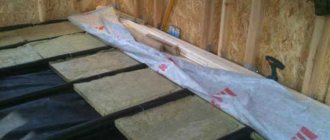
And the morning began with the installation of a wind-moisture-vapor barrier.
We start from the bottom, unwinding the roll, following the instructions, without mixing up the sides.
Using a stapler, we attach the isospan to the slats - bars.
The slats for fastening the lining will then be attached to the bars to which the isospan is attached. Therefore, you need to initially calculate how many rows of self-tapping screws you will run along the wall covered with clapboard.
The second row of isospan is more difficult to attach due to the height of the house.
I had to use a pole, which was inserted into the hole of the roll. One holds it from below and unwinds the roll, while the other attaches it with a stapler while standing on a ladder.
The next row, and the last one, is under the roof. Each subsequent row of isospan should cover the previous one by 20-25 cm. The seams should be taped with tape.
Between the first and second layers, the wide tape ran out. My omission, I was sure that we had a lot of it. But, oddly enough, everything went “quietly and nobly”, even peacefully, they just used a transparent and narrow one, which was not very convenient for such a case.
We cut out window openings in isospan. And then we use self-tapping screws to rivet bars 20 x 45 mm thick to the bars between the insulation slabs on the wall of the house. It is to them that the lining will be attached. And here you need to use a level so that the lining lies in one plane.
There was a mistake, more isospan was cut off on the left than it should have been... But this can be corrected, the outer frame will be covered with platbands.
Trying on a block, marking holes for self-tapping screws:
The wall is prepared for further clapboard covering.
The next day we bought four ebb tides, 2 narrow ones - 7 cm each and 2 wide ones - 20 cm each. We returned from the city and went straight to work. They ran the strip along the very bottom of the wall, attaching it with self-tapping screws. 2 wide ebbs were attached to it.
Next came the work of attaching the lining.
We needed a lining 3.3 m long; we bought a six-meter one, understanding that the remaining 2.7 m would be useful to us.
In the right corner of the photo there are 2 bars so that the lining does not bend, I mentioned this above. Therefore, the level is a necessary tool in the work.
The necessary tool (also a drill corresponding to the self-tapping screws).
We have reached the height at which it is necessary to secure the narrow ebb. The height corresponded to the height of the tides on the other wall of the house.
Having drilled holes in 2-meter metal ebbs, we attach them to the slats. They didn’t cut the ebbs, they just inserted an extra 70 cm into each other.
And then we cover the remaining surface with clapboard.
The sun is setting... Tomorrow we will continue...
Each subsequent 3.3 m long lining has to be adjusted to the required length due to the unequal logs on the sides of the house frame, sawing off 1-7 cm.
Another necessary tool is a level. We used 0.8 meter and 2 meter.
This is exactly the case when you have to attach an additional strip so that the lining runs in the same plane.
The wall is ready, all that remains is to cover the sides of the frame with clapboard.
It took two whole days to complete this work. If I had not seen with my own eyes how this is done, I would not have believed anyone and for nothing. Long adjustment - different diameters of logs. Measure, saw off, attach, level vertically, etc.
Up, down, up, down...
We won’t redo the remaining wall of the house for now; it retains heat well, which means the windows are in order.
We attach the lining vertically to these horizontally located planks.
In some places, pieces of clapboard were used; after painting they will not be noticeable.
The work on insulating the wall of an old log house has been completed. Next, we use two colors of “Propitex” wood coating – rosewood and teak in a 2:1 ratio.
After treatment with two layers of impregnation, the wall acquired this appearance:
All that remains is to paint it again and attach the trim removed during the renovation. 20 April days flew by unnoticed at work. Spring has arrived with a flood on our river.
New construction experiments are ahead. We hope that a photo story about how you can repair and then insulate the wall of an old log house will help some of the “seven-dacha residents.”