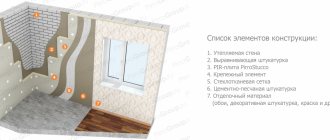
Why she?
Stone wool for facade insulation (another name for mineral wool) is a non-flammable insulation material. For example, according to the manufacturer Rokwool, their mineral wool slabs can withstand temperatures of 1500 degrees WITHOUT FIREING or MELTING!
Alas, cheaper foam plastic cannot boast of this. There is a second important nuance. Vapor permeability. Mineral wool allows steam to pass through better, which means that in a sense it can be called a breathable insulation. Of course, insulation with mineral wool will cost more. You can see more about the properties of this material in the video on the topic: how to insulate the facade of a house with mineral wool.
Mineral wool for plaster is produced by different companies:
- Knauf,
- TechnoNIKOL,
- Rockwool,
- Izovat,
- URSA,
- Paroc.
To insulate the facility, the customer provided TechnoNikol mineral wool for façade insulation.
According to the manufacturer Rokwool, their mineral wool boards can withstand temperatures of 1500 degrees.
Mineral wool: what is it?
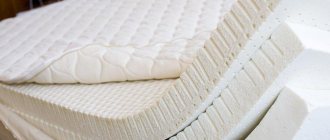
Insulating the facades of houses with mineral wool is a fairly common procedure. Many people prefer this insulation due to its combination of the best technological characteristics. Cotton wool is a “breathable” material that allows the steam generated inside to escape out. Moreover, it is absolutely hydrophobic.
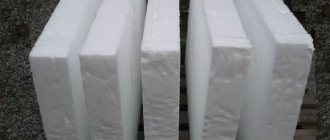
Rigid slabs 10 or 15 cm thick are ideal as insulation for wooden houses. Products are available in one of two formats:
- 120x60cm.
- 100x50cm.
Good foundation - good design
The next important step when insulating with mineral wool is preparing the wall. Considering that we are working at a new facility and the walls are quite smooth, no special preparation is required. But still, most of the objects are houses with old walls. Run your hand along the wall; if anything falls off, you need to prime it. In some, especially “difficult” cases, it is necessary to plaster the walls to level them, but this happens rarely or plaster is only partially needed. Use a facade primer, for example Ceresit CT 17.
Preparing the stove
The technology of façade insulation with mineral wool involves the use of a special adhesive solution. For example, you can use a mixture of Ceresit CT 180. How exactly to apply the glue can be seen in the photo below.
Note. If you apply the adhesive composition in exactly the same volume, you will end up with a large overspend. This was a special case for one slab; this photo shows only the principle: the amount of glue should be reduced by 1.5–2 times. As a base, using a spatula, apply a thin layer of adhesive to the entire inner surface of the slab. And after that, make large spot applications of the mixture. After this, you can attach the slab. The slabs at this site are quite heavy, so it’s difficult to install them alone; it’s easier with two people.
In places where the slab borders a window, the edge of the window opening must not coincide with the joint of the slabs. Otherwise, cracks will appear in the finished structure. The slab should “flow around” the window. For some areas you need to cut out “interesting” designs.
After the first row of slabs is installed, it's time to think about how to install the next one.
Fastening with dowels
If for polystyrene foam someone considers fastening with dowels-umbrellas only as reinsurance, then for mineral wool this cannot be said for sure. Its weight is at least twice that of foam, which means additional fixation is simply necessary. However, please note that these elements do not need to be attached immediately, but at least a day (24 hours!) after gluing. When insulating the facade of a house, carefully follow the instructions for the building materials. Dowels can be attached at least 24 hours after the board has been set on the adhesive. How many dowels are needed? For polystyrene foam, 4–5 is considered acceptable, for mineral wool, 8 and above. How to fasten with dowels? First you need to drill a hole for the anchor. It should be 15–20 mm deeper than the dowel itself. After this, the fastening element itself is inserted and hammered or screwed. Where should I place each dowel? Usually, the center of the slab is also attached to the “bandaging” areas. That is, in the place where the vertical seam abuts the top plate, a hole is drilled. If we are insulating the facade with mineral wool under the plaster, it’s time to move on to the plaster itself. And for this you need a reinforcing mesh.
Plastering technology for insulation
Tools and materials
To carry out the work, you will need the materials themselves (insulation, plaster mixture, reinforcing mesh) and the most common construction tools - a spatula and a bucket with a mixer.
Preparatory work
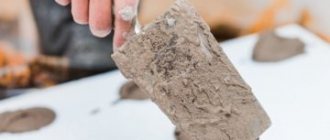
Priming the walls before plastering
Before proceeding with the installation of heat-insulating material, it is necessary to prepare the facade. Preparation consists of clearing the wall of all kinds of hanging elements from drainpipes to lanterns. It is also necessary to get rid of the old topcoat. After this, you should inspect the wall and assess its condition - if necessary, fill up cracks and dents. If the wall is uneven, you will have to plaster it - this step is mandatory if the fluctuation of the surface is one cm per 1 m of length. Treat crumbling areas with a deep penetration primer.
Installation of insulation
Insulation of walls with mineral wool under facade plaster
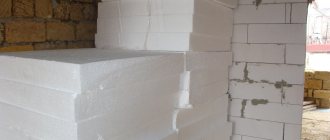
Installation work begins with the installation of a special profile - it not only fixes the insulation boards, but also ensures the horizontal arrangement of these same boards. The insulation is attached to a special glue - we apply it to the wall with a notched trowel and press the slab. Additionally, the thermal insulation material is attached using dowels. The slabs are laid end-to-end without gaps.
To ensure uniform properties of the wall, it is necessary to shift each subsequent row relative to the previous one, which will prevent the vertical joints from matching.
Facade reinforcement
Reinforcement of the facade on polystyrene foam
Reinforcement will make the facade finish durable, while the hardness characteristics of the heat-insulating material are low. We cut the reinforcing mesh for the exterior finishing into strips so that they overlap each other by 10 cm. We align the slopes of all openings with special plaster corners.
The mesh is placed on the glue - it is pressed firmly so that it is immersed in the glue, then thin-layer plaster is applied over the mesh and leveled with a spatula.
To hide minor flaws in the wall surface, as well as to further increase its strength, after drying, apply a second layer of glue - its thickness should not exceed a few millimeters. After this, the wall will be perfectly smooth.
Plastering facade walls
The final stage of facade insulation is plaster, which is produced using a technology suitable for the selected type of plaster composition. Instructions are included with the mixture, so you need to carefully read the packaging - it can even be decorative facade plasters with insulation, for example, bark beetle.
Strengthening the structure
The first stage of reinforcement is patches. These are elements that hold the structure in particularly vulnerable places. Namely: corners of window openings, corners of a building, doorways. In such places, an adhesive solution is applied to the slabs, over an area slightly larger than the mesh itself. At least 200 by 300 mm. After this, the mesh itself is embedded in the glue. Let's make a reservation here right away. You can’t do the opposite: fix the mesh and throw glue on top. The mesh should be embedded in the glue. The mesh is placed on the adhesive solution and embedded in it. Now that the weakest structural elements have been strengthened, we move on to installing the main mesh. Its installation is similar to the installation of “patches”, but only in larger sizes. Apply a layer of glue and, using a spatula at least 35 cm long, level it over the surface of the facade. After this, we gradually recess the mesh into it and close it so that it is not visible. Below is a video showing how to work correctly with a spatula at this stage of insulating a facade with mineral wool and the technology for applying glue.
Technology of wall insulation with mineral wool
First of all, you need to start by preparing the construction surface. Suppose you need to work with panels using mineral wool. To effectively heat walls with mineral wool, we recommend the following building materials: nails, umbrellas and glue specially designed for this work. Based on this, you can safely supply the surface with mineral wool.
Applying glue and installing insulation
Once you have prepared the surface, you can begin attaching the mineral wool boards. Professionals advise starting with the bottom, first row and be sure to take into account the horizontal installation. Because each next level must absolutely coincide and fit together, and also correspond to the previous one.
During installation, a mandatory condition is the use of a level. Before applying special glue, make sure you have a spatula with which you can do it smoothly and effectively.
After applying the glue with a spatula, you need to make an effort to press the mineral wool - this will be a 100% safe fastening. Then we make holes in the center and on the edges of the mineral wool, into which dowels and umbrellas are inserted.
Reinforcement
Often, this stage occurs in situations where there are layers with glue, which are not only a mineral wool closure, but also functionally cope with moisture protection. Then, to insulate the wall, another layer of glue is applied, in which the reinforced mesh is pressed into the reinforced mesh.
It is very important to accurately select a mesh that will be resistant to moisture and alkalis. Since the presence of many chemical elements in the top layer can contribute to the appearance of corrosion.
Facade finishing
The last step is the decorative design of the facade. The best solution is standard plaster, and its decorative varieties will only decorate the appearance of the building. If we compare the price for insulating the façade from the outside with mineral wool, it is low compared to other works.
It is very important to “get your teeth into”, that is, to have experience, since its absence can lead to unforeseen expenses not only for the purchase of materials, but also for inconsistencies in the correct installation work. Additional construction work, and further payment of heating bills due to incorrect installation.
Primer
To apply a high-quality finish to mineral wool under plaster, you also need a primer. Choose a good primer mixture, for example, the Ceresit CT 17 already mentioned above. If you apply the primer carefully and slowly, you will not have to apply it in two layers.
Now all that remains is to apply the finishing layer, which will give the building a finished look. Someone seeks to insulate a house with mineral wool under the siding; this topic is discussed in another article. In our example, the final finish will be peach-colored “Bark Beetle” Ceresit CT 175.
For the sake of fairness, it is worth saying that mineral wool is also used for facade glazing of large buildings. But insulating a house with mineral wool with your own hands is also not a rare case. We examined the basic, general principles of the technology of facade insulation with mineral wool. We have identified 3 important stages:
- how to insulate a facade with mineral wool - how to fix the slab to the surface;
- How to apply a layer of glue to the slab;
- And first we highlighted the advantages of insulation with this material.
Finally, you can look at a gallery of 28 photographs, which shows all the stages of insulating facades with mineral wool using technology:
Insulation from the inside with mineral wool - mistakes with serious consequences
Insulation from the inside with mineral wool is similar to sabotage in order to cause maximum damage to the structure and people. Standards require that experts recommend thermal insulation only on the outside of the building.
But insulation from the inside is an extreme necessary measure, and it must be carried out according to certain rules. Can this be done using mineral wool with special measures to protect structures?
Let's decide in order - how to properly insulate, how mineral wool should be used, what common mistakes and opinions exist in this regard.
Lack of insulation from the inside - freezing
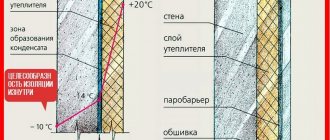
When insulated from the inside, not only with mineral wool, but also with any heat insulator, the wall is protected from heat, so its temperature decreases.
Moreover, with a sufficiently large amount of insulation, the wall can freeze through. Freezing a structure is always bad, because for any material there is a finite number of freezing cycles before its destruction. It’s even worse if the wall freezes while wet. In this case it will be so.
Humidification, dew formation
The dew point - the temperature at which dew falls from the air - will be located directly on the wall.
More precisely, condensation may begin to fall in the insulation, but the cold surface of the wall will also condense water on itself. And there will be a lot of water, it will also flow onto the wall from the insulation, especially if you use mineral wool.
A wet wall will grow excellent “greasy” mold and large colonies of putrefactive microorganisms. All this will be located indoors, spreading from the wet collapsing wall along the ceiling, floors... Residents will need means of rescue.
Finally, when insulating from the inside, the heat insulation and finishing will take up part of the usable space. The usable area of the room will decrease by about a square meter. It's a lot.
The above disadvantages can be circumvented and leveled out (except for eating up the usable area). But only if mineral wool is not used for internal insulation.
Mineral wool is moisturized and accumulates water
Mineral wool is not suitable for insulation from the inside, even in forced situations, due to its properties. This insulation perfectly allows water vapor to pass through itself and can accumulate water inside, becoming simply wet.
It is clear that when insulating from the inside, the insulation will become wet due to the dew point in it and the lack of ventilation. The consequences are known.
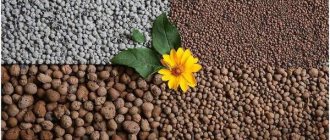
The material consists of tiny fibers of basalt or other minerals. It is also made from blast furnace slag and silicates (glass wool), these samples are cheaper. To bind the fibers together, phenol-formaldehyde resins are used, the same as in the production of chipboard.
Mineral wool owes its good thermal insulation to the air trapped between many interwoven fibers. If the air is replaced by water, at least partially, then the required thermal insulation qualities will disappear.
Even a slight increase in humidity (by 2%) of this insulation leads to a significant decrease (up to 8%) of its thermal insulation properties.
Mineral wool is harmful indoors
Some of the fibers are microscopic in size and are carcinogenic (cause cancer of the respiratory system). Resins evaporate, and when heated - significantly, they are harmful substances to health. In principle, it is not prohibited to use mineral wool indoors.
But it must be reliably isolated from the living space; it is advisable that the fumes from it do not get inside the house, but are discharged outside. Dispersing mineral wool fibers around the house (apartment) is not permissible. Some experts, due to potential health hazards, generally recommend using mineral wool only outdoors.
Work with mineral wool should be carried out only with personal protective equipment.
Why do they want to insulate from the inside?
Why is the desire to insulate from the inside great?
- It seems that this is easier and cheaper to do than from the outside (although in the end it is much more profitable to insulate from the outside).
- Many people want to use mineral wool - at first glance it is not expensive and it is not difficult to do without wet processes (in fact, it is often easier and cheaper to insulate with other insulation materials).
- In addition, you can also read on the Internet how to insulate the inside with mineral wool (the information is often incorrect).
Which methods are not correct?
Several common opinions about creating internal thermal insulation.
- Mineral wool needs to be protected with a vapor barrier on all sides - and the problem of moisture is solved.
Stretching plastic film directly over the wall and then over mineral wool does not solve the moisture problem. The owners can subsequently cut the film and, in endless surprise, drain the water from the insulation. Steam will still penetrate behind the film, and even through it, and condense there due to the temperature difference - after all, there is no ventilation. The wall will be moistened under the polyethylene. - Build a plasterboard partition and a waterproofing layer underneath it.
The wall will get wet, but it will not get into the room. All in all…. Why do all this if the insulation gets wet and does not perform its functions? - We build a partition with mineral wool at a distance of 5 cm from the wall. We make ventilation along this gap - we supply air through the holes at the bottom and exhaust it out through the top ones.
The superproject has the right to life as a fiction without economic meaning - a large consumption of space, materials, and a very unprofitable option for internal insulation. - There are even recommendations to dry the wall and insulation with electricity. All this is of course interesting, but it is better to do without such solutions at all. It is, in principle, possible to insulate from the inside; you can find out how to do this on this resource...
How is mineral wool used?
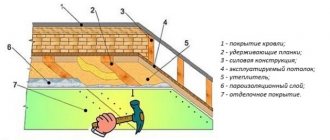
Mineral wool can be used to insulate all structures of a house, except the foundation. The classic application is thermal insulation of the roof above the attic floor. There, mineral wool is placed between the rafters; it is this insulation that is best combined with wood - it does not interfere with the “breathing” of the wood.
You can also insulate walls made of any materials outside the building. Wherever mineral wool is used as insulation, its ventilation must be organized. More precisely, a ventilation gap should be made above the layer, on the side of low partial pressure.
The heat insulator itself is covered with a diffusion (vapor permeability) membrane, which neutralizes wind pressure and prevents the spread of dangerous fibers.
On the inside (from the side of the steam source), mineral wool can be fenced with a special vapor barrier according to design solutions. But when insulating a wall, vapor barrier is not used. It is enough that the air from the street will dry the insulation moving along the vertical ventilation gaps. Also, walls with interior decoration always inhibit the flow of steam into the insulation.
Mineral wool is the best-selling insulation material. You just need to apply it correctly, and the effect will be excellent. Greater durability, the ability to effectively drain the entire structure and increase its durability, the ability to change insulation without destroying materials in the ventilated facade system, etc. are valued. As we see, insulation with mineral wool can and should be done. Just not the walls from inside the room.