How to insulate a cellar in a house or garage (materials)
Before considering in detail the insulation of a cellar in a house or garage, you should clarify what materials can be used:
- You can insulate your cellar from the inside using mineral wool, as well as glass wool (they retain heat well).
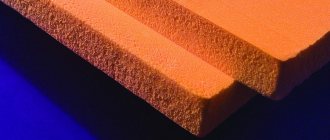
- You can insulate walls using polystyrene foam. The material is distinguished by low cost and high heat retention performance.
- Use peat or sawdust for work. They retain warm air well in rooms and also repel rodents.
- Polyurethane foam. A wonderful insulation product that is a sprayable substance.
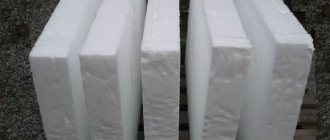
- Expanded polystyrene. An element similar to foam plastic, with higher density and higher cost.
- Application of expanded clay. We are talking about bulk insulation, which retains heat remarkably well.
To improve external thermal conditions in cellars, chernozem is used, since, unlike other natural types of soil, this variety retains heat best.
In this video we will look at insulating a cellar:
Features of basement insulation work
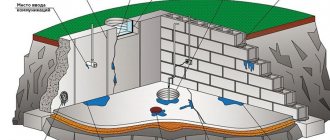
Every good owner who takes care of his home must know how to insulate a ceiling in a cellar. This type of work has many similarities with the process of finishing other premises. But still, there are certain differences between them that you should always pay attention to. After all, they have a great influence on the result obtained upon completion of all repair work outside and inside. It's no secret that in most basements there is a high level of humidity. This phenomenon occurs only because the walls of this part of the house are in contact with the ground. And chernozem is different in that moisture always collects in it. Through it she can get into the cellar without any problems. Owners of houses built on the ground often ask experts whether it is possible to somehow eliminate humidity in the room, as well as make the air temperature in them constant. Fortunately, craftsmen have learned to solve this problem with the help of modern insulation. The easiest way is to try waterproofing the room. This is the first thing a home owner should do when arranging a cellar. Many experts recommend this type of finishing on the outside. Particular attention is paid to the walls of the underground part of the living space. Insulating the ceiling in your cellar is no less important. To do this, waterproofing is carried out not outside, but inside the room. This work is quite painstaking. But upon completion, the home owner receives an ideal cellar that is not afraid of low temperatures and moisture.
What is insulated?
Depending on the average annual temperature and precipitation, on finances and the structure of the garage basement, the room needs to be insulated:
- floor;
- walls;
- ceiling.
Important! Even if there is internal heating, and there is no need for thermal insulation of the walls and ceiling, it is recommended to insulate the floor of the garage basement. After all, the warm air from the artificial air conditioner will rise upward, leaving the floor cold
Floor
To insulate the lower surface of the subfloor, it is recommended to use polystyrene foam. This requires:
- deepen the floor by 25-30 centimeters and level the surface;
- lay 10 centimeters of crushed stone around the entire perimeter;
- then cover the crushed stone with sand in half (this will help avoid moisture accumulation);
- then apply a layer of insulation;
- and finally make mesh reinforcement and concrete.
Walls
Regardless of the choice of insulation for basement walls, experts advise first treating them with antifungal solutions (quicklime or copper sulfate). Then carefully seal all seams and cracks.
Mineral or glass wool requires an additional frame so that it does not slide under its own weight. The insulation should be well secured around the entire perimeter of the wall.
Ceiling
It is recommended to insulate the garage ceiling with any suitable material
However, it is further important to hide the thermal insulation with sheets of plasterboard, plastic or plywood. Foam and reflective thermal insulation can be hidden under the cladding
Important! Before insulating the garage ceiling, you need to install all the electrical wiring for lighting, laying the wires in a heat-resistant corrugation
Stages and rules of external insulation
It is important to know these points, as they directly affect the quality and durability of the basement finish. This:
- Work should only be carried out in dry weather. Since the work on insulating and waterproofing a cellar can take several days (everything will depend on the number of workers and the pace of work), it is best to carry out such activities in the summer or early autumn.
- You will need to insulate the entire wall - from the foundation to the ceiling (floor). If you only insulate part of the base, it will do nothing.
Preparation for the process:
Remove the blind area. Dig a trench around the entire perimeter of the house. Its depth should be at the level of the basement floor. The width is such that it will allow you to carry out work easily. Clean the walls from remnants of building materials and old finishing
It is also important to remove dirt from it. Inspect the wall surface for cracks and chips
If such are found, they should be sealed with a solution of cement and sand. After the solution has hardened, you can continue further work. If the surface of the basement walls is finished with foam plastic, then you will also need to level the base so that the sheets lie flat. After preparation, the surface should be finished with a primer. There should be several layers. Only after it has been completely absorbed into the base can work continue. The waterproofing material can be fused to the walls after applying a primer. Next, you can work with the insulation.
Polystyrene foam or extruded polystyrene foam
Work on insulating an external wall using these materials can be carried out on your own. This type of work does not require any special skills or knowledge. These materials are the most common today, which are used as insulation.
The basement walls are insulated with extruded polystyrene foam slabs
Process:
Calculate the area of the wall and determine how many insulation boards will be required for work
It is important to add about 10% to the result obtained for the battle. Prepare the solution
Apply glue evenly to the foam board and glue it to the base. Such work must begin from below. Each row is attached to the base with an offset relative to the previous one. After finishing, you need to coat the seams between the sheets. This should be done using cement mortar. Also, if necessary, you can cover the entire surface of the slabs with this solution.
Expanded clay
This material is free-flowing, and therefore installation work can also be carried out on your own. The disadvantage of such insulation is that it is necessary to make too large a layer, since its thermal conductivity is lower than that of foam plastic. The recommended layer is 10-20 centimeters.
Scheme for insulating basement walls with expanded clay
Work order:
- Another wall is erected at a distance of 20-30 cm from the basement wall. It can be made from brick.
- Gravel spills along the bottom.
- Drainage is laid and diverted away from the building.
- Expanded clay is poured into the gap between the walls.
- The second additional wall from the outside must also be waterproofed.
After this, the expanded clay is compacted and a concrete screed is placed on top of it.
It is also important to put waterproofing underneath. You can refuse to install insulation
Important! For the interior decoration of the basement walls, you can use the same material as for the exterior. Only the use of expanded clay in this case will not be effective, since it will take up the usable area of the room
Typically, insulation from the inside is carried out using polyurethane foam.
Floor and its insulation
Not only the basement walls should be waterproofed and insulated. Such work should also be carried out on the floor. They are made using the same material that was used for the walls. Expanded clay should be poured or polystyrene foam should be placed between the joists, first covering the floor with waterproofing material. You can also put a film on top under the main floor to prevent moisture from entering the room.
Scheme of floor insulation in the basement on the ground
If there is no log system on the floor, then you can make it yourself using timber. It is also recommended to first waterproof them with a solution that will prevent the appearance of mold and mildew. The beams must be placed at a distance of 50 centimeters from each other, connecting them together with planks. If necessary, insulation can be placed on top of the first layer of waterproofing. After such work, the main floor is installed and finished.
Methods for insulating basements from the inside
When insulating basements from the inside, along with the general rules for installing the selected type of insulation, there are also some specific points .
The process of insulating basement walls from the inside must be done in the warm season, with dry walls.
If there is condensation on the walls , it is necessary to thoroughly dry the entire room. Otherwise, you can only aggravate the situation and speed up the process of destruction of the building’s foundation.
Insulation of basement walls from the inside
This process is the most important and labor-intensive when arranging thermal insulation of the basement. The future microclimate depends 90% on it. There are some common features :
- It is advisable to use polymer-type insulation for walls, which is not prone to getting wet and does not allow water vapor to pass through.
- Before installing the insulation, the surface of the walls must be leveled as best as possible by removing the old plaster.
- Any insulation must be laid in such a way that there are no gaps between it and the wall.
- Before insulating the walls of the basement, it is necessary to calculate the thickness and vapor permeability of the future thermal insulation layer, according to the calculation discussed in the article “Features of calculating the thickness of insulation for walls and roofs” or SNiP 02/23/2003 “ Thermal protection of buildings ”.
Only if all of the above requirements are met, can be achieved when insulating the basement.
Insulating the ceiling in the basement
Ceiling insulation is no less important than wall insulation. The technology here is similar, with the only difference being that when we insulate the ceiling in the basement, we insulate the floor on the first floor.
Since the living room is always warmer than below, the dew point here falls on the upper surface of the floor slabs.
Options for insulating the ceiling in the basement:
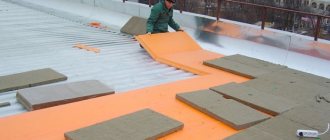
- Insulation with foam plastic and other polymer materials . It is used if the floors are made of concrete. The thickness of the insulation is usually 5 cm. It is carried out according to a scheme similar to wall insulation. First, a thick layer of waterproofing is applied, then sheets of heat-insulating material are attached to glue or dowel nails, then a reinforcing mesh is stretched and glue is applied. After drying it is plastered. If plastering is not planned, you first need to attach wooden joists to the ceiling, and then the sheathing will be attached to them. In this case, it is necessary to lay a layer of vapor barrier material under the casing.
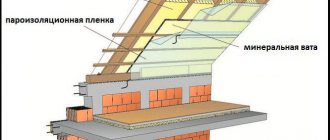
- Mineral wool . It is used if the ceiling (floor of the first floor) is made of wooden structures. A waterproofing film is attached to the bottom of the wooden base. Wooden blocks are nailed for external cladding. Mineral wool is laid in layers between the bars and fixed with dowels with fungi. A vapor barrier membrane is laid on the wool, and then the sheathing elements are attached.
Insulation of floors in the basement
Usually the floor in the basement is built directly on the ground. The most common method of insulating a floor on the ground is using bulk heat-insulating materials. The second method is insulation with polymer sheet materials:
- Floor insulation using expanded clay . To do this, we separate the soil from the insulation using waterproofing. This can be thick plastic film or roofing felt. A layer of expanded clay, at least 15 cm, is evenly poured on top and poured with cement laitance. A reinforcing mesh is laid directly on the expanded clay and the entire space is filled with a cement solution no less than 5 cm thick.
- When insulating with polystyrene foam, penoplex or expanded polystyrene, the following is done. A sand cushion 5 cm thick is poured onto the ground, which is well compacted. A waterproofing membrane is spread on top of it with a reserve for the walls. Sheets of insulation are tightly laid on it. There is another layer of waterproofing on top and the “pie” is completed with a reinforced concrete screed at least 5 cm thick.
Insulation from outside
Insulating a cellar from the outside is quite a painstaking task, as it involves performing a mandatory series of actions.
Basic work process:
- Removing excess soil.
- The insulation is being installed (polyurethane foam can be applied).
- Removing irregularities and roughness from the surface (if any).
- Dry all surfaces.
- Roofing felt is laid on top of the ceiling.
- Insulation of the cellar with polystyrene foam.
- The top of the roof is covered with a pre-prepared mixture (if the basement is bulk).
- Filling the gaps with polyurethane foam (good insulation for a cellar).
Having fulfilled all the above conditions, the thermal insulation of the cellar can be considered completely completed.
Floor
For reliability and durability, flooring requires hydro and thermal insulation, which is achieved in several ways.
Insulation using expanded clay occurs in several stages, namely:
- the base is leveled, after which it is covered with roofing felt, onto which a waterproofing agent is glued;
- expanded clay is poured, its layer should be 10-25 cm;
- A concrete screed with reinforcement is poured onto the expanded clay.
Stages of floor insulation using sand and crushed stone:
- the prepared surface is covered with 15-20 cm of crushed stone, then with a 5-10 cm layer of sand;
- the surface is covered with roofing felt or construction film for reliable waterproofing;
- installation of a reinforced belt and pouring concrete.
Floor insulation with foam plastic:
- preparing a gravel or sand cushion, subsequently covered with a waterproofing agent;
- laying foam on the surface;
- filling the screed.
Please note: the cellar must have ventilation, which will ensure air circulation and reduce the formation of condensation.
It is worth remembering that the features of insulation largely depend on the location of the cellar, be it a garage, barn or a separate building. In any case, the general recommendations presented in the article can be safely applied in practice.
How to insulate a cellar or basement, see the following video:
Floor insulation
It is unlikely that anyone will agree to install a heated floor system in a utility cellar or basement, so you need to consider more traditional options for carrying out insulation work.
Insulation of the cellar floor can be carried out as follows:
- A high-quality waterproofing layer is laid on the pre-leveled surface of the subfloor.
- Next, a layer of insulation about 4-6 cm thick is installed (no longer required).
- Finally, a layer of penophenol is laid.
It is best to lay reinforced screed on the thermal insulation layers.
Choosing insulation
We decided to insulate the cellar, but we don’t know how to do it, and most importantly, what material to use.
Let's look at how to insulate a cellar in a garage using modern materials that experts use to insulate basements:
- polystyrene foam or extruded polystyrene foam;
- mineral wool;
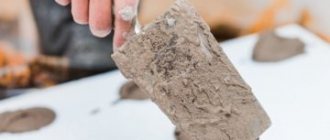
- “warm” plaster;
- glass wool;
- reflective thermal insulation.
Insulating a cellar in a garage with the materials described above allows you to achieve good thermal insulation properties and prevent the appearance of fungus in the room, but each material has its own advantages and disadvantages.
Extruded polystyrene foam or polystyrene foam
Advantages:
- simple installation;
- environmental friendliness;
- you can use extruded polystyrene foam for floor insulation;
- service life up to 40 years or more;
- excellent water resistance;
- low cost;
- perfectly tolerates sudden temperature changes.
Flaws:
- is flammable;
- does not allow air to pass through.
Helpful information! Extruded polystyrene foam differs from polystyrene foam in its increased density and strength. Thus, the thermal conductivity coefficient of extruded polystyrene foam will be higher than that of polystyrene foam with the same thickness of the material. In addition, only extruded polystyrene foam is used to insulate the floor covering.
Important! When using polystyrene foam or extruded polystyrene foam as thermal insulation, it will be necessary to treat all surfaces with a primer before starting work and, upon completion, additionally plaster the walls using reinforced plaster, and make a screed of cement and sand on the floor
Mineral wool
Advantages:
- allows air to pass through, allowing the room to “breathe”;
- excellent sound insulation;
- excellent thermal insulation;
- affordable price;
- long service life of 30 years or more.
Flaws:
- allows moisture to pass through;
- work is performed in special clothing and gloves.
Important! If mineral wool is chosen as insulation, then it will be necessary to additionally make a vapor barrier in the basement to prevent moisture absorption by the wool itself and deterioration of its thermal insulation properties
"Warm" plaster
Advantages:
- excellent thermal insulation;
- affordable price;
- excellent sound insulation.
Flaws:
- it is necessary to apply a thick layer for good thermal insulation;
- difficulty in installation.
Glass wool
Advantages:
- low cost;
- good thermal insulation properties;
- good sound insulation properties.
Flaws:
- work is performed in special clothing and gloves;
- an additional frame for installation is required;
- allows moisture to pass through;
- If exposed to moisture, it may emit an unpleasant odor.
Important! If mineral wool is chosen as insulation, then it will be necessary to additionally make a vapor barrier in the basement to prevent moisture absorption by the wool itself and deterioration of its thermal insulation properties. In addition to the vapor barrier material, it is necessary to use film or foil to insulate glass wool
Reflective Thermal Insulation
Advantages:
- high thermal insulation properties;
- material thickness is only from 2 to 5 mm;
- simple installation;
- possibility to use facing material.
Flaws:
- price;
- possible heat loss
Important! Reflective thermal insulation is quite thin and, like a mirror, will reflect infrared heat when reflected. As a result, it is not efficient enough at convection or induction of reflected heat, which leads to heat loss
How to choose insulation material
Since the ceiling in the basement of a private house is often exposed to moisture and low temperatures, when choosing an insulator, give preference to moisture-resistant materials and products that operate at low temperatures.
Among the variety of modern thermal insulation materials, preference should be given to products that meet the following requirements:
- the lower the thermal conductivity coefficient, the better;
- the insulation must be resistant to conditions of high humidity and not allow it to pass to the floor structures;
- a simple and quick installation method will facilitate independent insulation;
- reasonable price of the material is no less important than other characteristics;
- the product should not emit toxic compounds during operation;
- choose materials that do not support combustion and do not release harmful substances in a fire.
Important! Mineral wool, extruded polystyrene foam or polystyrene foam are suitable for insulating the ceiling surface in the basement. But these products differ in their characteristics and installation features.
Mineral wool
This insulator consists of fibers obtained from rock melts, inorganic materials, blast furnace slag, or glass fibers.
How to insulate the ceiling in a bathhouse with a cold roof with your own hands
Basalt wool is suitable for basement ceilings because it has the following properties:
- the material is characterized by low thermal conductivity;
- wool made from sedimentary rocks protects well from noise and heat loss;
- the material does not contain toxic compounds and does not emit harmful substances during operation;
- basalt wool is fire resistant;
- The product is chemically resistant.
Polystyrene foam and extruded polystyrene foam
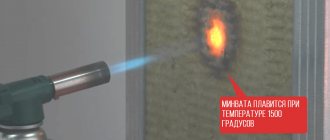
There are several types of foam plastics. The most commonly used foam is polystyrene foam and its variety – extruded polystyrene foam. They are lightweight, easy to install and have low thermal conductivity. However, polystyrene foam is considered a flammable material and releases toxic compounds in a fire. In addition, during combustion it melts and drips, causing fire of other materials and surfaces.
Extruded polystyrene foam has the lowest thermal conductivity coefficient. It is more resistant to combustion than polystyrene foam and does not release toxic substances in a fire. However, the price of extruded material is higher than that of conventional foam.
Important! A common disadvantage of all foam plastics is that they interfere with the natural ventilation of ceiling structures and ceilings. To ensure a favorable microclimate in the basement, you need to equip a high-quality ventilation system.
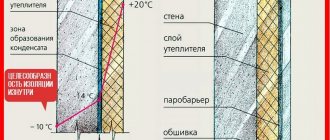
What is condensate
To understand why water droplets form on the ceiling in the basement and what condensation is, consider two parameters - absolute and relative air humidity.
Absolute air humidity is measured in g/m3, relative humidity is measured in percentage.
The ability of air to hold steam depends on temperature - the warmer the air, the greater the mass of moisture it can accept, and vice versa. Therefore, with a sharp cooling of warm air, the value of its maximum humidity decreases, and the excess moisture contained in the gas before the temperature dropped falls onto cold surfaces in the form of water droplets.
Conditions required for water condensation
From the process described above, it follows that for condensation to form in a room, two factors must be present:
- the presence in the cellar of bases in contact with air with a sufficiently low surface temperature;
- the entry of warm air containing moisture into the basement.
The absence of exhaust ventilation contributes to water condensation, since condensate evaporating from surfaces is not removed outside and participates in a closed cycle of evaporation-condensation-evaporation.
Reasons for the formation of condensation in the cellar
Thus, drops of water on the ceiling in the cellar are formed for the following reasons:
- lack of insulation of enclosing structures;
- Each time the hatch is opened, a portion of warm air with a certain amount of steam enters the room, condensing on the cold base.
At the same time, moisture condensation on the ceiling can occur with varying intensity, depending on the time of year. For example, if there is an unheated room above the basement, in which in winter the air temperature may be even lower than in the cellar, then the flow of cold air down will not be accompanied by the formation of condensation. In summer, on the contrary, moisture condensation will be stronger, especially after rain, when the humidity of the warm air entering the cold cellar is especially high.
Work order
First of all, it is necessary to ensure high-quality waterproofing of the insulating layer. This can be done either with the help of films or other rolled waterproofing materials, or with the help of special mastics. They are applied with a brush and cover all cracks well, and the effectiveness of such mastics is at the highest level.
After this, a vapor barrier layer is laid. The best vapor barrier performance is achieved by special films - membranes that prevent the penetration of moist air into the heat-saving layer.
Next, the insulation is installed. Typically, in such operating conditions, polystyrene foam is used. It is easy to glue, it is not to the taste of mice and other rodents, unlike the same polystyrene foam, and also has excellent heat-saving characteristics.
Mineral wool is also often used. It is convenient to use not rolls, but slabs of this material. They can also simply be glued to the surface of the ceiling. In addition, they have a dense structure, which is easier to finish on the outside, with an outer layer of finishing.
To install such a heat insulator, it may be necessary to build a frame. This design is especially relevant in basements, which are supposed to be used not only for storing potatoes, but also as one of the utility or living spaces that will be frequently visited.
On this basis, you can attach an external decorative covering, which will improve the aesthetic component of the room. And it will be much easier to install the insulation.
After the insulation material has been laid, you need to cover it from the outside with a layer of vapor barrier film. You can use glassine, but its characteristics in this room are worse and its service life is much shorter.
Any heat insulator will very quickly become unusable if high-quality ventilation is not installed in such a place. If ventilation windows are located at opposite ends of the room, as is traditionally done in basements, it is necessary to provide for the possibility of closing these windows during the cold season.
In summer, and in other months with positive air temperatures, it is necessary to open the ventilation holes either completely or by a small amount.
If natural ventilation is not enough and condensation continues to form, it is necessary to build a forced ventilation system, which will include both supply and exhaust ventilation.
What is the best way to insulate a subfloor?
Insulation is selected depending on the behavior of the basement at different times of the year.
The choice of material is also influenced by the following factors:
- Indoor humidity level;
- Availability of heating;
- Availability of drainage around the building;
- Purpose of the underground.
Construction stores offer thermal and waterproofing materials with various characteristics. The following are popular and available:
- Styrofoam. The cheapest insulation. It is distinguished by its lightness, resistance to rotting, moisture resistance, and low price. The combination of these qualities makes foam plastic the most popular material for insulating wooden houses. The disadvantage of polystyrene foam is that it attracts rodents, is fragile, is highly flammable and releases harmful chemical compounds into the atmosphere.
- Expanded polystyrene. A substitute for polystyrene foam, which is more durable and has a tongue-and-groove system for a seamless connection. The material is often used to insulate basements from the outside and inside.
- Polyurethane foam. A sprayed material that fills all cracks when applied to surfaces. Creates a completely sealed coating, does not burn, does not rot. Disadvantages of the material: high price and the impossibility of self-application without special equipment.
- Penofol. Flexible insulation. Provides decent thermal insulation. Fireproof and waterproof.
- Minvata. Soft insulation, suitable for use only inside absolutely dry rooms. Under the influence of moisture, mineral wool begins to rot and gradually decomposes.
- Expanded clay. The use of this bulk material is only possible for insulating the floor and protecting the foundation from the outside.
Choice of insulation
It is possible to insulate such specific places with various heat insulators, but some will be preferable to others due to their operational properties and installation features.
Foam plastic, expanded polystyrene and stone wool have good performance. It is necessary to pay close attention to the insulation used. Depending on what was chosen, it is necessary to install a layer of vapor barrier and waterproofing protection.
Waterproofing will protect the insulation from water ingress, and a vapor barrier film will protect it from exposure to moist air. Moreover, not only the basement in this case needs a vapor barrier, but also the rooms on the first floor of the house, into which moist air can penetrate from there.
How to insulate a basement ceiling
Condensation may form on the ceiling. To prevent this, heat-insulating material is attached to its surface. It is recommended to use expanded polystyrene or foam boards. The work can be carried out provided there is no moisture on the ceiling: first you need to ventilate the basement. To insulate the ceiling, you must do the following.
View of a foam-insulated ceiling in a basement
- An adhesive mixture is applied to the boards and pressed against the base surface. For temporary fixation, it is necessary to provide supports from beams and boards.
- Using a hammer drill, drill holes for the dowels. They must be placed with a density of 5-6 pcs/m².
- Dowels are driven into the holes and temporary supports are dismantled.
- The gaps between the plates are filled with polyurethane foam, and the excess is cut off after hardening.
- Glue the plaster mesh and apply a leveling gypsum solution.
The technology of applying polyurethane foam by spraying is also used. This insulation completely covers the surface of the ceiling, filling all cavities and microcracks. But to do this job you will need special equipment and skills.
Ceiling insulation using spraying method
Ceiling insulation
Cellar insulation includes work on thermal insulation of walls, ceiling and floor. It is imperative to insulate the ceiling, paying special attention to this work.
Foam insulated ceiling.
The work is carried out using the following technology:
- The first step is to eliminate all cracks, seams and crevices on the surface. If you use dowels to fasten the heat-insulating material, then they must also be insulated with insulation, because cold will definitely penetrate into the room through them, although not in significant quantities.
- At the next stage, it will be necessary to install a vapor barrier material on the ceiling so that condensation does not form in large quantities during operation of the cellar. Penofol can be used as a vapor barrier material. This material, among other things, will also create an additional thermal insulation layer, and of quite high quality.
- Next, the hangers necessary for fastening the sheathing profiles are installed. The distance between the hangers should be equal to the width of the slabs of heat-insulating material. Then, using self-tapping screws, the longitudinal profiles are fixed to the hangers.
- Thermal insulation material is laid between the profiles. In our case, foam boards. It is also recommended to insulate the joints using construction foam or other material.
- It is recommended to install another layer of vapor barrier on top of the thermal insulation layer. It is important to maintain a distance of approximately 40-50 mm between the heat insulator and the vapor barrier. This gap will allow for micro-ventilation between the materials.
After all the work is completed, the height of the cellar will be slightly reduced, but this must be sacrificed in order to obtain an optimal indoor microclimate. Finally, any materials intended for finishing, if any, can be installed on the vapor barrier layer.
Ventilation installation
Human life is impossible without fresh air. But there is another reason why you need to take care of ventilation. The moisture content in the air outdoors is usually lower than indoors. The ventilation system will allow you to regulate the humidity. It is especially important when there is a swimming pool inside the basement. This will allow the saturated masses to be removed and replaced with drier ones.
Basement/cellar ventilation scheme
You will have to choose from two systems: forced and natural. The first option implies the presence of a certain electric drive that forces air into the room and at the same time its excess is removed through an outlet. Or the fan is mounted on the outlet pipe and after a certain mass is released, a pressure difference is created, which will be the reason for the arrival of a fresh portion. The natural principle of operation implies the presence of inflow and outflow channels. This type of ventilation is suitable in cases where the ceiling height is less than 2 meters and the area does not exceed 50 m2. In order to implement the entire scheme, you will need to sketch a small drawing. You need to put an approximate plan of the house on it. The incoming pipe should be located as close to the ground as possible, and the outgoing pipe should be above the level of the ridge.
Forced ventilation
Parts you will need:
- PVC pipe for ventilation with a diameter of 120 mm;
- corners and couplings depending on the drawn diagram;
- ventilation grilles and valves;
- hammer drill or drilling machine;
- clamps.
Ventilation duct
The sequence of actions will be as follows:
The outlet pipe is installed. It can be located on the outside of the building or through rooms. The second option is suitable if there is an additional utility room through which the air duct can be passed. If there is no utility room, the pipe will have to be decorated. Holes are drilled in the floor and ceiling strictly opposite each other (a laser plumb line can be used for alignment)
It is important to insulate the section running through the attic well. This will avoid drips on the ceiling and in the basement.
The exit point through the roof is carefully sealed. Bituminous mastic or a special rubber seal is suitable for this purpose. To locate the air duct on an outside wall, you will need to drill a hole through the foundation and secure the duct with clamps. The pipe on the outer part of the wall must be well insulated. This is necessary so that the escaping warm air does not condense and the water does not flow back into the basement. The top end is covered with a visor. To do this, you will need an additional 90° angle. The outlet hole should be located as close to the ceiling as possible, because warm air rises. For inflow, another hole is made in the opposite part of the room. The pipe connected to this hole should be lowered as low as possible. You can make a gap of 5 cm from the floor. On the outside it is covered with a cover so that rainwater does not get inside.
It is important to ensure that the pipe at the inlet and outlet is of the same diameter, this is the only way to achieve the required air exchange. But the size should not be less than ∅ 120 mm or a square profile of equivalent volume
Otherwise the system will not work properly.
Insulating the ceiling in the basement
Insulating the ceiling is a mandatory procedure that includes arranging a cellar. It is especially relevant in cases where this building is not located under the house, but in a separate area. Therefore, water can easily penetrate into it from the top. The problem can only be prevented by creating an insulating layer. Typically, underground rooms are constructed from concrete slabs. They are also used for foundations and various floors. This material by its nature is not able to prevent moisture from penetrating into the building. And it is also not a guarantee that cold will not get into the cellar. The insulation of concrete slabs will allow you to create a favorable atmosphere in the room for food storage and preservation. It wouldn’t hurt to additionally treat the ceiling and other parts of the cellar with a high-quality moisture-proofing compound.
The procedure for insulating a cellar includes a number of sequential works:
- Before starting insulation, it is recommended to impregnate the concrete slab with a waterproofing compound that can penetrate into the material. This substance will fill the cracks in concrete that have appeared over the years of operation, as well as internal capillaries. It is through them that moisture can penetrate into the room.
- It is necessary to wait until the treated slabs dry completely.
- Foam boards are attached to a dry surface.
- The insulating material must be carefully secured with dowels.
- Now you need to attach the mounting mesh to the material.
- The entire treated area of the cellar is covered with a layer of plaster.
To insulate a cellar with mineral wool, you will have to do a little different work:
- Wooden blocks are attached to the ceiling.
- Between the bars and the surface of the cellar, laid out mineral wool mats are placed.
- Additionally, it is worth laying the insulation with a vapor-proof film. It will not let the cotton get wet.
Just like the ceiling, you can insulate the walls of the underground room.
Pros and cons of internal insulation
Most often, answers to the question of how to insulate a basement are sought by owners of private houses, who in this way want to reduce heat loss in the house and change the purpose of the room. The main disadvantage of this solution is cold bridges in the area where the basement wall meets the floor slab, which are very difficult to get rid of.
An advantage can be considered the absence of the risk of damage to the insulation by groundwater. Nevertheless, it is extremely difficult to achieve a protective layer that does not allow moisture to pass through foundation walls. To prevent the risk of damage to the insulation material under the influence of moisture, it is additionally waterproofed, including with bitumen, and groundwater drainage is practiced using special methods.
Another significant advantage of internal insulation is the ability to carry out work at any time of the day, regardless of the outside temperature and time of year.
Common mistakes and useful tips
Before insulating the basement in the garage, it is necessary to carefully level the surfaces of the walls, floor and ceiling. Some people neglect this process and make a big mistake. After all, most coatings are applied to a hard, flat surface using anchors or adhesive mixtures.
Leveling walls with plaster
For leveling, plastering is most often used, with the help of which:
- the durability of the installation is ensured;
- all inaccuracies in the structure are eliminated;
- surfaces acquire the necessary hardness.
Another common mistake is poorly thought out electrical wiring. Before plastering, it is imperative to lay a cable or wire for further installation of switching devices and lamps. The open installation method, even in corrugated plastic or metal pipes, is still undesirable due to the fact that the room has high humidity.
Important advice! A dark and damp basement is perfect for the growth of various types of fungi. Before insulating the walls and ceiling in the garage cellar, they need to be primed.
Nowadays there are many different materials on sale for this purpose with antibiological additives that inhibit the development of mold and bacteria. In addition, primers contribute to the non-flowability of the plaster and its long-term preservation.
If the basement has just begun to be built, then insulation is carried out from the inside and outside. This process is complex and costly in time and effort, but necessary. The cellar is dug around the perimeter and a layer of roofing material or bitumen-based material is laid.
How to insulate a ceiling correctly
Knowing how to insulate a cellar with maximum efficiency means understanding the principle of carrying out work, starting from the ceiling. It is its surface that is isolated first. Foamed polyurethane foam, resistant to mold and mildew, is suitable for the ceiling. Insulation with this insulation will prevent heat loss through the ceiling and prevent the penetration of cold from the outside.
The ceiling can be insulated from two sides: from above - from the side of the living space of a private house and from below - in the basement itself. The essence of the work practically does not depend on the choice of insulation method. They begin with preparing the surface, after which they install thermal insulation with an additional layer of hydro- and vapor barrier for insulation materials that exhibit insufficient resistance to moisture. The final stage is rough or decorative finishing.
They work in this sequence, insulating the ceiling both from the side of the living space of a private house and from the basement.
Which insulation materials to choose for insulation
An important stage in the internal insulation of a basement, especially when it comes to walls and ceilings, is the selection of insulation. The final result will depend on how high quality it is (we are talking about the coefficient of thermal conductivity and resistance to moisture).
There are many options for insulation on the market, including those suitable for internal insulation. Below are the most proven and accessible of them.
Polystyrene foam is the most budget option, but has a serious drawback - lack of resistance to mechanical damage and extremely low or high temperatures. The material has been used for thermal insulation for several decades, being preferred primarily due to its affordable price.
To insulate the basement, polystyrene foam is used only if there are no other options. The insulation will not be able to reliably protect surfaces from cold and moisture, and therefore will require additional vapor-waterproofing to avoid premature wear.
Another option is penoplex. The material is more convenient and effective for a private home than the foam described above, but will cost more. They install penoplex in the form of slabs according to the described algorithm, not forgetting about the cold “bridges” that are inevitable with a careless approach to the processing of joints.
To achieve maximum results, penoplex for internal insulation is used in conjunction with more advanced thermal insulation for insulating walls outside, for example, polyurethane foam.
This material is resistant to mechanical damage and proves itself to be a modern insulation worthy of respect and trust. The disadvantage of the material is the complexity of installation. To apply insulation you will need a special installation operating under high pressure.
Among the advantages, it is worth highlighting persistent protection from moisture without the need to install an additional layer, room tightness, and biological neutrality.
Expanded polystyrene, an example of modern thermal insulation with properties similar to penoplex, can also be a suitable option for insulating a private home.
Insulation of cellar walls from the inside
Now that you have understood the technology of insulating floors and ceilings, you can move on to the next stage of work - the thermal insulation of walls. “Internal” insulation has both positive and negative sides. Among the advantages, we can note the possibility of preserving not only “basement” but also home heat. Insulating the walls of the cellar will reduce heat loss from the interior living spaces of the house. Among the disadvantages of such insulation, the need for ventilation and waterproofing of walls is noted.
Polystyrene foam has proven itself to be the best material for wall insulation. Firstly, it has excellent thermal insulation properties. Secondly, polystyrene foam is safe for human health. Thirdly, it is relatively cheap. The service life of polystyrene foam very much depends on the quality of the thermal insulation work performed, namely on properly installed waterproofing.
First of all, you need to clean the surface. The foam will not adhere well to the surface if you do not properly prepare the base. Selecting an adhesive solution is quite simple - there are many different compositions on the market for working with polystyrene foam. Plastic dowels are used to fix the foam, although standard gluing can be used.
Laying foam begins from the bottom of the basement. The most important condition is that the insulation must be laid with minimal seams. That is why a lot of attention is paid to preparing the working surface. If there are many differences at the base, this can lead to significant gaps.
A reinforcing layer is created. First, the insulation boards are well saturated with an adhesive solution, after which a special construction mesh is embedded in it. The structure is secured with a second layer of glue. After the surface has dried well, it is thoroughly rubbed. Next, the vertical base is leveled using a special mixture, primed, and finishing work is carried out.
After successful completion of the interior work, you need to begin arranging the cellar from the outside. External insulation is also a very important stage of work.
What is the essence of the described example?
We could have cited the technology of the general process, but we did not for several important reasons. Firstly, the thermal insulation of certain objects requires a comprehensive assessment. In our example, it is clear that the premises required not so much thermal insulation as elimination of water leaks. Although thermal protection cannot be discounted. However, to fully create it, you will have to do a lot of rather complex work.
Secondly, everything needs to be built correctly from the beginning. It seems that the fact is obvious and understandable to everyone. Why then do many owners of private houses first make the same cellar along with vegetable storage, and only then begin to think about why it does not resist the cold? If during the construction process we had approached the issue of thermal protection and waterproofing normally, everything would have turned out differently.
And so, in order to cope with the task at a professional level, you will have to carry out labor-intensive measures. It is unknown how much they will cost. Saving during the construction process does not lead to anything good. In the future, costs may even exceed the cost of the initial work.
How to insulate a cellar from the inside against possible freezing
In order for measures to ensure favorable conditions inside the cellar to lead to the expected results, it is necessary to follow a number of technological recommendations:
- Insulation of the cellar from the inside is carried out taking into account the expected conditions inside the home storage.
- Internal insulation must be comprehensive: insulating material must be laid on all structural elements.
- Before carrying out work, it is necessary to inspect the premises for the presence of through holes to the street. They need to be sealed.
- The insulation for the cellar is laid in such a way that there are no free spaces left for freezing.
- The insulating material must be covered with a heat-resistant film on the outside and inside.
- To carry out insulation work, it is necessary to select the appropriate material.
To achieve the best thermal insulation performance, it is recommended to take into account all these nuances and features of insulation. All work is carried out in stages. You should start from the floor, gradually moving to the ceiling.
Inner work
Thermal insulation inside such premises is carried out in stages. In general, the entire work is divided into the following individual points:
- Creating frost protection for indoor floor surfaces.
- Thermal insulation for walls from inside the building.
- Insulating the ceiling of a basement or cellar.
- Arrangement of an entrance door or other passage providing access to the interior of the structure.
In addition, it should be taken into account that some land owners have separate facilities for storing canned food or vegetables. For such structures, the cellar is most often insulated with expanded clay or another type of bulk material, and the work is done outside.
Important. If a free-standing cellar allows cold to pass through, then it is additionally recommended to protect it from freezing from the inside with the help of auxiliary building elements.
Thermal insulation of walls
The procedure for protecting a room from the presence of low temperatures includes the following algorithm of actions:
- Insulation for the cellar (the material that will cover the surface of the walls) is pre-selected.
- A special film is prepared, which will act as a shell for the insulation component used.
- The next step will be to find and seal holes that go directly to the street.
- Installation of an insulating layer on the surface of the basement walls.
Completing the work with finishing material will reliably insulate the cellar from freezing.
Thermal insulation of the ceiling
Insulating your cellar with foam plastic or other material includes the need to mount thermal insulation elements on the ceiling.
- Requires lightweight or sprayable material.
- The surface is pre-cleaned of dust and dirt.
- Additionally, the wiring is released.
- The insulation is installed step by step.
- The joints of the elements are treated with sealants.
Use basalt wool to insulate your basement.
Finally, you need to cover the insulating components with a finish.
This is interesting: insulating the basement ceiling from the inside.
Floor thermal insulation
In practice, bulk elements are used as thermal insulation components for the floor in basements and cellars. Peat or sawdust are great for this. To prevent moisture from penetrating from below, you first need to lay everything with an insulating film, then make uniform mounds, and also, if necessary, apply a coating so that the material does not spread, but remains in place.
Thermal insulation of the floor with sand
To insulate a bulk or traditional cellar, it is recommended to choose sand as insulation for the floor. It has a relatively low cost, but at the same time it has excellent heat retention qualities. To achieve the best performance, the composition is distributed evenly and covered with finishing or film on top.
Thermal insulation of the basement entrance
Previously, we looked at how you can insulate the ceiling in the cellar, as well as other structural elements. However, the job will not be completed unless the input is properly insulated. Here you have to face the following nuances:
- Structures cannot be insulated with polystyrene, as the exit may subsequently be blocked.
- It is recommended to cover the entrance with insulating protection both from the inside and outside of the basement structure.
- Immediately before starting thermal insulation work, it is necessary to free the input element from all unnecessary things.
- It is recommended to insulate the door or hatch from the cold with mineral wool, which is attached from the inside of the cellar.
- On the outside, a more compact heat-resistant element (insulating film) needs to be glued to the entrance.
- It is recommended to use a material that is larger than the input.
- A film must be sewn on top of the thermal insulation material, followed by finishing elements.
- The door frame should be secured with foam to cover the gaps.
Taking into account all these nuances, you can reliably protect the entrance to the cellar from the penetration of cold air, as well as subsequent freezing.
Thermal insulation of the caisson
We are talking about separate storage facilities that are built on the territory of the plots for the subsequent storage of vegetables and preservation. To protect this building from frost, it is recommended to do the following:
- Carry out reliable work to insulate the room from the cold outside (this requires the use of dense soil).
- Create high-quality waterproofing, since moisture is often the main cause of freezing.
- Reliably protect internal structural elements from penetration of cold air through the walls.
- Also, if necessary, a special vestibule is created at the entrance, which contains a thermal insulating air cushion.
Previously, we looked at how to insulate a ceiling in a cellar, which is directly related to the heated building. It should also be clarified that when improving the caisson, it is necessary to do the same series of works, but choose denser materials for this.
Important. Gardeners and vegetable gardeners are often faced with the question of whether it is necessary to insulate cellar walls and other structural elements. Here an allowance should be made for the climatic conditions in the region, as well as the purpose of the storage facility. If it is necessary to maintain a comfortable temperature, thermal insulation is necessary. If low temperatures are required, then internal insulation is not always advisable.