Is it worth insulating the base with penoplex?
The best option to insulate the base is to lay extruded polystyrene foam boards on it. This material does not allow water to pass through and retains high thermal insulation properties even in a humid environment. Since the base of the house is in contact with the ground and is constantly exposed to precipitation, penoplex, like Technoplex, due to their technical characteristics, are excellent for insulating this structure.
You can also use Technoplex, an extruded polystyrene foam from the TechnoNIKOL company, to insulate the base.
When independently insulating the basement of a house from the outside with polystyrene foam, you can use two brands of this thermal insulation. Penoplex Wall slabs are capable of providing reliable heat and waterproofing not only for the base, but also for the columnar foundation of the building. "Penoplex Comfort" is designed specifically for use in external work related to the repair and construction of private houses.
Comparison of building materials by thermal conductivity
Constructive decisions:
Insulation of the basement from the outside
1. Applying plaster composition over a metal mesh
- building wall
- Basement ceiling
- Cutting from mineral wool slabs
- Cement-sand plaster on metal mesh
- Basement wall
- Blind area
- PENOPLEX FOUNDATION® insulation
- Waterproofing
- Foundation
2. Cladding with clinker tiles
- building wall
- Basement ceiling
- Cutting from mineral wool slabs
- Clinker tiles
- Basement wall
- Blind area
- PENOPLEX FOUNDATION® insulation
- Waterproofing
- Foundation
3. “Heavy” cladding (natural/artificial stone)
- building wall
- Basement ceiling
- Cutting from mineral wool slabs
- A natural stone
- Basement wall
- Blind area
- PENOPLEX FOUNDATION® insulation
- Waterproofing
- Foundation
4. Facing with facade panels (basement siding, block house)
- building wall
- Basement ceiling
- Cutting from mineral wool slabs
- Plinth panel
- Basement wall
- Blind area
- PENOPLEX FOUNDATION®
- Waterproofing
- Foundation
Insulation of the basement floor from the inside
- building wall
- Plaster on metal mesh
- Basement ceiling
- Cutting from mineral wool slabs
- Facing tiles
- Blind area
- PENOPLEX COMFORT®
- Basement wall
- Waterproofing
Table No. 2 “Required thickness of PENOPLEX for insulation of basement floors, including those located below ground level”
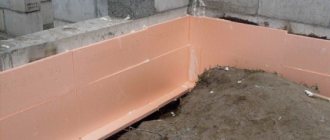
Insulating the foundation base is an important process, the implementation of which allows you to cope with a number of tasks.
External insulation can significantly reduce the level of heat loss of the building, and also increases the service life of the base, which is susceptible to atmospheric phenomena that destroy it.
Extruded polystyrene foam (penoplex) is the most popular material for insulating the base both from the inside and outside. This material is in high demand because:
- its cost is low;
- it has excellent thermal insulation properties;
- is characterized by high strength;
- easy to install;
- does not burn;
- waterproof.
The most effective is the insulation of the blind area and foundation in the complex. The work must be carried out according to a certain algorithm, and the first step is surface preparation:
- the base is cleaned of plaster, paint and other materials applied previously;
- if fungus, mold and other parasites are present on the surface, treatment is carried out with special means;
- after carrying out the above procedures, the surface must be dried;
- the last preparatory stage is leveling the surface by applying a solution of cement and sand mixed in a ratio of 4:1 and diluted with water.
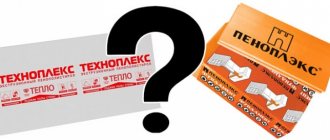
What to choose: foam plastic or penoplex?
Penoplex can lie in the ground for a long time without losing its characteristics.
There are two most common methods - insulating the base with extruded polystyrene foam and regular polystyrene foam. Each of the materials can be used for thermal insulation work, but there are still differences. Also read: “Wall insulation with foam plastic from the inside: technology for performing the work.”
As is known, both insulation materials belong to the same group of polymers, only different techniques are used for their manufacture. As a result, these polymers have different characteristics. Insulating the base with penoplex has an advantage due to its high performance qualities. Let's make a small comparison:
- thermal conductivity - for penoplex the coefficient is 0.029-0.034 W/m*C versus 0.037-0.043 W/m*C for polystyrene foam;
- vapor permeability – practically absent in each of the compared materials;
- fear of moisture - penoplex is not afraid of water and can lie in the ground almost forever, while foam is destroyed by moisture;
- density – penoplex has a maximum density of 45 kg/m. cube versus 35 kg/m. foam cube.
At the same time, insulating the base with penoplex will cost much more. But, knowing how important it is to make a high-quality thermal insulation layer on the base, it’s better not to think about saving, since it will most likely come out sideways. Extruded polystyrene foam is superior to conventional polystyrene in everything, so experts unanimously say that it is the one that should be used.
Modern paint for heating pipes can be applied even to hot pipes, but the thickness of the layer must be controlled. It doesn't smell and dries very quickly.
In each individual case, the optimal diameter of the heating pipe is slightly different. The type of heating system, the length of the circuit, the speed of the coolant, etc. are taken into account. Read more here.
Do they glue wallpaper and tiles over penoplex?
Questions about the finishing of polystyrene foam boards are no less common: is it allowed to put wallpaper or tiles on top of them?
With all the abundance of finishing materials used inside the house, wallpaper remains the most affordable and popular of all. They cannot be glued directly to the penoplex itself, but it is easy to glue them to a specially prepared base.
First you need to choose wallpaper and glue that matches it. It should not contain components that destroy foamed polystyrene (resins and solvents, formaldehyde, benzene).
- The easiest way to prepare the base for wallpaper is to first paste the walls with other paper material, for example, newspapers. However, even the simplicity and accessibility of this method no longer attracts modern home dwellers. There are more modern options that allow you to hang wallpaper and additionally protect foam boards.
- Plasterboard sheets mounted on top of foamed polystyrene boards provide a good base for wallpaper. The use of gypsum fiber sheets (gypsum fiber sheets) is also supported by the fact that according to insulation standards, penoplex slabs must be covered with a vapor barrier material. But gluing wallpaper onto film is an impossible process.
You can plaster the slabs using reinforcing mesh, and only then cover the wall with wallpaper. But the option with drywall is still considered the best.
As for tiles, the opinions of professionals on this issue are diametrically opposed. In any case, finishing directly on the insulation is not possible. If we are talking about porcelain stoneware or clinker tiles for finishing the facade, then the penoplex will first have to be hidden under a layer of Ceresit ST 85 plaster, using a reinforcing mesh. Such a base will withstand tiles of 30 × 30 cm format and will not lag behind polystyrene foam.
If you need to stick tiles onto extruded polystyrene foam indoors, then no additional processing will be required for the walls. But on the floor it is recommended to make a cement screed on top of the insulation boards and only create the finishing coating on it.
You can talk about which glue will be better for penoplex after all the points have been correlated:
- base material;
- environmental conditions: air humidity, temperature;
- drying speed of the mixture.
Once the answers to these questions are known, choosing the right mounting composition for foam boards will not be difficult.
Features of slab installation and subsequent finishing
If, after purchasing polystyrene foam boards, you find that their thickness is not enough to provide normal thermal insulation, then the insulation can be fixed in two layers so that the required thickness is achieved. Many experts say that with good adhesion, the double layer of polystyrene foam boards will actually be one whole. To prevent the formation of cold bridges, it is necessary to ensure that the installation of two layers of slabs overlaps at the seams. However, with vertical displacements of the soil, the insulation layers delaminate, causing serious heat loss.
Options for fastening dowels.
The question of whether to install insulation in two layers is very controversial, therefore, if there is such an opportunity, it is worth returning the unused material back to the store, and purchasing slabs of the required thickness to replace it. As a rule, stores now accept goods back without problems for some time.
The insulation of the basement is carried out on the outside of the house. Expanded polystyrene boards are glued to the surface of the base using any suitable adhesive composition that does not contain solvents that can potentially destroy the material.
The bottom row of polystyrene foam boards must be laid with emphasis on the base. It's great if you have a small foundation overhang that was made during construction. Despite this, very often polystyrene is laid on a gravel backfill where the foundation was built. Polystyrene foam can also be installed over gravel backfill, although many experts caution against such steps. If there is no protrusion, it is convenient to insulate with penoplex.
As a decorative finish, tiles, bricks, natural stone, facade paint, and plaster are laid on top of the insulation. It is recommended not to use decorative tiles or sand-lime bricks, which at sub-zero temperatures lose many of their characteristics and chips begin to form at the edges of the material.
Application of penoplex
To keep the house warm without extra costs, consumers are interested in whether it is possible to glue tiles in the house to polystyrene foam? The question is not easy even for specialists, so opinions differ. In any case, it is forbidden to finish directly on top of the insulation. If you are gluing porcelain stoneware or clinker tiles to the facade, then you need to cover the penoplex with plaster with a reinforcing mesh. The foam board holds the 30 × 30 cm tile.
Walls insulated from the inside with foam boards
If it is necessary to stick the material indoors on polystyrene foam, additional surface coating will not be required. But if you plan to insulate the floor, then put a layer of cement screed on the insulation, then lay the tiles.
To choose an adhesive that is suitable for penoplex, consider the following points:
- base composition;
- environment: moisture and temperature;
- how quickly the mixture dries.
Important! To ensure that the insulation lasts a long time, treat the installation responsibly and first familiarize yourself with all the details and nuances.
Insulation on the surface of the walls
Installation of polystyrene foam on monolithic surfaces
Scheme of insulating the base with extruded polystyrene foam.
When insulating the base with penoplex, the technology does not differ from the same procedure using ordinary polystyrene foam. We have already talked about this in the article about insulating walls outside and inside with penoplex.
Therefore, we will consider the issue comprehensively. A specific feature of working with monolithic surfaces made of concrete or blocks is the need to install waterproofing. Only after this can the base be insulated with penoplex. The technology of work is as follows:
- applying waterproofing to the surface - carried out in four stages with bitumen roll materials and in one stage with liquid rubber;
- gluing thermal insulation - the use of fasteners is prohibited, since holes cannot be made in the waterproofing layer;
- if necessary, external finishing is carried out - in the event that the insulation rises above the ground.
Insulation of the basement floor with polystyrene foam should be accompanied by finishing of the above-ground part of the thermal insulation, since the material is susceptible to the destructive effects of sunlight.
Once again we emphasize that the insulation of the base with polystyrene foam and extruded polystyrene foam is carried out only by gluing sheets of thermal insulation. To do this, use sealants (only special ones), adhesive foam or bitumen mastic. Even if there are locks around the perimeter of the sheets, the joints still need to be sealed. To do this, you can use ordinary polyurethane foam or the glue that was used for installation. The main thing is that the end result is a monolithic layer that will not let in either heat or moisture.
Finishing when insulating the base with polystyrene foam is not always necessary; if the thermal insulation is covered with loam, then no additional manipulations are necessary. If part of the polymer rises above the ground, then it must be protected from ultraviolet rays.
Fiberglass-reinforced propylene pipes for heating are most often used for assembling circuits. They only compete with PEX pipes, but they are much more expensive.
You can read about how to install heating pipes in an apartment or private house here.
Do-it-yourself insulation of the base from the outside with Penoplex
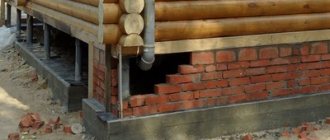
The foot of the building, which is located on the foundation itself and protrudes slightly forward, is called the plinth. This part of the house is the most important and at the same time quite vulnerable.
The base must be properly protected from the harmful effects of moisture and have the required level of thermal protection.
How to insulate the foundation of a house from the outside with penoplex
The excellent performance characteristics of extruded polystyrene foam make it possible to universally use Penoplex insulation of the base with Penoplex glue.
1 Which type of Penoplex to choose?
In most cases, the basement of a house not only effectively protects the structure from unauthorized penetration of moisture, but is also responsible for certain architectural functions.
In addition, a considerable amount of attention should be paid to its insulation. The thermal insulation layer formed by polyurethane foam must have a presentable appearance.
Now you can insulate the base with Penoplex yourself without much hassle. Nowadays, in the construction market, the buyer has to choose thermal insulation materials from a large number of products presented, with the help of which high-quality finishing with polyurethane foam can be produced.
All these materials are united by one technology - they are created on the basis of extruded polystyrene foam, also called polyurethane foam.
Insulating the base with polystyrene foam or even penoplex for the floor and its subsequent installation involves a moment of choice. When purchasing such cladding, attention should be paid to:
- Region of residence;
- General condition of the soil;
- The presence or absence of groundwater.
When insulating the base with polyurethane foam, you can use two main Penoplex brands that meet all the basic characteristics.
- Penoplex Wall. This material, with a high degree of efficiency, is able to provide reliable waterproofing protection for the base that has been insulated.
- Penoplex Comfort (also known as penoplex for wall insulation) is designed specifically for do-it-yourself work related to the construction and repair of private houses. Finishing the outside of the base with such material brings quite noticeable results.
How to insulate the basement of a house - penoplex insulation
The technology, which is oriented towards the installation of polyurethane foam cladding both outside and inside the base, has a number of significant advantages.
Despite the fact that the thickness of such cladding may be small, its low vapor permeability parameter prevents the formation of condensation and moisture in the structure and structures of the lower part of the building.
If the material is applied from the inside or outside of the base, then this element of the structure will receive a reduced level of thermal conductivity, which will not depend on the ambient humidity.
Despite the fact that the thickness of Penoplex is small, when it is used, neither the walls, nor the basement, nor part of the basement from the outside will be exposed to the harmful effects of moisture and frost.
This is due to the fact that when insulated with polyurethane foam, the coefficient of water absorption of the surface is significantly reduced, which ensures a high level of waterproofing.
The presented insulation has a high level of biological resistance to the harmful effects of fungi and mold. Remember that insulation with Penoplex Comfort will protect you from rodents.
This is directly related to the significant increase in the service life of the material with which the base was insulated from the outside with your own hands.
2 Technological nuances of insulating the base with Penoplex
Currently, installation and subsequent insulation of the basement of a building, both inside and outside, with polyurethane foam is a fairly effective method through which the heat-saving functions of the presented material are realized.
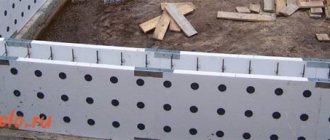
Do-it-yourself thermal insulation installation begins with the process of pre-installing metal profiles. This design, made and installed by yourself, will effectively protect the lower areas of the base from all kinds of mechanical damage.
Penoplex. Basement insulation from outside
In addition, these metal profiles are capable of supporting the first row of a heat-insulating slab, even if the outside of the base is finished with stone and there is plaster on its inside surface.
Experts recommend choosing those profiles that are made using aluminum - their installation is very simple. An example of this is extruded polystyrene foam.
You need to build a profile structure with your own hands, focusing on the parameter of the thickness of the seal. Plaster can be used to finish the inner surface of the plinth, and the outer part can be decorated with wild stone.
Do-it-yourself installation of a profile structure begins with installing the profile at a height of 500 millimeters from the ground level.
Thanks to this, the insulation will be reliably protected from the harmful effects of moisture that will arise in the process of rising water from the soil.
Installation also involves securing the guides, which are located every 25-30 centimeters on pre-installed special leveling pads made using plastic.
Installation continues by securing the base profile using dowels or a special adhesive solution. At the same time, plaster can be applied to the inner surface of the plinth, and it can also be finished with stone.
2.1 General recommendations for installation and subsequent insulation
The metal slats of the load-bearing plinth structure when insulated with polystyrene foam must be firmly secured, since the quality and service life of the structure directly depend on this.
The guide must be fixed at more than two points. The rail must be fixed using special dowels.
The procedure for carrying out work on insulating the basement from the outside
In this case, installation must be carried out using fasteners, which will subsequently be installed in the longitudinal holes of the guide.
You can control the horizontality of the slats using a building level. After a reliable metal structure has been installed, you can begin to insulate the outer surface of the base.
To begin with, the surface is thoroughly cleaned of dust and dirt, and then degreased. There should not be a large number of differences in the walls.
In order to improve the adhesion parameter, the entire surface is treated with sandpaper. After the walls are completely dry, you can begin laying Penoplex slabs.
When choosing the glue that is needed to fix the seal, you need to pay attention to the instructions. Simplification of installation work lies in the fact that when pre-installing an aluminum profile, you will not need to constantly align the slabs horizontally during the installation process.
When laying insulation, you will need to start from the bottom batten. In order to ensure a high level of reliability, along with a polymer-based adhesive, it is recommended to use additional elements that will ensure fastening of the insulation.
They are attached to the wall surface through insulating material with soundproofing of the walls using penoplex. The material is fixed at five points, which should be located in the corners and in the center. After the glue has dried and strengthened, you need to apply a primer, followed by a layer of plaster.
Technology of insulating the base with penoplex
2.2 Product reviews
Most reviews about the use of Penoplex are positive.
Vladimir, 45 years old, Ufa:
I noticed last winter that heat was not retained in the house as long as before. I decided to start insulating the basement from the outside. A neighbor advised us to use Penoplex slabs. I installed everything myself, since I worked in construction in the past.
Now, a year later, with the onset of winter cold, the temperature in the house remains at a high level. Excellent insulation, now I recommend it to everyone.
Sergey, 39 years old, Voronezh:
I have been selling building materials for several years now. When I bring Penoplex, people buy it like hotcakes. They respond very well to the fact that they can well insulate the basement of a house.
Pavel, 40 years old, Kherson:
I recently bought a house in the private sector and started thinking about preparing it for winter and insulating it. I decided to start from the base. My brother is a builder, and therefore he authoritatively advised using Penoplex for insulation, an excellent material, he says.
2.3 How to insulate a basement with Penoplex?
In order to increase the efficiency of fastening the insulation boards, it is necessary to thoroughly treat their surface using a plasterboard roller before starting work.
Thanks to this, indentations will appear on the smooth surface of the slabs, which will significantly improve adhesion. This can also be done with a metal brush, knife or screwdriver.
Insulation of the foundation from the outside
After the preparatory work has come to an end, you can begin installing the slabs on the outer surface of the base.
Currently, based on global construction practice, the two most common methods of installing slabs are used - by nailing and by gluing.
First, the start profile is installed, then, with the assistance of a building level or a stretched cord, the installation line is marked.
Next, using a drill or special mounting dowels, fastening is carried out. This will secure the slabs in the desired position during installation.
If there are no differences of more than 1 centimeter on the surface, then a notched spatula can be used on the surface of the base.
After the Penoplex slabs are securely fastened, you should apply the mounting mixture more carefully, this will help avoid the occurrence of unevenness.
In this case, the application of the mounting mixture should be carried out taking into account the existing recesses. After this, a sheet of insulation with maximum density should be pressed against the outer surface of the base. This will ensure the formation of a temperature barrier.
2.4 How to insulate a foundation with expanded polystyrene? (video)
Source: https://UteplimVse.ru/vidy/penopleks/cokol.html
Recommendations for using polystyrene foam
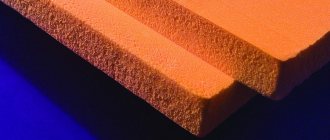
Modern manufacturers produce slabs of extruded polystyrene foam with a thickness of 3 to 12 centimeters. The required thickness of the thermal insulation layer is determined at the building design stage and depends on the following factors: the thickness of the walls and the material used and the geographical area where the building is being built. When building in the middle zone of the CIS, it is preferable to use slabs with a thickness of at least 5 cm, however, the corners that are most susceptible to the negative effects of low temperatures should be covered with slabs with a thickness of 6 to 10 centimeters.
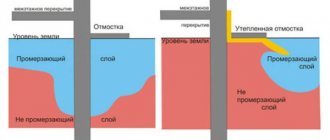
When designing a building, it is best to plan the so-called. sinking base . This form of construction will allow you to hide the hydro- and thermal insulation under the overlying walls of the building. Since the base is underground, it is exposed to the harmful effects of groundwater and frost, which can lead to damage to the integrity of the base.
If the integrity of the building's foundation is compromised, the floor temperature in the house may drop and drafts may appear along it. Most often, during construction, much attention is paid to insulating only the walls of the house, but not the base. This oversight will lead to heat loss in the future and increased costs for fuel to heat the house. By insulating the base with expanded polystyrene during the construction stage, you can avoid significant financial losses in the future.
Basic rules for installing penoplex
Before laying penoplex, the required performance characteristics and features of the floor are determined. But there are general rules when laying insulation, compliance with which will allow you to avoid wasting time and money.
Correct calculation of the square footage of the insulated floor and selection of the appropriate slab thickness. Penoplex is produced in widths from 2 to 10 cm, with a standard width (60 cm), sheet length from 120 to 240 cm. The material is sold in blocks of four to 20 sheets.
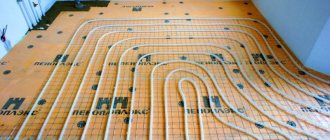
The slab must be laid on a flat surface, regardless of the floor (rough, dirt, concrete).
Advantages and disadvantages of thermal insulation of the base with polystyrene foam
Insulating the base with extruded polystyrene foam makes it possible to maintain its thermal insulation properties even in an extremely humid environment. Compared to many other materials, this insulation is able to withstand impressive loads without allowing subsidence. Expanded polystyrene has other advantages in use:
- Frost resistance;
- High thermal insulation characteristics;
- Not affected by moisture;
- Easy to install, easy to cut;
- The material is relatively inexpensive;
- Service life - 40-50 years.
Among the shortcomings it would be fair to highlight the following:
- The material is subject to combustion, so before installation, the basement part of the building must be treated with non-combustible materials.
- It absorbs moisture well, so before installation it is necessary to treat the base with waterproofing materials.
- The heat insulator can be damaged by rodents, which is why it is necessary to install a reinforcing mesh.
- It is subject to mechanical damage - when filling it with soil, you will need to install protection in the form of shields or reinforcing mesh.
- Not recommended for use in buildings subject to ground movement.
Penoplex trimming
If you need to lay insulation in non-standard rooms, or cut communication holes in sheets, use several methods of cutting the material.
Use any sharp knife. This trimming ensures relatively even edges of the sheet.
Trimming using a jigsaw. The cutting edge is very uneven; construction foam is used to tie sheets cut in this way.
Using hot wire. In this way, you can quickly cut a thick slab; for cutting, a nichrome string is heated with electric current and communication holes are easily cut out.
Being a universal insulation material, the material can also be used as thermal protection on wooden floors and on joists. The technology of laying sheets on a wooden base technically has few differences from covering a concrete base.
As an additional insulation element, mineral wool (as an additional thermal layer), construction foam (to fill possible gaps and for sealing), and mounting nails are used.
Technology of base insulation with polystyrene foam
Insulating the base with polystyrene foam can be done with your own hands both in a house under construction and in one that has already been commissioned. It is carried out both inside and outside the building, but the outside is the most effective, since the bottom of the building together with the walls will form a single thermal insulation layer.
Tools and Supplies
Tools for thermal insulation
In order to carry out work on thermal insulation of the base with polystyrene foam, you will need the following tools:
- solution container;
- screwdriver;
- spatula and trowel;
- buckets;
- wheelbarrow and shovel;
- brushes or roller;
- metal brush;
- mounting gun;
- hacksaw;
- stationery knife.
Consumables required for insulation outside the house:
- polystyrene foam boards;
- roofing felt;
- waterproofing material;
- reinforcing tape;
- reinforcing mesh;
- dowels;
- glue for working with polystyrene foam;
- bitumen mixture;
- putty.
Preparatory work
We free the base that we will insulate from dirt, all kinds of debris, grease stains, and clean it from soil. If there is roll waterproofing, it must also be removed. When purchasing expanded polystyrene, you need to know the thickness and its density. As insulation, you should use material with fire-retardant additives or treat it with non-flammable materials. The main tools for performing insulation work are the following: a hand saw or hacksaw (you can use it to cut an insulator), a spatula, a comb, a work bucket, a wooden hammer, a level, a plumb line, a drill, a trowel, a sharp knife-cutter, and clean rags. Materials used for fastening extruded polystyrene foam: the material itself, reinforcing mesh 2.3 times greater than the insulation, glue, polyurethane foam, umbrella dowels, primer, decorative plaster, brick.
Foam tiles? Easily!
Foam plastic is a very interesting and unique material, which daily increases its popularity among the general list of building materials. Recently, it is very often used as insulation for better energy saving, but it should be understood that laying tiles on polystyrene foam is quite difficult. The surface of the foam is quite porous and does not look reliable enough, and the tiles are very heavy.
Is it even possible to lay tiles on foam? If so, what is the best way to secure it? These are the questions most often answered by experts in this field. This, in general, is not a very good idea, but if you properly prepare the surface of the foam, then in principle it is possible and realistic.
For proper installation, you need good adhesion of the tiles directly to the foam. The traditional option of preparing a regular wall is not suitable, since the material is very fragile. But still, the wall needs to be made perfectly flat.
The tiles themselves are laid in a slightly specific way. Since foam plastic cannot be processed mechanically, it will still remain porous, a special construction mesh is taken and attached directly to the foam sheet before laying the tiles. For reliability, the mesh is anchored directly to the wall itself, since foam plastic is not able to withstand a load of this kind.
Once the mesh is securely fastened, you can proceed to plastering the wall. First you need to level the surface. This can be done with elastic glue. Instead, you can also use a cement-sand mixture. The material does not matter here, the main thing is to achieve a smooth surface. Only after leveling can the wall be primed. It is advisable to use a regular primer; the main thing is to carefully treat the entire surface (several layers are possible).
After preparing the surface of the foam, you can begin laying the tiles. The process under consideration occurs in exactly the same way as on any other wall surface. The place from where to start laying tiles is chosen according to the situation. You may decide to lay out a specific pattern or combine different colors or sizes of tiles. In the work you need to use a special glue for foam plastic, which has better adhesion of the wall to the tiles compared to conventional adhesive mixtures. Well, of course, you need to choose the tile as lightly as possible. Even though the mesh is reinforced with anchors, it may not be able to withstand the weight of some types of tiles. Today, finding lightweight material for our case is not difficult.
Types of internal foundation insulation
In general, methods for insulating a foundation from the inside are similar to external insulation of a foundation. The most commonly used methods are:
- Filling the basement with expanded clay. Allows you to reduce cooling of the ground floor floor. Not an effective method, suitable for temporary country houses;
- Insulation of basement walls with slabs - polystyrene foam, polystyrene or penoplex, with their subsequent finishing. A very popular method of thermal insulation, most often used in combination with external thermal insulation of the foundation for buildings with basements used.
- Insulation of the foundation from the inside with polyurethane foam. A very effective way of additional or independent thermal insulation of the foundation, allowing you to create a seamless coating with excellent adhesion, but performing this work requires the involvement of professionals with special installation.
Nuances of the work
The thickness of the base insulation with extruded polystyrene foam was mentioned above. If you want to make thermal insulation more effective, the layer must be more massive. The slabs can be fixed not only with polyurethane glue, but also with cold-hardening bitumen-polymer mastic. The composition must be applied over the entire surface or in separate spots. If you choose a mixture that contains a solvent among its ingredients, it can destroy the structure of polystyrene foam. Therefore, this feature of the adhesive can have a negative impact on the thermal insulation qualities and durability.
Due to the fact that mechanical fastening can compromise the integrity of the waterproofing layer and cause leakage into the basement walls, experts do not recommend fixing the slabs, relying only on the strength of the glue. You can independently insulate the base with extruded polystyrene foam; the technology is described in the article. From it you can find out that almost all models of slabs of the described insulating material made of expanded polystyrene contain a recess along the perimeter, this allows the sheets to be joined, forming a lock. If you purchase these sheets, you will rid the surfaces of cold bridges. When trimming, the joints of adjacent slabs should be coated with glue or mastic.
How to properly glue insulation boards?
A properly selected adhesive composition will not save you if you use it ineptly. Dry mixtures must be prepared and diluted with water strictly in the proportions specified by the manufacturer.
Before starting any work, both external and internal, the surface must be properly prepared.
- Noticeable irregularities and bumps need to be smoothed out.
- Clean from dust, visible dirt and old finishing materials.
- Allow the insulated surface to dry.
Installation on walls begins from the bottom up; on horizontal surfaces you need to glue from the edge. Expanded polystyrene boards should be tried to fit together as closely as possible. It is important that the glue does not come to the surface at the joints.
Any, even minimal, gaps between sheets of material are cold bridges through which unheated air will rush into the house. Subsequently, the joints are filled using sealant or polyurethane foam.
The applied layer of glue may vary in thickness. Even if the penoplex is covered with panels, drywall, or tiles are laid on it, the evenness of the fit should be checked with a level.
There are several ways to apply glue to the surface of extruded polystyrene:
- Stripes with a small interval from each other. At the same time, the glue line should not be interrupted at the corners. Be sure to apply adhesive in the center. The strips located around the perimeter should not reach the edge of the slab by 1-2 cm.
- You can use a continuous method of applying the composition. The beginning and end of each strip deviate from the edge of the penoplex by 1 or 2 cm.
- The beacon method involves applying glue pointwise with an even distribution over the entire surface of the slab. The interval between points should be 30 cm.
It is not even forbidden to combine methods of applying glue. Many craftsmen advise spreading the compound around the perimeter and applying glue in a spot in the center of the slab.
Using the chosen method, the mixture is applied to the first slab, it is pressed against the surface and held in place for some time. If the penoplex does not fall when your hands are removed from it, then you can begin installing the next element.
Is it possible to install slabs in two layers?
Some experts are still deciding whether it is possible to fix polystyrene foam boards in two layers to achieve the desired thickness. Some claim that the high adhesion of glue and mastic makes it possible to obtain a monolithic double layer. To prevent the formation of cold bridges, it is necessary to ensure that the seams do not overlap during installation. Others argue that with vertical displacements of the soil, the thermal insulation may delaminate. As a result, moisture penetrates between the layers, which causes increased heat loss.
The bottom row must be mounted, focusing on the base. The best option would be the existing foundation overhang, which is formed at the pouring stage. But quite often, thermal insulation is installed on a gravel backfill where the foundation is installed. Wild stone, brick, tiles or decorative plaster, as well as facade paint are laid on top of the insulation. Each of these materials can become a decorative finish. But sand-lime brick or decorative tiles cannot be called the best choice, since at sub-zero temperatures chips may form on the edges of these materials.
How to finish a base on top of penoplex?
So, the penoplex is installed, but the base of your house is ugly, it has acquired the characteristic appearance of an orange inflatable boat! How to fix it? To do this, firstly, you need to apply plaster over the penoplex.
The plaster is applied in the usual way, using a reinforcing mesh fixed on top of the penoplex. After the plaster has dried, its surface should be carefully primed.
Well, now, on top of the primer, you can install the selected finishing material. There is no limit to imagination here. You can decorate the base with natural wild stone to create the impression of “my home, my fortress.” You can use a brick finish. There are ceramic tiles of various types and textures, and there are decorative plasters - the so-called textured ones.
Having finished finishing, you can rejoice: you have significantly increased the thermal insulation properties of your home.
Instructions for compliance with thermal insulation rules
It is good to use decorative plaster as a finishing material.
- Sometimes owners try to insulate only the walls outside the building, neglecting the base. This is fundamentally wrong, since an uninsulated base leads to significant heat loss.
- When choosing insulation, you should be guided by the climatic conditions of your region of residence. For the middle zone of the CIS, insulation is made with polystyrene foam slabs with a thickness of at least 5 cm. At the corners, the slabs should have a thickness of 6 to 10 cm. Expanded polystyrene slabs with a thickness of 3 to 12 cm are available for sale.
- When building a house, it is better to plan a sinking base in order to hide all layers of thermal and waterproofing. Insulation of the base is of great importance; the microclimate inside the room depends on it, as well as the ability of the structure to withstand the destructive factors of atmospheric influence.
- The insulation process is carried out along the wall outside the house. In this case, you should choose a non-aggressive adhesive without solvents. Adhesive containing solvents can destroy the structure of polystyrene and lead to its premature destruction.
- The technology of construction work requires that it be carried out at temperatures above 5 degrees Celsius. This will ensure that with the onset of frost, cracks will not appear on the surface of the wall.
- Thermal insulation boards are attached with an overlap, this significantly reduces heat loss.
- Installation of thermal insulation boards is carried out using a drill using a metal mesh, connecting the slab, mesh and base into one whole.
- The slabs are installed using bitumen mastic, either spotwise or over the entire surface.
- Most slab models have a special recess for joining using the locking method without the formation of cold bridges.
- Fastening slabs in 2 layers to obtain the required thickness of thermal insulation is not always considered justified. Some experts consider this a mistake, because soil displacements can delaminate the insulating layer, allowing water to penetrate into the structure.
- Facade paint, brick, tiles, wild stone or decorative plaster are used as finishing on top of the insulation. But practice has shown that sand-lime bricks and tiles are unsuitable materials. They can become chipped when exposed to cold.
All these measures will stabilize the temperature in the home, regardless of external fluctuations, protect against drafts and dampness, and protect the foundation from destruction.
Inside or outside?
There are two options for insulating the base: internal and external. The difference is where the insulation layer is attached. External insulation has recently become extremely popular, and the demand for it is growing. Why?
Firstly, it allows for better preservation of the base itself. It minimizes seasonal heating and cooling of the base, which means it reduces stress that can lead to cracking.
Secondly, decorative finishing materials fit better on the insulation layer than on cement. Therefore, a base insulated from the outside can be finished on the surface like wild stone, brick, or even marble, and it will look much more beautiful than bare cement.
Insulation of the blind area
Insulation of the base and blind area with extruded polystyrene foam is being done more and more often today. If you decide to thermally insulate the blind area, then you first need to prepare the area. The space is cleared, the fertile layer of soil is removed to the depth of laying the thermal insulation. The depth of installation of insulation is determined depending on the thermal characteristics: the higher they are, the smaller the layer should be. You should get rid of large roots; if this is not done, then after a while vegetation will appear on the site of the blind area. In the place cleared of soil, crushed stone should be laid, which will act as drainage.
Insulating the house with extruded polystyrene foam in the area of the blind area at the next stage involves equipping the perimeter with removable formwork. The possibility of water seepage must be eliminated with the help of clay, which is distributed throughout the trench. It should be compacted, forming a 20-centimeter layer. Next, sand is laid, which will serve as the underlying layer. In order to ensure its shrinkage, you need to pour water on top. Next, thermal insulation is laid, the next layer will be water-repellent paving slabs, stone or any other material.
Nuances that should be taken into account when insulating the base
If the foundation of the house is deepened , then before carrying out insulation work it is necessary to dig a trench along the entire base, with a depth to its base and a width of half a meter to one and a half meters.
Upon completion of the work, the trench is buried with the same soil or it will be replaced with expanded clay and sand, which improve thermal insulation .
and at a depth of about 30 cm from the top of the trench, a ten-meter layer of sand is poured and compacted tightly. After this, roofing material is laid, the width of which is slightly greater than the width of the dug trench, and its joints are coated with bitumen.
When the bitumen hardens , penoplex is glued to the bottom of the trench on top of the roofing felt with acrylic glue, its joints are coated with polyurethane foam or the same glue. After the glue has dried, you should make a concrete screed with a slope away from the base, which will allow excess moisture to be drained away from the house.
The final finishing of the base can be done from clinker tiles, stone or using other materials. Insulating the foundation base helps reduce heat loss by more than 20%. Carrying out the work also protects the base from mechanical damage, protects against the formation of cracks and mold, and the development of fungus.
If external thermal insulation is not done, the service life of the foundation is significantly reduced due to the fact that it is exposed to harmful factors - frost, moisture. You can carry out external insulation of the foundation plinth with your own hands; for this you should purchase materials and carefully study the technology for carrying out the work.