Many vehicles, especially domestic ones and those in the budget price category, are equipped with a weak and ineffective stove. As a result, the interior warms up poorly and not as quickly as we would like. Expensive solutions are also sold on the market, but not every one of our car owners is ready to spend money on purchasing them. Therefore, an additional pump for the Gazelle cooling system could be the most optimal way out of the situation.
Operating principle of the additional heater pump
Many domestic car enthusiasts first try to solve the issue of raising the air temperature in the cabin using traditional methods. They seal the dashboard and doorways with insulation, change the heater radiator or install a motor with greater performance. When the effects of all such tricks are not enough, then the only effective solution may be an additional pump for the stove.
The operating principle of this technique boils down to the following: the electric pump drives antifreeze through the system within a small circle even at those moments when the power unit is not running. The auxiliary pump also helps out in situations where you have to stand in traffic jams for a long time in a Gazelle. Idle speed does not allow for an influx of well-heated air, and instead only warm air comes in.
By acquiring an additional pump, the driver receives a lot of advantages - these also include ease of installation, which does not require a significant investment of time and money. Of course, you will need a connection diagram, but the second pump is mounted into the standard electrical system of the car. The kit usually includes connectors, fasteners, adapters, etc.
How to install an additional pump
Installation of an additional pump on a VAZ stove can be done in the engine compartment or under the interior panel. The first option is preferable, since in this case the sound of the pump does not enter the interior, and there is also no risk of flooding the interior with antifreeze if it leaks. Depending on the installation location, the unit can be mounted at the mounting location of the standard engine compartment sound insulation or on additional brackets.
The installation of an additional water pump on the VAZ-2110 and other models of the domestic automobile industry is carried out on the heater supply pipe. In this way, it is possible to achieve a more active injection of coolant into the “furnace” radiator and increase heat transfer.
Note: increased pressure in the cooling system can lead to failure of poorly secured pipes or breakdown of the radiator. Therefore, before installing additional equipment, it is recommended to conduct a complete diagnostics of the CO.
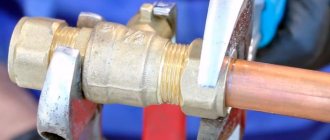
Before installing an additional pump, the antifreeze is drained. After this, the pipe at the intended installation site is cut in half using a sharp blade, and the resulting ends are put on the pump outlets. It is important to ensure that the arrow drawn on one of the outlets, indicating the direction of fluid circulation, is directed towards the radiator. The pipes placed on the outlets are secured with clamps. It is better to use Norma brand screw clamps, since products from lesser-known brands often have sharp edges and cut the pipe.
Article on the topic: How to properly make a door shutter yourself
The connection diagram to the on-board electrical network may vary depending on what goals the car owner sets for himself. If the pump is installed for more efficient cooling, it makes sense to connect it in such a way that it runs constantly when the ignition is on. The unit can be connected directly from the battery, but the circuit must be closed using a relay, which is activated after turning the start key.
If you plan to install an additional pump in the heating system to improve the operation of the stove at XX, it is better to connect it through a button. In this case, the power circuit will include a relay, a fuse, a pump button and a battery. Electricity is supplied via a single-wire circuit. The “minus” in this case is the car body. Using this scheme, the car owner gets the opportunity to turn on the pump only when there is a need for it. Note: it is better to install an additional pump using a second power supply connection scheme, since in extreme cold, its prolonged operation can lead to underheating of the motor and related malfunctions.
How a new pump in the cooling system will help the driver
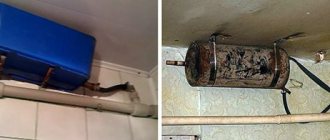
It is the pump for the Gazelle stove that is in high demand among car enthusiasts due to its practicality and low cost. It can even be installed on other makes and models of vehicles. Experienced drivers who have been using Gazelle for years are not lazy to disassemble the new pump and coat it with sealant. Particular attention should be paid to the area where the impeller and rubber sealing ring are located. Antifreeze leaks often appear in these places.
Where should I put the new heater pump? Typically, such installation is carried out in a gap created using a pipe going to the interior heater radiator. To do this, you can remove and cut the standard pipe. Using connecting hoses, a new heater pump is built into the gap.
The main reason why drivers think about an auxiliary pump is that there is little heating coming into the cabin at idle. The air becomes truly hot only after the engine speed increases. Additional equipment will help antifreeze circulate intensively through the radiator.
Let's sum it up
Taking into account the above information, it becomes clear that an electric pump for a stove is a fairly simple and convenient solution that allows you to increase comfort and safety when operating a car.
In practice, after installing such a pump, it is possible to warm up the interior faster, which is important when making short trips over short distances or while driving fast on the highway in winter. The glass warms up faster and sweats less during a trip, it is easier and faster to remove snow and ice from them, etc.
We also recommend reading the article on how to check the engine pump without removing it. From this article you will learn about checking the pump without removing it from the engine, as well as what you need to pay attention to when checking the water pump of the cooling system.
As for the choice of the pump itself and its installation, the additional GAZelle pump is in demand, primarily due to its low cost. At the same time, we are not talking about quality.
In turn, the more expensive analogue from the German company BOSCH is noticeably better in quality than the domestic solution. Among the main advantages, car enthusiasts highlight ease of installation, absence of noise during operation, better sealing, etc.
Finally, we note that an additional pump in a VAZ 2109, 2114 or on a budget foreign car can significantly increase the level of comfort, save on warming up the car, etc. If the installation is done correctly and the pump is working properly, the interior will heat up faster compared to the standard heating system.
The only thing is that you should periodically check the tightness of the cooling system, since even standard elements can leak. If we are talking about additional non-standard elements, in this case the connection points require separate control.
Installation instructions
Direct installation work can begin when the auxiliary pump, fastening and additional elements that are required according to the diagram have been purchased. The procedure for adding another pump to the factory system will be approximately as follows:
- First, a single structure is assembled, which includes a pair of hoses and a new pump. Particular attention should be paid to reliable fastening of hoses and fittings.
- The following work will be carried out on the car. It is put on the handbrake and the terminals are removed from the battery.
- Now you need to find the hoses leading from the existing stove and carefully disconnect them. The assembled structure will be connected to this place.
- To mount the pump itself, you should find a specific place.
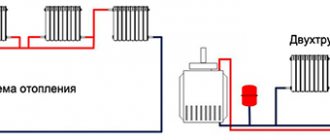
- The output from the thermostat should be connected to the top pipe, and this will be the input. We attach a side pipe to the stove, which will act as an outlet.
- Once the entire system is assembled, you can pour coolant into it and observe the tightness (no leaks, stains, etc.)
- Now we supply power to the pump and check the functionality of the complete system. Don’t forget that to do this you need to connect the terminals to the battery. These are the main stages of the process of how to install an additional pump to the heater on a Gazelle.
To avoid losing coolant from the system, it should be drained through the lower hose of the expansion tank. To do this, you need to remove the hose and place a suitable container under the tank (for example, any plastic canister). Antifreeze or other coolant from the hose will also be poured here. After this has been done, you can remove the supply pipe - you can find it on the side of the power unit.
During dismantling, we must not forget that the coolant is under pressure in the system and may be hot for a certain time after the engine is stopped. It is better to prepare the drain container in advance and make sure that the motor has cooled down sufficiently. Many people sequentially flush the cooling and heating system before connecting new equipment to it.
For washing, you can use a regular mixture of warm water and citric acid, which effectively removes deposits. The solution is poured from above, directly from the container, and the pump must be connected to a 12 Volt power source. Next, it will pass through the hoses through the system radiator. After the radiator, the remaining dirty antifreeze along with deposits will be drained into a bucket through another hose. The cycle must be completed several times.
Additional pump for a car heater: how to choose and install
As a rule, on many budget cars, the standard stove does not warm up the interior quickly and efficiently enough. To a greater extent, this applies to popular VAZ models (2109, 2114, etc.), as well as some foreign cars.
In practice, one of the most effective and affordable methods is an additional pump for the stove. Next, we will look at what the specified heater pump is, how to choose an additional pump, and also how to install an additional pump.
Additional pump: what you need to know
So, if the stove initially works poorly, although it is fully operational, and also if the car is often operated in severe frost conditions, standard heating may not be enough even for a middle-class car.
In the case of a VAZ or old foreign cars, the problem is solved by gluing the dashboard, upgrading the heating system, installing tight dampers, replacing the heater radiator, the heater motor itself with a more efficient one, etc.
However, if all these actions are not enough, then an additional pump for the stove may be the solution. In a nutshell, the auxiliary heater pump is an electric pump that circulates the working fluid of the cooling system in a small circle even when the engine is not running.
This allows you to more actively warm up the interior when the internal combustion engine is running or when the warmed-up engine is turned off, but the driver and/or passengers are in the car (fuel savings and increased comfort).
Also, an additional heater pump helps out when the engine is idling without load (for example, when sitting in a traffic jam) and quickly cools down. In such conditions, a standard stove usually does not blow hot air, but only warm air.
By the way, the same thing happens when driving on the highway at high speed in the cold season, when oncoming air flows intensively cool the engine compartment, as well as the coolant in the cooling radiator, etc. In turn, the additional pump to the heater causes the coolant to circulate more actively and give off more heat.
Another advantage is ease of installation, which means minimal intervention and changes to the factory design. To put it simply, an additional pump is installed so that the coolant circulates in a small circle.
A simple connection of the pump to the vehicle's electrical network is also implemented. Usually, all the necessary fasteners, adapters, connectors, etc. are included with the pump.
Which stove pump is better to choose?
First of all, the pump itself is the most important element. The GAZelle stove pump is in greatest demand on the market, as it is cheap and affordable. However, the solution has several serious drawbacks (noise during operation, high power consumption, average resource).
It turns out that even taking into account the fact that the Gazelle heater pump is inexpensive, experts recommend considering an additional BOSCH pump for a passenger car.
Depending on which pump was chosen and which car it is installed on, you may need to purchase a 4-pin relay, a 3-pin toggle switch, as well as wires, terminals, corrugation, hoses and clamps, bolts, fasteners and even sealants.
For example, a sealant is necessary if a Gazelle stove pump is installed on a VAZ 2114. Let’s also add that the GAZelle pump requires additional modernization, while installing an additional BOSCH pump is faster and easier.
Installing an additional pump on the stove
When all the nuances are taken into account and a suitable electric pump is purchased, you will often also need to buy the additional elements and fasteners discussed above. Only after assembling the complete installation kit can you proceed to installation. Let's look in general terms at a simple installation of a BOSCH pump.
As for the GAZelle pump, the general installation principle is similar, but the pump itself needs to be disassembled and modified. In short, it is recommended to disassemble the pump and coat it with sealant. If this is not done, antifreeze will very quickly begin to flow through the pump. More precisely, you need to lubricate the area where the impeller and the rubber sealing ring are located.
Also, it is optimal to immediately replace the standard self-tapping screws that are used in the design of this pump and install screws of better quality. After treating with sealant and assembling the pump, it should not be installed on the car immediately. The fact is that sealants must dry, which will require at least 48 hours.
- If we consider pump controls, it is also necessary to display a separate button. Usually it is placed on the dashboard, installed instead of plugs, etc. Power to the heater pump button can be taken directly from the battery. The main thing is to install a fuse, as well as a relay.
- You also need to lay out the wiring correctly; all wires must be heat-shrinkable and securely fastened. After installation, the driver is able to turn the pump on and off at his discretion.
How to properly organize the electrical part of the connection
Turning on the pump can be solved as follows: connect the negative terminal directly to the battery. The positive one is carried into the cabin along with the gas pedal cable, for example. The button is placed under the steering wheel in any convenient place and so that it does not interfere. As a result, absolutely all Gazelle drivers with such a solution noted that in winter weather the car becomes noticeably warmer. It is also convenient that even with a cold engine you can turn on the pump, and after a couple of minutes heated air will begin to flow into the cabin.
This is a fairly simple method, but it has weaknesses. If you forget to turn off the button in advance, then when you next start the car to warm up, the operating device will begin to take heat from the cold engine. The time it takes to warm up to operating temperature will increase. You can make a double control system so that the pump does not operate in the warm season and does not turn on automatically when it starts. To do this, you will have to add a two-position relay to the circuit.
Connecting the interior heater pump
An additional pump can be connected to the vehicle's electrical network in several ways. The simplest is the introduction of an additional switch button into the cabin with two positions “On” and “Off”.
But a more suitable way is still to connect the heater pump using a dual control system:
• the “on/off” button is used only for one-time activation and deactivation of the additional heating system with the onset of cold weather and its end; • if the “On” button is pressed, the system is activated every time the vehicle starts moving. The control signal can be taken, for example, from the handbrake light of a manual transmission. Every time you release the car from the handbrake, the pump will automatically turn on.
Recommendations for use
Please note: the pump that is produced for the Gazelle is stuffing box. Even the instruction manual does not recommend using it at speeds above 60 km/h. The fact is that at high engine speeds excess pressure arises - because of this, sooner or later the seal breaks through and a leak occurs. What is also important: after stopping the engine, the pump also performs the function of recirculating the coolant until it cools completely.
Of course, the main advantage of the Gazelle heater pump is its affordable cost. As already mentioned, leaks inevitably begin to occur over time. If you invest 2-3 times more money, you can order a higher quality analogue from the German Bosch, which does not have the above disadvantages. If someone thinks that an additional pump is a modern innovation for insulating the interior in winter, then this is far from the case. This solution is successfully used by owners of Lanos and other cars. Moreover, many German manufacturers equip their equipment with an additional heater pump right off the assembly line.
If we summarize all the information presented in the review, we can conclude that the auxiliary heater pump is a simple and effective solution for heating the Gazelle’s interior in harsh climates. A correctly installed pump will promptly warm it up even during short trips when the engine cannot reach operating temperature. This is not only comfort, but also safety, since the glass also warms up in a short period of time and visibility improves.
The additional pump from Gazelle does its job well, but it is noisy. You can use more expensive analogues, but in any case it is necessary to periodically check the tightness of the system. Leaks can occur not only from standard components, but also from self-installed equipment.
Which pump to choose
Unlike the standard VAZ and GAZ pump, which has a mechanical belt or chain drive, an electric pump is used as an additional driving force. Most often, motorists use an electric pump, which is standard equipment on the Gazelle car.
The unit has high performance, but the quality of its manufacture leaves much to be desired. Therefore, before installing such a pump, it is recommended to disassemble it, coat all seals with automotive sealant, reassemble it and let it dry for 24 hours.
Note: the above applies to old-style pumps. New GAZ pumps have good build quality. However, over time, they also begin to leak.
An alternative to GAZ products is to install an additional pump manufactured by Bosh. These units have high build quality and a different operating principle. The blade rotates under the action of a magnetic coupling, and not an electric motor, as in the first case.
Article on the topic: Which oil is better to fill in the Chevrolet Lacetti 1.4, 1.6 engine
By using such a scheme, the manufacturer was able to abandon sealing connections and almost completely eliminate the possibility of leakage. The disadvantages of the imported unit include its high cost and relatively low productivity (700 liters versus 1200 liters per hour for the GAZ unit).