We insulate from the outside
Before you begin to insulate the base, thoroughly clean its surfaces of cement, knocking off dirt with a hammer and brushing it off with a brush.
Identified surface defects or cracks are sealed with cement mortar. After which it needs to be allowed to dry, and only then do they begin to perform thermal insulation. Next, the base surfaces are coated with a primer to ensure reliable connection of the adhesive composition to the walls. The base structure of the foundation usually has a height of 0.30-0.50 m, while Penoplex is produced in larger sheets. Therefore, it will need to be adjusted to the base.
For this purpose, measure the height of the structure and mark the insulation sheets accordingly, cutting them with a hacksaw.
Consumables and tools
To thermally protect the base with penoplex, the master must prepare the following tools and accessories:
- metal brush for cleaning the surface,
- pick,
- shovel,
- buckets,
- trolley for excavating soil near the basement structure.
Basic building materials needed to perform thermal insulation work:
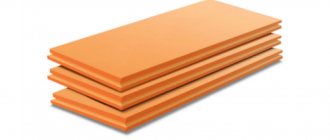
- extruded polystyrene foam, usually comes in bags of 4 to 10 sheets;
- waterproofing film;
- fiberglass reinforced mesh;
- adhesive composition for securing insulation sheets;
- dowels;
- putty;
- bitumen mastic.
Finishing technology
Waterproofing is applied on top of the treated and cleaned base surfaces. An indispensable requirement is the deep drying of its cover. Otherwise, the slabs will creep to the sides.
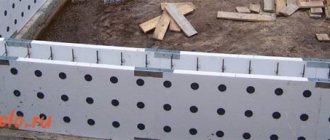
Insulation installation technology:
- The sticker starts from the bottom, the insulation sheets are placed horizontally in one row.
- The next layer of sheets is installed end-to-end and secured to the plane of the previous cover.
- Thermal protection boards must be of equal thickness.
- The next row is made with offset joints, placing the slabs in a checkerboard pattern; the seams between the tiles should be 5 mm.
- Fit the edges of the sheets tightly.
- The glue is applied at a number of points.
Having completed the stages of insulation and external decoration of the base, you will also need to insulate and equip the blind area.
Preparatory work
To insulate the foundation, a fairly large amount of preparatory work will be required.
First of all, it is necessary to remove soil along the perimeter of the building to the full depth of the foundation slab. In order to complete the entire scope of work on laying penoplex as comfortably as possible, the trench must be made at least 90 cm wide.
After completing the excavation work, you will need to thoroughly clean the surface of the foundation from adhering soil. The most suitable tool for this type of work is a plastic brush with stiff bristles, which can be used to thoroughly prepare the surface of the foundation slab for leveling.
In order for the insulating material to be fixed to the surface of the foundation, you will need to level the surfaces of the slab using cement mortar.
The concrete mixture is prepared from 1 part cement and 4 parts sifted sand. The solution is applied along the beacons, which must be in the same vertical plane. To control the position of the beacons, a building level is used.
After leveling the base, wait at least 1 week for the cement mortar to gain strength.
At this point, the preparatory work can be considered completed. But installation of insulation is possible only after waterproofing the underground and basement parts of the base.
Foundation waterproofing: features
For waterproofing concrete, it is customary to use mastic based on petroleum bitumen.
You can make mastic yourself:
- For this purpose, a metal container is used in which bitumen is heated to the melting point, after which motor oil is added.
- Oil is added to give the material plasticity and resistance to low temperatures.
- To give the mastic the necessary qualities, prepare a mixture of bitumen and oil in a ratio of 3 to 1.
The mastic is applied to a flat surface of the foundation in a layer of no more than 4 mm.
After which the entire treated area must be additionally sealed using roll materials. For this purpose, roofing material is suitable, which must be glued with an overlap.
To attach roll waterproofing to the foundation and plinth, you must:
- on one side, heat the material with a gas burner;
- attach roofing felt to the wall;
- smooth the material so that the air is completely released from under the surface;
- The joints of the rolled waterproofing material should be coated with mastic.
That's it, you can start installing the penoplex.
Installation of insulation
Installation of penoplex in the underground part of the strip foundation is prohibited using dowels, so to fix the insulation boards you will need to purchase acrylic glue. The adhesive is applied to the back of the slab in several places, after which the material is installed around the entire perimeter of the building.
How to calculate the thickness for thermal insulation
When buying material, the question involuntarily arises: what thickness is the right product to purchase? It turns out that to choose the right slab, you need to make calculations.
The manufacturer simplified the task and, taking into account the geographical and climatic conditions of each region, calculated the approximate thickness.
But construction is strictly individual for each erected structure, and correct calculation will be a reliable guarantee of its longevity.
For independent calculations, you need to know some indicators in order to apply them to the formula:
- heat transfer resistance (“R”). This indicator is individual for each region;
- foundation thickness (“h1”)”;
- thermal insulation thickness (h2);
- thermal conductivity coefficients (λ1 and λ2).
All indicators can be found on the Internet and tech. house documentation. And using the formula: R - h1/λ1+h2/λ2, you can find the thickness for the thermal insulation of your foundation. If the calculation results in a value that will need to be rounded, you should take the size up.
Foundation insulation” width=”549″ height=”380″ />
Insulation of the base and foundation from the outside: sequence of actions
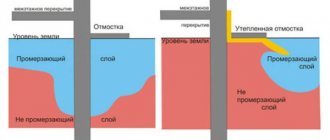
In general, thermal insulation of the underground (and lower part of the above-ground) part of the building is created taking into account the following considerations:
- it is necessary to protect structures from freezing, including under the influence of water that has penetrated into the pores;
- the effect of frost heaving of soil on the material should be reduced;
- It is also desirable to prevent heat leakage from the house into the cold ground.
Taking this into account, in addition to thermal insulation, waterproofing is required for foundations, since without it insulation is ineffective.
Perform horizontal and vertical hydro- and thermal insulation.
A rigid thermal insulation board from below (under the floor) is laid on top of the backfill, sand and gravel or, to improve insulation, expanded clay cushion.
Insulation of the base with penoplex from the outside is carried out over the entire surface of the wall, including the protrusion (shoe) of the strip foundation, if any. For slab foundations, insulation is placed under and on top of the slab, on the inside of the basement.
For insulation to be effective, general rules must be followed.
- When performing work, it is necessary to provide access to all surfaces to be treated and dry them thoroughly. To do this, in an already erected building, a trench is dug around the perimeter to a depth of 20...50 cm below the bottom plane of the foundation; for a building under construction, a trench or pit is immediately dug deeper than planned just for laying the foundation. Drying is carried out naturally; if the groundwater level is high, it is necessary to drain the area and divert it to the side. In any case, this measure is necessary for the normal functioning of basements.
- The base concrete must be prepared for insulation - cleaned of dirt, crumbling areas, repaired cracks, leveled the surface so that there are no protruding areas, protruding reinforcement and other elements.
- Correctly calculate the thickness of the insulation and the method of laying it - in one layer or two or three. The first option saves time and saves adhesive composition, the second guarantees the absence of “cold bridges” at the joints between the plates.
How to insulate the foundation and blind area of a house from the outside with polystyrene foam:
- a sand or sand-gravel cushion is placed under the lower part of the foundation, sloping away from the house. It is also advisable (if the groundwater level is high) to install a drainage pipe;
- Waterproofing is performed on the prepared surfaces. It is convenient to do this by coating (bitumen-based mastics) or by combining adhesive bitumen mastics and roll materials; you can also use modern membranes and films;
- sheets of expanded polystyrene are attached to the adhesive mixture or glue-foam, starting from the lower corner of the foundation. The slabs are laid in horizontal rows up to the level of the finished floors of the first floor and higher if it is planned to completely insulate the external walls.
Advantages and disadvantages of penoplex
Pros of insulation based on penoplex:
- Withstands heavy loads because it has compressive strength.
- Moisture resistant.
- Light weight.
- Not subject to rotting and decomposition.
- Low thermal conductivity, so a thin product can be used. And this leads to simplified technology.
- Resistant to temperature changes without losing properties.
- Harmless to humans, environmentally friendly.
- Durability (up to 50 years).
- Low cost.
Minuses:
- The material is flammable and requires additional finishing with non-flammable substances.
- Unresistant to rodent attacks, reinforced mesh should be installed.
- Susceptible to destruction if contact with alcohol-containing solutions and alcohol is used.
- Low mechanical strength; when backfilling with hard soil, protective shields should be installed.
Cost of insulation
How much will it cost to insulate walls using this material?
To do this, you need to calculate the geometric plane that needs to be insulated.
If a house has a perimeter of 42 meters and a foundation depth of 1 meter, then 42 square meters need to be insulated.
There are no sheets 120 mm thick. But, there is Penoplex Foundation 100 mm and 20. You will have to insulate it in 2 layers. A sheet 100 mm thick costs approximately 375 rubles and has an area of 0.72 m3. A sheet 20 mm thick costs about 70 rubles. In total, we need 59 sheets of each type. One hundred square meters will cost us 22,000 rubles and the second layer 4,200, totaling 26,000 rubles for the insulation.
If you add several cylinders of adhesive foam, then you can definitely meet the 30,000 mark.
Why Penoplex?
Penoplex or, to be more correct, “Penoplex” is a Russian brand for the production of insulation from expanded polystyrene (high-density foam). For the sake of fairness, it is worth mentioning other brands, for example:
- Technoplex;
- URSA;
- Primaplex.
However, in the domestic space, the word “Penoplex” has become an eponym - a case when a proper name becomes a common noun. And, in fact, the name of this brand is now applied to many types of polystyrene. However, for the sake of fairness, in this article we will focus specifically on Penoplex insulation in the classical sense of the word. What's so good about this material?
Required thickness
The thickness of the insulation depends on two factors:
- The region in which the house foundation is insulated;
- The thickness of the concrete layer of the foundation walls.
For each region, building codes establish minimum thermal resistance indicators - the ability of the building envelope to prevent heat from escaping from the room. This indicator can be found in SNIP dated February 23, 2003 “Thermal protection of buildings”. The diagram below shows the indicators for the main regions.
In addition, we will need the thermal conductivity indicators of the material from which the foundation is made and the same indicator of Penoplex. That is, in essence, you first need to figure out what the thermal resistance should be, and then how to get it.
Let’s take for an approximate calculation the insulation of the foundation with Penoplex in Surgut. The required value for walls is 4.03.
This indicator needs to be achieved.
Next, we take the thickness of the concrete foundation and divide it by the thermal conductivity of the concrete.
We take as an example a wall thickness of 550 mm. The thermal conductivity of concrete is 1.69.
0.550 m / 1.69 = 0.2958 - as we see, of the required 4.03 concrete, only a minuscule amount is given.
Now, this amount must be subtracted from the total thermal resistance.
4.03-0.2958 = 3.7342 is the minimum indicator that needs to be achieved using insulation. How thick should it be? Penoplex's ability to conduct heat is 0.032.
Foundation thermal insulation
The use of modern methods of thermal insulation is of great importance, especially in areas with harsh climatic conditions. This prevents a significant portion of heat loss and freezing of soils, which increase in volume, which leads to a rise in their level.
Foundation insulation with polystyrene foam
Insulating the foundation of a house from the outside with polystyrene foam is an excellent option for improving the thermal insulation qualities of the base of the house and preventing freezing.
Expanded polystyrene is an improved type of foam. Its use is more profitable, and installation is easier.
The video describes in detail how to insulate the base of a residential building with your own hands.
The process works as follows:
Preparing the base. This stage can be carried out both during the construction of the building and after its completion. To do this, you need to dig out the foundation, clean it of soil, debris, rust and grease. Sheet selection
In this case, you need to pay attention to two factors: density and thickness. They mainly use sheets with fire retardant additives and a density of 35 kg/m3. Waterproofing
This will prevent the influence of groundwater and its penetration through the insulator layer. Fastening polystyrene foam sheets with contact adhesive. You can attach two layers, but so that the panels of the second layer cover the joints of the first. Protection of insulation with a reinforcing mesh to avoid strong mechanical stress and the penetration of rodents. A layer of cement mortar can be applied to the protective mesh. Providing drainage. This step is considered mandatory when constructing a building on wet soils. Basement insulation. The base also needs to be insulated in the same way, followed by finishing. After the glue has dried, the panels are additionally secured with nails. Soil insulation. The event involves isolating the surrounding land with a blind area insulated with polystyrene foam slabs.
Knot
Insulating the foundation and blind area can significantly increase the temperature in the structure and protect the foundation from destruction.
Insulation of the foundation with liquid polyurethane foam
It is considered a fairly effective method that reduces heat loss by 20–25%.
To do this, two liquid components are mixed with each other, forming a thick foam. When applied, it increases in volume and hardens, forming a protective seamless layer with excellent thermal insulation and waterproofing properties. The optimal application thickness is considered to be 60 mm.
Wooden building
The polyurethane foam layer can be applied at a temperature not lower than +5 C. Surface preparation involves cleaning from contaminants, and surface quality is an unimportant factor.
As the foam hardens, it changes color. When performing work, various problems may arise related to equipment and neglect of weather conditions.
For example, when applied in sub-zero temperatures, cracks may appear that must be repaired in the future, otherwise water may accumulate in them and freeze. After polymerization, the polyurethane foam layer has low plasticity.
Incision
Foundation insulation using EPS
As a rule, not all insulation materials are suitable for thermal insulation of the base. To choose the right material for this purpose, you need to consider its service life: it must be as durable as the building itself.
Insulation with extruded polystyrene foam (EPS) is considered a more reliable method than, say, polystyrene foam, since this material is more durable and has excellent performance characteristics.
Blind area with trays
For this purpose, you need to purchase heat insulation boards and suitable glue for attaching it. After this, a number of preparatory activities should be carried out:
- Dig a trench around the foundation, digging into the ground.
- Apply EPS to the freezing depth of the ground.
- Clean the foundation from debris and dirt.
- Apply a special primer in two layers, wait for it to dry and absorb into the concrete.
- Provide waterproofing with bitumen mastic.
- Apply glue to the boards.
Attaching the slabs to the outer part of the foundation is allowed 1 minute after applying the glue. If the panels have a large area, you need to apply the glue in several strips using a comb spatula. If the slabs have locks, then a few days later the seams are sealed with polyurethane foam, and the slabs themselves are additionally secured with dowel nails.
Two-story mansion
Calculation of quantity and selection of the “right” penoplex
If high-quality material is used for insulation work, you can count on a good result. By appearance, you can determine whether the material is suitable for insulating the support of a house.
The surface of high-quality material is smooth without signs of destruction, and when broken, the penoplex cells have a polyhedron shape.
To insulate the foundation, a special series “F” material is used. This type of insulation is more resistant to biological decomposition, mechanical stress and wetness. The material is ideal for external insulation of the base, basement or basement, so when purchasing, be sure to pay attention to the markings.
To simplify the process of selecting penoplex, you should pay attention to products from well-known manufacturers, which are used not only in the construction of private buildings, but also for insulating apartment buildings.
Among domestic manufacturers, preference should be given to products. Which is not inferior in quality to European materials, and the cost will be noticeably lower than that of imported insulation materials.
Before purchasing polystyrene from any trade organization, you should correctly calculate the amount of material that will be used to insulate the foundation and basement of the house.
- To determine the area of insulation, it is necessary to measure the perimeter of the base, multiply the resulting value by the sum of the depth of the foundation and the height of the base.
- For example, if the perimeter of the building is 36 m, the depth is 1.5 and the height of the above-ground part of the base is 0.5 m, then 36 * (1.5 + 0.5) = 72 m2.
In this way, you can easily calculate the amount of penoplex that will be required for work.
If mice do appear
Having discovered traces of the vital activity of rodents, it is necessary to immediately draw up a plan for their removal and baiting:
- Spring-cleaning. To get rid of mice, sometimes it is enough to block their access to water and food. Fix the plumbing if there is a leak somewhere. Put the food in the refrigerator. It is better to throw away all food that mice may have touched, as it may be contaminated. After this, carefully check and clean all corners of the apartment. The peculiarity of rodents is their thriftiness. They rarely eat on the spot; as a rule, after grabbing food, they stuff it into secluded corners to eat later. Therefore, food can be anywhere - behind the closet, in the sofa, behind the radiator, on the balcony, behind the stove, etc.
- Check your apartment for holes through which mice can enter the room. Remove the baseboard, inspect the floor and corners, areas near sewer and water pipes, garbage disposal and ventilation areas. Burrows can even be in the ceiling, especially if you have a suspended or suspended ceiling. All these holes must be covered with foam, cement, plaster, etc.
- Call a pest control service that will quickly and effectively destroy rodents. The cost of such services starts from $20.
- Use special means to get rid of mice: traps, baits, poisons, repellers. You can buy them in a store or make them yourself from improvised materials.
Getting rid of mice on your own will not be as easy as in the case of professional pest control. But taken together, all measures to exterminate rodents give a good result.
Cat Kitty)
This is the easiest way to control mice. If you have the opportunity to keep a cat, then be sure to use it. Alternatively, if for some reason you cannot keep a cat in your apartment permanently, then you can temporarily borrow an animal from friends or relatives. Rodents sense a predator and reflexively leave the territory where the rat catcher is located.
Let the cat into the kitchen and close the door. Don't forget to provide a cat litter box.
The disadvantage of this method is that not all cats are rat catchers. Purebred cats most often lack the hunting instinct, and it is not a fact that in the morning you will see a couple of mouse corpses on the floor. If you use a cat to catch mice, you need to take one that lives in the countryside and is trained to hunt. If you decide to get a rat-catcher kitten, then you need to take it away from its mother at the age of no earlier than 3-4 months, so that the mother cat has time to teach the kitten all the skills of catching mice.
Mousetrap
It is also considered an effective way of fighting. If you set a mousetrap with bait at night, you will almost certainly catch one animal every day.
But this method requires a lot of patience and a lot of mousetraps. If mice crawl into an apartment from the basement, then their population probably numbers in tens or even hundreds of individuals. It will take more than one month to get rid of them this way. And if the mouse has managed to give birth (there are up to 12 babies in a litter), then it will take even longer to catch all the rodents with mousetraps.
There are different types of mousetraps:
- Classic with spring lever. There are open and closed types. A simple and cheap option, you can buy a lot of them, placing them in all corners. Disadvantage: false positives. Moreover, if a mouse gets caught in a trap with its paw or tail, it is quite capable of escaping by dragging away the mousetrap or gnawing off its own limb.
- A crocodile mousetrap is more effective than a classic one, although it has the same operating principle. The difference is that it only triggers when the mouse is completely in the “mouth” of the device. Disadvantage: danger to humans when triggering a mousetrap. If the spring is not carefully erected, the device may work and cut off your finger.
- Glue mousetrap. Adhesive tape or a device with special glue to which the paws of a rodent trying to get to the bait are quickly glued. Advantage: You can catch several individuals with one trap. Disadvantage: a nimble mouse can break out of the adhesive surface, and the one caught will make an unpleasant squeak. Also keep in mind that the rodent does not die, and in the morning you will have to get rid of the living mouse.
- Electric mousetraps shock rodents when they approach the bait. Pro: reusable. You can set one such trap and in the morning you will see several mouse carcasses near it. Disadvantage: mains powered and dangerous for pets.
Rodent repellers
Today there is a large selection of ultrasonic or electromagnetic devices that are effective and at the same time harmless. They operate from a regular electrical outlet, emit signals that repel any rodents within a radius of several tens of meters, and are not noticeable to humans. You can get rid of mice in 2-3 weeks. They will simply leave the unpleasant territory in search of a more comfortable home.
Advantage: safety, ease of use. Mice have good genetic memory, and even after a generation they will not return to a place that is unpleasant for them.
Disadvantage: Ultrasound does not pass through walls. Therefore, the effect of the device will only be in the room where it is installed.
Important! Do not use ultrasonic devices if there are pets in the apartment. They will also react to unpleasant sounds.
Poisons and poisons
They can be bought today in almost any hardware store. These can be liquids, gels, powders, poisoned treats in the form of cookies.
The method of application is very simple - just sprinkle the poison on the floor near areas where mice may potentially appear. It is best to place bait where mouse droppings are found. Mice will eat it with pleasure. But make sure that this poison is not eaten by any pet or child.
Disadvantage: you can get rid of mice using poison, but keep in mind that after eating the bait, the rodent will go to its hole and die there. As a result, several dozen decomposing mouse carcasses may accumulate in the ceiling of the walls. Poisons for rodents are good only when used in private homes, since mice in this case dig their nests in the ground.
Important! Rodents quickly adapt to poisons, so they need to be changed every 3 months if mice are a regular problem for you
Advantages of penoplex as insulation
The following advantages are most important for the consumer:
- mechanical impacts will not lead to damage to the waterproofing layer when using slabs. Groundwater will not penetrate into the basement and will not be able to destroy the structure of the walls;
- the house becomes drier, the microclimate becomes more comfortable. The dew point moves closer to the outer surface;
- thermal insulation material is not destroyed under the influence of high and low temperatures, including seasonal temperatures ranging from -500C to +750C. Numerous freezing/thawing cycles do not disturb the cellular structure. The service life of the entire building is significantly increased;
- thermal conductivity is in the range of 0.03-0.032 W/(m*°K). For high-quality insulation, slabs of minimal thickness are sufficient, which significantly reduces the overall cost of the work;
- withstands compression loads of up to 27 t/sq.m. without changes or deformations. m., which is enough even for a multi-storey building;
- the low weight of the slabs itself does not lead to a heavier structure and the need to strengthen the foundation;
- resistance to chemicals and aggressive liquids. Mold and fungal spores do not form on the surface. Penoplex is not attractive as food for mice and rats. The total service life without replacement is at least 50 years;
- absence of volatile substances harmful to humans. The material is considered safe and can be used in the construction of children's and medical institutions;
- easy and quick installation due to the tongue-and-groove system with minimal glue consumption. You can cut the slab to the desired size using a regular knife.
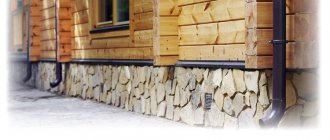
How to insulate the foundation of a house from the outside with your own hands correctly?
Insulating the foundation of an old house from the outside is the only right decision. Some owners claim that the building will be noticeably warmer if the foundation is insulated from the inside, and in some ways they are right. However, this will not solve all problems. For example, the foundation will remain unprotected from destruction by moisture and temperature changes. The problem can only be dealt with if a complex of external work is carried out to insulate the foundation with penoplex. Why is it necessary to insulate the foundation only from the outside? We suggest you familiarize yourself with several compelling arguments:
- the building will be protected from freezing, moisture, and temperature changes;
- insulating the foundation with penoplex around the perimeter will perform a barrier function;
- external insulation will protect the foundation from destruction, cracking, fungi and groundwater;
- the optimal temperature will be maintained in the basement, which will have a beneficial effect on the microclimate of the entire building.
To ensure good waterproofing, bitumen is used to paint the outside of the foundation.
For high-quality insulation of the foundation, experts recommend installing slabs with a thickness of at least 10 cm. Such a thorough approach will allow us to solve all problems with insulation and waterproofing of the base of the house for several decades.
How to insulate the foundation of a house from the outside: stages of work
When starting work, you must first determine what method of insulation is needed. The technology for performing this procedure depends on this. Warming may include the following activities:
- Vertical - installation of the material outside, directly on the basement of the house.
- Insulation of the blind area protects against soil heaving and can be used when carrying out complex activities.
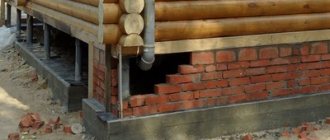
The foundation needs to be dug out around the entire perimeter, dried, and dust and dirt removed
Anyone can perform high-quality insulation of the foundation with penoplex. To carry out repairs, you need to dig out the foundation around the entire perimeter and dry it, remove dust and dirt. This is labor-intensive, but a necessary condition for carrying out the work. The depth of the trench must correspond to the depth of the foundation, and the width must be at least 1 meter.
Insulation of the foundation of the house from the outside, drainage
If the house is located on an area with a high level of groundwater, then in addition to all measures, drainage will have to be installed. For this purpose, a layer of sand is poured onto the bottom of the trench. Then a geofabric is covered, on top of which a layer of crushed stone is poured. Water is drained using a perforated pipe with a diameter of about 8-10 cm. Groundwater is drained into a well next to the trench.
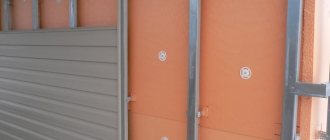
Installation of penoplex is carried out using special glue, after which the sheet is pressed tightly to achieve better adhesion
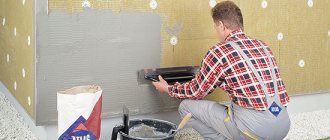
Foundation insulation includes the following steps:
- the outer surface of the foundation is leveled, cracks are eliminated. After treating the entire surface with a primer, all cracks are sealed with a sand-cement mixture;
- to ensure good waterproofing, bitumen is used, which is used to paint the outside of the foundation;
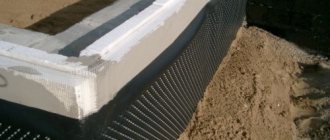
- installation of penoplex is carried out using special glue, after which the sheet is pressed tightly to achieve better adhesion;
- craftsmen in some cases use umbrellas for insulation, which securely fasten the material;
- installation of the mesh is a prerequisite for protecting the insulation from destruction by rodents. The mesh can be metal, it is attached with umbrella dowels. The polymer mesh is glued with the installation mixture;
- at the final stage, plaster is applied in 2 layers, after which the trench can be filled up.
As can be seen from the description of the sequence of work, all of them do not require special skills, but they take a lot of time. The advantage of this approach is that there is no need to involve heavy equipment or purchase expensive tools.
Video on how to insulate the foundation of a house from the outside:
Are you interested in how to insulate the foundation of a house from the outside? Even those who do not have special skills and expensive equipment can cope with the task with their own hands. Using penoplex for insulation will allow you to qualitatively insulate the foundation of the house. This highly effective method is guaranteed to preserve heat and save the family budget.
We equip the blind area with penoplex
- After insulating the foundation, we backfill it 15–20 cm below ground level. At a distance of one meter we assemble formwork with a height of 20-25 cm;
- Level and compact the soil. After this, Penoplex slabs are installed along the entire perimeter;
- A waterproofing film and reinforcing metal mesh are laid on top of the insulation with an overlap.
- After that, cement mortar is poured into the formwork. The surface is leveled so that there is a slight slope away from the house;
- After the time required for hardening has passed, the formwork is dismantled and the surface of the screed is covered with “street” material, such as tiles. Or you can treat it with a water repellent for concrete. This is a very effective means of “removing” moisture. Insulating the blind area together with the foundation reduces humidity in rooms located below ground level.
A few words about insulating the foundation in a bathhouse. A very good thing. Its thermal insulation reduces heat loss, which means the bath warms up faster and cools down longer. The room will have a warmer floor. In addition, the level of humidity and the risk of condensation on the internal surfaces of the foundation are reduced. Well, biological destruction in the form of mold, rot, etc., slows down significantly.
In the photo on the left, the photo was taken with a thermal imager. See the temperature difference.
That's probably all I wanted to tell you. As I promised last fall, I try to bring interesting material to the reader. Don't want to miss blog updates? Then subscribe to the news. Good luck to your family and a warm, cozy home! See you soon!
Wisdom Quote: The cruelest lies are often told in silence.
Choosing polystyrene foam for foundation insulation
Since the technological process for the production of extruded polystyrene foam is carried out under pressure, this makes it possible to produce insulation whose structure includes high-strength molecular bonds. EPPS is of higher quality than polystyrene foam (PSB). Often, extruded polystyrene foam becomes a material that is almost irreplaceable in cases where ordinary foam plastic simply cannot withstand the load.
Before choosing EPS, you need to understand what technical characteristics it has. Expanded polystyrene is manufactured in several modifications, since different types of EPS are required for different areas of the house (roof, walls, foundation). Each modification of PPS has different characteristics, so it can be used to insulate only a certain area of the house.
Building materials markets sell polystyrene foam of 3 main brands:
- PSB-S-15.
- PSB-S-25.
- PSB-S-35.
For insulating the foundation, the last option is considered the most suitable, because this brand of heat insulator has protective sealed layers, so it does not absorb water. When purchasing expanded polystyrene, you should make sure that the material is marked with o. This will allow you to choose a material that is suitable for all technical characteristics.
The thickness of the EPS is selected depending on the climatic conditions in the region of construction. The width of this material can vary from 1 to 10 cm. For middle latitudes, a heat insulator 5 cm wide is suitable. Each manufacturer produces similar heat insulation boards of various sizes, so you must first determine how many of them will be required.
Polystyrene can be strengthened to the foundation using either special glue or bitumen. It is worth considering: after gluing, polystyrene foam slabs remain movable for more than 20 minutes. Therefore, they need to be strengthened not only with glue, but also with plastic dowels, selected with a margin of length.
If polystyrene with a width of 5 cm is mounted, then the dowels must have a length of more than 10 cm. To attach the slabs, glue of the Bitumast brand, Ceresit ST-84, cement-polymer, bitumen adhesives that do not contain gasoline, ether and acetone are used.
Raw material selection criteria
The slab base, especially in conditions of high humidity of the external environment, needs high-quality insulation.
Thermal insulation allows:
- Protect concrete from temperature changes.
- Save on heating your home.
- Reduce heaving of the soil under the base.
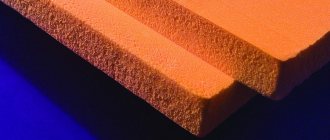
Penoplex - extruded polystyrene foam - can perform these functions. The material is characterized by low thermal conductivity, high strength and service life.
Despite the fact that penoplex can be easily cut with a knife, this material is not brittle , so balls should not be visible in places where it breaks, like foam plastic. If you press your finger on the surface of the sheet, the material will immediately return to its previous state.
When choosing a material, you need to pay attention to storage conditions. Penoplex is not left in the open air, but covered with cloth or packaging. Raw materials are selected depending on the purpose: for foundations, the material with the highest specific gravity is suitable - from 33 to 45 kg/m3.
Material characteristics
Technological properties of penoplex:
- thermal conductivity – 0.03 W/mK;
- density – from 29 to 45 kg/m3;
- compressive strength – 0.27 MPa;
- water absorption – 0.5% by volume for 8 days;
- fire resistance category – G4;
- operating temperature range – from –50 to +70 ͦС;
- size – 600x1200 mm;
- sheet thickness – from 20 to 100 mm.
Advantages and disadvantages
Advantages of the material:
Minimum water permeability. The liquid penetrates only into the outer structure of the penoplex, which was damaged when cutting the sheets. The closed cells of the material remain waterproof throughout its entire service life.- Low coefficient of thermal conductivity, which allows the use of penoplex for insulation of foundations with a basement, saving on waterproofing.
- Low vapor permeability. Extrusion-type raw materials are resistant to moisture evaporation: sheets with a thickness of only 20 mm have the same vapor permeability as rolled roofing felt.
- Long service life (more than 50 years), which is not affected by repeated freezing and thawing, as well as constant loads.
- Easy to install and process. You can cut foam sheets with a regular knife. At the same time, the properties of the material do not change if sedimentary waters fall on its surface.
- Environmental Safety. The raw material is not toxic and does not harm the environment when decomposed.
- Low chemical activity. Only a small amount of chemical reagents contained in soil and groundwater can interact with penoplex, softening its structure. In most cases, the material maintains its integrity throughout its entire service life.
The disadvantages of the material as insulation for a foundation slab include its high cost, but the material costs are more than offset by the advantages of penoplex.
At the same time, in order for the material to retain its qualities and shape during operation, it is necessary to take into account the permissible ambient temperature.
Insulation method
Improving measures for finishing house structures in an already erected building is a very labor-intensive task. The work is carried out in cramped conditions. It is inconvenient to use a level and operate with long parts.
External insulation technology is used in cases of condensation formation on the inner sides of wall surfaces. Exterior finishing with penoplex makes it possible to limit the loss of heat from concrete, as a result of which the dew point moves indoors. Sufficient external insulation removes it some distance from the wall. Therefore, even with high air humidity in the basement, condensation does not form on the walls.
Thinking in this direction, most developers prefer to carry out all work outside.