Technical description
Extruded foam is made from a foamed polymer mass with fire retardants and other additives. It is passed through an extruder to compact and form blanks. The release form depends on the purpose. These can be decorative items, pipe shells or slabs. The latter are in great demand for performing thermal insulation measures. The canvases have several versions with the following features:
- thin backing;
- corrugated surface for plastering;
- the edge is rectangular, with a mounting projection for overlap (quarter) or with grooves and ridges to form a monolithic web.
The result is a lightweight material with a low thermal conductivity coefficient: 25-45 kg/cub.m. and at a temperature of +25 degrees Celsius about 0.032 W/m*K. (0.026 at +10 degrees). For comparison: 4 cm of EPS is comparable to 14 cm of wood, 38 cm of concrete or 85 cm of brickwork. Samples with low specific gravity are used for insulation of walls and ceilings, heavier samples are used for foundations and plinths.
Other technical characteristics of extruded polystyrene foam are as follows:
| Parameter | Meaning | Description |
| Water absorption | 0,2 % | Moisture does not penetrate deeply only into the surface layer, since the structure of the material is represented by closed cells. The polymer as a whole can be used as additional waterproofing of the base. |
| Vapor permeability | 0.007-0.012 mg/m*h*Pa | This suggests that the fabric practically does not “breathe”, which explains the restrictions on use without ventilation systems. |
| Frost resistance | From 1000 cycles | Technical and physical parameters are maintained when the plates are cooled to -50 degrees Celsius. It is possible to reduce thermal conductivity by 5% after 1000 freeze-thaw cycles. |
| Working temperature | -50-+75 degrees Celsius | When the polymer fabric is heated above +80 degrees, the release of toxic substances begins. Therefore, for interior work in rooms with such differences, it is better to choose an alternative insulation. |
| Tensile strength | 2-3.6 kgf/sq.cm | The bending strength is 4-7.1 kgf/sq.cm. Both parameters depend on the density and thickness of the workpieces. That is, the values indicated are the maximum averaged ones. |
| Flammability | G3, G4 | The use of fire retardant components allows the class to be reduced to G1. The ability to burn cannot be completely excluded. But the material’s fire resistance is high enough so that it can be safely used in industrial, urban and private construction. |
| Sound absorption | 25 dB | XPS series EPS is used in facilities where impact-type noise insulation is needed. |
| Life time | From 45 years old | The service life declared by the manufacturer is valid only if the technological requirements for installation are met. |
Extruded polystyrene foam has standard dimensions: width - 600 mm (sometimes 580 mm), length - 1200 or 2400 mm (can be 1000 mm). Manufacturers also offer additional services for the implementation of projects according to agreed parameters with customers. The thickness of the products is in the range of 20-100 mm. The material is sold in packages of 4 pieces, which depends on the dimensions of the sheet. As a rule, the total height of the pack is approximately 40 cm.
See also: Catalog of companies that specialize in home insulation
Pros and cons of insulation
Considering the technical characteristics, we can conclude that the material is light and moisture resistant. At the same time, good strength is observed, which contributed to the emergence of a new thermal cladding such as sandwich panels.
Sandwich panel Source shumoizol.com
The advantages don't stop there. The slabs are also characterized by the following:
- inertness to fungi and mold (synthetic fabric is not a breeding ground for bacteria and parasites);
- resistance of polymer products to rotting and natural decomposition;
- versatility of use without the need for additional moisture protection of EPS insulation.
The chemical inertness of polystyrene foam is not absolute. The slabs are destroyed under the influence of building materials such as:
- oils – petroleum products;
- solvents – acetone, toluene;
- bitumen mastics and adhesives, paints and varnishes based on inorganic solvents.
It is worth noting that some advantages of EPS can also be disadvantages. These properties include vapor permeability, synthetic composition, cellular structure.
Enlarged EPPS Source sladkiyson.net
Let's take a closer look at each parameter:
- The material does not “breathe”. When insulating structures, the dew point shifts towards thermal insulation. That is, moisture will accumulate in polystyrene foam and turn into condensation, since steam does not pass through the slabs. This is a minus for both internal and external work with wooden buildings. Here it is necessary to provide natural or forced ventilation to solve the problem.
- By nature, the polymer composition cannot be classified as an absolutely environmentally friendly group of materials.
- High density is achieved through extrusion, but the insulation does not change the structure of foamed polystyrene. This explains the possibility of using the material as additional sound insulation. But EPS cannot absorb and reflect sound waves, it can only muffle (reduce the amplitude of vibrations).
In addition to the above, the disadvantages include sensitivity to ultraviolet rays. That is, the insulation is subject to mandatory protection from direct exposure to the sun. This can be cladding or facing material, plaster. Another disadvantage is that rodents easily chew through the slabs, which negatively affects the overall situation with heat loss.
Chewed polystyrene Source yandex.net
Why is polystyrene foam chosen for floor insulation?
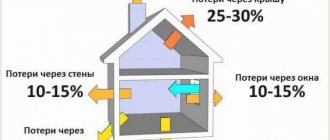
One of the factors of a comfortable home is the temperature on the floor surface. It is no secret that the floor temperature varies in different rooms of a private house or apartment; the reason for this is that low temperatures are transmitted from balconies and walls through their junctions with floor slabs.
Expanded polystyrene gained its popularity due to its relatively low cost and ease of installation.
In order to insulate the floor, you can use a variety of materials, but polystyrene foam is the most popular.
Laying such material on the floor is not difficult, and if everything is done correctly, then there is no doubt that the house will always be warm. However, why is polystyrene foam used for this, and what unique qualities does it have? There are many other materials that meet basic requirements, such as:
“Pie” of floor insulation with polystyrene foam.
- low conductivity;
- high degree of compressive strength;
- the ability to maintain the original thermal insulation properties when mechanical loads are applied and when moisture is exposed for a long time.
You can use a material such as expanded clay concrete to insulate the floor, but this is not profitable, and besides, you will need a thick layer of expanded clay concrete, and this helps to significantly reduce the height of the room. Mineral wool is also popular, but despite all its good qualities, it is not durable.
In this regard, in order to maximize indoor comfort, it is recommended to use polystyrene foam, which significantly reduces heating costs. Such material is made under the influence of a blowing agent, through thermal swelling of polystyrene granules. Each such granule contains many small cells that are filled with air, so the polystyrene foam slabs are soft.
Rules for carrying out installation work on walls and ceilings
Rigid lightweight boards are used for thermal insulation of horizontal and vertical structures inside and outside the building, in heated and cold rooms. The material is fixed to walls and ceilings using the adhesive method. The sequence of actions is as follows:
- cleaning the base from old finishes and flaking elements;
- removal of foci of biological damage and rust, followed by protection from reappearance with antifungal and anti-corrosion agents;
- strengthening walls and ceilings by reinforcing cracks and corners, impregnating them with strengthening primers;
- leveling the surface with plaster followed by re-priming,
You need to choose a specialized adhesive for polystyrene foam, and it is important to pay attention to the working thickness of the solution (or dry residue). Apply the composition to the slabs in an even layer using a comb. The size of the teeth is determined by the parameters of the permissible thickness (multiplied by 2). To ensure that the end edges remain clean, which is necessary for a tight fit, the glue is applied within 1.5-2 cm of the edges.
Adhesive for polystyrene foam Source davran.ru
The next step is additional fastening of the polystyrene foam boards to special dowels for insulation. This is a fastener with a wide plastic cap that presses and holds the blade at the base in a given position. It is better to perform fixation after the glue has hardened, so as not to create unnecessary voids that can become cold bridges.
The gaps between the edges of the slabs can be filled with polyurethane foam. The material has similar characteristics to expanded polystyrene, so you don't have to worry about thermal expansion or adhesion. The main thing is to follow 2 rules: the polyurethane foam must have low expansion, the procedure is performed only after the glue has dried.
It is worth paying attention to another way of fixing polystyrene foam to a flat plane - using polyurethane foam or glue in the form of cakes. Such options are acceptable, but it is better to properly prepare the surface and apply the adhesive mass in a continuous layer. This way you will get the highest quality and most durable results.
Application of polyurethane foam Source sdelai-lestnicu.ru
Features of insulation
There are two main types of insulation of the floor base: the technique of insulation over logs and over a concrete base.
Before starting installation work, you should prepare the necessary set of tools:
- Screwdriver;
- Drills with drill bits of different sizes;
- Construction mixer (for preparing the mixture);
- Plane;
- Jigsaw;
- Saw;
- Stationery and mounting knife;
- Hammer;
- Hammer;
- Hydraulic level;
- Pencil;
- Dowels and screws;
- Polyurethane foam;
- Distance pads;
- Putty knife.
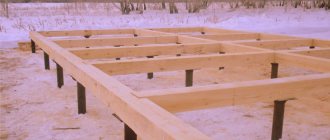
Insulation of floors with joists
Let's consider the sequence of work when insulating a floor with joists with your own hands:
- The old coating must first be dismantled.
- Wooden logs are laid on the subfloor at a distance of 0.6-1 m from each other.
Advice! Gaps along the walls and between the joists and the product should be filled with polyurethane foam.
- The recess between the joists is covered with a vapor barrier film and fixed to the slats using a stapler.
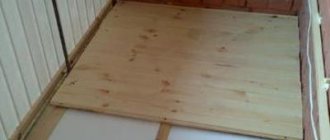
- Expanded polystyrene sheets are cut to size and placed between the joists.
- The insulated floor is covered with a waterproofing layer of polymer film.
- Lay the floorboard and install the decorative covering.
Insulation by joists
Tip: Before laying insulation boards on wooden structures, be sure to treat them with special solutions against fungi and microorganisms, as well as moisture-proofing substances.
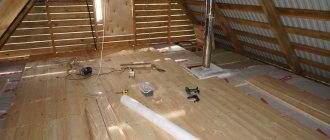
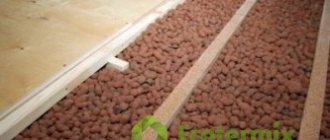
Do not forget that the choice of insulation scheme for the subfloor depends on the type of floor itself. The photo below shows how to lay polystyrene foam flooring on a soil and wood base.
Laying on compacted soil in a wooden house.
Insulation of floors on a concrete base
Expanded polystyrene is laid on a concrete screed after preparing the base.
The brief instructions below will show you how to do this work on your own without the help of specialists:
- We compact the soil, fill it with a layer of crushed stone and cover it with a layer of sand.
- Expanded polystyrene is laid evenly without gaps along the entire perimeter from the corner of the room towards the door. The maximum gap between sheets laid end to end is no more than 2-3 mm.
Note! All joints should be carefully glued or filled with polyurethane foam, since if proper thermal insulation and installation of the material is carried out, the polystyrene foam under the heated floor will perform its main function and the optimal room temperature will be maintained.
- A waterproofing film layer is laid.
Preparing the screed
- A reinforced mesh with a cell size of 100x100 mm is laid on top. The edges of the mesh, cut into strips, should extend onto the surface of the polystyrene foam approximately 8-11 cm from the edge.
- Then the entire surface is filled with a screed solution based on sand and cement, the layer thickness is approximately 4 cm. The floor screed with polystyrene foam is ready.
- At the finishing stage, any decorative coating is applied (linoleum, laminate, tile, etc.)
Note! Extruded polystyrene foam floors are ideal for subgrades.
Working with floors
Here the slabs are laid without additional fixation.
Floor insulation Source yandex.net
Preparing the rough foundation is similar for walls and ceilings. The difference is that the floor must be covered with waterproofing. As a rule, this is a technical polyethylene film with a thickness of 150 microns. A damper tape must be laid around the perimeter.
Laying of extruded polystyrene is carried out in 1 or two 2 layers with offset joints of each subsequent row. The joints are filled with polyurethane foam. If the floor is leveled with cement mortar, then a reinforcing mesh is laid. With heating systems, a heat-reflecting film is attached before this. There is no need for additional layers for sheets of gypsum fiber board, chipboard or plywood.
Installation of foam plastic under the screed
Due to its low weight and special structure, installing foam plastic under a floor screed is quite easy and quick to complete. To carry out the work, you will need a building level, guides (beacons), a rule or lath, a spatula, a hacksaw or a construction knife, a leveling solution (concrete, cement-sand or self-leveling mixture), waterproofing (film or mastic), adhesive tape, reinforcing mesh, Styrofoam.
Process steps
- Preparing the base. Initially, the rough foundation must be prepared for pouring the screed. If there are deep cracks or chips on the floor, they should be covered with cement mortar. All peeling and weak areas must be cleaned of destroyed material. Next, the surface should be cleaned of dirt and dust. The ideal option for this is to use a construction vacuum cleaner. However, you can get by with an ordinary broom.
- Leveling the base. To obtain a level base, you can use special leveling mixtures or cement-sand or concrete mortar. The thickness of such a layer should be 3-5 cm (depending on the differences in height of the base). The composition should be thoroughly dried before proceeding with the next steps. The drying period depends on the characteristics of the leveling mixture.
Leveling the base - Laying a waterproofing layer. Foam plastic is resistant to moisture, but it is still recommended to provide waterproofing. As a rule, special films are used as such materials, which must be laid on top of each other with an overlap of 5-10 cm. The joints are glued with any adhesive tape. It is also necessary to provide for the film to extend onto the wall to a height of 7-10 cm. In some cases, a special mastic can be used instead of the film. The composition is applied using a brush or spatula. The entire floor surface is treated.
Laying the waterproofing layer - Laying foam. Polystyrene foam is laid on the waterproofing. Initially, the plates should be attached with special glue. The composition is applied to the slabs using a spatula, after which the insulation is laid on the prepared base. The glue should not cover the entire surface, but only the edges and a few points along the central axis. The slabs must be laid close to each other, spaced apart (adjacent transverse seams should not be located in one straight line). If during the installation process gaps have formed between them, they should be filled with special mastic or adhesive putty. This will eliminate the occurrence of cold bridges and reduce heat loss in the future.
- Finally, as a rule, the foam boards need to be cut. For this, it is best to use a regular wood saw. You can also use a knife (even a kitchen knife will do). For accurate cutting, it is necessary to measure the remaining distance to the wall, which is deposited on the foam. The material is cut according to the marks made.
- When laying foam plastic and installing screed in the future, you should leave a small gap between the floor and the wall. Subsequently, the free space is filled with damper tape. This design feature will save the base from deformation in the event of shrinkage of the building. After insulating the entire surface, the slabs are additionally secured to the base using disc-shaped dowels. This will ensure reliable fastening of the thermal insulation and prevent the slabs from moving in the future.
- Screed reinforcement.
To complete this stage, a concrete or cement-sand screed 1-1.5 cm thick is poured onto the fixed insulation. A metal reinforcing mesh is then laid on it. Thanks to this stage, the strength and durability of the screed will be significantly improved. Reinforcement and filling of screed - The final stage is pouring the final layer of screed. For this, a concrete mixture is used. The thickness of the layer should be within 5-6 cm. To obtain a flat surface, beacons are initially installed, which are attached to the solution. To position them correctly, you must use a building level. In this case, you need to focus on the highest place on the floor. The fixing solution is applied in large strokes along a straight line. Then the beacon is placed on it and pressed tightly. Next, the concrete mixture is scattered over the surface and leveled with a rule or a lath. The surface is finally leveled with a spatula. During operation, it is recommended to periodically pierce the solution with a metal rod. This will remove the remaining air from the thickness of the viscous solution, which will have a positive effect on the strength of the screed.
All subsequent work can be carried out only after the finishing layer has completely dried. It takes approximately 24-28 days to dry completely. To prevent cracking, it is recommended to moisten the surface with water for the first 10 days.
Briefly about the main thing
EPPS is a type of polystyrene product that is manufactured using an extruder.
Polystyrene slabs are in great demand in construction as thermal insulation for walls, ceilings, floors, facades, plinths and foundations.
The main advantages of the material: low thermal conductivity, moisture resistance, low weight and good strength.
The main disadvantages are considered to be low vapor permeability and instability to ultraviolet radiation.
The slabs are glued to horizontal surfaces and ceilings and additionally secured with “fungi” dowels.
The finishing of insulated structures can be any.
Ratings 0
Choice of insulation
The material for insulating the floor of the first floor must be selected with low thermal conductivity and minimal water absorption, taking into account the design of the floor and the planned finishing.
Let's look at the most popular materials.
Mineral wool. Inexpensive insulation, produced in the form of slabs or rolls. With good elasticity, it has high density. Easy to install. Fire-resistant environmentally friendly material at an affordable price. Has a high level of sound absorption. Requires insulation to prevent mineral dust from entering the room.
Figure 2. Mineral slabs for floor insulation.
Styrofoam. Cheap boards with low weight and low thermal conductivity. Can be used in damp environments.
Environmentally neutral. In case of fire, it releases harmful gases. Afraid of rodents.
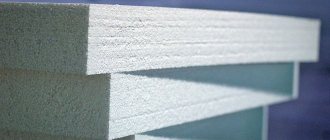
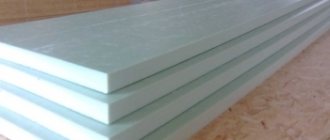
Extruded polystyrene foam . Lightweight, moisture-resistant material, not afraid of direct contact with water. Environmentally friendly. Withstands loads from 150 to 200 Pa. Easy to install.
The disadvantage is its high flammability, with the release of corrosive gases, so the material is not recommended for use for insulating wooden floors. The price is two to three times higher than the cost of polystyrene foam.
Figure 3. Extruded polystyrene foam.
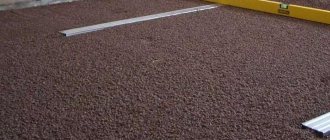
Expanded clay. Cheap bulk material made from baked clay. Non-flammable, absolutely safe, environmentally friendly insulation.
Can be used dry and mixed with cement mortar.
It can absorb moisture, so it is not recommended for use in rooms with possible leaks.
To form a dense layer, it is recommended to use a mixture of different fractions.
Figure 4. Expanded clay.
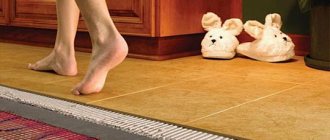
Cork insulation is an environmentally friendly, efficient, expensive material. Can be used as a substrate for laminate or linoleum and as a warm topcoat.
Figure 5. Cork backing and covering.
Ecowool is a universal cellulose material used for insulating floors between joists. It is absolutely environmentally friendly and safe.
Does not burn, thanks to fire retardant additives. In case of fire it does not emit toxic gases. Effectively protects the room from the cold, reducing heating costs. Apply by blowing or spraying using special equipment, or manually.
Figure 6. Ecowool.
The material is effective in insulating inconvenient, hard-to-reach places.