The specifics of insulating the second floor of a wooden house depend on the design of the room. At the design stage, it is determined whether this space will be occupied by a residential attic or whether a cold attic will remain.
The decision will affect the building insulation technology, the progress of construction and finishing work.
Insulation of the second floor requires technically correct execution of all work.
Benefits of wood
Wood is one of the most common building materials for building buildings, external and internal cladding. Its advantages:
- less weight compared to concrete, brick, stone and metal;
- high strength;
- low thermal conductivity;
- frost resistance;
- easy to glue and connect with fasteners, easy to process;
- environmental friendliness.
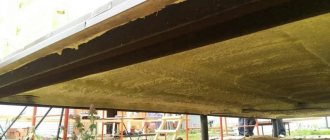
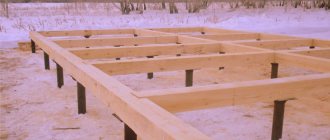
For private households, floors with wooden joists are most suitable.
They are installed simultaneously with the walls and the frame of the building before the cladding begins.
Design features of the room
The design of the room directly affects the planning of thermal insulation work. In cottages, the upper tier is occupied by an attic or a full second floor with an attic.
Attic
An attic is a simplified option to get additional living space instead of an empty attic.
Features of the room:
- The attic is located under the roof, completely or partially occupies the floor area of the upper floor.
- The geometry of the space directly depends on the roof, which determines the volume of the rooms and the height of the ceilings.
- Thermal insulation is required both inside and outside.
Attic is a usable attic space.
Full second floor
If the project provides for a full second floor, then there will be an attic between the ceiling and the roof. In this case, installation of waterproofing on the ceiling is not required.
Types of insulation
Insulation is designed to prevent the heat emanating from the building from mixing with external cold, and also protects against overheating in hot weather. Depending on the raw materials used for production, they are organic, inorganic and mixed. Based on their operating principle, they are divided into:
- Reflective - redirect warm air back into the room. To do this, they are equipped with a foil or metallized element.
- Preventative - contain most of the thermal energy within the protected surface.
Styrofoam
Polystyrene foam has a number of disadvantages, due to which it is not always recommended for use in residential premises, bathhouses or cottages. Minuses:
- flammability;
- when heated above 30°C, it releases toxic substances;
- frequent habitat for rodents;
- contributes to the formation of the “greenhouse effect”.
Foam plastic refers to foamed cellular materials.
Mount the foam on the frame or put it on glue.
Fiberboard
Fiberboards are resistant to temperature changes, have high sound insulation, and are excellent for insulating roofs and floors. They weigh little, can be easily processed with hand tools, are convenient and quick to install, and are not damaged by insects.
They have 2 sides - a smooth front side for finishing, a rough back side for better adhesion when gluing.
Glass wool
One of the cheapest insulation materials with high fire resistance. The material is elastic and easy to install. Due to its softness, it is susceptible to deformation; for a dense texture, several layers are made. When working, glass chips fall off, which forces the use of personal protective equipment.
Glass wool is one of the cheapest insulation materials.
Minvata
The best option for insulating wooden structures. Mineral wool (stone wool) is environmentally friendly, does not deform, is resistant to weather conditions, vapor transmission is at an acceptable level.
Expanded clay
Safe raw materials that are not subject to rotting. It is an oval or round granule with a diameter of 5 to 40 mm. Pros:
- easy to use;
- does not burn;
- resistant to chemicals;
- unsuitable for rodents and insects;
- high thermal resistance;
- durable.
Expanded clay is a lightweight porous building material.
Expanded clay has a relatively large weight, which will depend on the thickness of the embankment. It is used for strong ceilings with support beams.
Polyurethane
Polyurethane is used on attic floors and in the basement. Using special equipment, it is applied to the surface and it turns into foam. Penetrating into all irregularities and crevices, it creates seamless protection against water, wind and heat loss. Easily adheres to various materials, elastic and durable, high fire resistance.
Sawdust
Used to fill the space between floor beams. To avoid rotting, they are treated with antiseptic compounds and mixed with lime.
Sawdust fills the space between the beams.
Expanded polystyrene foam
Sheets of different thicknesses are resistant to mechanical stress and weather factors, and are leaders in the thermal materials market. Advantages:
- easy;
- frost-resistant;
- sound insulation is above average;
- low thermal conductivity and flammability;
- non-toxic;
- low moisture absorption.
Expanded polystyrene is susceptible to destruction by rodents and reacts with various types of solvents.
Liquid penoizol
Modified foam plastic in the form of foam insulation with a high degree of adhesion to other materials. Penetrates into voids of horizontal and vertical surfaces. It has a low density, forms a monolithic layer, and allows water vapor to pass through.
Liquid penoizol is a thermal insulation material.
Ecowool
80% consists of cellulose, the remaining 20% includes fire retardants and other additives. It is a liquid mixture that is supplied from a hose under pressure or applied by hand. Sometimes they just pour it in, but it produces a lot of dust. Due to high hygroscopicity, during installation it is necessary to create a ventilated gap so that moisture escapes into the atmosphere.
Penofol
Reflective insulation with a foil top layer and a PVC foam base. Advantages:
- environmentally friendly;
- thickness is less than that of other heat-saving materials;
- does not absorb or allow moisture to pass through;
- flame retardant;
- Easy to install with any fasteners.
Penofol has a foil layer.
Penofol is not used outside the building, otherwise the accumulation of condensation will lead to dampness and fungus on the wall.
Material selection criteria
To avoid making a mistake when choosing an insulator, take into account a number of features:
- climate of the region;
- the main building material of the building and the specifics of the design;
- installation features;
- cost of coatings for all types of insulation and cladding;
- operational features of insulation materials.
The choice of materials depends on the construction material of the building and the specifics of the design.
Indicators of toxicity and durability are not ignored.
Insulation layers
Components of the insulation design:
- finishing floor;
- screed;
- floor waterproofing;
- beams with heat and sound protection between them;
- ceiling vapor barrier;
- counter-lattice;
- ceiling cladding.
Ceiling vapor barrier is a component of insulation.
The interfloor ceiling is insulated if it divides the space into a living area and a basement or upper floor with an attic.
Floor insulation technology
It is important to lay the insulation correctly, observing the correct order of all layers. The floor pie when insulating the attic floor, the floor of the second floor or the first has not always noticeable, but significant differences.
Insulation of the floor of the first floor from below
Scheme of floor insulation above a cold underground
In this case, when carrying out work with your own hands, the materials should be correctly laid in the following order:
- waterproofing;
- insulation;
- vapor barrier;
- ceiling design.
When building a house from timber or frame, the material is secured along the beams. After which the filing is performed. As a protection against moisture and steam, you can use ordinary polyethylene film. As a second option for waterproofing, moisture-proof membranes are used. If all layers are laid correctly, the structure will be reliably and competently protected from the cold from the point of view of heating engineering.
This method is very labor-intensive and is used only if it is not possible to insulate from the inside.
Also, for insulation from below, the method of insulating the ceiling with foam is perfect.
Insulation of the ground floor floor from the inside
Carrying out work under the ceiling is quite inconvenient, so When constructing a frame house or a building made of timber, insulation of the first floor floor is often carried out using beams from above. In this case, in addition to the previously mentioned materials, you can use bulk materials such as sawdust and expanded clay. When carrying out insulation with your own hands, correctly lay all layers in the following sequence:
- floor design;
- waterproofing;
- insulation;
- vapor barrier;
- clean floor.
The vapor barrier must be placed from the inside of the room, so it will work correctly, preventing damage to the floor along the timber beams.
Insulation of interfloor ceilings
In the first case, the insulation dampens airborne noise: human speech, music, etc. In the second case, the structure is also perfectly insulated from impact noise - steps, jumps, etc.
Proper sound insulation of interfloor ceilings is the key to comfortable living for all family members.
Insulation of the ceiling of the upper floor from the inside
Installing insulation from the inside does not provide maximum protection for structures, but it can be used as a second option for laying insulation. In this case, the insulation is mounted on the beams from below the floor. It would be correct to arrange the layers in this order:
- vapor barrier;
- insulation;
- waterproofing;
- beam-based floor structure.
Insulating the attic floor
When constructing and repairing a frame house, a house made of timber or logs, it is better to insulate the attic from above. This method has the following advantages:
- ease of installation;
- the possibility of using inexpensive bulk materials;
- competent thermal protection;
- insulation of not only the room, but also the ceiling along the beams of a house made of timber or frame;
- prevention of condensation in the thickness of the ceiling.
To ensure proper protection, the layers are laid in the following order from bottom to top:
- floor design;
- vapor barrier;
- thermal insulation material;
- waterproofing.
For waterproofing, a plastic film will be sufficient, but as a second, more serious option, you can use roofing felt. When building a house from timber or during frame construction, you can also read the article “Insulating the attic floor using wooden beams.”
Calculation of insulation thickness
To perform a full-fledged thermal engineering calculation of the structures of a frame house or a building made of timber, it is not necessary to have a construction education. When performing calculations, it is important to know the thickness of all layers of the cake and their thermal conductivity. It's quite easy to find out.
Further on the network you can find the Teremok program, which is freely available.
The calculation will allow you to perform proper insulation of a house made of timber and prevent excess consumption of materials. All calculations, taking into account the search for source data, are unlikely to take more than half an hour. Typically, layers such as waterproofing and vapor barrier are not taken into account.
A competent choice of insulation method, type of material and its thickness can eliminate many problems during operation. When constructing multi-storey residential buildings, the question of insulation does not arise: it is required. The correct selection of thickness and the presence of measures for thermal protection of the floor, attic floor and walls are checked by an expert, which considers these calculations on a par with calculations of strength.
In private housing construction, no one checks the presence of proper insulation, but this does not make it any less important.
Types of jobs
The insulation of a wooden cottage or summer house is divided into internal and external according to the type of work. They can be combined.
External
All actions are carried out in dry and warm weather. Wooden structural elements are treated with an antiseptic, metal ones with an anti-corrosion compound. Damp areas are dried.
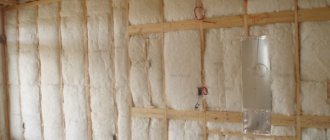
In private houses made of timber, waterproofing is attached to the rafters, after which the sheathing is made and the roof is mounted. From the inside, insulation is laid between the joists, a vapor barrier is fixed, and the finishing sheathing is made.
External work is carried out in dry weather.
For a soft roof, the sheathing is first covered with moisture-resistant plywood or OSB, and then a covering is created. If the roof slope has an inclination angle of up to 18°, then less protected areas from water need water protection:
- skates;
- overhangs;
- around pipes;
- valleys.
Domestic
If the decorative finishing of the house has already been done, then interior work will be a necessary measure. But with this option, the useful living space will be reduced.
Interior work reduces the area of the room.
Important points in the work plan:
- first attach the vapor barrier film, then the thermal material, leaving a 2-centimeter gap between the layers;
- It is advisable to lay 2 layers of insulation in the corners to further contain cold air;
- finishing the walls;
- seal around the chimney, entrance doors and windows.
Features of insulation
Before insulating the floor of a wooden house, it is necessary to find out the specifics of the location of the ceiling. The technology for performing the work depends on the type of foundation, the design of the basement level and the presence of a basement. It is most convenient to install the heat insulator from inside the room, i.e. above. However, this method is not suitable for all floors. If you act without opening the old flooring, the floor level will rise noticeably. The doors will no longer open and all units will need to be reinstalled.
Before insulating the floor in a wooden house without dismantling the floor, you should walk around the entire floor and draw up a diagram indicating openings, stairs and other elements adjacent to the ceiling. If there are too many of them, it is easier to find another installation option.
Let's look at how to insulate floors in a wooden house with different types of subfloors. For each method, brief step-by-step instructions will be provided:
Above the cellar
For floor insulation in a house with an unheated basement, two options are suitable:
- installing a layer of insulation from below, on the ceiling of the cellar;
- laying the material on the floor from above.
The choice of the desired option is made based on ease of use. The effectiveness of the result in both cases is approximately the same and depends on the properties of the selected material. Procedure for installation from below:
- preparation of the ceiling surface. Cleaning, removing foreign objects - lamps, hooks, brackets;
- slats 1.5-2 cm thick are stuffed onto the ceiling. A continuous sheet of waterproofing film is installed on top. The strips are laid with an overlap of 10-15 cm and taped with special tape. The canvas is attached to the slats using a stapler;
- installation of sheathing. This is a system of strips, the thickness of which is slightly greater than the size of the insulation. The distance between the planks (sheathing pitch) must be equal to the width of the slabs or rolls;
- Insulation is installed between the slats. It is recommended to use slab material that is rigid and easy to work with from below. Installation is carried out as tightly as possible, without gaps or cracks. If they appear, they are immediately filled with polyurethane foam;
- installation of a second layer of waterproofing. It is attached in the same way to the sheathing strips;
- covering the ceiling slab with sheet materials - plywood, OSB, chipboard or the like.
It is necessary to ensure complete insulation of the insulation using two layers of film. If air comes in from outside, the insulation will gradually become wet and stop working.
With low underground
If the house has a low underground floor, you will have to think about how to insulate the floor in a wooden house without dismantling the floor. This method is best implemented using thin and moisture-proof materials - isolon or penofol. In order to be able to walk on the floor without compromising the integrity of the insulation, a hard floor covering such as laminate will need to be installed on top.
Before insulating wooden floors in a private house over boards, you will need to prepare the surface. Procedure:
- removal of floor covering and all foreign elements. Sealing cracks and gaps (if any);
- installation of the support system. These are wooden planks arranged so that the insulation fits tightly between them. Their thickness should be slightly greater than that of the insulation;
- laying roll insulation;
- the entire floor area is covered with sheet materials (plywood, OSB, etc.);
- laying the underlay and laminate layer
Technologies used
Of all the technologies for insulating a wooden house, the most popular are the warm seam and the wet method. They are used depending on the situation.
Warm seam
The method is used when the timber is a decorative part of the interior and the joints of the crowns require insulation. The method eliminates the need to caulk gaps between logs with tow, flax and other suitable materials. The new technology repeats the principle, but the effect is more durable and simpler.
Before starting work, the wood is sanded, primed and painted. An insulating cord made of polyurethane is placed into the gap, taking the desired shape and not losing it over time. Apply sealant over it and level it with a spatula or a damp brush.
Warm seam is a technology that hides cracks.
Wet method
The method is used for houses with a flat facade surface, where external decorative finishing is planned. There will be no gap between the thermal insulator and the finishing cladding. Stages of work:
- a heat insulator is glued to the street side and secured with fastening dowels with plastic rods;
- attach a reinforcing mesh and perforated corners to the base layer of glue, level the mixture with a spatula;
- apply the finishing layer of the solution;
- After drying, they sand, prime, plaster, and paint.
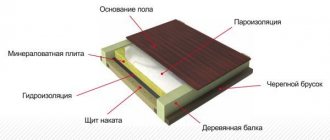
How to insulate a floor in a wooden house: layering
The most common technology is insulation along joists with mineral wool. The advantage of such a floor is the absence of “wet” processes, quick installation and ease of construction. Non-flammable insulation in the form of mineral wool also prevents external noise.
- The main components of the “pie” of floor insulation by joists:
- Lags.
- Wind barrier (membrane).
- Sheathing the lower floor (if it is planned to insulate the interfloor space), subfloor, or fastening the wire.
- Mineral wool.
- Vapor barrier film.
- It is better to leave an additional air gap between the vapor barrier and the subfloor: bars are mounted on the logs on top of the vapor barrier.
- Floorboard, OSB, plywood or other wood base for finishing.
- Floor layer (laminate, parquet, linoleum, carpet).
The principle of creating a “pie” from mineral (stone) wool
The basis of the structure is wooden floor joists. The distance between them is determined depending on the insulation used. For example, for standard stone wool slabs the distance will be 580-590 mm. With this size, the slabs fit tightly to the frame, leaving no cold bridges. This will also make installation easier.
OSB or another solid base (subfloor) is hemmed underneath, where insulation is subsequently laid. For screwing, it is better to use galvanized or yellow self-tapping screws rather than black ones (less susceptible to corrosion).
Helpful advice.
Instead of a subfloor, you can fasten the wire between the joists. It is most convenient to arrange it in zigzags. A good option is metal mesh. This creates a base for the insulation, and there is no need to install bars or hem the wooden base. Construction costs are significantly reduced.
If the ceiling of the second floor of a wooden house is located above a room with high humidity (bathroom), then before laying the stone wool, an additional layer of vapor barrier is laid. Otherwise it is not necessary.
The thickness of mineral wool is at least 20 cm. When laying the second layer of mineral wool, it is necessary to maintain a run-up between the seams of 100-150 mm.
To avoid moisture condensation on the insulation, a vapor barrier film is laid on top. Be sure to lay it overlapping, also overlapping the walls by 150 mm. The seams must be taped with double-sided tape (acrylic tape).
A solid foundation completes this pie. Typically this is OSB, wood, fiberboard or drywall.
Additional insulation of the floor of a wooden house
Wooden beams or joists between the insulation remain cold bridges that can be localized by transverse insulation. To do this, another row of joists are attached across the main ones on top of the laid vapor barrier. The width of the gaps depends on how to insulate the floor in a wooden house from below.
It is preferable to take organic heat insulators that are safe for human health:
- cellulose
- linen
- bonfire
- straw
- light adobe (clay with straw).
This is a good way to insulate the exterior floor of an old farmhouse without tearing down the old boards.
How to properly insulate a floor on the ground?
The most important thing when creating such a floor is high-quality soil compaction:
- Soil compacted with crushed stone.
- Preparation from 50 mm concrete.
- Built-up bitumen waterproofing on a synthetic base 3-4 mm.
- Extruded polystyrene foam 50 mm.
- Cement-sand screed M150 (not less than M100), reinforced with ZVR1-100 60 mm mesh.
- Finish floor covering.
Material (thickness, mm):
- Expanded polystyrene PSB-35,
- EPPS 40 kg/cu.m. m,
- Polyurethane foam 70 kg/cu.m. m,
- Mineral (stone) wool 120-170 kg/cubic. m,
- Perlite concrete 600 kg/cu.m. m,
- Aerated concrete, gas silicate,
- Foam glass (gas glass) 200 kg/cu.m. m.
The most popular and appropriate for today are EPPS and polystyrene foam for insulation PSB-35. An effective material with ideal technical characteristics for ground flooring. The price of the finished coating is also the lowest.
Insulation from the attic
Insulating the floor from the cold attic side of a two-story house requires less labor than from a living room. All types of heat insulators are suitable for use:
- bulk;
- cotton mats;
- foam slabs;
- folk
Industrial ones benefit from ease and speed of installation. If soft raw materials were used, then ladders are made from boards in the attic for maintenance and inspection. Bulk and crushable materials are loosened as they compact.
Use of mineral wool
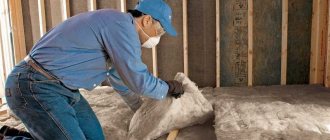
When working with mineral wool, use a respirator, gloves and goggles, and wear closed overalls.
Insulation from the attic side requires less labor.
The cotton wool is cut so that each cut is at least 2-3 cm wider than the cell size. The sections between the joists are covered with a vapor barrier, with an overlap made around the perimeter of the walls, as well as on the beams. A piece of cotton wool is slightly compressed and inserted into place. She will straighten up and hide all the bridges of cold.
Thermal insulation with polystyrene foam boards
To adjust to the required size, polystyrene foam boards are cut. Incorrectly cut parts can cause gaps and heat loss.
When using polystyrene foam, be sure to first create a layer of vapor barrier, since it absorbs water. The slabs are laid in 2 layers. If there are chamfers, then they are not treated with anything. Seams and joints on polystyrene foam are sealed with sealant or polyurethane foam.
On the slabs, paths are made of gypsum fiber sheets or a partial screed up to 4 cm thick with a reinforcing mesh. For the second option, before pouring the solution, lay waterproofing in order to protect the insulation.
Arrangement with expanded clay gravel
Expanded clay is the most popular backfill material, which is used both for insulation and to lighten mixtures and insulating compounds.
Expanded clay is a backfill material that is used for insulation.
Before backfilling, cover the floors with a vapor-proof film. In this case, the edges of the material extend onto the walls 10-15 cm above the expanded clay layer. It is periodically stirred with a rake to dry it. Moves for maintenance are made at will.
Bulk folk materials
Supporters of environmentally friendly materials use natural insulation materials. Before the development of the chemical industry, such raw materials easily coped with their task. Main advantages:
- There are no harmful components released. When replaced, they are disposed of or burned.
- It is extremely rare to provoke an allergic reaction in residents.
- Economically profitable and practical.
- Combination with natural building materials.
- Light weight.
There are also a number of disadvantages:
- Easy to flammable. Requires the use of fire retardants.
- Over time they cake, which leads to a reduction in thermal insulation properties.
- Attractive to rodents.
- If you don’t treat them with antiseptics and don’t stir them periodically, they will quickly rot.
Straw is a folk material.
Most of the natural raw materials are of the bulk type. They are laid over the ceiling and turned over as needed to dry. Folk materials include:
- Straw. The bundles are soaked in a 10% solution of copper sulfate and left until completely dry. Lay in a layer of at least 25 cm.
- Moss. It has antiseptic properties, perfectly absorbs moisture, and is durable. For insulation, a 10 cm layer is enough.
- Hay, dry leaves, pine needles. The raw materials are the most affordable; thermal insulation requires a thickness of 20 cm. The disadvantage is rapid saturation with moisture.
- Seaweed. Rarely used, mainly by residents of coastal areas. Laying layer up to 20 cm.
- Reed. Dry stems are tied with wire into mats 10-15 cm thick and filled with them in the spaces between the logs.
Materials with high environmental characteristics also include felt, coconut fiber, jute, flax, and clay.
Methods for insulating floors in a private house
Floor insulation in a private house
When choosing the type of insulation and the technology for its installation, you should not go into the intricacies of the law of heating engineering. The best option is to listen to the advice of professionals. They recommend in central Russia to install a heat-insulating layer over a cold basement with a thickness of at least 12 cm. And for the northern regions, increase this parameter to 20 cm.
Note! If you want to understand the laws of heating engineering on your own, we recommend that you familiarize yourself with SNiP 50.13330.2012 (PDF link). This regulatory document provides standard values for heat transfer resistance of various building materials in the form of tables. Examples of thermal engineering calculations are also presented to help you select the correct insulation thickness.
To insulate the floor in a low-rise residential building, the structure of wooden beams is most often used. Peculiar niches are arranged between the lags. Insulation material is poured into them or laid. This is a fairly simple procedure.
With diligence and a little skill, you can do it yourself without any problems. The main thing is to correctly select a technological algorithm that ensures fast, correct and efficient implementation of the insulation process.
We suggest considering several insulation options, taking into account the technical nuances of the building.
Insulating the floor above a low basement
Insulating the floor above the basement
This is the most labor-intensive method. To implement this, it is necessary to dismantle the floor covering, since the limited underground space will not make it possible to install a heat-insulating gasket on the joists from below. Insulation of the floor with penoplex or other insulating material in this case is carried out in the following sequence:
- Floorboards and skirting boards are dismantled. It is advisable to sign each component of the floor covering. This will allow you to put them back more quickly.
- An inspection of the wooden elements of the supporting structure is carried out. Any questionable area on the joists is cut out and replaced with a piece of new timber of similar dimensions. We fix it using boards installed on both sides of the logs and galvanized self-tapping screws.
- On the right and left at the bottom of each load-bearing beam we hem bars with a thickness of at least 40 mm. They will act as supports for the rough flooring.
- The distance between the lags is measured. We take unedged boards and cut them into pieces. It is advisable to make their length 1-2 cm less than the measured parameter. This will allow the rough flooring to be laid freely.
- Using prepared scraps of flat lumber, we lay out the auxiliary floor. Before installation, they must be thoroughly treated with antiseptic impregnation. This will minimize the formation of rot and mold on the wooden components of the auxiliary flooring.
Note! Experts do not recommend joining them tightly, since the wood will produce characteristic movements under the influence of fluctuations in humidity and temperature. As a result, the tightly laid cranial structure can turn into a cluster of mounds. It is advisable not to firmly secure the laid cuttings of boards.
- A waterproofing layer is laid. Try to create a continuous canvas that extends 10-15 cm onto the walls. It is advisable to periodically fix these “entries” on joists and wall surfaces using a special stapler. This will make it possible to install the insulation more quickly and conveniently. Any roll must be rolled out with an overlap of at least 10 cm, and all joints must be additionally taped with construction tape. If everything is done correctly, you will get several unique pallets.
- The floor in a private house is insulated with expanded clay or other heat-insulating material. The selected insulation is filled or laid into the created pallets. At the same time, its surface should not be lower than the upper planes of the joists (surface height is approximately 2 cm). This gap will make it possible to ensure natural ventilation of the insulating structure.
Note! If it is not possible to create a clearance of this size, then you need to install a counter-lattice on the load-bearing beams. To do this, it is necessary to nail 2 cm wooden slats perpendicular to the joists.
- The second waterproofing layer is being installed. To prevent any penetration of moisture from living quarters into the insulation, you need to create another insulating mat on top of the insulation pad.
- The existing floor covering is being restored. Taking into account the numbering made on the floorboards, we quickly install them in place. We install skirting boards. If the waterproofing roll material protrudes above it, then carefully cut it along the upper edge of the floor “edging” clamping strips.
We insulate the floor above a high basement
Do-it-yourself floor insulation above a high basement
The technology is similar, but the process takes much less time, since there is no need to dismantle the floor covering. The sequence of the event is the opposite:
- From an unheated underground room, we attach a waterproofing layer to the load-bearing beams. Before doing this, you must definitely check their technical condition. If necessary, replace questionable areas with new bars.
- From below, at the ends of the logs, beams are packed on both sides. These are the future supports of the rough flooring. Considering the increased dampness in basements, experts recommend using special galvanized profiles instead of wood.
Note! In this case, it is necessary to insulate the floor in a private house with polystyrene foam or other sheet insulating material, since it is almost impossible to use expanded clay.
- We cut the tile insulation into pieces - their overall dimensions should be 2-3 cm greater than the distance between the logs. This will make it possible to install insulating sheet material in the voids between the load-bearing beams by surprise. This temporary fixation will allow you to install the auxiliary floor without any problems.
- Using a stapler, we secure the outer layer of waterproofing. You can use roofing felt, thick polyethylene film, or a special insulating membrane.
- A rough flooring is installed from untreated boards or chipboards.
Note! A fine-mesh steel mesh installed between the heat-insulating pad and the auxiliary floor will help prevent damage from frisky rodents.
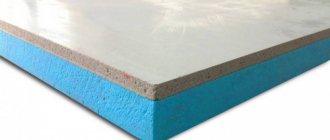
We insulate a concrete floor
Insulation of the concrete floor of the first floor
In this case, the heat insulator must be guaranteed to withstand the entire payload. Therefore, when selecting insulation, it is advisable to give preference to materials with a denser and more durable structure.
Recently, for arranging floors, especially on the ground floor, cement screed is increasingly being used instead of wood. This method provides certain advantages:
- Surface strength;
- Guaranteed fire safety;
- Environmental friendliness;
- Simplicity of the installation process.
With this method of arranging a heat-insulating gasket, a unique “floating surface” system is created. This effect makes it possible to provide floor insulation in a private house with polystyrene foam, since it has a fairly dense structure.
As a result of a properly carried out insulation process, a kind of cake is obtained with the following layers:
- Concrete base;
- Gasket made of extruded polystyrene foam;
- Cement-sand screed;
- Finish floor covering.
Options for insulating the second floor in a timber house
The second floor is being insulated in stages. First, work is done on the ceiling, then the walls and floor from the attic are insulated.
Floors between floors
They begin insulation on the upper floor in order to install it on the already sheathed ceiling of the lower one. Algorithm of actions:
- If there is a floor, it will be removed.
- Lay the vapor barrier film overlapping the panels and beams.
- Fill the voids with insulation, making sure there are no gaps.
- Waterproofing is laid on top.
- Lay the floor covering.
When insulating, a vapor barrier film is laid.
If it is impossible to carry out installation on the second floor, then the work is transferred to the first. Its sequence:
- The ceiling of the first floor is being dismantled.
- Attach waterproofing.
- Insulation is placed and secured with wooden slats.
- Another layer of vapor barrier film is made.
- Install the ceiling covering.
Ceiling
When there is no access to the attic, the second floor ceiling is protected from the inside. Expanded polystyrene boards, less often mineral wool, are used as insulation. This method takes away part of the height of the room, since it requires the construction of a frame made of metal profiles or wooden blocks. Sequence of layers:
- waterproofing;
- insulation;
- vapor barrier;
- counter-lattice;
- ceiling trim.
The ceiling of the second floor is insulated from the inside.
Thermal protection of walls
Walls are most often insulated from the outside. Internal installation is done when external protection is insufficient or impossible to perform. Disadvantages of the second method:
- reduction of useful floor area;
- the likelihood of condensation forming between the insulation and the wall;
- the façade remains cold.
To minimize negative consequences, strictly follow the installation steps:
- The cracks are caulked and the surface is treated with antiseptic impregnation.
- Horizontal slats 2 cm thick are attached for a ventilation gap.
- Install a tension vapor barrier layer.
- Make a vertical counter-lattice with a distance slightly less than the width of the piece of thermal insulation.
- Insulation is laid between the racks and covered with a vapor barrier.
- Install decorative trim.
Indoor installation increases the likelihood of condensation.
Insulation of the ground floor floor in a wooden house
Cold floors in a wooden house are quite common, since construction technologies may be violated during the construction of the house. And also when building a house, some people want to save on materials, and as a result, there is no insulation at all or it is not enough for warmth.
To insulate the floor of a wooden house, you need to lay mineral wool between the beams
To insulate the floor of the first floor in a wooden house, you need to do the following:
- Dismantle the floor, inspect the boards and remove those that show signs of rot and boards with any damage. If the logs are thick enough, then they can be completed by hemming the subfloor, which is usually made from second-rate boards, for example, slab.
- Layers of waterproofing are first laid on the subfloor, most often roofing felt. To prevent it from moving, it can be secured in several places with nails with wide heads.
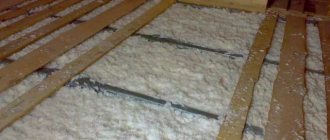
- Next, the insulation is directly laid on the layers of waterproofing; it can be anything: mineral wool, insulation, foam boards or other heat-insulating material. If we are talking about saving money, then in this case the thermal insulation can be made from expanded clay or even sawdust. A vapor barrier is laid on top of the insulating layer.
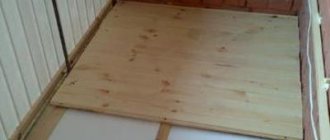
After you start laying the finished floor, you can partially use the boards that were already lying, or you can use completely new ones. The main thing is that they are smooth, well-planed and have the ability to fit them tightly to each other. The finishing floor boards are usually covered on top with additional material such as plywood, laminate and linoleum.
Ways to insulate the attic
The attic is used as a full-fledged living space. They are insulated so that the comfort of living in it does not depend on the time of year.
Floors
Floor insulation consists of the following steps:
- The vapor barrier is laid overlapping the beams, leaving a margin of 20-25 cm.
- They fill the subfloor.
- Lay the insulation in 2 layers in a checkerboard pattern so that there are no gaps.
- Cover with a vapor barrier membrane.
- Sew across the beams with a board in 10 cm increments.
- Cover with thick plywood or OSB slabs.
Insulation is laid on the floor and covered with a board.
Ceilings and walls
Insulation of the attic when the roof is adjacent to the floor:
- Lay waterproofing on the rafters from the ridge to the floor with an allowance of at least 20 cm.
- Make a sheathing with a distance of 50-60 cm.
- The inside is filled with insulation from the bottom up.
- Cover with a vapor barrier using thin slats. The joints are sealed with tape.
- Install the interior trim.
When there are walls, the diagram looks like this:
- Attach waterproofing.
- Install sheathing around the windows.
- A base beam is laid along the floor along the wall. Vertical racks are mounted to it. The voids are filled with thermal material.
- Attach a layer of vapor barrier.
- The counter-lattice is nailed with thin slats for ventilation.
- Finishing is carried out.
Ceilings and walls are covered with vapor barrier.
Door and window openings
The attic window block is insulated during installation with expanded polystyrene, basalt or mineral wool. The entire perimeter of the slopes is filled with material. The top is covered with a vapor barrier. You cannot use polyurethane foam, otherwise the frame will become jammed over time due to shrinkage of the rafters.
The gaps between the wall and the door frame are sealed, paying attention to the upper part of the opening and the threshold.
Gable
The principle of thermal protection is similar to insulating a roof or walls:
- Along the gable, beams are installed with a gap equal to the thickness of the insulation layer.
- Attach waterproofing.
- Place the insulation between the frame posts.
- Make a layer of vapor barrier.
- Sheathed with finishing material.
How to insulate an attic
What insulation is suitable for the second floor and attic of a log house? Typically, in this case, standard materials are used, traditionally used for thermal insulation of the roof in a wooden house. This:
- mineral wool;
- expanded clay;
- ecowool;
- expanded polystyrene;
- polyurethane foam.
We talked in more detail about each material in the article about roof insulation in a wooden house.
If thermal insulation is carried out in the attic located above the bathhouse, then there are slightly different rules in choosing the material. Not every insulation can work effectively in conditions of high humidity and extreme temperatures.
For example, one of the best materials for insulation in a wooden house, mineral wool, will very quickly lose its consumer properties in a sauna. This material strongly absorbs moisture, which is abundant in the steam room. They can be used to decorate the walls, but it is best to insulate the attic floor of a bathhouse with moisture-resistant polystyrene foam.
A very important role in a bathhouse is played by vapor barrier, which prevents the process of moisture accumulation in the insulation. Therefore, special attention should be paid to the arrangement of the vapor barrier, especially in cases where the thermal insulation is done by hand.
invites residents of the Moscow region to take advantage of professional home insulation services. We guarantee high quality workmanship and quick results. To leave your request, go to the “Contacts” section. There you will find all our data.
Calculate the cost of painting and insulating your home right now
Select types of work:
Select materials:
Insulation of the roof of a wooden house
Before insulating the roof, the structures are inspected for integrity and the presence of mold. If necessary, areas are cleaned and impregnated with special compounds or replaced. Operating procedure:
- Attach waterproofing to the rafters. The joints are taped. The use of a superdiffuse membrane will provide protection from moisture, reflect heat and create partial sound insulation.
- A counter-lattice is nailed along the beams, and horizontal slats are placed on top of it. The roof covering is attached to them.
- Install a heat insulator between the rafters.
- Stretch the vapor barrier with an overlap of 15-25 cm.
- Make horizontal lathing for finishing.
Methods for getting rid of condensation
Condensation accumulates under the roof due to temperature changes. It can worsen the thermal insulation properties of materials and shorten the service life of roofing elements.
The problem is common in houses and cottages with a cold attic, an unheated attic, or after violations of the roof installation technology. If there is no ventilation between the waterproofing and the coating, the structure is dismantled and a ventilation gap of 1-3 cm is made. If there is no moisture protection, then it must be laid.
A second layer of thermal insulation is added to the ceiling. In the attic, ventilation windows are made at the ridges of the roofs and under the eaves.
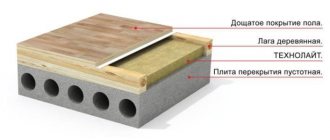
Insulation of the second floor of a wooden house
If the house has an attic, then there must be a thermal insulation layer on the floor of the second floor. It will consist of several layers located one below the other. It is very important to follow the sequence of laying each layer. Otherwise, there is a high probability that a floor will be obtained that will not have sufficient thermal insulation and waterproofing. So, the floor covering will have the following sequential layers:
- flooring;
- paper;
- mineral wool, which will be laid between the wooden beams of the ceiling;
- load-bearing beams made of fairly strong and powerful timber;
- construction paper;
- ceiling of the lower floor.
It is in this sequence that all layers must be laid. Sometimes it may become necessary to install a soundproofing layer on the second floor. This should only be done if someone regularly stays in the attic or if the house is located very close to a road.
Soundproofing will get rid of all extraneous noise.
Here you will need to lay not only insulation, but also two layers of plywood, which will act as a sound insulator. If expanded clay is used, a dry floor screed may be necessary.