Laminate is a universal floor covering that can be installed in any room of the house, with the exception of the bathroom. If you choose a floor for a loggia or balcony, then a laminated coating is also suitable. This is a beautiful, simple and durable solution. In order for laminate flooring on a balcony or loggia to last for decades, you should follow certain installation rules, which we will discuss in this article.
Advantages of laying laminate flooring on the balcony
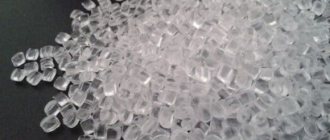
The basis of the laminate floor is a high-density HDF wooden board. She is not afraid of frost. The wear-resistant coating of the boards copes well with mechanical stress and temperature changes. The only danger is humidity. Therefore, traditional laminate flooring is not used for open, unglazed balconies. The exception is a special waterproof vinyl laminate, which can be purchased in our catalog.
The following advantages allow us to recommend laminate as a covering for a glazed balcony or loggia.
- Low price. Compared to ceramic tiles, natural boards and parquet, laminate flooring will cost you much less. Considering that the number of square meters of area on a balcony rarely exceeds 3-4 m2, the cost of laminate flooring is minimal.
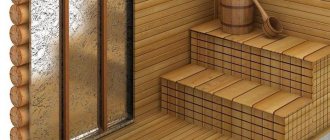
- Great looks. Laminate flooring harmoniously combines with any natural balcony finishing materials: wood, vinyl siding to look like stone or tile. You can choose from hundreds of different decors.
- Easy to install. You can buy and install laminate flooring yourself, without the help of professional craftsmen.
- Practicality. In domestic use, laminate flooring demonstrates excellent wear resistance. If you get tired of its pattern, you can easily update the interior by laying a new laminate floor in just 2-3 hours.
Basics
First, you will need to take measurements of your balcony and write down all the results. This will be needed to calculate the amount of consumables. Next, you need to decide on the type of finish. The balcony can be decorated with siding, plastic, trolley, plasterboard, it is even possible to cover it with wallpaper. You need to decide what to cover the floors with, how to repair the ceilings. At this stage, you need to calculate the budget for repairs, and based on it you need to select the material. It is also recommended to draw a plan diagram of the balcony based on calculations of the length, height and width of the balcony. Have you decided on the material? Now you need to purchase everything and do not forget to make allowances for a possible error, and purchase materials with a small reserve. So that in case of problems you don’t have to go to the store and buy more.
Decorating a balcony floor with laminate
Creating a beautiful and practical floor covering is quite simple. There are dozens of finishes on the market in different color options. Laminate is one of the five most popular materials due to a lot of positive qualities: aesthetic appearance, durability, ease of maintenance. But not everything is so simple when it comes to small utility rooms. Laminate flooring on the balcony will do its job well. The features of installation, care and general rationality of using the material on balconies and loggias will be discussed in this article.
Pros and cons of using laminate for finishing a balcony
To use laminate in finishing a balcony, one main condition must be met - it must be glazed. The fact is that this material is afraid of moisture and cannot get wet. The main advantages of its use include:
- Impeccable aesthetic qualities and a rich variety of textures and colors. If installed correctly, laminate flooring on a balcony will be impossible to distinguish from real parquet;
- Resistant to fading when exposed to ultraviolet rays;
- Easy installation on the balcony. Laying laminate flooring does not require special skills. It is a pleasure to work with thanks to the special tongue-and-groove connection;
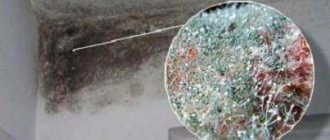
- Laminate is resistant to fungi, mold and the development of various other microorganisms on it;
- Affordable price. The cost of laminate flooring for a balcony is relatively low, along with other facing materials.
- Easy replacement of one element. Unlike linoleum, the laminate does not have to be replaced entirely in cases of local damage;
- Wear resistance. With proper use, laminate flooring will last up to 10-15 years.
With such advantages, laminate flooring is still not without its drawbacks. Minuses:
- Deformation due to moisture. Cellulose, which is part of this material, when wet, tends to swell and deform the joints of the laminate. The protective film, of course, protects it from moisture, but only with short-term exposure;
- Response to temperature changes. Laminate expands at high temperatures and contracts at low temperatures. This must be taken into account when performing installation work. If the temperature on the balcony is unstable all year round, you should leave a small gap between the boards and the perimeter;
- High demands on surface quality. Laminate requires a flat surface and the smoother its surface, the more ideal the coating will be.
How much does laminate flooring cost for a balcony?
The cost of laminated coating for installation on balconies and loggias will depend on several factors. It should be taken into account that the balcony is not a passage room in a house or apartment, so the floor here is unlikely to experience constant and high loads. That is why you can choose models of 31 or 32 service classes, which can last in an insulated balcony for more than 10-15 years without any problems.
Prices in this category of laminated coatings vary quite a lot. For example, the companies Kronospan and Egger offer models of 31 operating classes for 400-600 rubles per sq.m., while for Quick-Step or Kaindl laminate you will have to pay more than 1200-1400 rubles per sq.m.
Waterproof laminate is noticeably more expensive than traditional laminated coatings, which is due to the peculiarities of production and the very high performance characteristics of such models. Almost all models of moisture-resistant laminate comply with 33, 34 or 43 service classes, so their performance indicators are incredibly high.
This flooring is guaranteed to last on the balcony for decades. Manufacturer prices here are appropriate: Aquafloor – 2200-3000 rubles per sq.m., Berry Floor – 1200-1800 rubles per sq.m., Holzplast – from 2300 rubles per sq.m., Kronoflooring – from 2000 rubles per sq.m. m.
From all of the above, it becomes clear that the balcony and the laminate go well together, incl. forward. Go for it.
Which laminate is suitable
The choice of optimal covering for a balcony depends on the purpose of the room. For most domestic apartments, the balcony is a warehouse for small household items, a place for drying clothes, a room for smoking, repairing household appliances, etc. In rare cases, a loggia or balcony with a larger area can be equipped into a separate rest room.
Laminate for finishing a balcony must be treated with several types of protective agents at the production stage at the factory
When choosing a finish, you should pay attention to the class. This is a parameter responsible for the strength of the product, resistance to physical damage, moisture, open fire, UV rays
For a balcony it is better to choose class 31-33. This is the so-called “Production” laminate, which has the best protective properties and can be used in industrial premises. It is slightly more expensive than the standard 21-23 class, which is used in living rooms, but its general characteristics will allow the panels to be used for 10-15 years.
| Scope of application EN 685 | Load level | Laminate class |
| Living spaces | Lightweight | 21 |
| Living spaces | Average | 22 |
| Living spaces | High | 23 |
| Public premises | Lightweight | 31 |
| Public premises | Average | 32 |
| Public premises | High | 33 |
It is advisable to purchase more expensive coverage for several reasons:
- a balcony or loggia has a small total area: 1-2 sq.m., which will not affect the price too much;
- operating features require a more durable coating that should last a long time;
- industrial laminate comes in different patterns, patterns, and color palettes - you won’t be able to spoil the design of the balcony.
Panel classification
The strongest and most durable materials are from classes 31 to 33.
When choosing boards, you need to consider how exactly the laminate will be installed on the loggia.
If you plan to use it for floor finishing, it is recommended to pay attention to the classification of the material.
There are 6 different widows in total, differing in the density of the top protective coating:
- 21 - 23 class - has a small thickness, poor wear resistance and relatively low cost.
- 31 – 33 class – mainly used for floor finishing, characterized by greater density and high wear resistance.
In addition, each of them has its own specific production conditions. Thus, if the abbreviated term DLP is present on the packaging, it means that multiple layers of the panel were pressed, HPL means additional gluing of all levels.
If the use of material on the floor requires careful selection regarding the quality of the panels, then if you plan to finish the balcony walls with laminate, it is allowed to use even the thinnest and cheapest boards.
Methods for attaching laminate to the wall
Before you begin laying the covering, the wall surface is leveled vertically and all significant unevenness is eliminated. Smoothing out unevenness and leveling is carried out by installing sheathing, plastering, and covering with sheet materials.
When installing the lamellas of the bottom row above the floor, leave a gap of 1–2 cm, otherwise stresses may appear in the finished plane due to thermal expansion. The indentation after installation is completed is covered with a plinth. The joints of the finished plane with adjacent areas on the side and ceiling are masked with corners or moldings.
Fastening with clamps
A clamp is a galvanized metal bracket with three holes for fastening, used for hidden fastening. The clamp is placed on the wall of the groove and secured to the base with nails, screws or staples using a stapler. The lamella is attracted and is fixed on one side by a tongue-and-groove connection, and on the other by a clamp. This installation method is acceptable if the listed types of fasteners for clamps can be driven into the base.
Fastening with screws, staples or nails
The principle of fastening is similar to that used for cladding. As with clamps, the base must be suitable for screwing or driving in fasteners. The installation itself is faster, but the fastening is rigid, and deformation of the lamella is possible.
The laminate is pulled through the wall of the groove to the wall with self-tapping screws or nailed with staples or nails. Before attaching the laminate to the wall with self-tapping screws, it is recommended to drill a hole in the wall 1 mm smaller than the diameter of the fastener to prevent delamination of the material. For better fastening, the back side can be coated with glue.
Fastening with glue or liquid nails
Glue fastening is used less frequently than previous methods due to its high labor intensity. For vinyl laminate, this is the only possible installation method; all others can damage the finishing material.
The adhesive option for installing the coating requires a perfectly flat base and highly qualified installer. Leveling the wall with lathing is not suitable, since the contact surface area during gluing will be too small, the slats will not be able to hold on.
For the adhesive fastening method, it is preferable to choose a thinner material to lighten the load on the lower rows. Since the coating does not bear a mechanical load, the use of lamellas with a locking connection in this case is not at all necessary, which allows saving on the price of the material.
Rules for careful use of laminate flooring
Recommendations for caring for the new coating will not be superfluous. They will preserve its aesthetics and performance for as long as possible.
It must be remembered that the coating of a laminated board, which is resistant to mechanical loads, does not have the same quality with respect to aggressive substances. Therefore, when cleaning and maintaining the flooring, exclude:
- detergents with alkaline and acidic reactions;
- metal brushes and meshes;
- any abrasive (even very mild) substances.
Also, try to do without a vacuum cleaner when cleaning.
For cleaning, use soft cloth rags, sponges, and microfiber brushes; neutral household chemicals (soap, concentrates, pastes).
Material up to class 33 should only be swept and vacuumed. Wet cleaning of laminate class 32 once every 3 weeks is acceptable; coatings of class 33, 34 are washed more often if necessary (they are not afraid of water). After cleaning, the entire surface must be wiped dry. Coating the laminate board with mastics, polishes and wax is not required.
To learn how to properly lay laminate flooring, watch our video:
Laminate for finishing balcony walls
Finishing the walls of a balcony with laminate is a very profitable and practical solution for improving this room. This work can be done using several methods, depending on the type and method of installation of the coating.
How to attach laminate to a balcony wall? The adhesive laminate is attached to a metal sheathing covered with plasterboard. The joints formed between the sheets of drywall must be glued with adhesive tape and treated with putty. Then the resulting surface is primed, and laminate panels are fixed to it using special glue.
Covering a balcony with laminate using the adhesive method on leveled walls
Click-type laminate, which has reliable and durable locking elements in its design, is attached to the sheathing, which can be made of metal or wood. The frame is attached to the surface to be finished using dowels, and the sheathing elements are connected using self-tapping screws. In this case, the width of the frame cells for fastening the panels should be no more than 40 cm. The panels can be attached to the frame using glue (liquid nails) or small nails. It is very convenient to use a construction stapler and clamps for this purpose - galvanized staples created for fastening this material.
They can be of two types:
— With jagged protrusions (they are driven into the cut end of the laminate board and mounted on the sheathing or wall using self-tapping screws).
— With flat protrusions (pressing the protruding part of the click lock of the panel and not preventing its connection with other boards).
To cover a balcony with a tongue-and-groove laminate, a sheathing is also made of wood or galvanized profile. It is attached to it with nails or staples.
Step-by-step installation instructions
A little instruction will help you make the balcony cladding with your own hands. Required materials and tools:
- building levels for horizontal and vertical surfaces;
- tape measure or iron folding ruler;
- thin marker, felt-tip pen or pencil for marking;
- hammer for adjusting lamellas;
- jigsaw or grinder with a fine-toothed disk attachment.
Work begins with the flooring:
- the leveled surface is cleaned;
- a heat insulator (substrate) is placed on it;
- laying is done lengthwise or crosswise, up to 15 mm away from the walls;
- lamellas are laid in a checkerboard pattern, minimum length 30 cm;
- start work from the far corner.
Laying laminate flooring on a balcony in winter is not particularly difficult. To reduce the risk of swelling, it is necessary to leave small linear gaps between the ends of adjacent boards.
The walls are covered with plasterboard. It is attached to the sheathing. First, the vertical strips are attached, followed by the horizontal ones. If the walls are smoothly plastered, do not install drywall; the slats are attached directly to the wall.
To do this, use a gun filled with liquid nails. Before gluing the lamellas, the drywall or plaster is primed. Allow the wall to dry, only then apply the laminate.
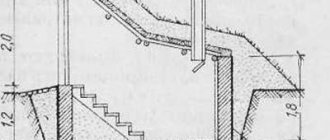
Related article: Do-it-yourself installation of sliding windows on a balcony
If sockets are needed on the walls, the cable is laid in the sheathing.
Plastic skirting boards and thresholds are installed at the end of the finishing work. It is better to use a plinth with a cable channel. The plug is removed from it, holes are made for the screws. Then the plug is returned to its place. Special additional elements are attached to the corners.
Laminate panels should stand on the balcony for several days so that the material is prepared for the humidity level of the room
Finishing with plastic panels
Plastic panels
Plastic panels are a convenient and practical type of finishing. They are easy to cut, bend, and have high strength. Caring for them is also quite simple. To panel the ceiling and walls of the balcony, you will need wooden slats and a ceiling profile. The slats are attached to the insulated surface in increments of 50-70 cm, aligned strictly vertically. The ceiling profile is mounted along its length, secured with 4-6 mm dowel nails.
Finishing with plastic panels
For corner connections, the ends of the profile are cut at an angle of 45 degrees; It is more convenient to trim the ends using a special device with grooves - a miter box. Sheathing posts must be installed in each corner of the balcony: if this is not done, the panels will sag in the corners, and the entire finish may be deformed.
Plastic panels. Balcony finishing
For the internal lining of the balcony, it is recommended to use plastic panels with a width of 10 to 20 cm and a thickness of 1 cm, as well as guides and dihedral corner profiles. The guides are screwed to the sheathing with screws 20 mm long and with a wide head, placing them in the corners of the room and along the perimeter of the openings.
Frame for panels
Fastening panels
Fastening panels
Now the panels are cut to length, placed with the groove up to the surface and, bending them in an arc, insert both ends into the guide profiles. Having straightened the panel, install the next one, then move both boards tightly and secure with screws.
The last panel is cut to width, a little silicone is squeezed into the grooves of the guides, the cut board is inserted and lifted up until it stops. Holding the panel in this position, insert the missing fragment and tightly join the edges. The areas above and below the openings are sheathed last, then platbands, ceiling moldings, and plinths are attached.
Laying laminate
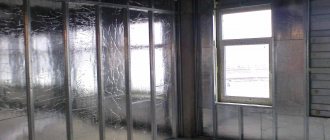
You can begin laying the laminated coating only on a balcony where two- or three-chamber double-glazed windows have already been installed and the walls have been insulated.
Glazed balcony ready for laying laminate
When is the best time to install laminate flooring?
It is not advisable to lay laminate flooring on a loggia in winter, especially at temperatures below 10 degrees and air humidity above 70%. Ideally, the temperature should be above 5 degrees. If these conditions are not met, the surface of the laminate may become cloudy, peel or stand on end.
Preparing the surface for installation
Pay special attention to the surface on which you will lay the new flooring. It should be smooth, well dried and clean.
For this:
- Remove all objects and things from the balcony;
- Remove the old coating down to the slab using a chisel and hammer;
- Take out excess trash;
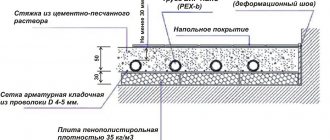
- If there are cracks, holes and unevenness, they must be eliminated using a new screed or grout;
- Check that the floor base is level with a building level.
Preparing the floor surface
Required set of tools
To sheathe a balcony with laminate you will need these tools:
- Marker and tape measure;
- Building level;
- Spacer wedges;
- Circular saw and hammer;
- Clamp;
- Metal bracket or block;
- Protective glasses.
Metal staple and hammer
How and with what to cut laminate
As we have already said, before installation, you need to leave the laminate on the balcony for two days, after which you can cut it into pieces of the desired size, following the step-by-step instructions:
- Draw a line on the board using a ruler and marker.
- Take another laminate board and place it exactly along the line of the future cut, securing it with a clamp. This is done so that the saw does not go to the side. Check that everything is securely fastened.
- Wear safety glasses.
- Saw off the board using a circular saw or jigsaw.
- Check if this board is the right size by placing it where it will be installed.
Can cut laminate with a regular saw
Main job
Finishing a balcony with laminate is quite simple and does not require much effort. You can easily handle this work yourself without the help of specialists. Laminated panels are easily fastened together with locks formed by inserting a tenon of one board into the groove of another, and are adjusted with a hammer and a metal bracket.
Two types of locks
Start laying the laminate on the loggia from the side opposite to the exit. Place the boards perpendicular to the window, then the joints will be almost invisible. Pre-install wedges at the threshold and wall, as well as at jambs and pipes. The first row must be laid with a gap from the wall of 5 mm to 1 cm, otherwise the laminate will deform over time, as it can expand or contract after some time. Take a hammer and a metal clamp and gently tap the end of the first board so that the tongue of the second board fits into its groove. First adjust the last board in the row to the desired size.
Wedges for laying laminate flooring
The remaining rows are assembled by analogy with the first and are additionally connected along the longitudinal edge. To do this, one board is inserted into the groove of another at an angle of approximately 40 degrees. When the board is lowered, a characteristic click will be heard. Use a clamp to connect the last board to the wall.
Assembling the laminate
When finished, remove the spacer wedges and cover the gaps with baseboard, nailing it to the wall. Don't forget to lay the threshold, which will complete the appearance of your new loggia. By the way, these details will also protect the laminate from moisture and make it static.
Video instruction
That's all the main stages of the work that needs to be done to install laminate flooring on a balcony or loggia yourself. Have no doubt, laminate is the best and optimal solution for flooring in these rooms. Ease of installation, ease of further maintenance and long service life will meet all your expectations.
According to what scheme can laminate flooring be laid on a balcony?
There are three ways to lay laminated panels on a balcony, which are the most popular:
- Perpendicular to the windows. When laying laminated panels perpendicularly relative to the window, during the operation of the floor the seams between the slats will not be noticeable, so visually there will be a feeling that a monolithic and solid floor covering has been laid. When choosing this installation method, 8-10% more material will be required than the total area of the balcony room.
- Parallel to the windows. If the laminate is laid parallel to the windows, then this approach will visually increase the size of the room, but the joints and seams between the individual slats will be clearly visible. This option is well suited for small balconies and loggias.
- Diagonal laying of laminate is suitable for balcony rooms that have an unusual and non-standard shape (round, triangular, polygonal, etc.). Diagonal laying allows you to increase the size of the room, but in this case you will need to purchase 15-25% more laminate than the total floor area of the balcony or loggia.
The choice of installation scheme will depend on the personal preferences and desires of the owners, so it is quite difficult to recommend something specific here.
Laying laminate flooring
After finishing the walls, you can begin installing the floor covering. But the first question that will arise in your mind is how to properly lay laminate flooring on a loggia or balcony. First of all, you need to prepare the floor.
Preparing the surface for installation
As with other rooms, the surface for installing the laminate must be flat.
While this rule is not critical for wall decoration, it is very important for floors. Preparing the surface for installation involves performing several steps:
- remove all items from the balcony: tables, chairs, cabinets;
- dismantle the old coating down to the slab;
- clean the floor of dust and debris;
- if it is wet, be sure to dry it;
- if there are deep cracks or holes on the slab, seal them with a cement-sand screed;
- check the resulting surface with a building level.
How to cut laminate
Tools
To install laminate flooring on a balcony, prepare a set of tools:
- marker and tape measure;
- level;
- spacer wedges;
- circular saw and hammer;
- clamp;
- metal staples or bar;
- protective glasses.
How to cut laminate, and how to do it correctly?
Professionals know that a lot depends on the correct cutting of laminate elements. But not everyone knows how to do it correctly. By following our tips and instructions, you will learn how to accurately cut the required piece of laminate flooring.
- First, take your measurements and mark them on the laminate strip using a marker.
- Take a ruler and draw a straight line where you want to cut the board.
- Prepare a second laminate board and place it along the future cut so that the saw does not move to the side. Make sure the board is securely fastened.
- Take care of your eyes and wear glasses.
- Cut the laminate along the marked line using a jigsaw or circular saw.
- Attach the cut piece to the installation site and check if the dimensions match.
Checking the evenness of the screed
Laminate installation
Further finishing of the balcony will not cause any difficulties. This work does not require any special knowledge. If you are installing for the first time, practice on small sections first to understand how the latches work on the material. Usually, snapping into place is difficult, but you can use a hammer or a metal clamp to securely fix it.
Laminate locks
Installation of laminate sheets begins on the side opposite the exit to the balcony. To make the joints less noticeable, many prefer the laminate to be perpendicular to the window.
At the very threshold, walls, jambs and pipes, spacer wedges are installed. To lay the first row, leave a gap of 1 cm from the wall, this will help avoid deformation of the material during expansion.
Using a hammer, place the tenon of the second board into the groove of the first. When laying the last board, you must first adjust its size.
Wedges for spacers
All other rows are assembled like the first ones, only they are additionally connected to each other along the longitudinal edge. To do this, insert the next board into the groove of the previous panel at an angle of 40 degrees. After lowering the panel, a characteristic sound will be heard, which means a high-quality connection. To secure the last panel you will need a clamp.
Assembly of laminate boards
When the last board is laid, the spacer wedges can be removed. The gaps between the wall and the floor are closed using skirting boards, nailing them to the wall. The entrance to the balcony is decorated by placing a threshold in this place. Finishing parts - skirting boards and thresholds, in addition to their aesthetic function, also perform a protective function. They prevent moisture from entering the laminate.
average rating
more than 0 ratings
Share link
Complex laminate finishing
On loggias and balconies, a complex method of finishing the room with laminate has recently been often used. This scheme allows you to combine high aesthetic indicators and good quality coating.
Installation begins with finishing the walls.
The work is carried out according to the following algorithm:
- First, a durable metal profile is fixed;
- Panels are attached to the profile;
- The panels themselves are connected using locking fasteners;
- The plates are fixed with self-tapping screws or nails for greater reliability.
After this finishing of the walls, the flooring is laid. Complex finishing of the balcony is quite profitable, convenient and allows you to create a rather interesting look, combined with functionality.
Wall decoration
Buying a laminate wall for a balcony will most likely not work. The fact is that this material, for its intended purpose, is used only as a floor covering.
Wall mounting is a modern design solution aimed at giving the room a certain uniqueness, chic and color. Definitely, a wide selection of color shades that largely imitate natural wood materials guarantees laminated panels wide popularity. For more information on the basics of laying laminate flooring on vertical surfaces, watch this video:
Installation methods
To properly fix the panels on the wall, you can use 2 methods. The first is to glue the laminate to the surface. To do this, you should carefully prepare the base: level and prime it. If this is not done, subsequent installation will be difficult because the connecting seams may protrude, and this will not look aesthetically pleasing in the entire structure.
For uneven walls of the loggia, the optimal solution would be to prepare a facing system - sheathing. The advantage of this method is that there is no need to level and prime the surface, which requires additional time and money. The sheathing can be made from wooden beams, which have a low cost. This allows us to talk about the low cost of work.
The walls under the laminate must be smooth, otherwise the structure may “lead”
In addition, inside it you can place not only electrical wiring, but also insulation, which will simultaneously act as a sound insulator.
After the sub-cladding system has been assembled, and the electrical cable and insulation have been fixed inside, you can begin fixing the laminate to the wall. This can be done using clamps used for fastening MDF panels.
It is recommended to take into account the property of the material to absorb moisture, so it is not recommended to use it in rooms with high humidity: bathrooms and showers. In all other cases, installation of laminated boards on walls is permitted. For more information about another method of installing laminate on walls, watch this video:
https://youtube.com/watch?v=R9WBaAiaeyU
Laying laminate flooring on a balcony yourself is not that difficult. In addition, this will require a small amount of material. But the result will not keep you waiting; after the installation of the baseboards is completed and the coating takes on its final appearance, you will be able to enjoy the interior appearance of the room, which has been transformed for the better.
Selecting panels for a balcony
The service life of the material also depends on the correct choice of panels. For balconies, experts advise purchasing laminate flooring of class 31 or higher, provided that the balcony is glazed and insulated.
Insulation means the installation of double-glazed windows, insulation of walls, railings of a balcony or loggia. If such events are not planned, you need to pay attention to class 33 laminate, which is characterized by greater resistance to moisture and temperature changes.
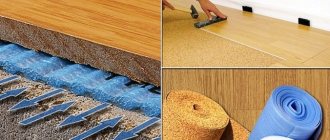
Selecting a substrate
One of the purposes of the underlay is to use it to eliminate minor unevenness in the floor and protect the panels from moisture.
The underlay actually eliminates excess noise coming from the laminate itself. The steps become quieter. Sounds from falling objects or shoe soles will be muffled. The above arguments serve as good evidence of the need to use a substrate.
Types of substrates
You should decide on the type of substrate: cork, polyethylene foam or polystyrene foam. A few words about each of them.
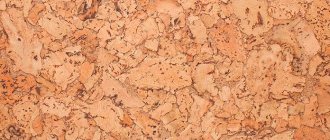
1. Cork backing is a natural material. It is made from crushed oak bark. Cork can withstand even the heaviest loads well. It is characterized by depreciation.
Cork flooring is ideal for living rooms, bedrooms and children's rooms. But cork is susceptible to moisture, so it is not recommended for use in the kitchen or loggia. It is also not suitable for “warm” floors. Cork flooring is the most expensive.
2. Izolon is the most economical material. But this is not his main advantage. It has an increased degree of moisture resistance and is intended for rooms with high humidity. This is a good heat insulator.
But it has significant drawbacks. Not durable. Under the influence of loads it is compressed. The service life is short. Over time, the material loses its qualities, shape and collapses.
3. Polystyrene foam backing is excellent value for money. It usually consists of two layers: foil and polystyrene foam itself.
The material has a lot of advantages. It is suitable for rooms with “warm” floors. Easily hides minor unevenness of the main floor. It's easy to install. The price of the product is affordable. The main thing is that it guarantees heat and sound insulation.
Nothing lasts forever in this world. Over time, the polystyrene foam backing wears out. This is its only drawback.
Installation features
There are several installation methods:
- for glue to drywall
- on a wooden sheathing
- on a metal sheathing
Glue mounting
This fastening method can be called the simplest. It is carried out on a plasterboard surface. But it has many disadvantages and nuances that you need to know about
The first thing you need to pay attention to when choosing this method is that drywall reacts negatively to high humidity. Therefore, it is better to initially give preference to special gypsum board impregnated with a mixture to reject moisture
Before finishing, the surface is carefully prepared - it must be perfectly smooth. Plasterboard on the wall can be glued. But to be sure of the durability of the fastening, it is still better to additionally attach it with self-tapping screws and dowels.
The easiest way to attach laminate flooring is with glue.
Laying on the floor involves leveling with plasterboard - this material is resistant to stress. The laminate is glued to the floor using pre-assembled strips of boards. Before connecting the locks, the grooves on the boards should be coated with glue or sealant - this will increase moisture resistance.
After this, glue must be applied to the base and the mounted strip must be laid. Carefully insert the board locks into the grooves and tap them with a hammer. The floor is covered with a floating underlay, but it is still preferable to use the adhesive method.
Everything is clear with the floor. But to glue the laminate to the walls, you will need to try. Firstly, you should be careful when knocking down the boards, because there is a risk that the already glued material will collapse. To prevent this from happening, first assemble a shield from boards, and only then glue the structure to the wall. Of course, this is inconvenient, but it will protect you from destroying other parts.
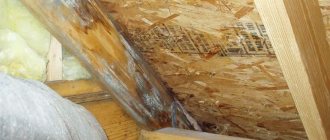
Installation on wooden sheathing
In view of the difficulties described above with the adhesive installation method, it is more advisable to assemble the laminate onto the lathing. It can be wooden or metal. The first option is more economical, the second is more expensive, but more durable.
How to make a sheathing from wooden blocks? The length of the bars should correspond to the distance from the floor to the ceiling. Before installing the sheathing, it is better to treat the bars with an anti-fungal agent. Fastening occurs along the entire wall at a distance of 40 cm. Horizontal slats are attached to the top of the vertical beams. It is on these slats that the laminate is installed.
Installation on metal lathing
Frame made of metal profiles
Metal lathing is constructed according to the same principle as wood, only zinc profiles are used. The outer profiles are the beacons - they will become the guideline when installing the middle sheathing parts. But horizontal slats for metal sheathing are also made of wood.
IMPORTANT. The methods discussed above are used only when covering with laminate, the boards of which are directed vertically
When laying horizontally, finishing is done the other way around: the lower beams should be attached along the wall, the upper ones – along its height.
Installation of the material is done with clamps. One is placed on the top of the board, the second on the bottom. A notched clamp is driven into the sawn-off end of the board and secured to the sheathing. The locking tenon is clamped flat and thereby secures the board.
When connecting boards, apply glue or sealant to each panel groove - this will make the fastening more reliable and moisture-resistant.
This way the entire surface is covered. If necessary, the board can be sawn. The edges of the last rows are covered with an aluminum corner. But before fixing it, the corner is also treated with glue or sealant.
What is attractive about laminate?
- Aesthetics is the main advantage of the material. Stylishness, classical severity, solidity, chic, expensive simplicity - these are just some of the characteristic epithets about the appearance of laminate floors. Thanks to this quality, most potential buyers choose this material for finishing flooring, wall finishing, furniture facades and other surfaces.
- The ease of working with the material allows any home craftsman to perform high-quality floor installation on his own at the first acquaintance with laminate. It is enough to adhere to simple technology and take into account some nuances.
- The affordable price of the product allows you to select a material of the required class that corresponds to the characteristics declared by the manufacturer.
- High (depending on the class) resistance of the material to mechanical loads.
- Good resistance to ultraviolet radiation. Laminate boards do not fade under short-term exposure to direct sunlight.
- The material is hygienic, resistant to fungus and damage from other microorganisms.
- The good thermal conductivity of the material allows it to be used for laying on top of a heated floor.
- Temperature changes do not affect the properties and characteristics of the laminate.
- A large assortment of laminates of various classes, price ranges, with excellent imitation of various surfaces of expensive natural materials, and a large selection of color shades is available on building materials trading platforms.
- The fire safety indicators of the material comply with the standards.
- The surface of the laminated board can be easily cleaned from dirt with mild detergents, without damaging the top protective coating.
- The method of fastening the laminate allows you to easily replace its individual element after unexpected damage.
- Impressive service life for heavily loaded flooring – up to 10 years.