Errors when installing a roof are unacceptable. This affects the integrity of the structure and its durability. Ondulin has earned trust with its qualities and characteristics. And if you managed to install the roofing material, then another problem arises: how to remove the pipe through the roof from the ondulin. After all, you will have to make a hole in it that needs to be properly sealed.
In fact, the work is not difficult, since the manufacturers themselves provide detailed instructions and videos on how to do the job. With them, the pipe on the roof made of ondulin will not violate the integrity of the roof. We will look at the features of ondulin and the technology itself for removing pipes, ventilation or chimneys.
Benefits of ondulin
Roofing made from this material gained popularity for a reason. Ondulin is a type of roofing material, classified as soft, based on bitumen. Externally, its shape resembles slate, however, that’s where all the similarities end. Thanks to its special composition, it has a lot of advantages and is easy to work with. The material is made from cellulose fibers, bitumen compositions, mineral components, dyes and hardening resins.
What does this give? It is easy to cut, it does not crumble or crack like a cipher, so a ventilation or chimney pipe can easily pass through the hole made. Ondulin has the following positive qualities:
- Excellent performance characteristics and high quality due to the composition.
- Manufacturers produce additional elements: ridge, valley, sealing materials and clamps. They make roofing even easier. Therefore, anyone can work with roofing material.
- Ondulin is lightweight and easy to transport.
- A long service life, along with an average cost, raises the position of the product.
- It is safe for humans and environmentally friendly.
- Installation will not be difficult. Fixation is carried out using roofing nails, and the presence of waves makes the process even easier. You can navigate by them.
- Large assortment of products in different colors.
- It suppresses rain noise. If we talk about metal roofing, residents complain about terrible noise when it rains. This is not observed with ondulin.
- The material can be cut using a hacksaw, mounting knife or jigsaw. No high-tech tools are required.
As for the disadvantages, these are average strength, color fading under UV rays and lack of fire protection. Since the material is soft, it is not difficult to pass the pipe through the ondulin. And thanks to additional materials, it is easy to make it airtight.
Features of choosing a location
Negative factors affecting the chimney include:
- atmospheric influences (wind, precipitation, ultraviolet radiation);
- difference in ambient temperatures;
- high temperature operating loads.
Due to the difference between the temperature of the working pipe and the air temperature in the chimney, condensation forms, which provokes destruction of the pipe during the combustion of heating oil. To avoid the formation of condensation and protect the pipe from external influences, it is necessary to provide reliable insulation of the chimney through lining.
Various materials are used to cover the protruding part of the pipe. When choosing, you should consider:
- resistance to external factors, wear resistance;
- appearance and color scheme (matching the roofing or wall decoration of the building).
Finishing a chimney on the roof is most often done using:
- clinker bricks or tiles;
- plasters;
- cement fiber boards;
- roofing material (corrugated sheeting, slate).
Clinker bricks or tiles are a practical option for finishing a chimney pipe, since dirt is not noticeable on such material. The advantages of clinker materials also include the aesthetics of the masonry; such a chimney goes well with any type of roofing. It is worth noting the resistance of tiles and bricks to weather conditions, temperature changes, as well as the strength of the material.
Finishing a chimney on the roof with plaster is characterized by:
- affordable cost;
- simple installation;
- versatility (suitable for any roofing);
- the ability to implement any color schemes (plaster can be painted with silicone paint).
Plastering pipes is carried out using the same technology as finishing facade walls. Traditional cement or lime-cement mortar can be used, but a more durable option is to use mineral, silicone, silicate or acrylic plaster. Painting the dried surface increases the wear resistance and durability of the finish.
Small-format cement-fiber boards are durable, resistant to ultraviolet radiation, moisture, temperature fluctuations, and light in weight. This is an environmentally friendly, non-flammable material. Smooth or structured slabs can be used for lining the chimney; the material is available for sale in a wide range of colors.
If slate is used for roofing, the chimney lining on the roof is usually made of the same material. Slate slabs can be shaped like an arc, flake, rectangle or octagon. The color of this natural material depends on the deposit. This color is usually graphite, green or purple.
A fairly simple and inexpensive option for finishing a pipe is to use corrugated sheeting. It is used if the roof covering is made of the same material. The pipe, finished in the color of the roof, looks aesthetically attractive.
Manufactured in a factory, the chimney elements for the roof passage have an aesthetic appearance and are quite easy to install. They are equipped with a steel chimney duct and can have a ready-made external cladding made of any material, or be prepared for independent finishing so that the chimney is externally in harmony with the roof. The modular steel structure is not additionally finished; it is enough to install it at the point of passage through the roofing pie.
Exiting a chimney through the roof is not as simple as it seems. Incorrect determination of the place where the pipe will be installed may subsequently lead to poor-quality operation of the entire heating system and not only that. Let us list the main problems that can arise if you choose the wrong location for the removal of combustion products in the furnace, taking into account that the sealing of the chimney on the roof and the roof itself will not be compromised.
- It is not recommended to install in areas located near ventilation openings and skylights to prevent carbon monoxide from entering the room.
- Installation at the joints of the slope, where there is an external corner, is not recommended, as this will lead to accumulation of snow in winter.
- Do not use hard material to secure the system. This is taken into account in cases where the roof itself “floats” for some reason. If the system is fixed rigidly, the drainage system will suffer along with the roof.
Experienced builders advise installing a chimney system directly near the ridge. Why in this place and not in any other place:
- In the joint area of the structure, moisture leakage is excluded, because in this place during snowfalls the least amount of snow accumulates.
- The location of the pipe in the immediate vicinity of the roof ridge reduces the impact of external factors. By placing the structure near the ridge, favorable conditions are created for the least collection of condensate in this place.
Increasing the distance from the ridge affects the height of the chimney structure itself, as it rises higher than the roof. If there is another building nearby that obscures the exit node, then this factor must also be taken into account, raising the height of the structure above the structure.
Features of pipe exit through ondulin
There are some rules to follow. They are related to the properties of the material. Professionals know that a residential building requires several pipes to be installed through the roof. This includes a chimney and a ventilation passage through the roof made of ondulin, which have a corresponding weight. When working, the following is taken into account:
- ondulin, unlike slate, is afraid of fire, so it must be protected from elevated temperatures from the chimney pipe and sparks flying from it;
- Since the material has average mechanical strength, it is important to create full supports for the edges. If this is not done, it may become deformed;
- high temperature from the chimney can soften the material, it loses its strength.
You need to know this before you start working. Let's look at two types of work: removing a ventilation pipe through ondulin and removing a chimney.
Features of using ondulin for roofing
An ondulin roof has its own characteristics, among which there are both positive and negative aspects. Positive characteristics include:
- High technological and operational characteristics, which are ensured by the components included in the composition - bitumen, organic fibers, various fillers that increase strength and durability;
- In addition to the coating itself, the industry also produces ready-made solutions - ridges, valleys, seals, fasteners;
- Long service life;
- Environmental friendliness;
- Easy installation;
- Various colors.
Disadvantages include average strength and fading of colored elements in the sun.
On the roof, the pipe from the ondulin must be removed correctly, and it must also be ensured that the sealing is carried out accordingly.
Ventilation pipe outlet method
There is a method to make things easier for yourself. For this, not just an ordinary pipe is used, but a special proprietary transition element made of polyvinyl chloride. In construction stores, for example, STD Petrovich, there is an ondulin roof ventilation transition that you can buy. And then the process of removal through the roof can be divided into several stages.
First you need to determine the point from which the pipe will be led through the roof of the ondulin. Most often they are placed in the last row of roofing material. The installation of the passage element in the desired place is carried out so that its lower edge is overlapped and secured to the ondulin sheet of the bottom row. This overlap on the bottom row is 17 cm.
However, there are some nuances. If the work is carried out while laying ondulin, then it is enough not to lay the last row to the end, leaving space for the passage element. If the roof is already finished, then you will have to make a hole of the appropriate diameter and continue the process.
Properties of ondulin
Before talking about any ventilation, you need to understand the properties of the main coating. It is very important to find out about the degree of waterproofing and condensation accumulation. If a large amount of moisture accumulates in the roofing pie, then you will have to take some measures, but if it is almost always dry there, then there is no need for this
Ondulin is a good and high-quality roofing covering, but its service life is extremely short. The material contains a large amount of natural cellulose. During the manufacturing process of the sheet product, it is impregnated with bitumen, and it comes under its protection. However, heavy precipitation can immediately deform the surface.
IMPORTANT: When installing ondulin, it is very important to monitor its stretching. If you are missing a couple of centimeters to the end of the roof slope, you should not stretch it, this will absolutely lead to the rupture of the canvas even during frosts
The bitumen sheet has gained such popularity due to its similarity to asbestos slate. It was produced in the 40s in France, and some developers have since called this material Euroslate. Outwardly, it is a little reminiscent of slate due to its wavy structure, but even in their quantity there are many differences.
We suggest you read: How to properly assemble chimney pipes
The advantages of ondulin are as follows:
- High waterproofing. Despite this parameter, an excessive amount of moisture will deform the material, so this coating can often be found in arid, but not hot, countries.
- Low material weight
- Simplicity and speed of installation
- Relative cheapness
- High sound insulation. Thanks to the soft and rough surface, extraneous noise will not penetrate into the attic, therefore, the house will always be quiet.
- Resistance to chemical and biological influences. Thanks to the large amount of bitumen, no vegetation will ever appear on the coating.
Minuses:
- Increased degree of fire, which does not correspond to fire safety. Ondulin cannot be installed on public buildings.
- Low service life. Severe frost and heat negatively affect the material. When frozen, it becomes fragile and decreases in size. As for the heat, it melts it and it practically flows. In addition, excessive rainfall quickly destroys the bitumen protection and is mistaken for a “paper” base.
IMPORTANT: The material can be laid over the old coating without dismantling it
This makes the material special and attracts the attention of many developers.
Instructions for removing the pipe when laying ondulin
If the removal is carried out at the roof installation stage, then the instructions are as follows:
- The passage element is installed with an overlap of 17 cm, and is nailed to the sheathing at the bottom in each wave, except for the waves for the overlap. Special nails for ondulin are used.
- The next sheet is measured so that the side overlap is equal to 1 wave, and on top, the same 17 cm. The excess is cut off with a jigsaw or saw, if we talk about cutting across, and the work is done along the assembly knife.
- The sheet is placed in place and secured with nails in each wave to the sheathing.
- Ventilation is being assembled. an ondulin pipe passes through the ondulin and is installed in the passage element.
- It remains to lay the last sheet in contact with the passage element, just like the previous one.
Job is done. The ventilation pipe is routed through the surface of the ondulin roof. Detailed video instructions will help you cope with the task:
Slate roof: system output
Slate has not been used as often lately as other, more modern and popular ones. But nevertheless, its relevance in construction remains high in demand. The smoke hole is drawn out using a special circle to ensure even edges. The most popular materials for making a slate roof are fire bricks or pre-fabricated ceramic pipes.
Returning to the question of how to seal a joint with a roofing material that uses slate sheets, it would be appropriate to use a ready-made connector that provides maximum sealing quality. In all other matters concerning the organization of installation work for the construction of a device on a slate roof, they are not much different from installation options with other types of roofs.
Installation on a finished roof
The instructions are:
- A hole is made for the pipe in the selected location.
- Now you can install the pipe through a special apron. The edges of the apron are tucked under the ondulin sheet, and the gaps at the junction points are sealed using Onduflesh tape.
- The apron is nailed to the sheathing slats and reinforced with a flashing from the inside of the roof.
Note! If the apron is universal, then the angle of the roof is unimportant. Sometimes the angles don't match. In this case, the adapter is made by hand from galvanized steel or copper sheet.
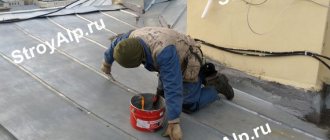
Sealing a chimney on a roof made of ondulin
Thanks to modern materials, construction technologies have become simpler, but some structural elements still require increased attention. One of these nodes is the passage of the chimney through the roof: the junction of the roofing covering to the walls of the pipe often becomes the site of a leak. Reliable sealing of a chimney on an ondulin roof is carried out using special additional elements and waterproofing tapes produced by the Ondulin company.
Throughout the entire life of the house, the junction of the roof and the pipe “breathes.” This happens both in the cold season and in the summer when the stove is not in use. The reasons for the displacement of the roof covering relative to the pipe walls are changes in temperature, humidity, snow and wind loads. The proposed method of sealing a chimney on an ondulin roof makes it possible to compensate for displacement and prevent the destruction of the roof, the formation of cracks and the occurrence of leaks.
Materials needed for work:
— covering apron Ondulin;
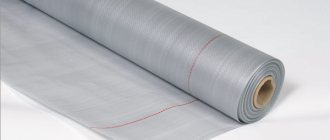
— waterproofing tape Onduflesh Super 300 mm wide;
- metal strips, dowels, Ondulin nails.
Sealing a chimney on an ondulin roof is carried out in the following sequence:
— the walls of the chimney and the roofing are cleaned of dust and dirt. The deposits are removed with a wire brush or scraper. Grease stains are removed with a solvent;
— a bitumen primer is applied to the brick (concrete) walls of the pipe;
— the covering apron is cut to the size of the pipe with a margin of 1 wave on each side. The apron is installed at the front wall of the pipe and secured with Ondulin nails along each wave. Nails are driven in at a distance of 5 cm from the bottom edge of the apron;
— the upper part of the covering apron is attached to the chimney using Onduflesh Super waterproofing tape. The ends of the tape, 20-25 cm long, are placed on the side walls of the pipe;
— pieces of tape for sealing the side and rear walls of the pipe are cut with a margin of 20-25 cm on each side. The strips are bent along the entire length and glued to the roof and pipe with an overlap of 15 cm;
— the waterproofing tape at the rear wall of the pipe is covered with an additional sheet of ondulin;
— the upper edge of the tape is pressed against the pipe walls with a metal strip and secured with dowels. The joint between the tape and the chimney is filled with bitumen sealant.
Onduflesh Super waterproofing tape can be used at low temperatures and can be extended. These properties make it possible to ensure the tightness of the junction of the roof and the walls of the chimney in any conditions.
Source
We arrange the junction area for the chimney
There are several rules that must be followed when it comes to working with a chimney or stove pipe. These are the rules:
- the chimney is installed closer to the roof ridge;
- The height of the pipe is important. It should rise above the ridge;
- It is prohibited to adjoin the window structure of the attic room to the pipe;
- It is better to make protective screens for pipes on the roof from materials that are not too hard;
- the arrangement of the pipe passage depends on the material used for the chimney.
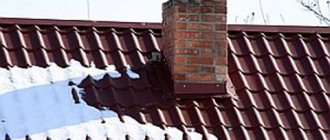
Fire safety when removing the chimney is given special attention. Although the fire source is low in the stove, the combustion products heat the chimney to an impressive temperature. In this case, sandwich pipes through ondulin are used. Their body can be seen in this photo.
It's like a thermos that holds hot liquid on the inside while keeping the outside cold. Thus. the chimney will not harm ondulin. As for chimneys made of brick or other material, they are covered in a protective metal casing with a layer of thermal insulation. Then the outer shell will heat up no more than 30–40 degrees.
Advice! Don't forget about safety rules. The work is carried out on the roof; any wrong movement can lead to harmful consequences.
Installation features
To ensure a high degree of fire safety and tightness, a separate duct is installed on the roof to provide a chimney passage.
In most cases, this applies to both round-diameter pipes and square or rectangular cross-sections.
How to pass a sandwich pipe through ondulin is shown in the video:
Such chimneys are practical, economical and do not cause installation difficulties.
Attention! An improperly installed stove chimney can cause a house fire, resulting in damage or destruction of property.
During installation, all connections should be hermetically sealed to prevent moisture or condensation from entering the chimney and attic. As it settles on the walls, it can lead to the formation of mold or mildew and contribute to the development of rotting processes.
The following recommendations from the video will tell you how to remove a chimney from a brick:
- Installation of additional sheathing is in progress;
- A special covering apron for ondulin is attached, which will cover one wave on each side of the pipe;
- The apron is laid and nailed to the roof covering;
- Sealing of joints is carried out using Onduflesh-Super tape.
Attention! It is advisable to carry out the installation of ventilation and chimney before the roof is completely covered. Only after arranging the connections should we proceed to the completion of installation work.
Let's sum it up
The removal of a ventilation pipe or chimney is an important part of the roofing installation. We looked at several options for how to put everything into practice. The main task is to ensure high-quality waterproofing of ondulin at the junction of the pipe. If this is not done, the area will become a weak point of the entire structure. Moisture will penetrate there, destroying the insulation layer, if any, and the entire structure as a whole. Therefore, following the instructions, it is important to carry out the work correctly so as not to shorten the service life of the roof.
Recommended Posts
Waterproofing roofing felt brand TG 350
How to lay corrugated sheets on the roof
Installing snow guards on a corrugated roof with your own...
Construction of a rafter system for a hipped roof
How to build a hip roof with your own hands
How to get rid of sparrows under the roof of a house
How to properly remove a chimney through the roof of a bathhouse covered with ondulin
What is a chimney pipe for?
The traditional material used to fire the sauna stove is wood. When it burns, gases that are dangerous to humans are formed. When burning, they must be removed. This is why a chimney pipe is needed.
What is the difficulty of passing a pipe through an ondulin roof?
It would seem – what’s wrong with running a pipe through the roof?! But no! There are problems. The cause of all the problems that arise when removing a chimney through an ondulin roof is the composition of the roofing pie. Most types of thermal insulation are made from synthetics, and hydro- and vapor barriers are made from polymer films. Obviously, they are all flammable materials.
As a rule, the roof frame and ceiling in bathhouses are made of wood, which is also a flammable material.
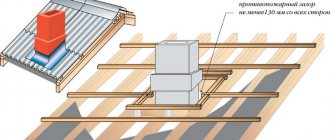
Meanwhile, the corresponding SNiP prohibits the placement of flammable roof elements closer than 130 mm in the light of brick, concrete, or ceramic insulated pipes. For pipes without thermal insulation, the distance is even greater - 250 mm. If we take into account that this distance must be maintained on all sides of the pipe, we get a very large hole in the roof.
The presence of such a large hole in the roof can lead to moisture entering the insulation, both from the atmosphere and from the bathhouse room. In addition, the organization of ventilation of the under-roof space becomes problematic.
How to solve a problem
There are two ways to reduce the problems that arise when leading a pipe through an ondulin roof to a minimum, or even avoid them altogether.
The first method is to install your own rafter system around the chimney.
The gap between the pipe and this system must be filled with any non-flammable insulating material (for example, basalt mineral wool).
With this method, the chimney pipe is placed in an insulated channel. Around the rafter system created for the pipe, layers of steam and waterproofing are tucked in and secured with staples or nails. For reliability, it is worth sealing the joints with sealing tapes. The Ondulin company produces high-quality Ondufresh tapes.
In order to avoid disruption of air circulation under the roof, it is necessary to install the necessary ventilation components above and below the pipe exit point.
The second method is to install special mass-produced metal kits on the roof. However, there are a number of limitations:
1. Steel pipes for furnaces can be used if the temperature of the exhaust gases does not exceed 500 degrees Celsius.
2. The use of metal pipes for furnaces that burn coal is prohibited.
3. Chimneys must be equipped with spark arresters.
Advice. Do not attach the pipe rigidly to the roof structure. Any deformation of the roof can destroy the pipe.
There are technical solutions for how to remove a chimney through the roof of a bathhouse covered with ondulin. All you have to do is choose the one that suits you.