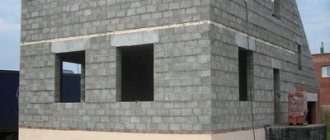
Installation of waterproofing film - what to do if it is torn at the installation stage?
Answer
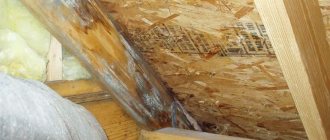
The situation is quite complicated. If it happened as in your case, then most likely there will be only one way out. No matter how much you would like this, you will have to disassemble everything and re-install the waterproofing membrane, since it is not possible to glue it together.
Of course, it’s a pity that it happened this way, but apparently there is no other way. Since it is waterproofing that protects the inside of the roof from rain and snow getting inside, it is in your best interests not to be lazy and do everything according to the rules so that your roof serves for a long time and reliably.
By the way, installing a waterproofing film is actually not such a difficult thing. You just need to follow the manufacturer’s instructions or take the advice of experts on our website.
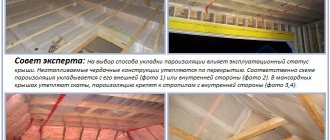
The film should be laid strictly horizontally (from one edge of the roof to the other). In this case, there should be a slight “overlap” of at least 15 centimeters. Fastening should be done to the rafter system; you can use a construction stapler for fastening. In those places where there is overlap, you need to go over it with adhesive tape.
Laying must be done so that in those places where there is an “overlap”, there must be wooden structures.
An important point is that there should be a small gap (about 2 centimeters) between the rafter system and the film itself, and the film should sag slightly (both on one side and the other). This is necessary so that there is not too much tension on the film and so that it does not tear (which, most likely, happened in your case).
It is highly not recommended to mix up the sides of the waterproofing membrane. If there is a bright tape along the edge of the waterproofing film, then you need to lay it on this side to the roofing. In this case, the roofing pie will be ineffective, since it will not work correctly.
As you can see, laying waterproofing film is not something very complicated. Anyone can do this procedure. But it is important to follow the installation technology, since only in this case can the functionality of the entire roofing structure be guaranteed, and the house will warm you and your friends with warmth!
rooftops.ru
Membrane installation
Membranes, vapor barrier, moisture insulation and others - perform a very useful function. Few people ask why this is necessary. But many do not know how to install the membrane correctly, because often even the manufacturer himself does not give recommendations on this matter. And I don’t really want to believe the words of a salesman from a store who has never seen a house being built.
Which side should the membrane be attached to?
First of all, it is necessary to understand the type of membrane used, the diversity of which makes it possible to perform various tasks when insulating the roof or facade of a building. Construction membranes are classified as steam and moisture insulation membranes, geotextiles, and polymer membranes. The main task of vapor-moisture-proofing membranes is to protect the insulation from vapors from inside the room and the formation of condensation. Geotextiles serve for filtration, strengthening, drainage, compaction and mechanical protection, while polymer membranes are used to waterproof the structure.
When installing a roof, waterproofing films and membranes are used to perform the tasks of preventing moisture from entering from the outside and removing moisture from the internal roof structures. Waterproofing membranes are placed directly under the roofing covering above the insulation, while between the insulation and the waterproofing membrane it is necessary to provide for the formation of a ventilation gap due to the difference in the thickness of the insulation used and the rafters, in turn, above the waterproofing membrane it is also necessary to form a ventilation gap due to the counter battens directly on which they are laid roofing covering. Thus, waterproofing membranes must be laid above the insulation to prevent moisture from entering, with the obligatory formation of lower and upper ventilation gaps.
Vapor barrier membranes prevent moisture from the interior from entering the insulation material, thereby increasing its service life. Vapor barrier membranes are located under the insulation from below, and, like waterproofing membranes, they must be overlapped with each other.
When installing a facade, the installation procedure is similar, depending on the facade (ventilated or not): waterproofing (wind-moisture-proof) on the street side, vapor barrier on the room side.
Which side should the membrane be laid on?
There are three types of waterproofing membranes: polyethylene, polypropylene and antioxidant. The first two types of films are double-sided, so it doesn’t matter which side is facing the roof covering, but antioxidant membranes have one-sided application, they are placed with the glossy surface up and the rough antioxidant layer down.
Polyethylene membranes are in turn divided into three types: not reinforced, reinforced and with an additional layer of foil, the first two types are double-sided, and membranes with a layer of foil must be attached in such a way that the metallized side faces the room.
Sometimes manufacturers, depending on the material used and technical conditions, produce mixed types of membranes, with the sides of the membranes marked using different colors; in this case, most often the colored side of the membrane should face outward.
Is there a need for a ventilation gap near the membrane?
A ventilation gap (about 50 mm) must be installed in front of the vapor barrier membranes and the sheathing of the room, which serves to ventilate accumulated condensate. During installation, waterproofing membranes are equipped with upper and lower ventilation gaps, as mentioned above, the width of which should be within the range (40-60 mm).
How should the overlap of the canvases be?
When used, building membranes must be laid with an overlap, the width of which can vary from 100 to 200 mm; usually the manufacturer provides special markings on the materials, often a line along the edge of the sheet. When the membrane performs the function of waterproofing on the roof, it should be noted that the width of the overlap is directly related to the angle of the roof slope, that is, depending on the angle, the width of the overlap also changes (with a slope angle of 30 degrees, the overlap width is 100 mm, 20-30 - 150 mm, 20 - 200 mm). In the area of the roof ridge, the overlap of the sheet should be at least 200 mm. At the junction of two slopes (valley), the overlap width of the web should be at least 300 mm.
It should be noted that the membranes should cover the ends of the insulation, and the waterproofing membranes should overlap the drain gutter or metal drip.
Do I need to tape the joints? If yes, then with what?
For best sealing, membrane joints must be glued together. The main mistake when installing building membranes is gluing the joints with packing tape; this mistake causes depressurization and, as a consequence, the membrane does not properly perform its functions.
It is important to remember that membrane joints must always be glued with a special self-adhesive tape, which is made on the basis of various non-woven materials: polyethylene (including foam), polypropylene, butyl, butyl rubber, they can be either single-sided or double-sided. When choosing a material for gluing joints, you must look at the manufacturer's recommendations.
If the joints of the membrane sheets are not glued, then during operation the layer of construction membrane will not give the desired result.
How to attach the membrane?
When installing a roof, for the convenience of installing building membranes, it can be temporarily fastened with staples or nails with wide heads, however, such fastening is not reliable, because there is a threat of rupture of the membrane sheet during further installation. It is important to remember that reliable and safe fixation of building membranes must be done using counter lathing.
When installing a suspended (ventilated) facade, reliable fastening of building membranes becomes much more complicated, since mineral wool slabs are laid after installing the brackets, using two to three disc dowels, so the membrane is laid with holes cut in the places where the brackets are installed and fixed to the wall with disc dowels made of calculating four fastening points per square meter.
On roof slopes, as well as on other building elements (windows, doors, pipes, antenna stands, etc.), membranes are attached using double-sided adhesive tape along the entire perimeter of the junction. On rough surfaces it is necessary to use various adhesives: acrylic, polyurethane, rubber, etc.
How long can the membrane be left open?
It is important to know that building membranes differ in the type and type of material used for their manufacture, which have different resistance to ultraviolet radiation, the manufacturer indicates this information on various sources available to the consumer, however, due to the characteristics of the materials used, such a period cannot exceed 4-5 months, after this period, the material begins to age and loses a significant part of its useful properties. But in addition to ultraviolet radiation when installing membranes, precipitation poses a great danger, which, if it gets on building membranes, can cause a change in the structure of the material, reducing its useful properties, so it is important to remember that building membranes are only effective together with roofing cladding, so for effective and the most The main thing is the long-term service of the roof; its installation must be carried out in stages, in small sections, guaranteeing the absence of external factors that negatively affect the properties of the materials used.
As an epilogue, I would like to emphasize that the use of building films and membranes in modern construction is a prerequisite for the correct functioning of complex multilayer structures. This condition is reflected in the building codes and regulations, namely clause 6.5. SNiPII-3-79 “Construction Heat Engineering” provides for the mandatory placement of a vapor barrier in buildings with humid or wet conditions to protect the thermal insulation layer.
Thus, when building a residential building or installing a roof, it is impossible to do without building membranes, but often many people neglect the quality of the material used for the sake of economy, forgetting that the durability of the structure is ensured by the tandem of materials used, especially since the cost of membranes is no more than half percentage of total materials costs.
Prices for membrane installation
Depending on the complexity, prices range from 30 rubles per m2 (large areas) to 200 rubles per m2 (small areas in limited space on complex surfaces).
kama-dom.com
Silicone sealant
Processing the joints obtained as a result of installing a window block eliminates the appearance of condensation and drafts in the premises. In addition to mounting tape, window sealant is used to protect seams. Unlike conventional analogs used in construction, the special composition has increased resistance to temperature changes, moisture, and exposure to ultraviolet rays.
Related article: How to make plastic windows close tighter
High-quality sealant for PVC windows is excellent for processing seams in any room: living rooms, bedrooms, offices, children's rooms. It has no unpleasant odor and hardens quickly. The use of a protective composition helps prevent deformation of the seams.
Other important features that silicone adhesive sealant has include:
- long shelf life of the hardened composition (its cracking and drying out are excluded);
- excellent adhesion (suitable for working with brick, concrete blocks, plaster, glass);
- resistance to mold (complete safety of the product).
Installation of waterproofing film
If the integrity of the waterproofing membrane is damaged, restoration of the previous surface is not possible. After all, waterproofing is only needed to protect the roof from large amounts of moisture. In your situation, there seems to be only one solution to the problem - reinstalling the entire waterproofing.
However, installing a waterproofing film yourself is not at all as difficult as it seems at first glance. If you are not going to pay for the services of specialists to install such material, you have found the strength to install waterproofing yourself, then we present to your attention some tips for installing such a film:
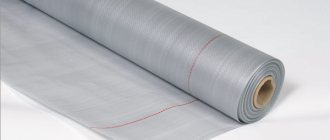
- First you need to roll out the material and cut it right on top of the insulation layer. The photo shows a roll of waterproofing membrane
- Installation should be carried out using horizontal sheets laid tightly to each other. The amount of overlap of the sheets at vertical and horizontal joints should be at least 15 cm. For additional fastening of the waterproofing material, experts advise securing the film to the rafters using a stapler.
- After this, it is necessary to lay wooden boards treated with an antiseptic on top of the film. They will play the role of a control rail, which is the boundary between the rafter system and the waterproofing. The lath is secured with nails or other fasteners. The size of one control rail board is 4 by 5 cm. Remember that the junction of two horizontal panels must be very tightly pressed by the control rail to the entire rafter system.
- When attaching the control strip to the waterproofing film, a ventilation space should be left between the roofing covering and the outside of the film. The distance is usually made equal to the width of the rail. In our case, it is 4-5 cm. Also, to ensure ventilation of the lower part of the roof and in the area of the upper point of the roof (ridge), it is planned to leave a gap for the circulation of air vapors. To prevent damage to the waterproofing membrane, which occurs when the control strip is installed carelessly, it is best to use sealing tape that can stick on its own.
- The waterproofing membrane is installed on the roof in a tensioned state. The lower edge must subsequently ensure the flow of water from the surface of the waterproofing material into the drainpipe.
ukroem.ru
We glue the waterproofing.: fraukorps
Today we move on to reliable and time-tested protection against water using the gluing method.
The method is used to protect any foundations and premises; application is possible on concrete (cement) and brick foundations. Withstands pressure from 2 to 4 atmospheres. The materials for this method are varied, these are polymer films and membranes, as well as rolled bitumen materials. Rolled bitumen materials for waterproofing are described in this article; they are still the most used due to their moderate cost, increased durability and ease of application. Polymer films have a thickness of up to 0.5 mm, and membranes from 0.7 mm; it is not possible to describe all the polymers from which they are produced within the scope of this article, but the main ones are polyethylene, polyvinyl chloride, polypropylene and synthetic rubbers. The advantage of polymers is their chemical resistance, durability and good extensibility.
All bitumen roll materials, with extremely rare exceptions, are produced reinforced, and polymer ones can be unreinforced. The main positive properties are the high crack resistance of this insulation, the continuity of the cover and rot resistance.
The work is carried out in 2 or 3 stages: preparation of the base, priming (absent when laying “dry”) and fastening the waterproofing. The requirements for the surface here are somewhat higher than with paint insulation; the base must be even and smooth, so that during the work no bubbles or untaped places are formed; for this, the brickwork is plastered, and the concrete slabs are cleaned of sagging and chips are covered. Surfaces for bituminous materials are primed with primers on the same basis; for polymer films, the primer is selected individually; many rubbers are incompatible with bitumen. Dry laying is typical only for rolled materials, since they can form a continuous, seamless cover.
Gluing the insulation can be done either entirely or in separate places (for example, strips); dry laying of materials with the help of fasteners or without it is also possible. Bituminous materials are glued over the entire surface either using mastics or by melting the bottom layer of the roll. In areas of transition from vertical to horizontal surfaces, additional layers are laid into the joint to avoid excessive bends and breaks. The joints of bitumen roll materials are coated with mastic. The number of layers required to protect against moisture can be from 1 to 3. Layers can be applied immediately, one after the other. Depending on the chemical composition, polymer films and membranes are laid on synthetic glue, bitumen mastic, glued to the base with waterproof tapes, secured with fasteners (dowels, staples, etc.) or laid freely. Non-reinforced materials are used at bends. Polymer films are produced in wide rolls, which simplifies work over large areas, but requires a flat base. In the case of a significant width of the insulated surfaces, the rolls are glued with synthetic adhesives or welded with hot air into large panels. The number of insulation layers is limited to one.
In most cases, laminated waterproofing is protected with screeds and plasters; it is also possible to construct protective walls from brick or sheet materials (asbestos cement); in rare cases, it is possible to use a clay castle (in low-rise construction).
Bituminous materials must be glued over the entire surface, without swelling, the overlap of adjacent panels must be more than 100 mm, the seams of different layers must be offset by more than 300 mm. When tearing layers away from each other, the tear should go along the material, not the seam. Polymer materials, in the case of gluing over the entire area, must meet similar requirements (due to the single-layer nature, only an overlap of 50 mm is taken into account); in the case of gluing in strips or laying dry, the seams that form the overall fabric must be checked, and tearing along the seam is unacceptable.
fraukorps.livejournal.com
Application of sealants Stiz A, Stiz B and Stiz D for plastic windows.
Polyurethane foam is destroyed under the influence of sunlight (both direct and diffuse), losing its water- and heat-insulating properties. In this regard, there is an objective need to protect it from such influence, which is what GOST 30971 advises to do.
When installing plastic windows, great attention must be paid to the quality of the seams, which must be airtight. Some installers are negligent in their work and after installation they have to check the joints, and if defects are found, seal them themselves using special sealants.
Using window sealants
A high-quality sealant should have the following properties:
- Strength;
- Long service life;
- Elasticity;
- Ability to cope with moisture, ultraviolet rays, temperature changes and active chemicals;
- The ability not to drain from vertical surfaces under the influence of gravity.
The sealants Stiz A, Stiz B and Stiz D have all these qualities. Work using them must be carried out in strict accordance with GOST. The area where the sealant is applied is first cleaned of dust, dirt and dried, after which it is applied to the surface.
Installation work in winter can be carried out at a temperature not lower than -25 degrees, and in summer not higher than +35 degrees. Otherwise, the seams and joints may not be sealed properly.
Stiz A and Stiz B sealants protect the joints of plastic or wooden windows from wind and precipitation. Stiz A is used to protect the outer seam. Stiz B is used for sealing joints indoors.
Steez D sealant is considered a relatively recent novelty. Its main task is to protect the seams from moisture, which can saturate the walls of the house. A layer of this sealant is applied before installing the window.
Stiz D sealant has good moisture-proofing and vapor barrier properties and is recommended for use during installation work on windows.
Features of window sealants
In appearance, sealants for window installation resemble a white paste with good plasticity. It is made from various polymers that can cope with harsh weather conditions during operation.
Due to its elasticity, the sealant is easily applied to the surface, after which it hardens, forming a durable protective layer on the surface.
In addition, the sealant makes the window structure look more neat from the street side, since often unscrupulous installers do not care about the quality of the junctions. The material allows you to correct this shortcoming, making the window attractive to people passing near the house.
Sealants Stiz A, Stiz B and their advantages
To ensure that the window performs its functions flawlessly, during its installation they use polyurethane foam and various types of sealants, the best of which are considered to be Stiz A and Stiz B, since their properties perfectly meet the requirements of GOST. We list their main advantages:
- Easily applied to surfaces made of any materials (concrete, brick, aerated concrete, wood, plaster compositions, polyvinyl chloride).
- Stiz A and Stiz B sealants are not exposed to moisture and ultraviolet rays and retain their properties in the off-season, when the air has high humidity.
- The material can be used to seal seams with a width of more than 2 cm.
- The hardening time of the sealant allows you to have time to install window structures of any complexity.
- Sealants Stiz A and Stiz B can withstand temperatures from -60 to +80 degrees, maintaining their properties.
Is it possible to use Stiz B sealant instead of Stiz A sealant and vice versa?
No, you can't do that. Stiz A sealant has good vapor permeability. This is necessary so that moisture from the seam can be easily removed. Stiz B sealant has a different function. It does not allow moisture from the room to get inside the seam. In other words, both types of sealant should be used in pairs.
Sealant Stiz D
It’s worth talking about this sealant separately, since its purpose is slightly different. With its help, an additional layer is created that protects the junction of the window frame and walls from moisture and heat loss.
Stiz D sealant is supplied in containers weighing 3 kg. Consumption per linear meter averages about 20-25 grams with a width of the treated surface of no more than 80 mm.
What are the advantages of Stiz D window sealant?
- Excellent vapor barrier and water repellent properties;
- Possibility of performing installation work at subzero temperatures;
- Good adhesion to all types of surfaces;
- Easy to apply.
Stiz D sealant is used when installing windows in residential, commercial, administrative or industrial buildings. It is recommended to use it in combination with Stiz A and Stiz B sealants.
The shelf life of Stiz D sealant is 6 months at temperatures above zero degrees. In this case, the packaging must not be damaged. When performing installation work with Stiz D sealant, the following safety precautions must be observed:
- Avoid contact with skin and mucous membranes of the eyes;
- Work in protective clothing;
- After work, you must wash your hands well using detergents.