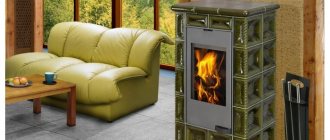
Difference between stove and fireplace
A conventional stove, in addition to heating the house, performs other household functions. The design absorbs most of the thermal energy released from the fuel, gradually releasing heat into the room.
The stove heats up for a long time, cools down slowly, and partial heat absorption maintains a comfortable temperature. You can maintain the operation of the stove if you add fuel in portions at regular intervals.
A complex smoke removal system prevents the complete escape of heat flows, retaining them partially inside the furnace, optimizing the heating process.
The stove structure contains a separate ash pan and firebox, where the latter is closed by a cast iron door. The ash pan allows fresh air to flow into the combustion chamber through the bottom. The opening width controls the combustion force, the combustion of resources.
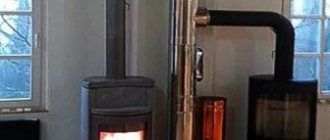
Example of a working fireplace
The fireplace is much simpler than the stove; it comes in two types.
Open design
The traditional model is an open device without doors. To prevent firewood from falling out, wrought iron stops are installed for decorative purposes.
The equipment only warms the air near itself; to warm up, you need to sit in front of it.
The combustion chamber is located inside the wall or an extension is made.
Open
To avoid a fire hazard, it is necessary to constantly monitor the combustion process, otherwise there is a risk of hot coal and sparks getting on the floor covering or carpet.
The air is in full access, it is impossible to control the operation of the structure, the firewood burns out very quickly.
Closed analogue
A safer option is a closed fireplace, the combustion chamber is closed with a door made of heat-resistant glass.
A closed device heats the entire room; with a closed firebox, the fuel burns out much longer. High level of efficiency.
Closed
There are other requirements for the chimney, compliance with which will require additional costs. High-quality thermal insulation is needed, factors affecting the operation of the unit are taken into account.
The increased costs are gradually paying off.
Design features and advantages of the Dutch
So, a heating and cooking Dutch oven is an excellent choice for any home. Moreover, the base can be chosen according to almost any configuration - rectangular or oval. The round Dutch heating and cooking stove looks especially interesting; such a design can become a real decoration of the house.
The walls need to be built with one brick for small structures, two for a massive stove intended for heating a large cottage. With such a thickness, fuel consumption will be minimal and heat transfer will be high.
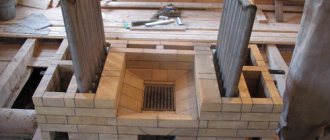
Foundation for a house and separately for a stove
It is imperative to start laying on a previously prepared foundation. Therefore, the Dutch oven diagram should separately contain a page with the foundation parameters, based on the main dimensions of the above-ground structure. The firebox should be located at least 25-30 centimeters to ensure quick and uniform heating of the room. The Dutch oven differs from other stove designs in several ways:
- the firebox is voluminous, but does not have a ash pan;
- the firebox is always rectangular , even if the stove is round;
- three lifting channels and three lowering ones, which are located one above the other, ensure sequential movement of gases.
Minus! Since there is no ash pit or grate, the wood in such a stove does not burn very intensely. Since air oxygen approaches the burning fuel through the firebox door, there is not enough oxygen to maintain active combustion.
Rework
Before drawing up a project for a future fireplace, check the condition of the chimney. The smoke exhaust system bears most of the responsibility for safety.
Check the condition of the stove and foundation. If violations are detected, it will be necessary to redo it from scratch, especially if the foundation was damaged.
It is easier to convert the structure into a decorative device.
The chimney pipe must meet basic requirements. For example, the height of the pipe used can be at least 7 m. The cross-section of the material is 13 - 25 cm, the depth of the firebox is from 0.5 m.
The combustion chamber is lined with fireproof, fireclay bricks, which will not deteriorate from direct contact with fire.
During laying, channels are created that allow air to pass along the door, which will prevent the accumulation of soot.
After all the rough work has been completed, you can begin finishing.
An example of converting a stove into a fireplace design with a heat shield:
How to decorate the fireplace?
Making a fireplace out of a stove is not so difficult; if the structure is strong and reliable, then you can only widen the hole for the firebox and make a beautiful and convenient portal out of it. After this, you can install a glass fireplace door, which will give the entire structure integrity and decorativeness. Lastly, finishing work is carried out; for this purpose, we can use any material with which fireplaces are lined. The simplest is brick, but you can also use stone or ceramic tiles or tiles. Natural stone will make this design more presentable.
https://1popechi.ru/www.youtube.com/watch?v=DTMNct1EqtM
The question of how to make a fireplace out of a stove arises for many summer residents. There may be several options for such a modification; the work itself must begin with a careful inspection of the stove; it is quite possible that you will not have to do the masonry from scratch. This will significantly save your budget and time.
Which side to approach the work from?
It is necessary to begin the reconstruction with a thorough check of the existing structure. You need to make sure of the required dimensions and integrity of the working parts of the device. If the chimney does not match the cross-sectional width of at least one brick, completely dismantle it and install a new one that will provide the required level of draft.
Often, the dimensions of the firebox are not suitable for organizing a fireplace, which means that a project must be drawn up, with the area remodeled during general work. Outside, it is better to immediately install a glass door made of heat-resistant material.
The body part must be completely intact; cracks and deformation are unacceptable. If there are no visible violations, it is recommended to completely renew the upper layers of the case.
What to pay attention to when remodeling a stove?
Stove-fireplace diagram.
When remodeling the furnace, it is necessary to perform the following preparatory steps:
- Checking and assessing the condition of the stove and chimney structure. This is done necessarily, since further safety of use depends on the quality. The chimney must have good permeability, since the fireplace simply will not work without draft. The cross-section must be no less than the size of one brick. Otherwise, the thrust will be very small, completely insufficient. Usually the chimney is immediately dismantled, after which a new one is installed in its place.
- The stove has a small firebox, which is not enough for a fireplace. This means that when carrying out reconstruction, the size of the firebox must be increased to the required size. You can install a glass door that will cover the firebox, ensuring the safety of using the structure. But this door is not mandatory; it does not need to be specially mounted.
- It is necessary to carefully inspect the body of the structure. If it is intact, there are no cracks, signs of deformation, or numerous falling bricks, then there is no need to disassemble it. It is better to decorate the surface of the case after all the work, making it more attractive.
Remodeling methods
There are several options for converting a stove into a fireplace.
The simplest method is updating, expanding the firebox with installing a door, without completely rebuilding the device. There will be no significant changes, however, it is better to clean the stove right away so that heating is more efficient.
For the greatest similarity with a fireplace, all that remains is to perform decorative cladding.
Only dry wood can be used for the firebox; coal is not suitable.
A more complex, expensive option is a major reconstruction of the furnace. The old stove is dismantled and a new fireplace is installed.
First, complete dismantling and assessment of the condition of the foundation are carried out. If necessary, add sand. The base is covered with waterproofing (roofing felt).
On a prepared base, fresh brickwork is created, eliminating the steps of checking other parts of the furnace, while simultaneously preventing possible negative consequences. A new structure that meets fireplace standards will function completely properly.
The outside is beautifully lined with natural material that is resistant to high temperatures.
Completion of work
The junction of the furnace and pipe must be equipped with a damper to regulate draft
Approaching the end of the masonry will mark 25-27 rows, which will smoothly transition to the pipe. Therefore, it is worth installing a valve in row 29, with the help of which the draft will be regulated. But it is worth noting that the oven can have more than 30 rows. History confirms the existence of furnaces, the passages of which extended to 4 and even 5 floors of the building. This unique situation arose because in Holland itself, similar stoves were installed to heat small, but still tall, buildings and structures. This is due to the fact that the Netherlands is a very small country in area, and local residents literally had to reclaim their lands from the elements.
Step-by-step instructions for remodeling
You need to draw up a diagram, which is better to order from a specialist. The specialist will carry out calculations to avoid errors and rework. It will be immediately established what materials and tools are needed for the work.
You will need fire-resistant bricks for the firebox and heat-resistant blocks. The material can be found in a hardware store, on the market, or ordered delivery through a reliable company.
For masonry you will need dry cement mortar, clay, a construction mixer, and a drill attachment.
The solution requires a large container and clean water. The mixture is applied with a trowel.
Rework
In order for the fireplace to be level, it is necessary to constantly monitor the installation using a building level, usually a plumb line.
The first fireplace row is placed on waterproofing with markings applied, applying the mortar downwards. After laying out, according to the rules of order, you need to lay the second tier with a shift of half, a third, a quarter of the brick. To make the rows even, the blocks must be cut evenly with a grinder.
The order of brickwork involves placing the bricks of each next row above the joint of the blocks of the previous tier.
Clay in the solution prevents the destruction of the structure; a mixture of sand and cement does not tolerate such loads. In combination with clay, a heat-resistant effect can be achieved.
To form a combustion chamber, you will need a dense sheet of refractory metal on which subsequent rows will be laid.
A frame is immediately installed under the future door, which is fixed with fire-resistant wire.
Dutch classic
Dutch ovens have two recognizable shapes: rectangular and round . Externally, the stove is made very simply - the brickwork also serves as a design element (as an option, you can also use tiles).
Inside, the Dutch oven is equipped with a blind firebox of impressive size and six smoke circulation channels located in such a sequence that the heated gases, entering those of them that are called lifting ones, cool slightly, heating the stove structure in parts. That is, schematically it happens like this :
- The flow of gases in the hottest state into the first lifting channel.
- Gases that have cooled slightly in the first channel enter the second channel.
- The gases that have cooled sufficiently in the first two passages enter the third channel.
This sequence allows the stove to warm up gradually and protects its surface from cracking and cracks that would certainly appear during instant heating.
As the gases rise and fall, they travel through all six revolutions, circulating heat .
When laying such a stove, it is imperative to adhere to parameters that absolutely do not correspond to the parameters of a bulky Russian stove. And the point is not so much in the elegance of the Dutch woman, but in the height of her firebox . It is located lower than a traditional Russian stove - 25 cm from the floor level. This height ensures uniform heating along the height of the room by shifting the level of the steam balls.
Dutch women used in everyday life are now usually divided into obsolete and modernized . Modernization consists of installing a steam heating system or a gas burner - and the good old stove begins to heat the house without firewood.
Facing
When the structure is completely dry, you can move on to decoration. There are different methods for cladding a fireplace; the material must be resistant to high heat.
Brick finish
Old brick can be given a more fresh, decorative look if treated correctly.
First, excess cement-clay mixture is removed from the seams and bricks with abrasive paper. It is necessary to treat the seams, for example, with a colored mixture, to give them a convex shape.
The bricks must be coated with heat-resistant paint. The final coating is a varnish that can withstand high heat.
Plaster coating
A simple finishing option is plaster. To perform the cladding, complex installation work is not required, as, for example, with tiles.
It is necessary to make the solution more durable; you can use salt or crushed fiberglass. To give the coating a tint, add lime paint.
Before you start plastering, the fireplace is heated until the outer surface becomes warm. The plaster is applied in layers, the first layer eliminates minor irregularities, the second is decorative.
The application thickness at each approach should not exceed 1 cm; you need to wait until the previous layer has completely dried.
Stone covering
An impressive finish can be made with artificial or natural stone. In both cases, environmentally friendly material will be used, the difference is in weight and density of raw materials.
Artificial material is much cheaper, you can make it yourself. The natural analogue is better due to its natural properties.
Natural raw materials are characterized by increased resistance to any changes in temperature, humidity, and mechanical damage, in contrast to artificially created materials.
The cladding is complex, and it is difficult to attach natural raw materials to ordinary mortar. It is recommended to consult a mason.
Dutchwoman with a stove
Although it was noted in this article that the classic Dutch stove structure does not provide a place for cooking, however, over time and taking into account everyday needs, some stove makers allow you to deviate from the specified standards and equip Dutch stoves with durable stoves, on the hot surface of which you can cook and the first, and the second, and the compote.
Why not? The Dutch oven's heating mode makes it possible to use this stove for culinary purposes, to pamper your home with truly stale dishes from the real heat , and not from a multicooker.
In order to provide yourself with a kitchen unit in addition to a heating unit, all you need to do is place a cast-iron stove above the firebox door (at a height of 3-5 rows) and decorate it a little with the same building material that you use in the masonry.
Laying a Dutch oven takes several hours; if you build in a stove, it will take 2-2.5 hours more. But you can feel the efficiency and functionality of such a stove-stove from the first days of the heating season.
You will find out which stones are best suited for a sauna stove by reading our article. And here we talk about brick stoves for baths.
Restoration and decoration
You can decorate the stove with the following materials:
- Heat-resistant tiles. This type of tile must be laid on a clean and level surface, using construction crosses for the seams. The tiles can be combined with various bas-relief edgings and frescoes. The advantages of the tile are obvious: it is easy to care for, and it also maintains a presentable appearance for a long time.
- Coating with enamel paint. The walls of the oven are covered with white paint, which reacts well to temperature changes. You can apply drawings to the main background with paints, using stencils, or paint the stove with aerosols. But it should be taken into account that when enamel paint is heated at first, it will emit an unpleasant odor, which will go away over time.
- Whitewash or lime. Add salt to the lime and water mixture to give the stove a snow-white shine and shine. Whitewash and lime are natural antiseptics that have a beneficial effect on human health and do not emit harmful substances.
Description of other popular types of fireplaces
Wood-burning fireplaces can be called a classic option, but there are other heating devices. They run on different fuels, their installation is simpler and takes a little time.
31645a5ab732723e3288a3142ba2e131.jpe 66abc9aa63ba679a7db6652699058198.jpe
In the store you can purchase ready-made fireplaces of the following types:
- Gas devices. Installing them is very simple, but to connect you need to invite a gas service specialist with special permission. In addition, written permission to install such a fireplace will be required.
- An electric fireplace can be installed not only in a private house, but also in a city apartment. You can choose a stationary model or a mobile device. Most stationary electric fireplaces are designed as a firebox with a beautifully designed portal. Fireplaces of this type are powered by mains power and do not require a chimney. Modern fireplaces are equipped with electronic panels, so to heat, switch or turn them off, just press the corresponding button on the remote control.
- Eco-fireplaces that use ethyl alcohol are gaining popularity. However, such fireplaces are not suitable for heating a room; they are purchased as a decorative element of the interior. They are designed to create comfort and a special atmosphere that can “warm the soul.”
- You can make a decorative home fireplace with your own hands from plasterboard sheets and a metal profile. There will be no fire or heat in such a fireplace, but in this case you can get decoration or a shelf for various accessories.
You can install or build a fireplace in your home with your own hands; the main thing is to choose the right model, learn how fireplaces are made, and also take care of fire and environmental safety.
Where can you see a Russian stove?
We will answer all your questions step by step. In our country, a huge part of the population lives far from civilization. In the 90s, there was a tendency for villages to die out. Young people left their parents' homes and went to the city in search of a better life. Many buildings remained simply abandoned.
Today, agriculture is gradually heading towards restoration, which means that personnel are being attracted and housing is being provided. Many families with personal transport purchase country houses and move into them while continuing to work in the city.
Most village houses were equipped with stove heating. In order to dismantle the stove, it is necessary to re-lay the floor covering and seal the hole in the roof under the chimney. Not everyone had the desire and opportunity for this, so the symbols of warmth and comfort in the home, sung in Russian fairy tales, still stand to this day.
Massive brick building
Gasification made it possible to install a burner in the stove and give the structure a second life. But the modern approach to reconstruction implies that it will be converted into a functional, stylish fireplace.
Detailed instructions and order
It is easier to build a fireplace with your own hands if you have a detailed description and photo of each installation stage. There are several stages that are followed during construction. Carrying out the work step by step, you can build a country stove-fireplace with your own hands.
Create a drawing
Regardless of the shape and configuration of the structure, the first thing they do is create a sketch and drawing of the future fireplace. Adhering to the scale on a piece of paper, draw the design, indicating all the elements of the device
It is important at this stage to choose the cladding. For example, if you plan to embroider the outer part, you will need red ceramic brick
And if the cladding will be done with tiles, then choose a more economical option.
What are frame houses and what are they made of?
Preparatory work
When installing a fireplace in a living room, cover all furniture and the floor with plastic wrap in advance. If the premises are not residential, then this is not done, but after construction work, they simply wash and clean everything thoroughly.
52654227f81b7b6fc0a54cf4c7e6e4a7.jpe
The next step is the construction of a foundation, on which the reliability of the structure depends. The foundation is made separate for the fireplace, rather than shared with the house. If the construction is being done in a residential building, then carefully remove the floor in the place where they plan to build a fireplace. It is made 6 cm larger than the structure itself.
They dig a hole 60 cm deep, fill it with 15 cm of crushed stone, fill it and form a base. The foundation is given 7 days to dry. Before building a fireplace, the bricks are first laid out dry without using mortar.
Note! During the process of laying bricks “dry”, each stone is numbered. This will allow you to build the fireplace faster.
Laying out the fireplace
As soon as the foundation has dried, lay out roofing material in two layers. For the first row of masonry, cement is added to the mortar in a ratio of 20% of the total volume of the mortar. The first brick row is laid edgewise. The equality of the diagonals is determined using a tape measure.
Continuous rows are built using a trowel. The chimney and firebox are built manually. The solution is applied to the middle of the brick. If there is excess solution, remove it with a damp cloth immediately before it dries.
After the foundation, a firebox is made. A grate is laid on the bottom, then rows of firebox are erected and the door of the fuel chamber is secured. To securely fix it, the door is placed on a metal mustache and laid between the rows. The blower is built on the fifth row.
The next step is the arch. Regardless of the design of the fireplace, steel corners are used when constructing the arch. Bricks are attached to them, and when facing they are hidden. When building an arch, the bricks are placed in a wedge.
Construction of a chimney
Whether smoke enters the room or not depends on a well-built chimney. If the smoke exhaust duct is round, then the draft is better, but if it is square, it is worse. The walls are made smooth so that soot does not form and smoke easily passes through the pipe. The chimney itself is made vertical, less often at an angle. In this case, the angle of inclination is no more than 30 °C. The size of the pipe depends on the size of the structure and the outlet channel. The minimum cross-section is 14x27 cm. A cap is installed at the top of the chimney, which protects it from precipitation and other parts.
Cladding works
If you build a regular or mini-fireplace with your own hands, then finish it with cladding. Decorate the outer part of the structure in several ways:
- Plaster. First, tighten the mesh and install U-shaped brackets. Drying oil is applied to protect against corrosion. The first layer of 5 mm plaster is applied to the warm wall. The second layer is applied after the first has dried. The thickness of the layer is made thicker than the previous one. The third layer is made with a thickness of up to 15 mm.
- Coloring. Use a chalk or glue solution.
- Drywall. It gives the fireplace a rectangular shape. First, a metal frame is made, and drywall is sewn onto it.
- Decoration.
Note! When painting the outer part of the fireplace white, it is recommended to add blue to the paint. Then the paint will be more snow-white.
806d9bee2ae82c964ba00b857b11994f.jpe
With the help of cladding, flaws that arose during the masonry process are hidden. If the work is done well, you don’t have to do any cladding.
Construction work
Since the masonry of the structure is done with wet bricks, it must be dried before lighting the fireplace. They do this for 6-7 days. Open the combustion door and ash chamber. Then the fireplace is lit to dry, but the temperature is not raised to maximum. During the second week, the structure is heated every day, without raising the temperature to the maximum.
With factory firebox
If there are metal stoves, then why not metal fireplaces? And they are. Fireplace inserts are made from complex alloys - organosilicon, composite and special. The processes occurring in the fireplace insert are simulated by special programs, which is why the efficiency of these heating devices is high and the complexity of installation is average. Another advantage is that you can connect a regular metal chimney.
Another nice point: the weight of the firebox is about 100 kg. If the finish weighs a little, you can place such a fireplace on a reinforced concrete slab. If you want natural stone, you will have to make a foundation for the fireplace.
When installing a fireplace with a firebox, you must comply with a number of requirements:
- the walls near which the heating device will be mounted must be covered with non-flammable materials and thermal insulation with a reflective layer;
- the distance from the firebox to the wall is at least 10 cm, to the insulation - less than 5 cm;
- The ash pan should facilitate cleaning, and its inlet should be located as close as possible to the firebox;
- the chimney must correspond to the parameters of the firebox;
- chimney joints are sealed with high-temperature sealant;
- the gap between the firebox wall and the lining must be at least 1 cm;
See the video for the principle and procedure for installing a fireplace insert.
Types of brick structures
Before you build a fireplace in your country house with your own hands, you need to choose its type. There are several types of contraction, which depend on the installation method:
- Built-in.
- Wall-mounted.
- Angular.
- Island.
The style and type of fireplace depends on the wishes of the home owner and on the area of the room in which the structure will be erected.
Built-in type
A fireplace for a dacha of this type is built immediately during the construction of a wall or column. If you make a built-in structure in an already built house, then the costs will be higher. Since you will have to make a hole in the wall for the chimney and portal.
Of all the types, it takes up the least space. The portal or firebox is chosen in accordance with the area of the room. This size is 70x60 or 80x70 cm. The portal itself is framed with masonry or brick. If the area of the room is small, up to 20, then the size is 60x50 cm.
Wall type
It is installed against a wall where the chimney can be built into the wall or partially protruding. It can be built in a house with ready renovation, since it does not require the destruction of a wall. It is considered one of the popular types. It takes up a lot of space, so it won’t be possible to build it in a small room. The cladding is made of stone, tiles, bricks or other similar materials.
Corner type
They are popular because they are conveniently located, do not take up much space, and there is a lot of free space in front of the fireplace. The chimney of the structure is mounted in one of the adjacent walls. The part that remains open is made of concrete or metal. The front part itself is plastered or covered with decorative brick or stone. This type of fireplace creates additional coziness in the house, since chairs can be placed in a semicircle near it.
What to consider when designing a house made of profiled timber
Island type
In this case, the structure is erected separately from the walls, in the center of the room. Then the heat spreads evenly throughout the room. Its feature is an open firebox. True, sometimes the open space is covered with glass. Island fireplaces look impressive, but take up a lot of space. Therefore, they are installed exclusively in large rooms. Then they do not block the light and look appropriate and neat.