Constructing a pipe box in the bathroom is the best way to disguise plumbing and sewerage systems. This design does not require the transfer of communications. During its production, a minimal amount of construction waste remains. If you have the appropriate skills, you can do all the work yourself.
It is very convenient to install a pipe box in the bathroom.
Advantages of hiding communications under a box
When decorating bathrooms, boxes are now often used to hide several or all pipes. Such elements not only allow you to create a beautiful design, but also have a number of advantages.
These include:
- Attractive appearance. When made from high-quality materials, a cabinet for masking pipes will not stand out against the general background or spoil the interior.
- Easy to assemble. The structure can be assembled not only at the rough finishing stage. Often pipes are sewn up during a bathroom refurbishment. Frame and sheathing elements can be installed on top of the cladding.
- Possibility of pipeline maintenance or repair. If the box is equipped with a hatch, you can find out the readings of metering devices and monitor the condition of the pipes. If necessary, water supply or sewerage elements are replaced.
- Possibility of combination with shelves, installations and other interior details. This allows you to effectively use the space of a small bathroom.
Recommendations
Installing a box in a bathroom requires caution and compliance with the following recommendations:
- Before installing the box, they check not only the tightness of the joints and the stability of the valves and meters, but also the correct functioning of communications, for example, a sufficient slope of the pipes.
- If the frame of the box is made of wooden beams, it is worth additionally impregnating it with a protective composition. The same procedure will be useful for wood boards.
- At the measurement stage, it is useful to take into account the location of household appliances in order to avoid unnecessary problems in the future.
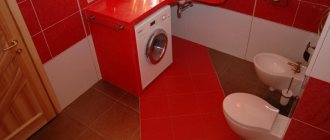
Toilet with a box system Source mykaleidoscope.ru
Options for materials for manufacturing the structure
When making a box in the bathroom, first install the frame. It is sheathed and then veneered. Galvanized profiles are used to construct the base.
Materials with the following properties are selected as coatings:
- Resistant to moisture. The structure is installed in a room with high humidity, so the material should not be destroyed when condensation forms.
- Small thickness, lightness. The ease of installation and the size of the finished box depend on these parameters. Walls that are too thick take up useful space.
- Environmental Safety. The material should not emit toxic or allergenic substances.
- Attractive appearance. The walls should be in harmony with the interior or allow for cladding with any materials.
Moisture-resistant drywall
Moisture-resistant drywall.
Standard gypsum boards are not suitable for decorating the interior of a bathroom or toilet. The moisture-resistant type of material is resistant to water. This type of drywall is distinguished by the green color of the sheets. It is suitable for creating rectangular, semicircular or polyhedral designs. The sheet is impregnated with an antifungal compound that protects against mold.
When choosing a material, you need to take into account its features, which include the following points:
- Installing sheets requires more steps than installing plastic or MDF panels.
- It is impossible to build a collapsible box from drywall. During manufacture, a hatch is provided that provides access to communication systems.
- GCRs are not considered a finishing material. After assembling the structure, cladding is required. Bathrooms are often tiled, but other finishing methods can be used: plastering, gluing waterproof wallpaper, painting.
Waterproof plywood
Waterproof plywood differs from simple plywood by its special impregnation . The sheet has a thickness of 6-40 mm. The material has good performance qualities. Despite the moisture resistance of plywood, it must be treated with hydrophobic compounds. The main disadvantage of the material is its high price, due to which it is rarely used.
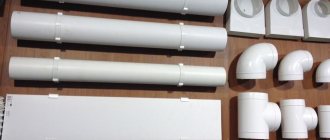
PVC plastic panels
A box made of plastic panels does not require additional finishing. The large number of colors offered allows you to choose products that are in harmony with the color scheme of the room.
In addition to good aesthetic qualities, the material has the following advantages:
- Resistant to moisture. The material does not deform when water drops enter or condensation settles.
- Long service life. Durable plastic does not lose its qualities for 5-7 years.
- Easy to care for. Remove dirt with a damp cloth or soap solution.
- Easy to install. A person who does not have construction skills and special equipment can work with the material.
- Acceptable price. PVC panels are a budget cladding product that helps reduce finishing costs.
- Possibility of repair. Damaged parts can be removed without destroying the entire structure.
- Compact sizes. Due to the small thickness of the panels, the box does not take up useful space in the bathroom.
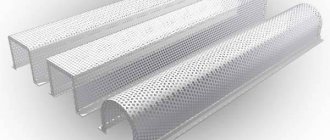
OSB boards
Oriented strand boards help quickly disguise the pipeline. They are multilayer sheets impregnated with resins, artificial wax and other substances.
There are several types of such material. To repair rooms with high humidity, sheets with additional impregnation are used. For a box made of OSB boards, a wooden frame is more suitable.
OSB boards.
MDF and HDF boards
Assembling a cabinet to mask pipes from MDF panels is not the most suitable option for a bathroom. The material quickly absorbs moisture, collapsing under its influence. HDF sheets have a higher density. They are resistant to moisture. Structures assembled from HDF panels last more than 10 years.
What to make a camouflage box from
With a successful choice of shape and material, the design of the box in the bathroom will become an organic (or, if necessary, spectacular) detail of the interior. Installation of the box is something like a small redevelopment, so the material is chosen based on the characteristics of the functioning of the pipes.
Popular materials include moisture-resistant plasterboard, PVC panels, decorative MDF board or moisture-resistant plywood. There is also an alternative to pipe insulation in the form of blinds or roller shutters.
Moisture-resistant drywall (GKLV)
There are several types of plasterboard sheets (GKL) on the market; A moisture-resistant type of material labeled GKLV is suitable for the bathroom. Sheets suitable for finishing plumbing units can be easily recognized by their characteristic green color. They are additionally impregnated with antifungal agents, which is a definite plus for wet rooms.
GKLV sheets are suitable both for creating standard rectangular shapes and for producing radius surfaces. True, to obtain a curved shape, special skills will be required.
Box with hatch made of gypsum boards Source stroyfora.ru
When choosing drywall, you must remember the following features:
- Plasterboard sheets weigh more than MDF boards or plastic panels, so installation will require more effort.
- Experts recommend additionally treating the slabs with a moisture-proofing compound. This will increase the structure’s resistance to moisture and extend its service life.
- A collapsible structure made of sheets will not work. Therefore, a hatch must be provided in the box, which will provide quick access to the meter and valves.
- If pipes with hot water (water supply or heating system) are hidden in the box, several holes are provided in the upper part of the structure. They will allow warm air to penetrate the room.
- Drywall is not a finishing material. It can be decorated with the same finish that was used for the bathroom walls, or you can choose a different material. Most often, the panels are sheathed with tiles, but other types of decoration are also used: moisture-resistant wallpaper, paint (preferably latex-based), decorative plaster.
Finishing with tiles Source berizon.ru
Plastic panels
Often the box is made of plastic panels. They have an attractive appearance and are available in a wide range of colors. You can always choose a shade that matches your bathroom design. In addition to aesthetics, plastic has the following undoubted advantages:
- The panels belong to budget finishing materials.
- They have a minimum thickness, so they do not hide the area; This is convenient for a small bathroom.
- PVC panels are waterproof and therefore easy to clean: just wipe the dirty surface with a damp cloth.
- Plastic is a durable material. It is quite flexible, durable and resistant to mechanical damage.
- Plastic panels are easy to install and, importantly, repair. The damaged part is replaced with a new one without destroying the structure.
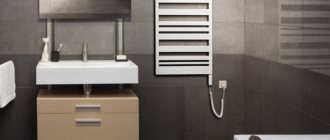
Design of a small bathroom with hidden pipes Source assets.kemmler.de
Waterproof plywood
In the manufacture of moisture-resistant varieties of plywood, special glue is used; They are also treated with a compound that increases moisture resistance. Materials with the following markings are suitable for the bathroom:
- FC (moisture resistant). The veneers are glued with urea glue, which allows the material to be used in interior decoration.
- FSF (high moisture resistance). Resin phenol-formaldehyde glue is used in production, so the material is characterized by high water resistance. Additional advantages are mechanical strength and special wear resistance. In residential premises, material with an emission class not exceeding E1 is used.
The main disadvantage of waterproof plywood is its high cost. For this reason, it is used less frequently than other materials.
Paint or wallpaper is suitable for finishing a plywood box Source bezkovrov.com
Wood boards
Popular materials in the construction industry: particle boards (chipboards), fibreboards (fibreboard or MDF) oriented strand OSB. They are often used to create a box, focusing on the relatively low cost.
The problem is that their technical properties are not designed for continuous use in a damp room. The surface tends to absorb water vapor, so the service life of wood boards in the bathroom does not exceed 10 years. To increase durability, the surface is painted or varnished.
Both wooden beams and metal profiles are suitable for the manufacture of a supporting structure; To fix the plates, use ordinary self-tapping screws. The finished box needs further finishing. If you used a laminated MDF board, you can refuse decoration.
MDF with tile imitation Source sense-life.com
Design selection
You can sew up pipes in the bathroom in different ways.
The most commonly used types of structures are:
- Cabinets. This option is suitable for hiding sewer risers or other vertical pipelines. The design provides full access to engineering systems. It can be equipped with shelves and other elements that allow you to make good use of the space.
- Partitions. They have the width and height of the room. Despite the fact that the area of the room is reduced, the bathroom looks neat. All engineering systems are hidden. This option is suitable for spacious combined bathrooms. The partition is installed when there is a wall-hung toilet; it hides not only the pipes, but also the installation. Behind the partition there are shelves for storing household chemicals.
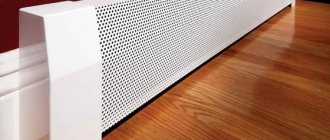
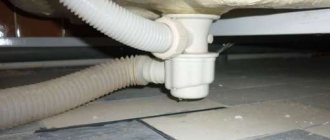
- Horizontal. Used to hide water supply or sewer lines laid close to the floor.
- Compact. Small structures are used exclusively to camouflage pipes. They do not take up useful space, giving the room a neat look. Compact boxes can be horizontal or vertical.
Types of designs
There are many ways to disguise unsightly communications. Making a box that simultaneously performs a protective and decorative function is the most sound solution. The task is implemented in different ways; The most common configurations are:
- In the form of a cabinet. It is chosen if it is necessary to hide a riser or other vertical system and leave free access to communications. Shelves help to rationally use the interior space.
- In the form of a partition. A convenient option for a large bathroom, all communications of which are located on one wall; Also suitable for wall-hung toilets. The pipes are separated by a wall-sized partition; The area of the room is slightly reduced. The bathroom looks neat, and behind the partition there is enough space to organize the storage of a variety of things.
- In a compact design. The box is constructed directly around the pipes. This option is used more often than others, as it does not clutter up the space, looks neat and is quickly made. Suitable for all types of systems, including those adjacent to the ceiling (floor).
Corner design with inspection hatch Source cleanipedia.com
Preparing to install a masking box
At the preparatory stage the following actions are performed:
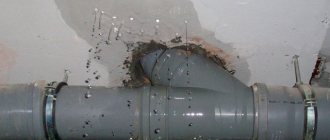
- Assess the condition of pipes, fittings, metering devices, and other communication elements. When laying a new pipeline, make as few connections as possible. All joints must be treated with sealant.
- Drawing up a diagram. You need to choose the option that is most suitable for the bathroom. They take the necessary measurements and make a drawing. At the same time, they provide for the presence of a hatch in the places where plumbing fixtures are installed - meters, valves.
- Calculation of the quantity of materials. Determine the dimensions of the future structure by counting the number of frame elements, sheathing and cladding.
Briefly about the main thing
The pipe box in the bathroom is an important component of the comfort and aesthetics of the room. It is made from materials that can resist fluctuations in temperature and humidity. More often than others, structures are built from plasterboard with ceramic tile cladding; options made from plastic panels are popular. There is growing interest in using roller shutters, but they do not fit into every design.
When choosing a suitable option, pay attention to the final cost of the project and its compliance with the dimensions of the room. Part of the design is an inspection hatch necessary for access to metering devices and fittings. They try to make it invisible, for which they use the same material as in the rest of the decoration.
Ratings 0
Required materials and tools
Construction knife.
After drawing up the project, they proceed to the purchase of the following materials and devices:
- construction knife with spare blades;
- roulette;
- building level;
- screwdriver with different attachments;
- scissors for cutting metal;
- fasteners (dowels, screws, self-tapping screws);
- drill;
- profiles made of stainless metal;
- sealing compound;
- sheathing sheets (plasterboard, chipboard or plastic panels);
- plastic skirting boards;
- tiles or other facing material.
Marking
Installation locations need to be marked. The first point is placed at a distance of at least 3 cm from the most protruding pipe. Using a level, draw a vertical line on the wall along which the first frame element will be installed. In the same way, mark the other surface and the places where horizontal pipes are sewn up. The wall should be of a size that allows only whole tiles to be laid out. This gives the structure a neat appearance and reduces the amount of remaining waste.
Frame construction
The frame is built like this:
- Install the guide, attaching it with dowels. The distance between fasteners is 0.2-0.3 m.
- Mount the guides on the floor and ceiling. This allows you to make the angle of the frame required for installing the rack. To ensure that the sharp parts of the structure lie in the same plane, the profile is attached to the ceiling at an angle of 90°. A plumb line is lowered from it and the location of the underside of the stand is marked. The latter is screwed to the horizontal guides with self-tapping screws.
- Install reinforcing elements. In this case, the location of future inspection holes or doors is taken into account.
- A profile is attached to the wall and floor, which determines the dimensions of the structure. Using jumpers, the front frame parts are installed. At the same time, the location of plumbing fixtures, sewer outlets, and meters is also taken into account.
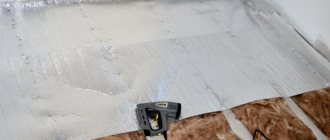
Finishing
It is necessary to properly prepare the box for lining.
They do it like this:
- Use a knife to stitch the joints between the sheets of drywall. The resulting gaps and corners are cleaned with abrasive paper.
- The cracks are filled with putty and glued with reinforcing tape. All corners of the box must be processed.
- After the solution has dried, the surfaces are primed, applying the composition in 2 layers.
The plasterboard box is decorated with tiles. The wrong side of the material is treated with glue, which is smoothed with a wavy spatula. The facing is applied to the surface and pressed. The remaining elements are installed in the same way. The seams of the tiled product are treated with grout. The corners are covered with additional elements of a suitable color.
How to make a plastic box with your own hands
A structure made of PVC panels is assembled if the room is sheathed with plastic. It does not require finishing.
Frame assembly
The base is assembled in the same way as when constructing a plasterboard box.
Plastic box for pipes.
To do this, perform the following actions:
- Fix the guides to the wall using dowels.
- An outer corner is formed, securing the profile with jumpers. All frame parts are fixed using metal screws.
If there is a large distance between the pipe and the wall, install a wooden shelf. The design includes an additional hatch. This allows you to use free space for storing household chemicals and equipment.
Frame covering
The frame is covered with simple PVC panels. The width of the strip is selected in accordance with the size of the structure.
Sewing is done like this:
- An initial profile is installed near the wall, and the edge of the lamella is inserted into it. The second edge of the product is attached to the jumpers with self-tapping screws.
- The next panel is joined to the previous one. The free edge is cut along the frame post. It is also secured with self-tapping screws.
.If some of the pipes cannot be masked, they are bypassed in this way:
- install a starting profile near the wall;
- holes are formed in the panel with a size equal to half the cross-section of the pipe;
- the panel is cut to width and inserted into the space behind the pipeline;
- in the next lamella the same cutout is made, the sheathing elements are connected to each other;
- the remaining gaps are filled with sealant.
The locations of the hatches are marked on the surfaces of the plastic panels.
Final stage
The assembly process ends with the installation of the hatch, which is carried out as follows:
- Use a jigsaw to cut holes. Install a tilting or rotating hatch of the appropriate size. The plastic product is fixed using sealant.
- Press the hatch to the surface and remove excess sealant. If the hatch does not have a handle, the fittings must be purchased separately.
- The outer corner is covered with a polymer plinth, which is secured with sealant. While the composition dries, the part is secured with masking tape.
Making the frame of the box
When installing the structure frame, follow the following instructions.
- On the walls adjacent to the corner, install guides (UD profiles) that will determine the dimensions of the box. Don't forget to use a level. To attach load-bearing profiles to the wall, use European screws and dowels. If the surface is tiled, you can take metal screws 2.5 centimeters long and 3.5 millimeters in diameter. They are screwed into the seams between the tiles.
Tip: To save space in the bathroom, install profiles closer to the pipes. The minimum distance is 3 centimeters.
- If the pipes run horizontally, place the profile parallel to the floor and secure it to it.
- Start forming the outer corner. Twist a corner post from two UD profiles. Direct their shelves in different directions at right angles and connect them with small screws - “fleas”.
USEFUL INFORMATION: Installing a socket with degree of protection IP44
- Cut the CD supporting profile into pieces, the length of which will correspond to the dimensions of the structure. Attach the corner stiffener to the wall. Insert the finished profile pieces with one end into the guide installed at the first stage, and the other into the stiffening rib. Thus, both parts of the corner are connected to the profile.
- Every 50 centimeters, add jumpers, which are necessary for the subsequent fastening of PVC panels.
- The second corner profile is attached in a similar way to another wall.
Installation of an invisible hatch
This hatch opens by pressing the middle part. The magnetic lock slides, releasing the door from the frame.
The hatch is constructed as follows:
- At the preparatory stage, the location of the part is marked. Most often, the hatch is installed in the middle part of the front wall of the box. This allows you to preserve the tile pattern.
- When installing the frame, a niche is formed, the parameters of which coincide with the dimensions of the hatch. The frame is secured with long self-tapping screws. This part is supplied with a door and fittings.
- The frame is sheathed with sheets of plasterboard, laid overlapping. The frame is also covered.
- Drywall is treated with a primer. After the composition has dried, the tiles are laid. The seams are covered with sealant and the structure is allowed to dry.
- Use a construction knife to cut through the hatch, holding the tool at an angle.
Collapsible tile box in the bathroom.
This time we want to share with you our experience of creating an easily dismountable box from plasterboard and tiles in the bathroom. As usual, during the previous major renovation of the bathroom, the riser pipes were efficiently and reliably hidden behind the brickwork, so that they would last for centuries. But nothing lasts forever under the sun, and plumbing pipes are especially perishable in conditions of capitalist water supply. And it's time to replace some of them. In general, the particularly strong structure had to be eliminated, freeing the riser for repair work. And then the question arose of how to restore the former beauty of the damaged premises so that it would not be very expensive and neat. At the same time, a desire was expressed to make something that could be easily dismantled or disassembled, so that the story of destruction would not repeat itself. A complete overhaul of the bathroom was rejected as impractical. The rest of the bathroom was not damaged and looked very attractive. After going through several options, we settled on the following: make a collapsible box from plasterboard and lay it out with tiles that match the design.
Collapsible box design
The box was made of moisture-resistant plasterboard and metal guides PN40x50. The design consists of three attached elements stacked on top of each other. Each section of the box is a corner element and is attached to the bathroom walls using regular hinges for hanging shelves. Self-tapping screws are screwed into the walls and there are counter holes in the guides. The box is hung with screws, but at the same time rests on the floor or lower section of the box. This fastening reliably holds the structure from moving. You can use metal corners on the inside of the box as an additional or main fastening. Access to them is provided through the hatch and from the outside when the upper section is removed. Handles are attached to the inside of the sections for ease of movement during installation.
Horizontal joints of sections are made along the seams of the tiles. It was not possible to save the old tiles when the previous box was destroyed, and only dark ones were in stock. It was used for the bottom of the box. For the middle and upper parts, a mosaic of a suitable color was purchased. Tiles and mosaics are glued to drywall using liquid nails. An opening hatch is mounted in the middle part for everyday access to valves and water meters. The design turned out to be not very light, but if it is necessary to provide access to the riser pipes, it can be disassembled and assembled by two people very quickly, which is exactly what was required. We left the seams between the sections unsealed; if desired, you can seal them with silicone or rubber sealant, because we plan to dismantle this structure only as a last resort.
Advice from professionals
Plumbers and builders give the following recommendations for masking pipes:
- When hiding the risers, markings begin from the floor.
- Installing a door or forming an inspection hole is mandatory.
- Any material used for cladding is impregnated with an antifungal solution. This will prevent mold from forming.
- Wooden structures are not recommended for installation in the bathroom. This frame is suitable for a toilet.
- The cabinet for pipes cannot be assembled from chipboard, which absorbs moisture. The material swells and begins to crumble.
- Vertical parts are installed at a distance of no more than 30 cm. This gives the structure rigidity.
- Closely located pipes are not sutured separately. It is recommended to build a single structure.
The walls should not come into contact with communications. The minimum distance is 3 cm.