Where to start fixing a leak
Standard situation - it was discovered that a pipe is leaking: what to do in such cases? The first step is to determine exactly where the pipe is leaking. If a sink, washbasin or bathtub drain is leaking, the cause of this phenomenon is usually a poor-quality connection of the drain hole, siphon and entrance to the pipe.
In this case, to fix the problem, you will need to tighten all the threaded connections through which the sewer pipe flows. Sometimes it helps to replace the gaskets at these joints.
If a pipe leaks at the connection
Using the caulking method for cast iron pipelines
If leaks are detected at the junction of cast-iron sewer pipes, you should prepare for a rather complex procedure for eliminating the problem (read: “How to repair a crack in a cast-iron sewer pipe - reliable and proven methods”). In this case, much depends on the quality of the docking work.
If caulking is carried out with lead, the procedure is as follows:
- Clean the joint area until clean metal appears.
- Caulk the gap using lead cones. This is done with a blunt chisel, since in this case it is quite easy to seal the gap with soft lead.
What to do if the pipe in the toilet is leaking:
- Clean the joint from the old mortar using a narrow chisel and hammer. You need to act carefully so as not to damage the pipe.
- After removing the old seal, the gap must be thoroughly cleaned.
- For new driving, use tarred strands and an aqueous solution of cement in a ratio of 10:1 to water. Before driving, the strands are treated with a special substance, which includes cement and asbestos in a ratio of 7:3. While kneading, add a little water: the finished solution should be like plasticine.
What to do if a pipe is leaking in the bathroom - ways to eliminate leaks
Pipe leaks accompany their operation from time to time: most often, the causes of such phenomena are corrosion or deformation. Thanks to the use of polypropylene, polyethylene and metal-plastic pipes, the problem of corrosion was solved, but the threat of mechanical damage remains relevant in this case.
Where to start fixing a leak
Standard situation - it was discovered that a pipe is leaking: what to do in such cases? The first step is to determine exactly where the pipe is leaking. If a sink, washbasin or bathtub drain is leaking, the cause of this phenomenon is usually a poor-quality connection of the drain hole, siphon and entrance to the pipe.
In this case, to fix the problem, you will need to tighten all the threaded connections through which the sewer pipe flows. Sometimes it helps to replace the gaskets at these joints.
If a pipe leaks at the connection
Using the caulking method for cast iron pipelines
If leaks are detected at the junction of cast-iron sewer pipes, you should prepare for a rather complex procedure for eliminating the problem (read: “How to repair a crack in a cast-iron sewer pipe - reliable and proven methods”). In this case, much depends on the quality of the docking work.
If caulking is carried out with lead, the procedure is as follows:
- Clean the joint area until clean metal appears.
- Caulk the gap using lead cones. This is done with a blunt chisel, since in this case it is quite easy to seal the gap with soft lead.
What to do if the pipe in the toilet is leaking:
- Clean the joint from the old mortar using a narrow chisel and hammer. You need to act carefully so as not to damage the pipe.
- After removing the old seal, the gap must be thoroughly cleaned.
- For new driving, use tarred strands and an aqueous solution of cement in a ratio of 10:1 to water. Before driving, the strands are treated with a special substance, which includes cement and asbestos in a ratio of 7:3. While kneading, add a little water: the finished solution should be like plasticine.
Repairing leaks at pipe joints using cement
What to do if a pipe is leaking, and the only possible materials available are cement?
In such a situation, work is carried out as follows:
- The pipe junction area is cleaned, with the obligatory removal of the old seal. To avoid damaging the pipes, it is better to refrain from using heavy tools.
- Next, you need to get a wide gauze bandage. Cement is mixed with water to form a slurry. A bandage is immersed in the resulting solution.
- The same cement mortar is used to treat the joint between the pipes, and then wrap a bandage there.
- The hardening of the seal usually lasts for two hours, after which it can be sanded and painted.
In cases where a leak was detected directly on the pipe body, a completely different algorithm of actions will be required.
Installing the bandage
If a pipe in the bathroom is leaking, a temporary solution to the problem is to install a bandage. Before this, you need to determine what type of damage you will have to deal with (fistula or leakage), and where exactly it is located.
The rubber band is applied as follows:
- A rubber gasket is installed in the emergency section of the pipe.
- After pressing tightly to the pipe, fixation with a clamp is applied.
You can easily purchase a clamp in a store, but it happens that you don’t have it at hand at the right time. In this case, you can make the clamp yourself, or use wire, a harness, rope or hose instead.
Repairing leaks at pipe joints using cement
What to do if a pipe is leaking, and the only possible materials available are cement?
In such a situation, work is carried out as follows:
- The pipe junction area is cleaned, with the obligatory removal of the old seal. To avoid damaging the pipes, it is better to refrain from using heavy tools.
- Next, you need to get a wide gauze bandage. Cement is mixed with water to form a slurry. A bandage is immersed in the resulting solution.
- The same cement mortar is used to treat the joint between the pipes, and then wrap a bandage there.
- The hardening of the seal usually lasts for two hours, after which it can be sanded and painted.
In cases where a leak was detected directly on the pipe body, a completely different algorithm of actions will be required.
Elimination of minor defects in cast iron pipes
Connection diagram for cast iron pipes.
It also happens that a defect has formed on a still normal cast iron pipe. But you don’t want to change your only pipe to plastic yet or you don’t have enough money for it. There is also a good way out of this situation. But it only works in cases where a minor defect has formed on the cast-iron riser (the so-called small “fistula”) and water only flows slightly under the bathtub without flowing out in a stream. Of course, in this case you can use an ordinary clamp. But if you think about it, by and large it is not really needed here. You can eliminate the defect in a simpler way, using ordinary cement.
To do this, first turn off the water and wipe the pipe. Then take sandpaper and thoroughly clean the defect area. Use a rag to remove dust and lightly wet the surface. Take a small handful of dry cement and place it on the leaking pipe. Once the cement is wet, apply a little more. Do this until the cement stops getting wet. Due to the fact that cement adheres well to the metal, the defect site will be completely healed and will not leak.
If the problem is more serious and not a fistula, but a crack has formed on the cast iron pipe, then you need to make a gasket from a bandage and cement. Alternate layers of bandage and cement, going around in a circle about three times. This makes it more reliable to hold the metal together. It should be noted that eliminating a defect on a metal pipe in a bathroom using cement requires waiting about three days, during which the cement will set. Only then can you use the riser.
Article on the topic: Modern technology for assembling a log house from rounded logs
The next way to prevent a metal pipe from leaking is to wrap it with a rubber band. You will need either a medical tourniquet or elastic rubber from a bicycle inner tube. Then you simply wrap the leak area with this bundle and secure everything with wire. For greater reliability, it is recommended to wrap the problem area with a bandage on top and paint it with oil paint. But if the pipe flows very close to the bathtub itself, this method will not work.
Installing the bandage
If a pipe in the bathroom is leaking, a temporary solution to the problem is to install a bandage. Before this, you need to determine what type of damage you will have to deal with (fistula or leakage), and where exactly it is located.
The rubber band is applied as follows:
- A rubber gasket is installed in the emergency section of the pipe.
- After pressing tightly to the pipe, fixation with a clamp is applied.
You can easily purchase a clamp in a store, but it happens that you don’t have it at hand at the right time. In this case, you can make the clamp yourself, or use wire, a harness, rope or hose instead.
The bandage rubber can be an old rubber boot, from which the boot is cut off. The same goes for a rubber hose and a bicycle tube. The width of the bandage is made depending on the diameter of the pipe being repaired.
Temporarily fixing a weak leak with your own hands
It also happens when the cause of a pipe leak in the bathroom is not so terrible and serious, so there is no particular need to change the pipe. Then you can try to fix the problem on your own. There are two solutions for this: cold welding or bandage.
Option one - cold welding
Scheme of cold welding of pipes.
Now on sale there is a very useful substance in everyday life called cold welding. Such welding, without much effort or skill, can very reliably bond together materials such as metal, glass, plastic, wood and others. Cold welding is perfect when the pipe under the bathtub does not flow much, but only oozes.
Before performing such welding, turn off the water and put rubber gloves on your hands. Then thoroughly clean the area where the pipe is damaged, thereby freeing it from dust and dirt. Wipe the pipe dry and thoroughly degrease the surface with acetone or alcohol. After this, remove the welding material (the so-called punches) from the packaging and press it as hard as possible to the place where the pipe is deformed. It is best if a man does this. Within about 20 minutes the weld will set and the surface will be restored. All you have to do is wait a little and cover it with paint.
Option two - clamps and bandages
Another equally good way to eradicate the problem of pipe leakage with your own hands is a clamp or bandage. A clamp is used when you need to stop a water leak in a pipe for a while (usually for several days). The bandage is used in the same cases, as well as when condensation constantly collects on the pipe.
To repair a pipe using a clamp, you will need a regular metal clamp, which can be bought inexpensively on the market or at any hardware store, and a piece of rubber that will serve as a gasket. Moreover, the piece of rubber should be approximately 2 times larger than the damaged area. If the problem needs to be solved urgently, you can use ordinary wire instead of a clamp. Turn off the water. Clean the damaged area on the pipe and wipe dry. After this, press the rubber firmly against the damaged area and secure it as tightly as possible with a clamp or wire.
Related article: Bathroom interior in a panel house
Scheme of fastening a metal clamp.
To install a bandage on a pipe under the bathtub, you must first purchase it. There are many pipe bands on sale now. Please note that it must be the right size and made of waterproof material. The best option is made of fiberglass. Typically, bandages are selected according to the diameter of the pipe. But its width should be about 7 cm larger than the damaged area. In this case, the bandage has a longitudinal cutout, with which it is put on the pipe.
Before installing the bandage, turn off the water valve, wipe the pipe dry and, if necessary, clean its surface. Coat the inside of the pipe and bandage with epoxy resin or special waterproof glue. Carefully place the bandage on the pipe and secure it very firmly with a metal clamp. Depending on the width of the damaged area on the pipe, you can use two or even three clamps instead of one. This is necessary for greater reliability. After two days, when the glue or resin has completely dried and set, you can open the valve and use the bathroom.
Using a wooden wedge in the bathroom
There are situations when a high-pressure leak occurs, but there is no possibility of shutting off the water: how can you prevent the pipe from leaking? A bandage usually doesn’t help in such a situation either.
If the leak is caused by a fistula, it can be eliminated using a small wooden peg in the form of a wedge. The size of its tip is made the same as the resulting hole in the pipeline.
The peg with its sharp end is inserted into the fistula, after which it is hammered in with a hammer. This temporary measure allows you to gain time needed to call emergency services.
If a metal pipe is leaking
It often happens that a pipe in the bathroom leaks: what should you do to avoid flooding the apartment and the neighbors below?
In this case, proceed as follows:
- The first step is to shut off the water supply.
- Cut off the damaged section of the pipeline using a hacksaw or grinder. The cut is made with an indentation of 30 cm in both directions.
- Unscrew the threaded connection of the pipeline adjacent to the damage site.
- Threading is carried out on the cut off fixed end of the pipe. It is convenient to use a gas wrench to hold the end of the pipe.
- The coupling is screwed onto the threaded end.
- A measurement is made of how long the new pipe should be, taking into account the threaded section.
- To make the insert, use a pipe of exactly the same diameter as the old one. The manufactured segment must be equipped with threads at both ends.
- To connect the new section to the pipeline, a coupling is used, which can be held using a pipe wrench.
Before screwing on the coupling, it is necessary to seal the threaded sections of the section using flax, sealing putty, or a special tape-fuser. In addition to repairing metal pipelines, leaks on pipes made of other materials can be repaired in the same way. If it is not clear what to do if a pipe is leaking, it is best to turn to professional plumbers for help.
Source
Initial emergency measures
Typically, pipes, especially plastic ones, do not become unusable on their own. They do not burst, rot or crack. However, if you installed them a long time ago or the installation was done poorly, they may begin to systematically leak. The best option, of course, would be to replace the pipe and the adjacent wiring. But not everyone can afford it, and you can’t do it instantly. But you still have to stop the leak. Let us then consider the first steps to take when dealing with this problem.
First, you need to completely turn off the water valve. If you live in an old Khrushchev building, which is now a very rare occurrence, then you will have to turn off the water in the entire house. Usually the valves in this case are in the basement, and you can’t just get to them, but you can easily flood your neighbors during this time. It’s very good that now almost all apartments have their own valves that can be closed without difficulty.
Scheme of laying internal sewerage.
It is necessary to turn off cold water and hot water too, just in case. Moreover, this needs to be done as quickly as possible. This is why it is so important that access to the valves is always free. And if you are already planning to change the pipes, make sure that the valves are installed in the toilet near the toilet. This will ensure easy and quick access to them at all times.
If you turn off the valves and the water stops flowing, this is a good sign. This means that the pipe is damaged up to the valve. Now all that remains is to call a plumber and transfer the solution to the problem into his experienced hands.
But there are also cases when a pipe flows under the bathtub in a place where shutting off the valve may not produce any results. A clear sign: water continues to flow even after shutting off. In this case, you must immediately call the emergency service! In the meantime, you are waiting for its arrival, you need to place some kind of container under the leak so that all the water collects in it.
Another option is to temporarily stop the water leak by tying off the pipe with a rag. But the container will still have to be substituted. You can also tie the pipe with tape as tightly as possible. To make the fabric or tape hold more securely, you can sprinkle a little table salt on their surface before wrapping. Any puddles under the bathtub that have formed as a result of a leaking pipe must be wiped up quickly with rags, so as not to flood the neighbors and not create even more problems.
Related article: How to install a street switch yourself?
How to fix a leaking pipe in the bathroom
Water supply pipes experience regular hydraulic and corrosion stress. Metal defects, cracks in plastic and loose joints can allow water to enter the room.
To avoid flooding your neighbors, you need to know why a bathroom pipe may be leaking, what to do if this problem occurs, and how to detect it in the early stages.
How to seal a leaking pipe
Sometimes it is not possible to cope with the problem, especially if the leaks are significant or an accident threatens to flood neighbors on the lower floors. Before the emergency team arrives, a number of repair measures can be carried out.
So, what to do if a pipe is leaking:
- Place the bandage on the problem area. If there is a fistula in the pipeline, take any rubber gasket you can find around the house (for example, a piece of rubber boot, a hose, a thick glove, or a piece of a bicycle tire). Wrap the bandage tightly and secure the ends with a tourniquet or clamp of a suitable size;
- Hammer a wooden peg with a slightly larger diameter into the resulting fistula. Take a piece of wood of the appropriate size and cut the desired piece. Grind the edges around the entire perimeter so that you get a conical shaped stake. Hammer it into the hole until it stops.
Don't know what to do if your bathroom pipe is leaking badly? No need to take risks. Contact a plumber for help. We will arrive to your call within an hour with a full repair kit and quickly eliminate any accident. Call the phone number or write an e-mail.
Causes of leaks in pipes
A water pipe break can happen for the following reasons:
- pitting corrosion due to defects and structural inhomogeneities in the metal pipe;
- pressure drops in the cold and hot water supply system (CW, DHW);
- long-term operation without replacing worn areas;
- damage to the thread during repair or assembly;
- oxidation or breakdown of reinforcement, aging and cracking of elastic gaskets;
- improper installation of the cold water, hot water or sewage system;
- depressurization of joints;
- mixer breakdown;
- weak tightening of nuts on connections;
- a sharp shift of the shell, creating a lateral load on the siphon.
The cause of the leak affects its location, intensity and difficulty of detection.
For example, if the gasket is defective, the joint between the drain and the siphon under the bathtub may leak only when the bowl is filled, since increased pressure is created on the weak point.
How to determine the location of a leak
The following signs may indicate a pipeline leak:
- unpleasant smell in the bathroom (mold, musty or sewage);
- reduction in water pressure;
- wet surface of metal or plastic, even if the faucets have not been used for several hours;
- the sound of falling drops (with a dry tap);
- moisture on the floor (for example, after draining, taking a bath, etc.).
If you suspect a leak, you should first check the most vulnerable areas.
These include:
- threaded connections;
- contact areas with a gasket or a layer of sealant;
- branch insertion points;
- welding seams;
- straight loaded sections of pipes.
Required Preparation and Tools
To fix a leak, you will need the following tools and materials:
- an adjustable wrench for loosening tight connections;
- new siphon or fittings;
- clamp;
- degreaser (white spirit, or nefras);
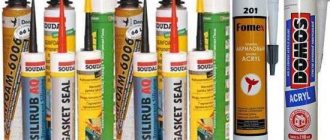
- sealant, if necessary - epoxy glue, cold welding;
- plumber's tape or tow (for leaking metal threads);
- liquid soap for lubricating gaskets;
- a bucket and dry rags to collect liquid.
To replace the section, you will need a grinder or a metal saw, a coupling and a new pipe 40-50 cm longer than the cut one.
Before you begin the repair, you need to perform several steps:
- Determine the location of the leak and, if possible, determine the cause of its occurrence. This will prevent problems during subsequent use.
- Shut off the water supply. If a leak is observed at the point of supply to the plumbing, then you can turn off the valve in 1 area. Otherwise, you will have to turn off the water in the apartment or throughout the riser. In the presence of cold water and domestic hot water, both supply valves are closed.
- If you couldn’t quickly turn off the water, wrap a section of pipe with a rag and lower its end into a wide basin. It is possible to repair a leak without draining the water only if the cause is minor corrosion damage.
- Disassemble the connection if necessary for repairs. Clean the siphon and adjacent pipes.
- If connections leak, check the threads and nut for cracks and replace the rubber gasket.
- Dry and degrease the repair area. Dirt and grease impair the adhesion of sealants, so the new connection will not be strong. When assembling plastic parts, do not use strong solvents, acids or acetone.
If the location of the damage is close to the common apartment valve (for example, near the meter), then after shutting off the hot water supply and hot water supply, you need to check whether the leak has stopped.
If liquid continues to collect on the pipe, then the entire riser must be disconnected for repair.
Our gallery of works
How we fix leaks
Leaks in pipes can occur both in straight sections and at corner or threaded connections. Depending on this, and on the type of equipment used: materials of manufacture, wall thickness and other parameters, various methods of eliminating them are used.
To quickly repair a small fistula on a straight section of communications or in a radiator, cold welding is used. To do this, the water supply to the area is shut off, the pipes are cleaned of insulation, paint and rust, after which they are degreased and dried. The composition is mixed in the required proportion and applied to the pipe along its entire diameter. After 3-4 hours, start-up work is carried out. Electric-gas welding is more often used at pipe joints, but if a large leak occurs or equipment is seriously worn out, it is better to replace a section of the line. This way you can not only save on future repairs, but also extend the life of the pipeline.
Emergency measures to eliminate leaks
You can quickly eliminate a leak using clamps, sealants, bandages and cementing the defect site. If water drips from the joint, you can try tightening the nut before disassembling.
Bandage and clamps
A plumbing clamp is a crimped metal ring that wraps around the damaged area of the pipe and is tightened with screws. The diameter of the part must match the pipe.
To stop the leak, you need to compress the defect area with a rubber seal (bandage), put on a clamp, adjust its position and firmly tighten the fasteners on the sides.
In most cases, it is applied temporarily to restore water supply in a house or apartment. A damaged pipe requires replacement or repair.
If there is no clamp, you can tighten the seal using wire; instead of a special plumbing bandage, use a piece of a bicycle inner tube or any soft rubber.
Folk method: self-tapping screw
It is recommended to use self-tapping screws only for holes and cracks whose size does not exceed 1-4 mm. It allows you to eliminate leaks under pressure if it is not possible to completely turn off the water supply.
For repairs, you will need a galvanized fastener and a press washer. Using a hand drill, a self-tapping screw is screwed into the leak site, wedging it in and tightly fixing it in the hole. To increase efficiency, you can place a thin elastic spacer under the washer.
The method is suitable for temporary repairs of cold water and sewage systems. The presence of an obstacle inside can lead to clogging of the pipe, so you need to replace the damaged section as quickly as possible.
Cold Welding Tools
Cold Weld adhesive contains epoxy resins, a hardener and reinforcing particles that consist of metal or ceramic. The composition is used to repair water supply systems with pitting corrosion or a crack in a straight section.
How to use Cold Welding:
- turn off the water supply to the apartment and wait until it dries;
- put on gloves;
- carefully remove rust and paint from the pipe (processing with sandpaper should be local, since removing a large layer of oxides can lead to the appearance of new fistulas);
- Apply glue thickly to the damaged area, wait for it to dry according to the instructions (to speed up polymerization, you can warm it up with a hair dryer).
To repair sewer plastic pipes, you can use the patch method. An additional section with a margin covers the damage, and is attached with polyurethane sealant or “Cold Welding”.
To repair, you need to cut a patch from a pipe of the same diameter, apply glue to both surfaces, press tightly and wrap it with tape or a bandage. After polymerization, the additional screed is removed.
How to eliminate a leak in a pipe: malfunctions of systems and products made of various materials
Depending on the location of the damage and the material from which the system or its individual parts are made, there are also the following ways to eliminate them:
Seal a leak in the heating battery (radiator)
- The main battery malfunctions are divided into the following types: formation of cracks in the case. Such damage can be repaired using cold welding (an adhesive consisting of two components prepared on the basis of epoxy resin). This glue is highly resistant to high temperatures and humidity. Before starting to apply it, you must turn off the system from the water supply and clean the surface using sandpaper or a file.
- the malfunction is caused by poor sealing of the seams between the individual sections. In most cases, to solve the problem, you will have to replace the entire radiator, or a separate section of it (for multi-section collapsible batteries). But to urgently repair the damage, you can use the following method. Available tools will require alabaster, cement, water, medical bandage or gauze. Alabaster, cement and water are mixed in any container until thick. Then strips of bandage or gauze are dipped into the resulting mixture and applied to the damage in several layers (from 2). The radiator can be used only after the pad has completely dried.
- The leak occurs at the junction of the radiator and the pipeline. This problem is most often caused by poor installation of the product. During battery operation, the vulnerable spot is subjected to heavy load and, as a result, a leak occurs. Such a malfunction can be eliminated using a rubber gasket and a clamp (or regular wire). The gasket can be made from a piece of a car inner tube. The overlay is cut out with a “spare” and wrapped around the damaged area. Then it is tightened with a clamp or wire (using pliers).
How to fix a leak in a plastic pipe
- To eliminate leaks on polymer pipes, there are methods similar to methods for eliminating leaks on products made from other materials: a common way to eliminate damage on a straight section of a pipe is to apply a rubber band or a similar “tightening” material. Such a gasket is attached to the pipe using metal clamps (which may already contain a rubber gasket), plastic ties or wire.
- Very small cracks and leaks in a straight section can be solved by wrapping regular electrical tape in 4-5 layers. It is important to take into account that each subsequent turn should overlap the previous one by 2-3 mm.
- Also, a very small leak (droplet type) can be solved by applying oil paint to a previously cleaned and degreased surface. It is worth remembering that this method will most likely eliminate the problem for a short period of time, and in the future it will make itself felt.
- Various chemical compounds can help eliminate leaks on straight sections of plastic pipes, bends and joints. These can be various sealants, cold welding (epoxy-based glue), silicone-based adhesives. The main rule that must be followed is that the composition must be applied to a completely dry, cleaned (using a file or sandpaper) and degreased (acetone and other solvents) surface. When using chemically active substances, you should wear gloves and carefully read the instructions for their use.
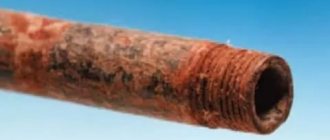
How to fix a leak in a cast iron pipe
- To troubleshoot straight sections of cast iron pipes and at their joints, the following methods are usually used: for the work you will need a cement mortar (10:1 - 10 parts cement to 1 part water), a bandage or gauze. The first step is to clean the damaged area with a file or grinder. Then a bandage is dipped into the prepared cement solution and wrapped around the damaged area in 3-4 layers. Next, the remaining thick cement mixture is either compacted into the joint between the pipes (in case of damage at the pipe connection), or smeared over the surface of a bandage or gauze (in case of damage in a straight section)
- A good emergency solution would be to apply a rubber gasket to the fault and secure it with metal clamps.
How to fix a leak in a faucet
- Any mixer is a sealed device with a cavity inside. The main reason for a leaking faucet is the depressurization of its individual elements. Depending on what caused the leak, there are certain methods for eliminating the leak: quite often the cause of water leaks is small debris caught between the moving elements of the faucet. In this case, regular cleaning will help.
- The next common cause of faucet malfunction is the wear of rubber gaskets in its individual parts. In this case, it is necessary to determine the location of the fluid leak, disassemble the tap as much as possible, visually inspect and clean the gaskets. If the gaskets are very worn, even to the naked eye, they must be replaced.
- The main advice when a leak occurs in the mixer is to check the wear of the O-rings and gaskets in its individual parts and “scroll” all the screwed parts to the limit, thereby ensuring its complete tightness. If this does not help, you will most likely have to completely replace the faucet.
Before starting work, you should correctly assess the resulting damage in order to most effectively apply one or another method of repairing it.
Other ways to fix a leak
In addition to the main sections of the pipeline, joints, siphons, and junction points of faucets and valves can leak in the bathroom. The repair method depends on the location of the breakdown.
Sealing joints
If the joint begins to leak water, the problem may be a loss of elasticity of the gasket, damage to the sealing layer, or cracking of parts near the joint.
What to do if there is a leak:
- Shut off and drain the water.
- Disassemble the connection. Wash and dry parts. Check them for cracks.
- Degrease the surface, apply a layer of silicone or polyurethane (depending on the type of sealant) to one or both surfaces.
- Leave it in the air according to the instructions, and then assemble the joint, pressing the parts tightly together. If gaskets are used in the connection, then during repairs you need to replace them with new ones.
To repair metal joints, it is recommended to use neutral rather than acidic sealants.
Replacing a damaged siphon
If the glass cracks or the siphon thread is damaged, the entire part must be replaced. Signs of failure are the characteristic location of the leak and the passage of liquid during test filling with water.
For repairs, the entire drain and overflow system of a bathtub or sink is disassembled, the joints are treated with sealant, and during assembly all adjacent gaskets are replaced.
Working with plastic pipes
Defects in plastic pipes are eliminated by applying a coupling, replacing a section or soldering. If a leak occurs again in the same place, the cause of the breakdown may be errors in the design of the system or too high operating pressure in the area.
If the valve leaks
A leak in the valve area can be caused by a loose thread, a problem with the mechanism itself, or a crack in the nut or connection. To eliminate the breakdown, it may be necessary to tighten the fasteners, seal them with fum tape, or replace the faucet or section of pipe.
Banding of fistulas
Banding is performed by wrapping it with a rubber seal. The insulating layer is secured with a clamp or wire. This method is used primarily for cold water systems.
Connections to mixers
For leaks around faucets, the following repair methods are used:
- faucet replacement;
- installing a new gasket, sealing the joint near the wall;
- cleaning or replacing the mixer cartridge;
- fixing the tap in place.
After eliminating the leak, you need to check the repaired area. If the problem was observed in the drainage area, siphon or pipe adjacent to the plumbing, then draw a full sink or bathtub of water to control.
If you find a leak in another area, you can wrap the repair area in toilet paper and use the faucet. Soaked absorbent indicates ineffective repair.
How to repair damage to pipes
Water in the bathroom may be due to a hole in the water pipe. In plastic products, the cause of the problem may be a violation of production technologies or a long service life. Metal pipes are more susceptible to corrosion and rotting, which eventually destroys their integrity.
If water is leaking from a pipe under the bathtub, the first step is to shut it off. In most cases, this can be done using valves installed in each apartment. After this, you should call a plumber.
If after shutting off the water flow does not stop, you must call the emergency service. To avoid disturbing your neighbors, you need to place a container under the leaking pipe. And wrap the damaged area with cloth.
The second method is to install clamps and bandages. The first device allows you to temporarily stop the leak, and the second gets rid of condensation on the pipe. To fix and seal the metal element, an additional rubber gasket, as well as a coil of clamp or wire, are purchased.
Bathroom rod - tips on the correct selection, installation and adjustment of modern rods (100 photos)Glass for the bathroom: advantages of use, main disadvantages and recommendations for choosing glass elements for the bathroom (125 photos)
Designer furniture in the interior: features of choice, photos of new products, ideas for placement