Types of heaters
According to the energy source they are:
- electrical;
- gas;
- using solid or liquid fuel;
- indirect heating from heating boilers or central heating.
According to the method of heating water, they are divided into:
- accumulative;
- flow-through.
The storage device is more bulky because it has a tank for heating water, which requires a large area for installation.
Flow-through models, when turned on, immediately heat a small volume of water and take up little space. Consumers receive hot water immediately when the tap is opened, since the water passing through them is heated without delay. Their features include temperature limitation and high energy consumption.
Flow models are divided into:
- non-pressure, installed on a faucet or shower and capable of serving only one water point;
- pressure, serving several water points.
If hot water is temporarily turned off, the best option would be to install a flow-through electric device.
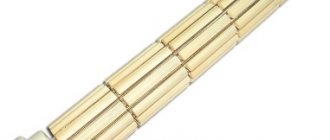
The operation of such devices is based on heating due to heating elements - copper tubes with an internal spiral. When using, you need to remember that they should be turned on only if there is water in them, otherwise the heating element will burn out. Turn them off in reverse order.
When choosing a location for a non-pressure option, installation in the bathroom is advisable. The water pressure will not be too strong, but it will be enough to wash yourself.
Criteria for choosing a water heater
The main parameter of the device is energy consumption. This determines how much electricity it will use and how hot the water will be. For an apartment during seasonal outages, devices of 3-7 kW are suitable. They connect to a 220 V household outlet. For a private home or industrial premises, it is better to buy a unit from 18 kW, it operates from a 380 V network.
An instantaneous water heater does not impose restrictions on the volume of heated water.
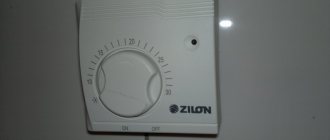
According to the control method, water heaters are divided into electronic and hydraulic. The first ones are regulated by microcontrollers, all parameters are precisely adjusted. Their disadvantage is their high price. Hydraulics switch modes using water pressure. It is easier to operate and repair.
Popular models
For an apartment, it is better to choose the Thermex Stream 700 device. It comes complete with a shower head, a faucet with an adapter and a set of fasteners. The device is simple - on the left side there is an inlet for cold water, on the right there is an outlet for hot water. There is a filter that will trap particles larger than 2 mm. Maximum temperature: 50°C.
Another good model for an apartment is the Electrolux NPX6 Aquatronic Digital. Power - 5.7 kW, this is enough for a small family. The device has electronic control. The advantage is stable heating and easy installation. The disadvantage of the device is its low power for the winter period.
Third place in the rating is Timberk WHE 5.5 XTR H1. Heats water up to 60 °C. It consumes electricity economically, but at the same time has good performance. Installed vertically with bottom connection.
Choosing a location for installation
To figure out how to connect a instantaneous water heater in an apartment, determine the place where it is advisable to install it. You should choose a place according to the following criteria:
- ease of switching on and off;
- no interference when using the tap or shower;
- no moisture or splashes on the device;
- ease of connection to the water supply;
- evenness of the wall;
- convenience of electrical wiring;
- proximity to the mixer to avoid heat loss;
- free approach to the water heater.
The choice of location depends on the type of device:
- Non-pressure. Low-power models are connected to one water supply point. Can be installed on the side of the sink or under the sink as close to the faucet as possible. When used for a shower, the best installation is in the bathroom using the included shower head.
- Pressure. Since they can serve more than one water point, they can be installed near a cold water riser, which will allow servicing all taps. The ease of use of such devices for all family members of different heights is also taken into account. Everyone should be able to set a temperature that is comfortable for them.
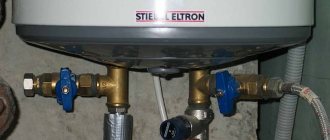
Connection diagram for instantaneous water heater
Before installation, we’ll figure out what the flow pipe consists of and how it connects to the water supply system.
- Flow body.
- Heating elements.
- Contact group related to the control unit.
- A unit that controls fluid flow.
- An inlet through which cold water is supplied.
- Out with hot.
The cold water supply pipe enters the device body. The liquid passes through the heating element (represented by a heating element or spiral). The pipe with the increased temperature of the contents is removed from the water heater.
Preparing for use - checking the electrical network
NEED TO KNOW! An instantaneous water heater creates a serious load on the electrical network (more than 3 kW), so it is necessary to organize a separate line.
In the apartment, household networks are loaded with a variety of equipment that requires power. Personal computers, televisions, washing machines, refrigerators, air conditioners, electric kettles in a large family can be turned on simultaneously. It is not recommended to add a boiler to this list - create a separate line with an RCD.
Quick tip. Do not connect the flow generator directly to the outlet - there is a high probability that the network will not withstand the load.
Determining the location of the water heater in the apartment
When installing an instantaneous water heater indoors, it is important to consider a number of factors:
- Heat loss . Place the device as close as possible to the water intake point. This will help reduce heat loss resulting from transporting heated fluid through the pipeline.
- Electrical safety . It is important to choose a position in which the boiler will not be damaged during operation. The housings of some models are equipped with reliable moisture protection systems (standards IP-24, IP-25). To avoid liquid ingress, do not install boilers directly under water sources - they can be installed on the side or on top. In the bathroom, the optimal height of the device is at head level or slightly higher.
- Convenience . Keep in mind that, if necessary, you need to leave yourself the opportunity to adjust the temperature or make other settings.
Quick tip. Choose your installation location wisely.
Necessary tools and consumables
All that remains is to prepare a set of tools with accessories, and then you can begin fastening and connecting the unit.
- Drill/screwdriver or hammer drill with equipment appropriate for the wall material. The diameter of the equipment is selected for the fastener.
- Stripper (crimping tool).
- Hammer.
- Adjustable and open-end wrenches.
- Pliers.
- Screwdriver.
- An RCD that must be selected based on the amperage of the device.
- FUM tape (fluoroplastic sealing material).
- Metal-plastic pipe.
- Tee for pipes.
- Grounded outlet.
Wall mounting option and drilling holes for mounting
Before installing a instantaneous water heater in an apartment, we select a location in the bathroom, toilet or kitchen. We mark the places where holes for fasteners will be created.
- Choosing a location for the boiler. Using a building level, we make sure that we have found a level place. Otherwise, the water supply will be uneven and this will lead to incorrect operation (possibly damage to the heating element).
- We create holes using a drilling tool (drill, hammer drill) and suitable working equipment.
- We mount the fasteners, which often come complete with the duct. These can be supplied as hinges and brackets.
- Next is connecting the instantaneous water heater to the water supply. We bring the cold water supply pipe to the entrance. We connect pipes to mixers or a shower head to the outlet, depending on needs.
- We install a tap to adjust the heating temperature at the inlet.
IT IS IMPORTANT TO KNOW! Due to their large mass, boilers are oriented for installation on strong, reliable walls: made of brickwork, concrete, durable wood.
Connecting to the home network
We recommend connecting an instantaneous water heater to the electrical network only if you have the appropriate skills. Otherwise, call an electrician.
- Before starting work, it is necessary to turn off the power supply to the apartment or private house.
- Pass the electrical cable through the corresponding hole located in the back of the boiler (note that it may be covered with a rubber plug).
- Using a crimping tool, strip the ends of the wires .
- Connect the wires to the terminal box (color coding will help avoid mistakes).
- Secure the wires using fasteners.
NEED TO KNOW! It is recommended to connect to the electrical network before you fix the instantaneous heater on the wall.
Color coding of wires when installing an instantaneous water heater
| Cable color | Meaning |
| Yellow-green | Grounding |
| Blue, light blue | Zero |
| White, brown, red | Phase |
NEED TO KNOW! Do not combine neutral and ground! This will cause injury!
NEED TO KNOW! Do not connect the device directly to standard outlets because they may not be grounded.
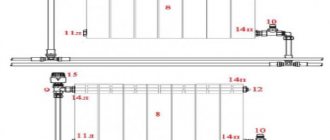
Connection diagram of the flow pipe to the water supply
Let's consider a stationary connection method. With it, the installation diagram will contain a valve responsible for disconnecting the boiler from the general water supply if necessary (completion of repair/seasonal work). This will allow the use of a device with several water intake points.
- Install the tee. Use FUM tape to seal the connection.
- Connect the tap (valve). Choose a place where it will be most comfortable to use.
- Connect the tap to the boiler using a metal-plastic pipe.
- Hide the pipe in a way convenient for you: in a wall or a groove.
By completing these steps, you have created a water socket. Use a flexible hose to connect the boiler to it.
Preparing tools
The parameters of the circuits of such devices are almost the same, so for wall mounting you will need:
- drill;
- concrete drills;
- screws;
- screwdriver;
- dowels;
- self-tapping screws;
- hammer;
- screwdrivers;
- ruler or tape measure;
- level;
- gas key;
- open-end wrench;
- pliers;
- pliers;
- copper three-core wire with double insulation;
- FUM tape for sealing connections;
- metal-plastic pipe;
- Euro socket;
- tee;
- shut-off valves;
- flexible hoses.
If it is necessary to extend propylene pipes, purchase a pipe cutter and a specialized soldering iron. The outlet must be grounded. The set may vary, it all depends on the model.
Tools and materials
Before installing an electric instantaneous water heater on a shower, tap or pipes, you should stock up on the following set of materials and tools:
- instantaneous water heater;
- impact electric drill;
- Victory drill;
- screws with dowels;
- screwdriver;
- gas key;
- FUM tape;
- pliers.
Wall installation
After choosing the location, installation of the instantaneous water heater begins. Markings are applied to the wall using a level and a pencil.
Installation of an instantaneous water heater begins with removing the top cover. Having attached it to the wall, align it horizontally and mark the locations of future holes.
Using a drill, drill holes and insert dowels into them. Using a screwdriver, attach the device to the wall and put on the top cover. Self-tapping screws are also used.
The installation must be strictly horizontal. Even with a slight tilt, an air pocket will form inside, which will lead to rapid failure of the device.
You should know how to properly check the installation. To do this, after installation, make sure that the device is securely fastened. Before the instantaneous water heater is connected to the electrical network, it is connected to the water supply.
Connection to water supply
Connecting an instantaneous water heater to the water supply is done in different ways. The choice depends on the experience of the person performing this work and the time available to complete the operation.
The first method is simpler. Even beginners can do the installation themselves.
Sequencing:
- Remove the shower head from the shower hose.
- Connect the hose to the cold water inlet located on the water heater.
- Set the mixer handle to the “Shower” position and make sure warm water comes out.
- To control, set the mixer handle to the “Tap” position and make sure that cold water comes from the tap. This means that it does not pass through the heater. When restoring hot water in a centralized manner, disconnect the device from the “Shower” and attach your watering can to it.
Connection technology
Before work related to cutting into water pipes, the water should be turned off.
There are two ways to connect a non-pressure model:
- using a shower hose. The nozzle is removed from the hose and attached to the inlet of the device. This method is good for occasional outages of hot water;
- through a tee. The tee fits into the water pipe or is attached to the outlet for the washing machine. A valve or ball valve is attached to the tee (if there is a washing machine, two valves or valves). A plastic pipe or a special hose stretches from it to the inlet of the water heater. A hose with a shower head is installed at the outlet. If you want to use the water heater constantly, then such a tee with a valve is cut into the hot water pipe at the outlet.
Storage-type instantaneous water heaters cut into water pipes with fittings. The connections should be sealed using tow or fume tape.
Did you know? In the ancient Roman baths there was a centralized heating system using a stove, water and air, which then circulated in the voids of the walls and floor. This system came to the Romans from the Hellenes, but was improved by Roman engineers.
Electrical connection
Do-it-yourself installation of an instantaneous water heater includes connecting it to the electrical network. To understand how to properly connect an instantaneous electric water heater, you need to study the recommendations of the experts:
- connect the device not to an outlet, but to an electrical panel;
- Copper cable has the advantage;
- to protect against electric shock, install an RCD;
- choose an installation location that is convenient for connection;
- There should be no electrical equipment under the heater so that if a leak occurs, the wiring will not be disrupted.
Connection
Requirements for installing any water heater:
- The equipment is located closer to the water supply inlet, ideally between the inlet and the water intake point.
- Increased power consumption does not allow connection to a regular outlet. It is necessary to lay a separate line from the distribution panel.
- To protect equipment that operates in conditions of high humidity, an RCD (residual current device) must be installed to protect against electric shock, and a circuit breaker for protection against overvoltage and short circuit.
- The water heater is a source of heat, so when installing it, be sure to maintain a distance on all sides from obstacles and other equipment, to avoid overheating.
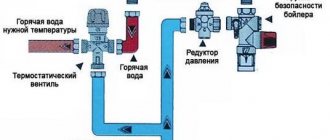
If there is a centralized hot water supply system, the water heater is installed as a jumper between the hot and cold water pipes. The system of check valves and shut-off valves determines the flow of water only from cold water into the tank and from its hot outlet towards the consumer.
If there is no hot water input, then the water heater is installed on a branch from cold water and forms an internal wiring in the apartment from its outlet.
Any electric water heater is sensitive to the purity of the water, so a mandatory element is coarse and fine filters in front of it.
Connecting cold water from the inlet after the meter and fine filter to the cold (blue) inlet of the heater:
- Ball valve.
- Safety valve for water heater.
- A tee with a connected drain valve for discharging water.
- Connection for connecting to the cold input of the heater.
A hose with a diameter of 8-10 mm is led from the pressure relief fitting of the safety valve to the sewer pipe. To do this, you should provide a special “dry” siphon or outlet from the pipe with a rise of at least 50 cm and a plug in which a hole is drilled for the hose.
Connecting hot water from the hot (red) output of the heater to the mixers:
- Connection for connecting to a water heater.
- Ball valve.
- Tee for connection to the DHW line
- A check valve on the inlet side that prevents water from entering the boiler into the central hot water system.
For polypropylene pipes you will need: a soldering iron, a pipe cutter, a set of fittings, including tees, elbows and adapters from plastic to metal with external thread, American. For cold water, an unreinforced pipe PN16(20) is used, for hot water - reinforced with fiberglass or aluminum PN20(25).
For metal-plastic, the only tools you will need are a pipe cutter and a calibrator when using clamp fittings. The set of fittings is selected with the same composition as in the first case (tees, elbows and adapters from plastic to metal).
Power connection
To connect power, in most cases, a terminal block is used, located under the protective cover on the body of the water heater. Where exactly it is located and how to get to it should be specified in the instructions. Only low-power heaters of 1.5-2 kW are supplied with a power cord with a plug for connecting to an outlet. However, even in this case, it is advisable to make do with a direct connection to a separate line, for which a machine and an RCD are allocated in the panel.
Diagram for connecting a water heater to electricity
The connection is made with a three-core copper cable with a cross-section of at least 2.5 mm2, unless otherwise specified in the instructions. The higher the consumption, the thicker the cable should be. The Table shows the cable requirements based on power and current.
| Aluminum | Wire cross-section, mm2 | Copper | ||
| Current strength, A | power, kWt | Current strength, A | power, kWt | |
| 14 | — | 1,0 | 14 | 3,0 |
| 15 | — | 1,5 | 15 | 3,3 |
| 19 | 3 | 2 | 19 | 4,1 |
| 21 | 3,5 | 2,5 | 21 | 4,6 |
| 27 | 4,6 | 4,0 | 27 | 5,9 |
| 34 | 5,7 | 6,0 | 34 | 7,4 |
| 50 | 8,3 | 10 | 50 | 11 |
There should be no more equipment on the line for the water heater, just like on the machine with an RCD. It is possible to install protection and a circuit breaker directly next to the water heater, but they should be mounted in special moisture-proof boxes