Why is the siphon leaking in the bathroom?
First, let's figure out what causes puddles to appear under the bathtub, in what situations they occur and how intensively this happens.
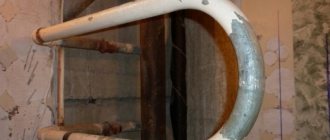
Leaking siphon under bathtub
The siphon is leaking under the bathtub - reasons
The most common ones are the following:
Bathtub drain clogged
- The rubber o-ring has worn out, that is, it has cracked, stretched, or moved out of place due to a poorly tightened nut.
- The overflow pipe burst.
- The siphon was not tightened tightly after cleaning it.
- The bathtub siphon device is dirty. You can read about the design of the water seal in the article on our website “Installing and replacing a bath siphon.”
- O-rings are deformed.
- The joint between the drain and overflow pipes has become loose.
- The connections are not tight because the threads are stripped and the gaskets are damaged.
Bath siphon design
A siphon is leaking in the bathroom: ways to eliminate the leak
1. If the ring has burst or stretched, then replace it with a new one.
2. If the overflow pipe bursts, replace it by installing a new one. You can also read about how to remove the siphon from the bathtub and replace its parts with new ones in the article on our website “Installing and replacing a bathtub siphon.”
3. If the ring has moved, then correct it and tighten the nut well.
4. If the siphon is dirty, do the following:
- To prevent dirt from getting onto the floor, place a basin or some suitable container under the siphon to collect liquids.
- Unscrew the lock nut and carefully remove the siphon flask (bottom cover) so as not to damage the integrity of the connection and threads.
- Carefully clean the inside of the siphon using a long wire or a screwdriver to remove any buildup and any debris that has accumulated on the walls of the water seal.
- Screw the bottom cover back into place in reverse order. Important! Make sure the ring is in the same place.
5. If the O-rings have changed shape, this may be due to cleaning the siphon. And you will not be able to return the siphon to its place as it was long before its current form. Therefore, it is better to change the siphon when cleaning it.
Perhaps the siphon under your bathtub is leaking because you chose it incorrectly? The article on our website “Types of bath siphons” will tell you about the different types and models of these devices
Let the instructions on our website on how to choose a bath siphon become your guide to the world of plumbing. Read it here: https://remontspravka.com/siphon-selection/
How to install or replace a siphon with your own hands? Refer to the advice of experienced people on our website!
Often replacing the rings does not help. Then - seal the joint between the siphon and the bottom cover with silicone sealant.
6. If the siphon is leaking under the bathtub at the junction of the drain and overflow pipes, then seal the entire circumference of the joint over cement sealing using liquid glass, i.e. office silicate glue. This way, you will reliably seal the cracks in the cement.
7. If the siphon connections are not tight, apply sealant to them. Also, additionally “wind up” the thread with tow or special silicone tape if it does not fit tightly. And then coat the thread with paste and screw the part.
Siphon repair completed
Source
Basic methods for sealing cracks in the bathroom
The oldest and most proven method is to fill the gaps that form between the bathtub and the wall with cement mortar . This material is durable and reliable, not afraid of moisture, so using it as a base always gives reliable results.
Cement mortar is usually used in the following proportions: 3/1 - 3 parts sand, 1 part cement. It is better to mix such a solution using water mixed with PVA glue. The glue combines well with cement and has a positive effect on the quality of the seam. The consistency of the solution should be similar to thick sour cream.
The gap, only 2-5 mm wide, is carefully sealed with the prepared mixture, pressing it with a spatula along the entire perimeter of the gap. It is recommended to immediately level the visible part of the seam, since such a solution quickly begins to harden.
If there is a gap more than 5 mm wide, the solution is applied to a support profile pre-installed in the wall. You can start decorating after 24-72 hours (it all depends on the thickness of the layer).
Related article: Which putty to choose for walls under wallpaper
The gap is quickly and easily sealed with construction foam. The main condition is that the foam must be moisture resistant in order to withstand the level of humidity characteristic of a bathroom and maintain strong contact with the wall. This method allows you to eliminate large gaps without resorting to a metal profile.
After filling the cracks with foam, you need to wait about an hour for the material to dry, and then remove the excess with a special construction knife. A porous surface remains at the site of the cuts, which must be treated with plumbing silicone.
By the way, silicone sealant itself is also a good way to eliminate empty space between the bathroom and the walls. This type of seal is ideal for filling small gaps (up to 8 mm), but can also be used to fill larger gaps. In this case, the sealant is applied to the plank or profile installed in the wall.
To close a gap between the bathtub and the wall that is 0.5 cm wide or less, you can use a mixture for filling tile joints - grout . Cover the gap with a special rubber spatula, and carefully remove the remaining product from the surfaces. This material is quite moisture resistant, therefore it prevents the penetration of moisture and the formation of mold and mildew. You cannot use the bathtub immediately after grouting. The composition should dry well.
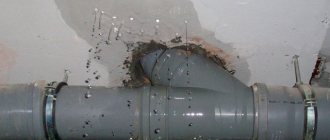
Elimination of leaks at joints
The first step is to determine exactly where the leak is coming from. If water collects under the sink or under the drain in the bathroom, then first of all you should check the quality of the connection between the drain hole and the pipe.
Advice. Often, the problem of leakage can be solved by tightening all threaded connections of the pipeline or replacing rubber gaskets at the connection point.
Joints of cast iron pipes
Joints of cast iron pipes
In order to understand what to cover when the joints of cast iron sewer pipes leak, you should first determine how the connection was sealed.
If the connections of the sewer cast iron pipeline parts were caulked with lead, then the following must be done:
- The joint is cleaned to bare metal;
- The slot is caulked with lead. Caulking of lead cones is done using a chisel. Soft metal is easily compacted into the gap.
If the joint was sealed using cement, then the following instructions should be implemented in practice:
Advice. Before driving, it is recommended to treat the strands with an asbestos-cement mixture with the addition of water in the proportions of asbestos/cement 3/7. The putty should have the consistency of soft plasticine.
Sealing the joint with cement
Sealing the joint with cement
If it turns out that you have a sewer pipe in the toilet that is leaking right at the joint and the only thing left from repairs that can be sealed is cement, you should not be upset because cement is perfect for this purpose.
Bathroom drains slowly
The main reasons for poor drainage are as follows:
- clogged drain pipe;
- the slope of the drainage system is too small;
- The diameter of the drain pipe or riser is insufficient.
If the water coming out of the bathroom is worse than before, then most likely you have a blockage. If the drain worsens slightly, you can use a good old plunger or clean the system with chemicals. This is the easiest way to remove clogged drains. But you need to remember that these products can only deal with minor blockages. In cases where the water drains very slowly or does not drain at all, these products cannot be used.
You can clear the blockage by disassembling and washing the siphon (sump) or by cleaning the entire drain pipe to the riser with a cable. In some cases, removing the blockage requires dismantling the entire drain system under the bathtub, cleaning and flushing it. This happens in cases where, for example, repairs have recently been made and solutions and suspensions have been poured into the sewer. In this case, the settled particles severely clog the pipes and have to be knocked out.
A common reason for poor drainage in a bathroom is that the slope of the sewer pipes is too small. Look at how your drain works. If the slope is too small or there is no slope at all, then this is the reason that the water drains slowly. In this case, you should not use chemicals to remove blockages.
Related article: Different ways to install kitchen sinks with your own hands
What should the outlet slope be for the drain to work properly? The exact slope values are determined by calculations that take into account the volume of wastewater, pipe diameters and some other indicators. But, guided by practical experience, you can adhere to the following generalized values: with a sewer pipe diameter of 100 mm, the minimum slope should be 2%; with a pipe diameter of 50 mm, the slope must be at least 3%. For reference, we add that a slope of 2% is a decrease in the pipe by 2 cm through every meter of the pipeline.
To increase the slope of the drainage system, you can simply lower the outlet into the central riser or raise the bathtub itself. Too large a slope is undesirable, as this can lead to gradual clogging of the pipes with heavy sediments, and also cause the effect of “bubbling” water when draining. The relevant building codes state that the maximum sewer drainage slope can be up to 15%.
The best posts
- How to lay plasterboard on the ceiling with your own hands?
- Do-it-yourself clothes hanger manufacturing technology
- Where Volochkova lives: a mansion near Moscow worth 2.5 million Euros
- Cabinets for installation of telecommunications: advantages and types
- How to make an icon from a photograph with your own hands - decoupage method
- Taboos in interior design or how to avoid common mistakes
- How to weave a gladiolus from beads: a master class for beginners with video
- Butterfly Crochet Rug - Knitting Patterns
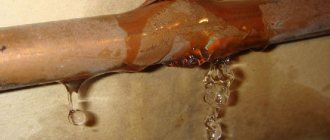
Leak in the pipe body
If it is not the joint that is leaking, but the pipe itself, then the problem must be solved in a completely different way.
Banding method
When the owners know where to call if the pipes are leaking, but at the moment they do not have the opportunity to use the services of a plumber, then they can install a temporary bandage on the pipe with their own hands.
The bandaging procedure consists of the following steps:
- Search and identify the location of the leak;
- Installation of a rubber gasket in the emergency area;
- The gasket is pressed tightly against the pipe and secured with clamps.
Advice. A huge number of clamps can be found in a hardware store, but if you don’t have one at hand, you should simply wrap the gasket tightly with improvised materials.
The rubber gasket can be:
Source
Leak under the bathtub. How to repair?
Good afternoon everyone. I turn to forum participants for help. The point is this. Just made some renovations. The bathtub was sealed with foam blocks and tiles, leaving only a 25*25 cm inspection hatch. A week after the renovation, I looked under the bathtub and saw a puddle. I started to find out and take pictures of the leaks under the bathtub and discovered the following. A sewer tee was installed under the bathroom for the sink drain, bathtub drain and washing machine drain. There are several leaks: from the bathtub siphon (semi-automatic Geberit). The bathtub siphon leaks if I suddenly empty a full bathtub (even half full) or pour a shower over the overflow hole. When I pour the shower into the overflow hole, it flows directly under the siphon. The second leak in the corner (opposite the inspection hatch) is the connection of the drain pipe leading to the washing machine + a small leak in the drain pipe under the washing machine in the corner opposite the wall. For the purity of the experiment, I took the drain hose out of the pipe and directed it into the bathtub, but it still leaks in the corner where the drain pipe from the washing machine connects. I don’t understand why, only the effect of communicating vessels comes to mind. Help with advice. What to do? 1. With a bath siphon? With a drain pipe under the bathtub? How to repair them and eliminate leaks if there is only a 25*25 hatch?
Anyutik wrote: How to repair them and eliminate leaks if there is only a 25*25 hatch?
find the Master who installed it, and let him look for a “gynecologist”...
Anyutik, the hatch should not be an audit hatch, but a TECHNICAL one.
Accordingly, the leak cannot be repaired.
, and eliminate
Look for a specialist who installed all this disgrace to eliminate the leak. According to your descriptions, they did it with the left heel and didn’t even look at what happened.
Anyutik wrote: How to repair them and eliminate leaks if there is only a 25*25 hatch?
The question is where you can reach through this hole and where it actually flows. If you are smart, then you need to find out why it is leaking, for example, in a siphon you may need to tighten the screws that hold the siphon and overflow to the bathtub. If the problem is cracked pipes/siphon then replace it. Is it possible to make a replacement through the proposed window, you need to look and try (the window is not large, but not very small either).
Another method of patching with improvised means is to use all kinds of sealants, wheel inner tubes, clamps, plastic bags and other improvised materials, but this is more likely when it is really necessary, but there is nothing to replace it with.
Thanks to those who responded. I was so surprised. I thought no one had an answer. I'm waiting for the craftsmen who did the repairs this week. I hope they don’t leave me to deal with all this. You can reach the siphon, but you can’t reach the drain pipe, which is near the wall of the bathtub; it basically flows. What is the difference between a technical hatch and an inspection hatch?
I'll try to take a photo in the evening. And as for the siphon, I don’t understand why if I shower into the overflow, the water drips from the bottom (where the siphon connects to the bathtub below), and not from the side if the connection is not tight?
Anyutik wrote: And about the siphon, I don’t understand why if I shower into the overflow, the water drips from below (where the siphon connects to the bath below), and not from the side if the connection is not tight?
The water flows down the overflow pipe, where it is connected to the drain, and that’s where it drips from.
DmitryM Ie. Is the siphon at the bottom not tight?
Anyutik wrote: what is the difference between a technical hatch and an inspection hatch?
You can only look into the inspection room to assess the technical condition. And through the technical one you can also carry out repair or maintenance work.
Anyutik wrote: The bathtub siphon leaks if I suddenly empty the full bathtub (even half full) or pour the shower over the overflow hole. When I pour the shower into the overflow hole, it flows directly under the siphon.
Check the presence and correct installation of seals, and that the screws or nuts are sufficiently tightened. I strongly advise against sealing with silicone. The new fittings are made so that they do not leak even without “crutches” in the form of silicone. Silicone will help for a while, but sooner or later it will still leak, and during repairs it will greatly interfere with disassembling the unit.
Anyutik wrote: The second leak in the corner (opposite the inspection hatch) is the connection of the drain pipe leading to the washing machine + a small leak in the drain pipe under the washing machine in the corner opposite the wall. For the purity of the experiment, I took the drain hose out of the pipe and directed it into the bathtub, but it still leaks in the corner where the drain pipe from the washing machine connects. Why I don’t understand
If we could photograph this joint with a flash, it would be easier to advise something. If the drain hose of the washing machine is simply inserted into the hole of the rubber cuff in the pipe, something like this: then throw out the cuff, buy an adapter with a fitting and do it the human way. Or the cuff in the sewer pipe in this corner may be damaged. Or the pipe is inserted particularly crookedly and the cuff cannot seal the connection. Or, at the time of insertion, the pipe was full of dust and construction dirt, crumbs of hardened mortar, etc., as a result of which the cuff leaks due to these contaminants.
Anyutik wrote: Message from DmitryM The water flows down the overflow pipe, where it is connected to the drain, and that's where it drips from.
Those. Is the siphon at the bottom not tight?
How to seal the gaps between the bathtub and the wall?
There are several ways to get rid of imperfections. The simplest solution is to contact a specialist who will immediately find the best option. Another way is also quite possible: since such work does not require any specific skills, the owners will be able to cope with it on their own. In this case, they first need to find out how to seal the gaps between the bathtub and the wall, choose the optimal material, and then proceed with the operation.
The choice of product to use directly depends on the decoration of the walls of the room, on the features of the interior, and on the size of the gap. For example, wide gaps require a combination of materials. In this case, a “duet” is often used - a sealant and a simple plastic edging.
An alternative option is polyurethane foam with a border. Narrow gaps are not that difficult to close, so they won't require borders or edging. However, there are other, simpler methods, so these methods cannot be ignored.
Using grout
This is the simplest solution, but it is only suitable if the gap width is no more than 2-3 mm. As a rule, the compositions remain with all owners after installing the tiles, so this method is also the cheapest.
Surfaces are wiped and degreased. Then the gaps are filled with grout, the excess is immediately removed with a rubber spatula or a damp sponge. After the composition has dried, the bath can be used. The disadvantage of this method is the unreliability of such protection. For this reason, it is better to consider alternative options for eliminating gaps.
First aid “in the face” of cement mortar
This solution can be called universal, low-cost and reliable, although not very durable. In addition, such a composition will require additional finishing, since “bare” cement does not look at all attractive. But working with the solution is familiar to many, so it does not involve any difficulties.
- First, the joint is cleaned (degreased), dusted and good adhesion is ensured using a primer.
- Then they prepare the solution. It should be quite thick. Craftsmen advise adding tile adhesive to the traditional building mixture.
- Rags are soaked in the solution and used to seal the cracks. After the improvised “plugs” have dried, a layer of solution is laid on top, along the entire length. Smooth out the composition with a damp sponge.
Mosaics or pieces of ceramic tiles are chosen as a camouflage agent. An alternative to the products is paint that matches the color.
Polyurethane foam as a sealant
This material is good because it allows you to get rid of even a wider “hole”. The foam guarantees reliable fixation and protection against mold. However, in the “bath case” it is necessary to purchase moisture-resistant material. For example, foam with a polyurethane base is considered a suitable option.
- Strips of tape are glued to the side of the bathtub and the wall so as not to accidentally stain them. The surfaces to be joined are cleaned, wiped, and degreased.
- Shake the container and begin to apply foam, watching the direction, not allowing the container to “walk” in your hand.
- After the material has hardened, the excess is cut off with a sharp knife.
The same materials used for the camouflage of cement mortar are chosen as the finishing coating for the seam: elements made of tiles or paint.
Using silicone sealant
Recently, this composition has become a real savior: it is used for various types of repair and construction work. Pros: low price, simplicity of the procedure, effectiveness of the material, which eliminates problems almost immediately and for a long time.
There is a limitation for the use of sealant: the width of the gap. The maximum possible value is 3 mm. For bathrooms, a white composition is usually purchased, which will be optimal for the same baths.
You need a special material - sanitary, intended for rooms with high humidity - for bathrooms and toilets. The product must be moisture resistant. The optimal sealant is one that contains antibacterial components.
Since the scope of work is small, the operation of sealing cracks does not promise serious expenses. Therefore, it is better to give preference to quality materials. For example, the following compositions are praised: Seresit CS 25, DAP, Dow Corning, KRASS, Moment Germent.
The work is not difficult, but all its stages must be carried out strictly.
- First, the surfaces to be joined are processed. The area of the wall and the side of the bathtub is wiped with water, then degreased with an alcohol-based product or solvent (White spirit, acetone, kerosene, etc.), and dried.
- The tube with sealant is installed in the gun. The nose is cut so that the hole is not much, but larger than the gap. The sharper the angle, the thicker the roller.
- They begin to apply the sealant from the edge of the bathtub, trying to ensure that it fits completely into the gap and lies flat.
The resulting “sausage” is leveled and pressed with a finger or a special spatula. Before work, the first “tool” is moistened in a soap solution, otherwise the sealant will try to stick to the skin or glove. To be on the safe side, it is recommended to apply a second layer, then lightly press it in and level it out. After the composition has dried, the excess is scraped off. If the work is done carefully, then the composition will not require any “hide and seek”.
Masking with plastic baseboard and sealant
This is the second, relatively simple answer to the question of how to seal the gaps between the bathtub and the wall. In this case, practical PVC products are used - borders, skirting boards, corners. They are easy to work with, and the wide range of products allows you to find the perfect option for any room. There is one recommendation: joints look better when the color of the sealant matches the “plumbing” color. However, this is not a rule; some masters find other interesting solutions.
Before purchasing, measure the length of the gap and add a small margin, since the corners of the plastic elements will have to be trimmed. They also purchase parts for decorating the baseboard. This is a corner and a plug.
This operation also consists of several simple steps.
- First, the surfaces to be joined are wiped, degreased and dried in the same way. Then a tube with sealant is prepared for work.
- The plinth is cut to the length of the wall, not forgetting that it is necessary to leave space for a corner and a plug.
- Move on to working with silicone sealant. First, it is applied to the baseboard, then the cracks are filled with the composition. In this case, it is important that the product fits into the gap very tightly.
- Apply the baseboard to the crack, then gently press it and smooth it with your hands, evenly distributing the sealant. Excess composition is removed immediately. This is done with a damp cloth.
After the sealant has dried, install the plug. To better fix the corner, use a load: for example, a piece of tile. You can use the bathroom after 3-4 hours, but it is recommended to give the materials more time - about a day.
Using a ceramic border
This option is considered the best, since ceramics are a reliable and durable material. This border can withstand mechanical stress and does not change color, unlike plastic elements that turn yellow over time. The material is not afraid of any aggressive cleaning agents. Such elements with tiled walls look perfect - one whole.
To install the border you will need to buy silicone sealant, several ceramic products and two corners. Another required material is a degreaser. The work differs little from the already described operations of masking unattractive cracks.
- First of all, prepare the surfaces: wash them, wipe them with a degreaser, and dry them. Fill the gaps with sealant. Make sure that there are no “gaps” left.
- Installation of the ceramic border begins from the corner that is in the most visible place. Then glue the following elements, making sure that they are located evenly.
- If there is a need to trim adjacent elements, then use a grinder. The cut edges are carefully processed with sandpaper or a grinder. The last stage is grouting the joints.
For the last step, you can use either sealant or tile grout. After completing the work, remove excess sealant (grout) with a damp sponge and leave the bathroom alone until the curb dries.
Border tape - the finishing touch
This solution is used if the cracks were closed with silicone sealant or polyurethane foam. When using this disguise, it is important to choose the appropriate tape size. It should be at least twice as wide as the gap. The work is as simple as possible:
- Glue is applied along the entire length of the seam. The ideal option is “liquid nails”.
- Border tape is glued to the wall and side of the bathtub.
- Then the joints and corners are treated with sealant.
The operation is simple, but you will have to allocate enough time for it: the glued curb tape is left to dry for a day.
What to do if the gaps are large?
In this case, the cement mortar will be useless, the sealant will not help, and special camouflage - plastic or ceramic products - will not help. Several methods are used to decorate a large hole.
Installation of false walls
This is a frame made of a metal profile, which is sewn up with moisture-resistant plasterboard or covered with plastic panels. This solution is an ideal option if one defect (a large gap) is accompanied by another imperfection - water pipes “proudly” sticking out outside the wall.
Homemade shelf
This is a shelf made from a plastic window sill. This method is unusual, but it has the right to be considered. Such a PVC window sill is not only capable of hiding an indecently wide gap. It will become a functional element - a shelf on which you can store many bathroom “useful things”.
Acrylic corners or overlays
These elements (especially the last ones) are designed to bridge very large gaps. The advantage of such products is a fairly wide range, allowing you to find a camouflage element for a “black hole” of any size. Such polymer linings are suitable for all types of plumbing fixtures.
Original solutions
Another option is a mini-frame (box) made of a profile (at one level, or above the bathtub), it is sewn up with gypsum board or other sheet material. For the same purpose, plastic panels are used, which are attached to the wall with brackets. An alternative is boards held in place by guides fixed on the side and wall with double-sided tape.
Some owners prefer “solid solutions”. They make cabinets from bricks placed “on edge” to make the structure lighter. The latter option has a serious drawback: to build a massive cabinet, the bathtub will have to be dismantled. The second disadvantage is the weight of the bricks: the load on the floor will increase.
Causes of leakage
Steel pipes are not resistant to rusting and oxidation due to the constant circulation of water inside and the deposition of air condensate and moisture outside. Polyethylene is more resistant to the onslaught of aggressive substances from the outside, but leaks in the heating system also occur for certain reasons:
- Incorrect selection of material, improper use. For example, polyethylene and polypropylene are not suitable as heating and sewer pipes.
- Savings, because people make mistakes when buying cheap polypropylene pipes for cold water. You can expect them to swell, deform, or burst when high temperatures are applied at any time.
Metal products for the heating system also do not last forever. The walls become thinner over the years and become corroded. Leaks appear on threads, fittings, section joints, and even sections of pipeline.
Constant contact of a hot pipe with cold air from the outside sooner or later leads to the accumulation of condensation or the formation of rust, injury due to constant humidity.
Plastic ones are unstable to mechanical damage or are made of low-quality material, when they begin to ooze and leak long before the end of their service life.
The weakest points of the heating system are the joints and spans. City residents should know how to quickly install a new part in the event of a leak, apply a patch to the damaged heating section, in order to successfully carry out dismantling and not flood the neighbors.
Initial solution to the problem
Plastic pipes are installed everywhere, because they cannot be demolished. For decades there will be no cracking, rotting, or corrosion, although the joints are weak and may begin to leak over time.
The main reason is poor installation. To solve the problem, take the following steps:
- We turn off the water valve with cold and hot water. Fortunately, the valve was installed directly in the apartments, and not in the basement of some old Khrushchev-era buildings.
- If water still oozes out after closing the valve, then we try to tighten the threaded connections.
- We replace the gasket at the joint in case of leakage directly from the sewer pipe.
If the methods do not work, then all that remains is to call a plumber or an emergency service team. Before their arrival, place a container under the leak to collect water or tie it tightly with a coarse cloth or tape, sprinkling a little salt on the surface of the pipe.
If a metal pipe is leaking or leaking and you have a grinder or a hacksaw at hand, then as an option to solve the problem:
- turn off the water;
- cut off the damaged area, retreating 25-30 cm in both directions;
- remove the threaded connection located near the damaged area;
- cut a thread on the end of the cut pipe;
- measure whether the segment is suitable taking into account the length of the threaded section;
- connect the section to the common pipeline;
- wrap with a seal (putty, flax, foam tape);
- screw on the coupling.
If the valve is installed in the basement, then in the event of a leak, you will have to shut off the entire riser with water.
When replacing pipes during major renovations in an apartment, residents are advised to install a valve or make sure it is located directly in the toilet room near the toilet to ensure unhindered access to it in case of a leak and quickly fix the problem.
How to eliminate the minimum gap of up to 10 mm?
The easiest way to seal joints is to use a waterproof silicone-based sealant.
For gap sizes up to 3 mm, it is enough to apply a uniform thin layer of sealant using a mounting gun and carefully level the surface with a clean silk rag.
Before using the sealant, it is recommended to completely clean the sealing area from dirt, and also degrease it to improve adhesion.
It is also recommended not to use the bath for a while to keep humidity to a minimum. When applying the composition, it is necessary to ensure a tight fit to the wall and end part.
Owners of acrylic bathtubs need to fill them with water before using sealant. When the composition hardens, shrinkage will occur and either a gap will remain, but of a smaller size, or the acrylic walls will move slightly. Therefore, throughout the entire drying time, which is indicated in the attached instructions, the bath should be kept under load.
To eliminate the continuous gap between the bathtub and the wall, it is recommended to use special plastic pads.
Related article: How to attach a countertop to a wall without support
They perform not only a decorative function, but also a sealing function. With their help, you can eliminate gaps up to 1 cm in size.
Seal the gap with plastic elements with your own hands as follows:
- Clean the surfaces at the joints.
- On the plastic inserts that will be installed at the joints of the bathtub, cut the end parts at an angle of 45º using a knife or hacksaw for metal, and then sand them with sandpaper (“zero”).
- Fill the seam with silicone sealant so that when inserting plastic parts it comes out. That is, the amount of composition applied should be in excess.
- After the sealant has hardened, use a construction knife to remove any excess.
- Wipe the seam with a soft, lint-free cloth.
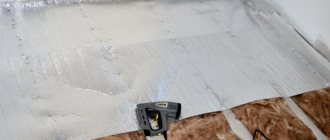
Another budget-friendly way to seal a joint of minimum dimensions from 3 to 10 mm is to apply polyurethane foam, which is highly water-resistant.
Before use, shake the can several times and warm it up a little so that it is 2-3º warmer than the environment. Clean the joints from dirt and dry with a dry cloth.
To prevent foam from getting on finishing materials and the bathtub, cover them with tape. After this, seal the cracks.
Since the foam expands when it hardens, again, if the seal is made for an acrylic bathtub, then you must remember to first fill it with water.
Hardening time is usually up to 12 hours, depending on climatic conditions.
Eliminating leaks at the joint
A leak in a cast iron pipeline can be caulked in 2 ways using lead or cement.
- we clean the rotted joint with pulsating water until clean metal appears, remove the old seal;
- We close the gap with molten lead using a blunt chisel;
- let it dry;
- turn on the water to check if it will leak again.
If you have some cement available, you can carry out the following work:
- clean the joint with a hammer (chisel);
- remove old solution from the treated area;
- prepare an aqueous solution of cement and water (10x1);
- mix asbestos with cement (3x7) until a plasticine-like mass is obtained;
- treat the damaged area with the composition;
- prepare a slurry of cement and water, lubricate the joint;
- cover the pipe with a bandage lubricated with cement mortar;
- wait for 2-3 hours to harden.
Sealing the joint with cement will allow you to survive until the end of the heating season.
When mixing asbestos with cement, the solution should resemble plasticine. The main thing is that there are no lumps. Before filling with the solution, it is recommended to wrap the damaged pipe with a tarred strand.
Mechanical methods for eliminating a fistula on a straight section of pipeline
If the water supply pipe in the bathroom is steel, water whistles like a fountain from a section the diameter of a match, then the steps are as follows:
- clean the hole from rust using a grinder or file;
- screw a threaded screw with a rubberized tip into the hole;
- Make sure that the screw protrudes slightly at the exit of the hole and does not rest against the opposite wall inside the pipe.
When closing a hole with a volumetric cross-section of a fistula:
- drill a hole with a drill slightly larger in diameter to cut a thread for a bolt (with a thread diameter of 3 mm, a drill diameter of steel or brass of 2.5 mm is suitable);
- screw the bolt and washer into the hole, having previously threaded a rubber gasket for sealing;
- make sure that the bolt does not rest against the opposite wall of the pipe and does not block the gap.
The most reliable, durable way to eliminate a leak is caulking using electric welding.
It consists of drilling a hole, driving a cone-shaped chop into it, grinding it off from the outside until a small protruding head is left, and welding it around the circumference using electric welding.
The method is more suitable for sealing galvanized pipes with a thickness of 3 mm. Also, to maximize the elimination of a through fistula, it is important that the electrodes have a rutile coating.
If the connection to the drain under the bathtub is leaking
Water breakthrough between the gander or at the junction, what to do. We solve the problem as follows:
- turn off the water;
- unscrew the pipe from the drain, placing a container to collect water;
- clean the cavity inside with a brush or vacuum cleaner;
- heat the piece of pipe and the drainage area with a blowtorch until the steam stops flowing, which means the moisture has completely dried out;
- clean the places on the gander and drain with sandpaper;
- degrease with acetone, wipe with a dry cloth;
- apply a piece of silicone to the pipe and the bottom around the gander;
- attach the gander to the bottom of the bath, wrap it around the circumference with a sickle mesh, and add another layer of silicone on top;
- wrap with construction polyethylene;
- wait 2 days until the silicone and polyethylene dry completely, and check if the pipe is leaking.
If dismantled correctly, the structure will last at least 3-4 years.
How to seal the gap between the wall and the bathtub
Each owner chooses the most convenient method for eliminating the gap. Each method has advantages. It is important to take into account not only the simplicity and speed of installation of structures covering the sealed seam at the crack site, but also durability and service life. For example, polypropylene border tape looks great in the bathroom, installation is quick and simple, but its service life is no more than two years. Gluing strips of tiles is a little longer and more difficult, but a durable material will last for many years without damage or leaks between the seams.
Learn how to keep cucumbers fresh longer in the refrigerator.
How to make clear pear jam? The best recipes are collected in this article.
Polyurethane foam
To eliminate the gap between the wall and the bathroom, you will need a moisture-resistant type of sealing compound. Manufacturers indicate information on the can. After trimming the protruding parts, the hardened foam is covered with tiles, waterproof paint, or a polypropylene border is glued.
READ ALSO: How to clean a shower stall from limescale at home: effective folk and chemical remedies
How to proceed:
- purchase a can of waterproof polyurethane foam and carefully study the instructions for use;
- prepare the surface: remove particles of debris, paint, rinse and dry the area where the sealant is applied;
- Only dry areas are covered with polyurethane foam: it is important to take this nuance into account;
- Wear gloves so you don’t have to think about how to clean the foam from your hands. You can stick masking tape on the top edge of the bathtub and cover the surface of the bathtub with film: stuck porous material is difficult to remove from various surfaces;
- you need to work carefully, avoid getting foam particles on the walls and metal parts;
- shake the canister, carefully place the long tip into the slot, press the cap to squeeze out the foam;
- the filling is carried out carefully, without gaps, but the gap cannot be filled to the edges: in the air, the polyurethane foam increases in volume, excess sealant will protrude beyond the edges of the seam;
- After an hour, the porous material dries and the edges can be trimmed. For the operation, a sharp construction knife is used (it is important to follow safety precautions, open and hide the blade correctly so as not to injure your fingers);
- work is carried out until a fairly flat surface remains;
- The final decoration is carried out using a border made of tiles or PVC tape. You can apply paint, but this option is less aesthetically pleasing.
Cement mortar
The simplest method, high speed sealing of cracks anywhere, including in the area where the bathroom and the wall meet. There is also a drawback - poor aesthetics after the cement mass has dried. You can lay a plastic border over the seam or apply a layer of putty and paint the narrow, long space to match the walls.
How to proceed:
- thoroughly clean the surface for applying the solution, dry it, remove old finishing material;
- prepare cement mortar (the consistency of thick sour cream is optimal). If the gap is large, first soak old rags in cement paste, close the gap, and cover the top with the remaining compound;
- when using a rag, you need to wait until the base sets and becomes hard enough, only then apply the rest of the solution;
- After the seam has dried, you need to decorate the surface with a suitable material.
READ ALSO: Plumbing for an apartment: what should you buy?
Silicone sealant
A modern product with excellent water-repellent characteristics. Transparent sealant is a universal option; if desired, owners can choose the optimal shade to match the tile or paint.
For the bath, use a sealant with antifungal components. The presence of fungicides in the product provides protection against mold.
How to seal the space between the wall and the bathtub:
- prepare the surfaces, remove all unnecessary elements, wash and dry the joints;
- apply a degreasing component: alcohol or acetone, wipe, wait until the surface is completely dry;
- fill the gap with the contents of the tube using a mounting gun;
- the line should be continuous, as smooth as possible. You can trim the material by slightly moistening your finger and pressing the mass in the right place;
- the thickness of the layer depends on the cutting angle of the tip;
- You can improve aesthetics by fixing plastic baseboards, polypropylene borders or tile rectangles over a layer of sealant.
Tile side
An effective option for sealing gaps measuring 3 cm or more. If there are pieces left after laying the tiles, then use this material. If there are no tiles, new elements are purchased. When using a decorative border on the wall, you can repeat the motif to seal the gap and prevent leaks. For white tiles, use a border of the same color.
How to proceed:
- it is advisable to protect the floor under the bathroom from particles of cement mortar during work: a wooden frame, thick film or other material is suitable;
- prepare a cement-based solution, taking into account the brand, fill the gap, wait until the mixture sets;
- Carefully lay the rectangles of tiles, install special crosses made of durable plastic between adjacent elements. Simple devices maintain the optimal distance between the border parts;
- After 24 hours, the home craftsman grouts the seams between adjacent tiles with a mixture that matches the color.
READ ALSO: What to do if the toilet is clogged: how to clean it yourself using improvised means without involving specialists
Other methods for eliminating leaks
There are various options for doing it yourself if a pipe is leaking in the bathroom. The most common:
Rubber bandage
Prepare for work: a piece of soft rubber, a clamp, wire:
- Measure the section of pipe from which water siphons.
- Cut a gasket from a piece of rubber so that the area is slightly larger than the hole.
- Wrap the problem area in rubber and secure with wire or a clamp.
- Install a plumber's clamp to ensure the patch sits securely.
Adhesive bandage
A high-quality solution if a pipe in the bathroom is leaking. For what:
- turn off the water;
- dry the damaged area with a hairdryer;
- take any flexible material (a piece of plastic, fiberglass, rubber), glue it like a patch to the leak, place it on epoxy glue using a spatula or brush;
- wrap fiberglass around the pipe 5-6 times
The width of the bandage should be approximately 1 times larger than the perforated section of the pipe.
It is important to know
- Acrylic bathtubs are characterized by their ability to sag. To prevent the sealing work from going down the drain, the plumbing fixtures must be screwed on three sides with four fasteners - two fasteners at the ends and two more fasteners along the long side.
- Filling the gap between the walls and the acrylic bathtub is done by filling the body with water. Drain the water only after all adhesive materials have completely dried.
- Steel and cast iron bathtubs are installed in such a way as to eliminate possible vibrations and swaying during operation.
- All bathtubs should be installed level, adjusting the position by twisting the legs.
You should entrust the work of eliminating cracks in the bathroom to master tilers. They will quickly and efficiently seal the unnecessary gap, and the owners will only have to accept the work. But if you have free time and strictly follow the instructions, even a woman can do this work on her own. Whatever method you choose, the main condition is waterproofness and aesthetic appearance. You will learn about the pros and cons of this or that sealing method by watching the video below.
Related article: What to put between the stove and a wooden wall