What to consider when choosing radiator piping schemes
To correctly connect heating radiators, it is important to pay attention to the features that influence the choice of piping scheme. Experts take into account the following factors:
- radiator device;
- features of a single-pipe system;
- features of a two-pipe system;
- dependence of the efficiency of equipment operation on the connection scheme into the system;
- the degree of thermal output of radiators depending on the installation location.
Connecting heating radiators in a private home requires a detailed analysis of all this data, so it is important to contact specialists for a more professional calculation.
What is needed for installation
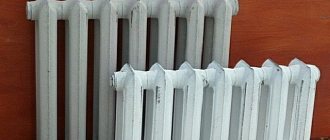
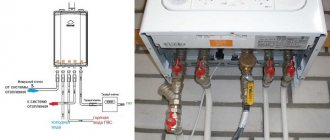
Installation of heating radiators of any type requires devices and consumables. The set of necessary materials is almost the same, but for cast iron batteries, for example, the plugs are large, and they do not install a Mayevsky valve, but instead, somewhere at the highest point of the system, they install an automatic air vent. But the installation of aluminum and bimetallic heating radiators is absolutely the same.
Steel panel ones also have some differences, but only in terms of hanging - they come with brackets, and on the back panel there are special arms cast from metal, with which the heater clings to the hooks of the brackets.
These are the arms that hook the hooks
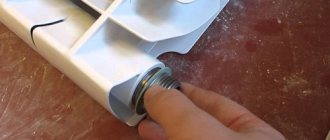
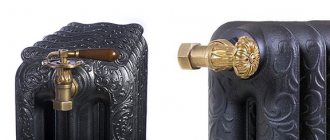
Mayevsky crane or automatic air vent
This is a small device for releasing air that may accumulate in the radiator. Placed on the free upper outlet (collector). It must be on every heating device when installing aluminum and bimetallic radiators. The size of this device is significantly smaller than the diameter of the manifold, so you will also need an adapter, but Mayevsky taps usually come complete with adapters, you just need to know the diameter of the manifold (connection dimensions).
Mayevsky crane and method of its installation
In addition to the Mayevsky crane, there are also automatic air vents. They can also be installed on radiators, but they are slightly larger in size and for some reason are only available in a brass or nickel-plated case. Not in white enamel. In general, the picture is unattractive and, although they deflate automatically, they are rarely installed.
This is what a compact automatic air vent looks like (there are more bulky models)
The side-connected radiator has four outputs. Two of them are occupied by the supply and return pipelines, on the third they install a Mayevsky valve. The fourth entrance is closed with a plug. It, like most modern batteries, is most often painted with white enamel and does not spoil the appearance at all.
Where to install the Mayevsky plug and tap for different connection methods
Shut-off valves
You will need two more ball valves or shut-off valves that can be adjusted. They are placed on each battery at the input and output. If these are ordinary ball valves, they are needed so that, if necessary, you can turn off the radiator and remove it (emergency repairs, replacement during the heating season). In this case, even if something happens to the radiator, you will cut it off, and the rest of the system will work. The advantage of this solution is the low price of ball valves, the disadvantage is the impossibility of adjusting heat transfer.
Radiator taps
Almost the same tasks, but with the ability to change the intensity of the coolant flow, are performed by shut-off control valves. They are more expensive, but they also allow you to adjust the heat transfer (make it less), and they look better externally; they are available in straight and angular versions, so the piping itself is more accurate.
If desired, you can install a thermostat on the coolant supply after the ball valve. This is a relatively small device that allows you to change the heat output of a heating device. If the radiator does not heat well, you cannot install them - it will be even worse, since they can only reduce the flow. There are different thermostats for batteries - automatic electronic ones, but more often they use the simplest one - mechanical.
Related materials and tools
You will also need hooks or brackets for hanging on walls. Their number depends on the size of the batteries:
- if there are no more than 8 sections or the length of the radiator is no more than 1.2 m, two mounting points on top and one on the bottom are sufficient;
- For every next 50 cm or 5-6 sections, add one fastener at the top and bottom.
You also need fum tape or linen winding and plumbing paste to seal the joints. You will also need a drill with drills, a level (preferably a level, but a regular bubble one will do), and a number of dowels. You will also need equipment for connecting pipes and fittings, but it depends on the type of pipes. That's all.
https://youtube.com/watch?v=nnQz2VA7C_M
Features of connection diagrams
There are several types of connection systems that have their own characteristics and can be used in specific situations. This is a single-pipe, two-pipe, side, diagonal, bottom heating system. Let's look at each variety separately.
Single pipe heating system
Warm water is transferred from the boiler through the upper level and flows down to the appliances. This system is most often used in apartment buildings. The main disadvantage of this type of work is the inability to independently set the appropriate temperature without the use of additional elements.
In addition, while the coolant in the form of water, steam or other substance reaches the end point, it has time to cool down greatly. Therefore, distant rooms or top floors may be heated unevenly.
Two-pipe heating system
This system uses two types of pipes: the first moves hot coolant, and the second carries the cooled substance back to the boiler for reheating. The heating radiators are connected in parallel and independently of each other. This system is best suited for private houses and cottages. The main feature is to constantly maintain the same temperature in all radiators without changes.
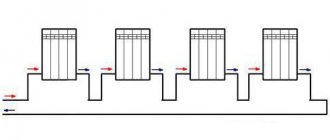
Side battery connection
This is the most common option used in any structure. The lateral connection of radiators for heating is carried out in such a way that the hot pipe enters the upper pipe, and the cold water pipe goes to the boiler through the lower pipe. This method has the maximum thermal output, but when moving the water supply, the power may drop by 8-9%. The lateral connection of heating radiator pipes is carried out according to the simplest scheme.
Features of the bottom connection
This option is less common, since it is used only if you want to hide the battery from view. It looks nice, but in terms of efficiency it is not the best choice. With such a system, the heat output will be approximately 10% lower, which will affect the room temperature. Therefore, it is better not to use it for residential buildings located in a harsh climate zone or on the upper floors of an apartment building.
Diagonal connection diagram
Connecting radiators using this method is used for long radiators. This connection scheme evenly heats the equipment along its entire length. The pipe with the hot coolant is connected to the upper pipe, and the outlet pipe to the lower one, but from the other side. The connection must be carried out using exactly this method; with the reverse circuit, the thermal output may drop by about 12%.
Heating systems
Before connecting the batteries to the mains, you need to determine what kind of heating system is installed at home. There are two types - single-pipe, double-pipe, let's look at their features and differences.
Single-pipe wiring
An economical and simple installation option in which the batteries are connected in series. Most often, a single-pipe system can be seen in multi-story residential buildings, but you can also make a scheme in a private house. The main feature is the circulation of the coolant, which comes from the boiler, first passing through one battery, then the second and all subsequent ones to the outermost heating device. Then, through the return water flow pipeline connected to the last radiator in the network, the coolant returns to the heating source - the boiler or to the riser in multi-storey buildings.
Advantages - simplicity, economy, the ability to start gravity circulation. The disadvantages include the lack of regulation of heat transfer in the batteries. It turns out that devices located close to the heating source receive a hotter coolant, while those on the outermost ones remain cold. This feature must be taken into account when creating a single-pipe heating system in a private house.
Two-pipe scheme
The design is complemented by another pipeline, which is needed for the reverse flow of water. Thus, each radiator has a hot coolant supply pipeline and a return line, so heat is supplied evenly, without reducing heating. An additional plus is the ability to install a thermostat on each battery, with which you can set the operating mode, the intensity of coolant circulation and the amount of heat received.
Replacing heating pipes in an apartment and how to hide them
The only downside is doubling the amount of materials to form the heating system. The cost of arranging the circuit will increase, but you can save on the heating mode. For example, set the daytime mode, when the radiators are heated at the minimum permissible levels, while no one is at home, and in the evening turn on the heating at full power.
Options for piping heating radiators
Piping is important when connecting heating radiators, since the efficiency of heating the room depends on the correctness of its implementation.
If we consider the system of wiring and piping of heating radiators, it can be represented as follows: vertical ones are connected to the horizontally located upper and lower jumpers; the substance moves through these passages using circulation under the influence of a pump or gravity. Let's look at the features of individual types of radiators.
Strapping with one-sided connection
In this case, all radiators are connected into one pipeline, which is why such a system is called one-pipe. Warm water rises up, after which it passes into the same pipe, which leads to the fact that not all radiators warm up evenly.
It is recommended to equip batteries with bypasses. This will provide the opportunity to dismantle without damaging the entire system. Horizontal distribution is carried out by a parallel or dead-end movement of the substance. The work is carried out more efficiently with a length of 30 meters and the number of devices is about 5.
Strapping with diagonal connection
Two types of pipes are used: the first supplies hot coolant, and the second removes cooled coolant. The radiators heat up evenly, maintaining the same temperature throughout the house. Connecting the pipes ensures minimal heat loss. Water circulates in a passing or dead-end type.
Correct connection of all pipes to the heating radiator leads to significant savings. In addition, it becomes possible to regulate performance. The connection of heating radiators is accompanied by the installation of a valve to release air.
Strapping with saddle connection
With this type of wiring, the radiator remains invisible and convenient, but at the same time the thermal output is reduced by 10-12%. Connection is implemented using two systems:
- Two-pipe - there are two connection options: with or without a bypass. In the first case, taps are installed, the radiator can be removed if necessary. A jumper is installed between the taps in the form of a piece of tube of a certain length with threads at the ends.
- Single-pipe - vertical wiring is used, in which heat loss is about 14%.
Our specialists will carry out all the necessary work for the correct connection of heating radiators in any building.
Selecting the type of strapping
The heating system radiator piping scheme is selected based on the following factors:
- the type of system that supplies heat to the room;
- method of connecting the radiator to the central lines.
Determining the system type
Before proceeding with the selection of heating equipment piping, it is necessary to determine the type of room heating system. The following types are currently used:
- single-pipe systems;
- two-pipe systems.
Single-pipe heating is a system in which all heating equipment is connected by one pipe. The coolant sequentially enters each radiator and returns to the boiler through one closed circuit.
Heating system with one closed circuit
The advantages of a single-pipe heating system are:
- balanced system, which allows for uniform heating of all connected radiators;
- increased warm-up speed;
- aesthetic appearance and minimal amount of occupied space;
- ease of installation;
- savings on materials.
The disadvantages include:
- the interconnectedness of all elements of the system, which makes it impossible to carry out repair work on one of them without shutting down the other;
- difficulty in regulating coolant temperature;
- the need to install a pump with a high power rating.
Two-pipe heating includes two main pipelines. One delivers coolant to the radiators, and the second returns it to the heating equipment.
Heating network with two main pipelines
The advantages of such a system are:
- the same temperature of all radiators, since the coolant for a separate battery comes directly from the heating device;
- the possibility of constructing a system with lower internal pressure, which allows the installation of equipment of lower power.
The most significant disadvantage is the cost of the system. It is generally accepted that the cost of purchasing materials increases by 2 times. In fact, this statement is incorrect, since a single-pipe system requires fewer pipes, but with a larger diameter, and for a two-pipe system it is vice versa.
A single-pipe heating system is installed in almost all old apartment buildings. It is also advisable to install it in country houses with an area of up to 150 m². In new houses and country cottages, a two-pipe system is installed.
Connection options
Methods for connecting radiators also depend on the location of the pipes in a private or apartment building. Highlight:
- lateral connection, in which the inlet and outlet pipes are located on one side of the radiator. This type is characterized by minimal costs for arranging the connection (serial connection), aesthetics and minimal losses of thermal energy. Typically used in most apartment buildings;
Lateral radiator connection
- diagonal connection. Unlike the previous case, the input and output are located on opposite sides of the radiators. The main advantage is the possibility of uniform heating of radiators with a large number of sections (from 12 pieces);
Diagonal battery connection
- bottom connection - inlet and outlet pipes are supplied from below. The advantages of this method are aesthetics and the ability to install lines on the floor or wall. The disadvantages include significant losses of thermal energy, ranging from 1% to 15%.
Bottom connection of the heating device
Rules for connecting heating radiators
The choice of connection diagram is not the only feature when installing pipes; it is very important to study individual characteristics to avoid serious mistakes during work.
When connecting vertical or horizontal heating radiators, it is important to place the equipment under the window not because of aesthetics, but because of the outgoing air flow, which creates a curtain that does not allow cold air to enter the room.
To increase thermal output, it is important to adhere to the following requirements:
- the installation height above the floor must be at least 10 centimeters;
- the distance from the wall to the radiator should be about 3-4 centimeters;
- the battery should be at a distance of 8-10 centimeters from the top of the niche or window sill.
When connecting steel or any other heating radiators, our specialists adhere to all established requirements to achieve maximum heat transfer in your home.
Radiator installation area
The standard option for installing batteries involves placing the devices under the window. This is necessary to cut off the cold air flow that enters the room from the window opening. Due to the rising thermal jets, the cold does not enter the house, and condensation does not settle on the glass. The basic rule is that the battery should occupy up to 70% of the width of the window opening, only in this case the absence of drafts and condensation is guaranteed.
Advice! When choosing a battery, you need to take into account the width parameters in relation to the window opening, selecting the power of the unit not lower than the specified values.
What else needs to be taken into account when determining the battery installation area:
- from the floor to the lower collector no more than 120 mm - this ensures the circulation of warm air at floor level and your feet will not be cold;
- from the window sill to the upper collector no more than 120 mm - this is necessary for heat flows to flow around the window sill protrusion and rise along the window glass to dry the condensate;
- from the wall to the battery at least 50 mm to ensure unhindered air circulation from the rear wall of the radiator.
Advice! To increase heat transfer and reduce heat loss, it is recommended to hang a screen made of foil insulation with foil into the room on the wall behind the radiator. The heat will be reflected from the layer and directed not to the street, but to the room.
Sequence of actions when installing a radiator
Installation of a radiator and connection of heating radiators with various elements and pipes includes several successive steps. Let's take a closer look at them.
Required Tools
To connect aluminum, steel, cast iron or other heating radiators, it is important to prepare the necessary equipment and tools. Their list may change during the process and depends on the battery model and connection diagram. Required tools and parts are:
- coupling;
- nipples;
- corners;
- adapters;
- shut-off valves;
- threaded fittings in accordance with the radiator and pipe;
- sleeve;
- brackets: 8*250, welded, for cast iron, adjustable or others.
- Mayevsky crane.
All necessary elements are prepared by our specialists at the preliminary stage, after the creation of the project.
Marking
In order to correctly connect and connect heating radiators, it is necessary to apply markings. The radiators must be installed at the same level in all rooms so that the coolant does not accumulate and is evenly distributed in a circle.
An approximate scheme for applying markings is shown in the photo:
To increase heat output, a reflective element is attached between the wall and the radiator, or the surface is coated with a heat-reflecting compound.
Mayevsky crane
After a long time after using the radiator, a situation may arise in which the battery heats up unevenly or does not heat up at all. This occurs due to the accumulation of air, which prevents the passage of moisture.
To remove air, a Mayevsky valve is used, which pushes the air plug by loosening the shut-off cone valve.
Installation of "American"
The radiator is installed using a nut and fitting, which are called American ones. They are a separate threaded unit. Installation is carried out in accordance with the diagram.
To begin with, the plugs and landing cells are unscrewed, after which the American plugs are installed in accordance with the following algorithm:
- determination of thread type;
- winding;
- screwing in the tool and fixing it;
- fixing the tap with a cape nut on the battery;
- fixing the tap with a union nut on the pipeline.
At the end of the work, the nuts are tightened using a wrench for greater tightness.
Screwing valves
After installing the American ones, the specialists begin to work on the valves. Connecting the heating battery pipe requires fastening one element. This approach allows, if necessary, to disconnect the radiator from the general system.
The valves are installed by screwing, carried out by a jumper. The tool drains water from the lower pipe to the upper one when the tap is turned off.
Radiator installation
After all the preparatory work has been completed, you can begin installing horizontal or vertical heating radiators. Installation is also carried out according to a simple scheme.
The radiator is hung from the wall, after which the pipes are connected. At this point the work is considered completed. The complexity of the process depends on the chosen scheme (diagonal, single-pipe, double-pipe, bottom or side connection) and the battery model.
Features of the bottom connection
Open bottom connection
Three connection methods:
- Connecting ordinary radiators through the lower holes.
- Using a set of components from below, steel or bimetallic radiators.
- Purchase batteries that are designed for this connection.
Now let's look at the methods, pros and cons of various methods of lower connection.
Connection with side outlets
Double-sided bottom connection
The connection itself is not very difficult. The pipes are located below - above the floor or hidden in the floor. A radiator is mounted on the wall, and a pipeline is connected to the lower holes. So that the battery can be removed without stopping the heating process, shut-off valves must be installed on both sides. An air vent is installed in the top hole (no matter which side).
Connection using an adapter
Connection diagram
Sometimes it is not possible to connect an ordinary radiator by connecting a pipeline to it from both sides. In this case, you can use an adapter. It is screwed into the lower hole, and a stainless steel tube is connected to the upper hole. The heating pipes are connected to the adapter itself from below.
You will receive more information about this type of connection by watching the video attached at the end of the article.
Bottom connection with flow extension
Flow extender
The bottom connection can be made using a flow extender. The device screws into the bottom hole and does not have any outlets to the top. The circulation of the coolant occurs due to the fact that water, passing through the tube in the middle of the radiator, comes out of it at the end of the heating device, rises, squeezing cold water through the outlet located in the device.
This type of connection is not suitable for gravity systems.
Connecting batteries with bottom connections
Piping in the wall
Now let us dwell on the more effective and most aesthetically acceptable method of lower connection - from below, simultaneously describing its advantages and disadvantages.
Advantages
Flow direction adapter
- It is possible to install a flow direction adapter.
- Both pipes go directly from the battery into the floor or wall (or into pipes located above the floor).
- When buying radiators with bottom connections, you do not need to worry about purchasing a suitable thermostat, since it is already installed there.
Flaws
You need to bleed the air from the battery
- An air vent must be installed on each battery.
- Warming is less uniform and not as effective.
- Cannot be used for gravity heating systems.
- You need to constantly use the circulation pump.
Radiator location
Regardless of the chosen pipe connection system or coolant supply, the radiator can be located in three options:
- in a niche - you need to prepare a special place in the wall. This option is mainly suitable only for a residential building with thick walls. You need to understand that the heat emanating from the sidewalls will not effectively heat the room, that is, there will be some losses in thermal output.
- under the window is the best option. The heat emanating from the battery will not allow cold air to enter the room. This placement is the most common.
- on the wall is a fairly effective option. The wall will not absorb heat, so the thermal output is normal. The radiator is usually hung on the wall if it is not possible to install it under a window.
We will help you calculate the best option for location and carry out the wiring and installation of heating radiators.
Conditions for choosing the location and parameters of radiators
If the choice fell on installation in a niche, then the distance between the side and rear wall to the battery should be 5 centimeters, and the distance from the bottom and top of the radiator to the wall should be 10 centimeters. When choosing a decorative grille, it is important to pay attention to how efficiently heat will flow. You should not choose steel or other metal decors, as they will become very hot.
When installing a radiator under a window, you should follow the marking rules when installing a heating radiator with a pipe.
When installing the battery on a wall, the distance to the wall should be at least 3 centimeters, and the distance from the floor at least 5 centimeters. Before installation, it is important to make sure that the walls are strong enough to support the weight of the radiator, otherwise this may cause serious problems.
Pipes: price for quality
The heating battery is mounted using pipes. When choosing these products, you should take into account the material of manufacture, which has different characteristics.
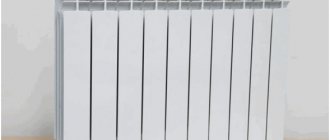
It is worth deciding on the type of radiators. A cast iron heating radiator can be tied with pipes made of any material.
Steel
Bimetallic heating devices are tied using steel lines. A welding machine is used for connection. Threaded fittings are used as connecting fasteners.
Steel products are used in systems with natural circulation, when a large cross-section pipeline is required. The advantages of the material include strength.
The structures are characterized by resistance to high temperatures and throughput. Moreover, steel pipes can last longer than 100 years.
- LiveJournal
- Blogger
Steel pipes are more often used in the heating system of private houses.
It is recommended to use seamless models to eliminate the risk of leakage.
If zinc is used to cover the lines, then welding cannot be used to connect the pipes.
Tying heating radiators requires certain skills.
Metal-plastic: we do it together with a thermostat
Different types of heating radiators are tied with metal-plastic lines, but under certain conditions:
- This type of piping is used in systems with limited pressure.
- Press fittings are used during installation.
- If compression fittings are used, a calibrator will be needed to ensure that the O-rings do not move.
This material combines the qualities of plastic and steel materials. Metal-plastic has a multilayer structure. The inside of the heater is equipped with a smooth surface, which prevents the formation of sediment.
The designs are easy to install. They search without special equipment.
The products are characterized by durability and can withstand high pressure in the system.
Polypropylene paired with strapping kit
Polypropylene piping is recommended for autonomous systems. This material is rigid, so it bends under a large radius.
More corner fittings are required during installation. The connection is made using a welding machine. This material does not rust or clog. The advantages include resistance to aggressive environments. These pipes are frost-resistant and resistant to temperature changes.
WATCH THE VIDEO
Proper piping of radiators contributes to the efficient operation of the entire heating structure. Tying heating radiators is not a difficult task and anyone can do it.