Ways to camouflage plumbing systems
There are many ways to hide pipes in the bathroom, which differ in composition, shape and purpose.
Most designs can be made by yourself without the involvement of other specialists or the selection of expensive tools.
Masking box-shaped structure made of plasterboard
Drywall is convenient and practical, but a frame must be built to attach it. A moisture-resistant option is used for the bathroom. The frame is assembled from rack profiles, the size of which is 27 * 50 mm, and connecting jumpers, the dimensions of which are 26 * 27 mm. The sequence of work is as follows:
- Marking the base. The master must draw a floor plan that will indicate the exact dimensions of the structure and all its components. At this stage, the thickness of the finishing drywall is also taken into account. If the pipes run vertically, then the marking of the box starts from the floor. A gap of 3 cm is made between the pipes and the masking structures.
- Installation. For this, a galvanized steel profile is used. The elements are connected to each other with self-tapping screws. The structure must be screwed using dowels and European screws. First, the profile is fixed on the walls, and then on the floor and ceiling. If the vertical posts are more than 1.5 m, then pepper jumpers are required. The distance between them is 0.8-1 m.
- Covering with plasterboard sheets. It is better to use whole slabs rather than pieces. Their edges should not protrude beyond the profile. For fixing, self-tapping screws up to 4.5 cm long are selected, and the distance between them is 2.5 cm. The fastener caps are recessed into the material. An open space is left in the box for valves and a meter.
- Sealing seams between sheets and covering the surface of drywall.
READ ALSO: How to use scissors to cut plastic pipes?
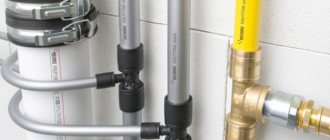
Installation of a plastic pipe box
Their installation is carried out as follows:
- Determining the features of the system and making a sketch of the frame. If you plan to replace the pipes before hiding them, then they need to be installed in such a way that there are a minimum of connections. The sketch is needed in order to correctly calculate the amount of original plastic.
- Construction. During installation of the profile, a building level will be required. To secure the parts, you will need dowels with screws, for which holes are pre-drilled. The frame is located closer to the water supply, but the minimum distance is maintained (3 cm). The guide profiles are mounted on the floor and ceiling, then the racks are screwed to the walls. They are reinforced with stiffening ribs installed every 40 cm.
- Installation of plastic. First, the starting PVC profile is secured with self-tapping screws. After this, decorative panels are attached. At the same stage, inspection holes are made. Doors can also be made of plastic by gluing them with sealant.
Installation of a water supply system made of polypropylene pipes in the wall
You can hide the pipes in a Khrushchev-era building, if they are polypropylene, in the wall, but this requires first making grooves in the base. The process is labor-intensive and does not always provide quick access to water pipes, so they must be closed after preliminary preparation.
Horizontal grooves cannot be made in main walls, as the base will crack and its strength will weaken.
The masking process is carried out as follows:
- Sketch of pipe layout diagram. This is necessary to quickly locate the pipeline in the event of a breakdown.
- Grilling. To do this, use a grinder or a hammer drill. The holes should be 1-1.2 cm larger than the diameter of the pipes themselves, since they tend to expand under the influence of temperature.
- Insulation and laying of pipes in grooves. After the entire system is installed, the holes are sealed with cement-sand mortar.
Installation of pipes in the wall does not require additional construction of the frame, and finishing is carried out faster. However, access to the pipes will be difficult. There should be no detachable connections in the walls. Do not lay metal pipes inside the base.
Metal gratings
They are made of chrome or stainless steel, so moisture practically does not harm them. No frame is required to disguise the pipes.
The advantage of the grille is that it can be combined well with various bathroom design styles. It is better to screw the grilles using self-tapping screws.
Plumbing roller shutters
Aluminum or plastic roller shutters are suitable for the bathroom, as they are not afraid of high humidity. They allow you to hide the pipeline, but access to it is simple and carried out in one movement. The advantage of this design option: preserving the space of the room. The technique for fastening the product is as follows:
- Preparing the opening for installation. All surfaces are leveled using putty or plaster.
- Box installation. It is mounted at the top of the opening on the wall or ceiling. In this case, a building level is used, since the product must stand strictly horizontally. Any distortion will lead to the fact that the roller shutters will not roll up completely.
- Installation of vertical guides. They are mounted at the end of the opening. Dowels are used for fastening.
- Fixing the false frame on the floor. It does not allow unauthorized opening of the canvas.
- Installation of drum with canvas. After this, the web stroke is adjusted. If necessary, the drum is lubricated.
READ ALSO: DIY pipe crafts (90 photo ideas) - step-by-step master class for beginners
You can use a false wall to support the device.
Disguise with furniture
You can hide water pipes using furniture. This method is functional, since you can hide various little things in bedside tables or cabinets.
To ensure that the furniture fits perfectly into the bathroom, it is better to order it according to individual measurements. For production, laminated chipboard or other material that is resistant to moisture is used.
- There is no need to build a frame or box or remodel the bathtub. The base is practically not affected. The system is closed using mirrors, pencil cases, and bedside tables.
- Furniture takes up space, and ready-made sets are expensive. To access the water supply, these items often need to be removed.
Masking of “lying” communications
To sew up horizontal communications, it is better to make a box from plastic, sheets of waterproof plywood or chipboard.
Previously, markings are made on opposite bases, along which a guide metal profile is screwed.
To fasten the sheets, additional jumpers are needed, the step between which does not exceed 60 cm. The structure can be stationary or removable.
Decorative mosaic
This method is suitable for designing a sewer system riser or a large pipe. However, working with such material is not easy. It is advisable to lay out small fragments of the mosaic in a certain order. The sequence of work is as follows:
- Making the frame. A metal profile is used for this. Vertical racks are screwed to the walls with self-tapping screws, and horizontal racks are screwed to the floor and ceiling. To strengthen the structure, crossbars are used, the pitch between which is 40-60 cm.
- Fastening drywall sheets. They are screwed with self-tapping screws to the metal profile. The caps of the fasteners are recessed inside.
- Mosaic cladding. Construction adhesive is used to fix the fragments. Before applying it, the surface of the drywall is puttied and primed. You can use mosaics to create paintings.
How to make a pipe bypass on a fabric stretch ceiling
This material is more durable and is not afraid of heat, so plastic protection is not needed. A different installation technology is used here, which is why the bypass method is also different.
First, the fabric is fixed into baguettes. They tighten it around the pipe so that there are no wrinkles. Make a cut from the communication to the wall and several smaller ones around the pipe. The canvas is tucked into the profile so that the edges meet. The remaining material in the pipe area is removed inside.
Then a decorative cap is installed. The lining is also purchased taking into account the diameter of the pipeline.
Features of factory products and homemade products
You can hide plumbing structures using factory-made or home-made structures. Both types have their advantages and disadvantages:
- Factory. They have a rectangular, rounded or angular shape and are sold in specialized stores. Plastic is often used to make such boxes. Factory designs are easy to install and remove. When choosing, you should carefully look at the quality. Cheap plastics quickly turn yellow or lose color, warping under the influence of temperature and moisture.
- Homemade. They are easy to make yourself, so you can save money. This takes into account the size of the room and the location of the pipeline. You can hide communications in a panel box, using lining or natural wood or brickwork.
The choice is determined by the style of decoration of the room and the financial capabilities of the owner.
How to cover heating radiators with decorative screens?
When a decision is made on how best to hide heating pipes in a modern apartment, the use of screens is the fastest and most effective. Old-style heating batteries function no worse than new ones, and sometimes it makes no sense to change them. Screening them does not require the help of professionals. It is best to cover risers and radiators with screens when they are located at a distance from the wall. It should be taken into account that up to 15% of the heat will be lost.
Decorative overlays and a plastic box for heating pipes are often transformed into a cabinet or cabinet. Materials are purchased in stores or decor is made from improvised materials.
Apartment owners are interested in the question: is it possible to leave the valves accessible in the presence of a screen in order to repair radiators, regulate the temperature and bleed air when it gets into the heating system? To do this, the screen is made removable or the ends of the batteries are left open. Also, the surface of the screen is made with holes or slits in order to improve heat transfer and reduce energy loss.
If the heating radiators protrude outward, they are covered with a box. Panels are used for radiators in niches. Materials can be metal, plastic, wood, glass, etc. Products must match the interior of the premises in color, design or pattern.
It is advisable to choose glass screens for heating radiators that do not transmit radiation and do not reduce convective heat transfer, if the gaps are chosen correctly. They are easy to remove and clean. Tempered glass does not break, but many now prefer a screen made of transparent acrylic due to its light weight, variety of shapes and colors.
Frame covered with tiles
Tile is an ideal material for cladding walls or protective boxes in rooms with high levels of humidity. Laying tiles requires constructing a frame and covering it with plasterboard. This process requires a lot of time and certain skills. The step-by-step instructions for carrying out the work are as follows:
- Measurements of the location of water supply and sewerage pipes.
- Construction of a metal or wooden frame. If the second option is used, then the surface is treated with antiseptic impregnations.
- Sheathing the sheathing with moisture-resistant plasterboard, chipboard or plywood. Self-tapping screws are used for fastening.
- Fixing the reinforcing mesh on top of the box. It is necessary to strengthen the base, as the tiles can be heavy. To fasten the mesh, rivets or self-tapping screws are used. The material must be in tension. After this, tile adhesive is applied to the surface. You can fix the tiles to the base within a day.
- Installation of tiles. In order for it to be correct, you should first mark the order of gluing the fragments. Tile adhesive is used to fix the fragments. To ensure that the distance between them is the same, plastic crosses are used.
- Grouting tile joints with a product with antifungal properties. This procedure is carried out after 24 hours.
READ ALSO: How to clean sewer pipes: types of clogged sewer pipes and ways to eliminate them
The choice of box shape depends on the location of the water supply junction. Sometimes it should be extended until the wash itself.
A few words about pipes
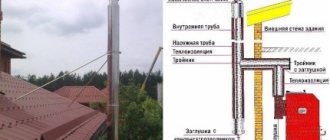
In one article it is quite difficult to pay broad attention to such a topic as the construction of an external chimney. Firstly, it has many nuances, and, secondly, such an article will be incredibly large and inconvenient to read.
That is why I will now give only a general overview, and I will address all questions on individual points that you have in separate publications. Although today there is already material on a similar topic. So, the outer pipe can be made of several materials.
Such arrangement of the hood will become as convenient as possible for people who want to organize a fireplace in their home. After all, this design is considered the most optimal for a fireplace. Although, it may be suitable for a bathhouse (it all depends on your capabilities and desires). But it is worth noting that it requires certain skills to install it correctly (which we will talk about in other articles).
- An ordinary stainless steel pipe.
The simplest and most cost-effective option for organizing this type of chimney. After all, the main difficulty in its manufacture will be making a hole in the wall for the outlet pipe. But there are certain difficulties here, namely the need for external insulation (especially in low temperature conditions). After all, its absence will significantly affect the draft due to excessive accumulation of condensate. The stove simply does not want to be heated and will smoke heavily.
In fact, this is an ideal option for installing an external chimney, both in a bathhouse and in a wooden house. Consisting of two sleeves placed inside each other, between which factory thermal insulation is already provided, such a pipe is extremely easy to install and efficient in operation. It is for this reason that I would recommend using it when installing a chimney through a wall in your room.
It can withstand the highest temperatures, but at the same time requires the most complex installation and insulation. In addition, it is distinguished by its rather high cost and relative fragility.
Which pipe elements should not be masked?
When renovating a bathroom, remember that not all parts of the water supply or sewer system can be closed. If they are completely sealed in the walls, then if a breakdown occurs, you will have to break the base to fix it. The following elements cannot be completely hidden:
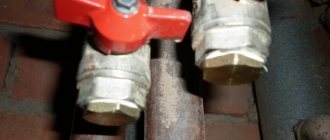
- threaded connections of pipes of different shapes, as there is a risk of leaks;
- installation locations for taps and shut-off valves;
- mounting area for counters and filters.
These areas should always be within easy reach so that if there is a leak, the entire repair does not have to be redone.
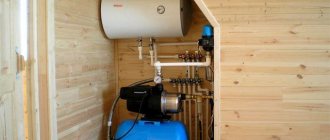
Methods for hidden installation of heating pipes in a private house
Heating pipes in a private house can be hidden in the floor, in the walls or under the ceiling.
Installation of a heating system with in-wall wiring
- A plan is drawn up in advance and a drawing of future communications is prepared. Indicate the locations of the outlets to the radiators and the locations of the threaded connections.
- In concrete or brick walls, according to the drawing, recesses (grooves) are made for pipes. The size of the recesses is calculated based on the diameter of the pipe + the thickness of the thermal insulation + the layer of mortar for sealing the grooves.
- Along the entire length of the recesses, mounting brackets are installed that will hold the pipes.
- The pipes are covered with heat-insulating material, connected and secured to brackets.
- The grooves are sealed with mortar, or the walls are covered with plasterboard.
Note! In its finished form, the heating system of a private house looks like free-standing radiators. They are decorated with protective screens in the style of the chosen interior.
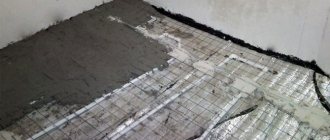
Installation of a heating system with camouflage “in the floor”
When laying a heating pipeline under the floor, two installation options are possible: with and without thermal insulation of the pipes. The option of laying heating communications in the floor with thermal insulation differs little from embedding it in the walls.
If the floor is concrete, then it is grooved. The dimensions of the niche are calculated taking into account the diameter of the pipe and the volume of thermal insulation. The pipeline is hidden in the made niches. If it is wooden, then it is mounted on joists.
When embedding the pipeline into the floor, it will be necessary to provide for forced pumping of water in the system. Why install a pump?
The second option to hide heating pipes under the floor is to install a heating system without radiators, called “warm floors”.
What to do with sewer pipes
In order to remove the sewer system from view, you need to follow the basic rule: there must be access to it. The masking structure should be easy to open to eliminate breakages or leaks.
Sometimes special niches for the subsequent laying of pipes in them are designed right away, so hiding them is not very difficult. Sewer pipes have a large diameter, so they can only be hidden in a box.
Technical characteristics of sandwich pipes
- Material. Basalt fiber (mineral wool) is mainly used as a thermal insulation material. This type of insulation is resistant to high temperatures and chemicals. Mineral wool has excellent thermal insulation/sound insulation properties and is laid with a thickness of 30-60 mm. Due to their fireproof properties, multilayer pipes can be used in houses built from any material. More expensive alloys with a high degree of heat resistance are used for the inner casing.
The inner layer of the sandwich pipe is mainly made of galvanized steel, and the outer layer can be made of copper, brass, stainless steel, etc. The scope of the pipe and the price depend on the content of alloying materials, various alloys and the thickness of the heat-insulating layer.
Sandwich pipes galvanized and stainless steel
- Connection type. Sandwich pipe elements are connected in two ways: corrugated edges and sockets. The advantage of a corrugated connection is ease of installation, but to ensure tightness, a large amount of sealant is required, and this increases the cost of the chimney. With a socket connection, a high degree of tightness is achieved due to the presence of a wider chamfer on one side of the pipe. The advantage is a high degree of tightness, due to which the design can be used for gas boilers. But the downside is the complexity of installation and the need for very precise adjustment of all parts.
Types of sandwich pipe connections
Avoiding mistakes
Since you need to close the pipe in the bathroom correctly, during work it is important to take into account possible mistakes that may be made. To prevent them, the following rules should be taken into account:
- make sure the water supply is working properly;
- provide access to connections and taps;
- ensure the tightness of threaded joints, use sealing gaskets;
- do not forget about the equipment of inspection hatches;
- Use only high quality materials.
All work should begin only after careful planning. This will minimize any errors.
Design Features
Despite the huge selection of materials for the construction of chimneys, the most widely used today are double-circuit steel pipes, popularly called “sandwich”.
The sandwich type chimney is a two-layer structure. Between two metal pipes of different diameters there is a layer of heat-insulating material, which simultaneously serves as insulation and insulation.
Video: Chimney made from sandwich pipes
Compared to single-circuit pipes, which are made from steel 0.5 mm thick, the double-circuit design is characterized by increased fire safety and better technical characteristics. To install a chimney outside the building, single-circuit pipes are not recommended. After all, due to only one layer, they are simply not able to retain heat in the cold season. Due to a sharp temperature difference, condensation forms in such a chimney, reducing draft and creating blockages in the pipe.
Construction of a double-circuit sandwich pipe
Therefore, to install a chimney through a wall, the best option would be to purchase sandwich pipes. The popularity of such a double-circuit chimney is due to its low price compared to a brick chimney, attractive appearance, excellent technical characteristics, fire safety and long-term operation.
In addition, you can do the installation of a chimney made of this material yourself. And although there are some nuances and subtleties here, even a beginner can cope with the task if you strictly follow our detailed instructions.
The pros and cons of hiding pipes in the bathroom
- aesthetic design;
- preservation of usable area when using internal wiring concealment;
- additional storage space if furniture is used for camouflage.
- structural failures when using low-quality materials;
- restriction of access to communications;
- the likelihood of repeated repairs if the water supply wiring or closing structure is incorrectly designed.
Piping in the bathroom always somewhat spoils the appearance of the room. To eliminate this problem, various methods are used to hide the system. Such decoration will hide the pipeline and create an additional element of convenience or attractiveness in the room.
One of the ways to camouflage pipes is presented in the video.
Pros and cons of installing an external chimney
A chimney located in the wall, of course, is more familiar to our eyes and does not attract the attention of others. But at the same time, it also has its shortcomings, which are more than covered by the external hood.
- Installing an attached external chimney significantly increases the fire safety of the room. After all, everyone knows that over time, soot deposits accumulate in the pipe, which, when heated at high temperatures, can flare up no worse than gasoline. At the same time, during its combustion, temperatures arise that only ceramics can withstand. Therefore, an external chimney is the safest in this regard.
- Minimizing possible smoke. With the correct design of a chimney of this type, the part of its outlet channel located inside the room is negligible, and therefore the probability of exhaust gases entering the room tends to zero.
- Possibility of arrangement without disturbing the roof covering and installation in an already finished building (I know from practice that not many people want to “make holes” in the roof).
- Simple increase in traction due to free choice of pipe height.
Certain disadvantages of this design include only the need for the correct choice of fasteners for its reliable fixation, the likelihood of strong windage when rising to a great height and a possible violation of the general style of the building.
Examples of successful solutions
To disguise pipes in the bathroom, take into account all factors - where communications can be made, the availability of equipment, the size of the room.
The material covering the risers must be highly resistant to moisture and corrosion
Plastic box
It may be better to install a plasterboard box or make a false wall. It all depends on the conditions of your apartment.