Causes of damage to aluminum radiators
Aluminum radiators are not durable compared to bimetallic and cast iron ones. In apartment buildings, they most often leak due to pressure drops in the system and water hammer.
Changes in water or coolant temperature also affect the condition of the batteries. If a liquid hotter than 100 degrees circulates in the heating system, it can damage the gaskets and sealant.
When water or coolant boils, the pressure in the central heating system (central heating system) can rise significantly. This often results in damaged sections. In some cases, an aluminum radiator may simply burst.
Sometimes problems are due to incorrect installation. Moreover, an aluminum radiator can leak several years after installation. In this case, you can only rely on yourself and hope that the other batteries were connected correctly without violating the installation standards.
If you have cheap aluminum batteries installed, there is a risk of manufacturing defects. No one is immune from this and it cannot be determined in advance. Therefore, before you buy a radiator, think about it: isn’t it easier to pay a little extra and buy a good battery than to fix problems?
Let's draw some conclusions
As we now know, it is quite possible to repair it yourself; the main thing is to understand and understand this topic in general. First of all, we find the cause of the breakdown, and then prepare all the necessary tools and parts for replacement. After all this, you can safely begin repairing the bimetallic radiator with your own hands!
Also, do not forget that if you are not confident in yourself, it is better to call a specialist. Because if you assemble the radiator or install it incorrectly, it can cause big problems both for you and in the overall heating system of the whole house. If you are sure, take the tools, spare parts, gaskets and start fixing the problem!
Locate the leak
When an aluminum radiator leaks, the most difficult thing is to determine the location of the damage. Believe me, it's not as easy as it seems.
When you see a puddle on the floor under the radiator, you can determine which section the water is coming from. But the shape of the sections is such that it is difficult to look under the outer feathers; the gap between them is usually 4-6 mm. Therefore, you will not be able to determine the real cause and location of the damage.
First of all, inspect the joints at the top of the radiator. They are visible through the gaps between the feathers that remove air. If there are drops of water on the connection or it is wet, you are in luck.
and you are deprived of most of the problems with “making a diagnosis”. You can proceed to the section “How to fix a leak between sections of an aluminum heating radiator.”
The lower joints are difficult to inspect, since you cannot get close to them. You can feel them with your fingers, but it’s better to be smart. Use a small mirror to examine them.
Advice
To better see the inside of the radiator through the mirror, shine a flashlight on it. The light reflected by the mirror will fall on the inner parts of the sections.
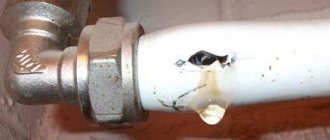
If all connections are dry, then the problem is more complex and a crack has appeared on the side wall of the radiator. In this case, water drips onto the floor from one of the feathers.
The easiest option is to simply remove the damaged section. But if you don’t want to do this, you will have to find the leak and fix it.
Checking the side walls of aluminum radiator sections
Now comes the hardest part...
The problem is that 95% of leaks occur only when water or coolant is under pressure in the radiator. It won't work to remove a section, fill it with water and see where it comes out from.
Unfortunately, at this stage you will have to work hard. To find out exactly where the aluminum radiator is leaking, you will have to dismantle the sections.
If your radiator is installed and connected correctly, then there are taps on the lower and upper pipes, and they are connected to each other via a bypass. You need to do the following:
- Close the valves on the supply and return pipes;
- Open the bypass;
- Drain the radiator.
To drain the water from the battery, first unscrew the top plug, then the bottom one. When the water has completely drained, you can begin dismantling the sections.
If there is no bypass or taps, you will have to turn off the entire heating system. This is not difficult to do in a private home. In an apartment building, for this, contact the employees of the housing office, housing and communal services or a regular plumber. In some houses (especially new ones) you can turn off the heating only in your apartment.
Options for leaks and searching for section damage
In this situation, two options are possible (see figure).
Options for radiator side wall leaks.
If an aluminum heating radiator leaks from the side of the section that is located further from the supply pipe, you must do the following:
- Using a nipple wrench, unscrew the nuts located between the leaking section and the intact one located further from the pipe (see figure) ;
Places for unscrewing the nipple nuts of the section located further from the water supply.
If a leak appears from the side of the section located closer to the supply pipe, proceed as follows:
- Using a nipple wrench, unscrew the nipple nuts located between the leaking section and the intact one located closer to the pipe (see figure) ;
- Unscrew the damaged section;
- Turn it so that the wall on which there is a leak is located further from the pipe;
- Install the damaged section using a nipple nut and wrench.
Places for unscrewing the nipple nuts of the section located closer to the water supply.
After these manipulations, you need to completely seal the radiator:
- Screw the bottom plug;
- Install the Mayevsky tap in the upper hole of the radiator and unscrew it two turns;
- Open the water supply and close the bypass slightly.
After this, the radiator will begin to fill with water, and the air will exit through the Mayevsky tap. When water comes out instead, turn off the tap. There is now fluid in the radiator that is under pressure.
At the site of a crack or break in the radiator wall, water will begin to leak out. It's done - you've found a leak.
Important!
If the joints between the nipple nut and the radiator were treated with sealant, you will also need to use it. This also applies to the places into which the plugs and Mayevsky tap are screwed.
How to eliminate a leak between sections of an aluminum radiator
There are three reasons why leaks may occur at the joints between sections, namely:
- Gaskets or sealant allow fluid to pass through;
- The nipple nut is cracked or its thread is broken;
- Thread failure in the section mounting hole.
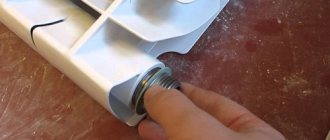
First, completely unscrew the nipple nut and inspect it. If it is cracked, just replace the old one with a new one. If there is damage to the thread of the mounting hole in the section or the nipple nut, you can simply wrap it with fum tape and install it in place.
If there is no visible damage, replace the gaskets. Some radiators (especially cheap ones) use a sealant. Sometimes nothing is installed at the connection points. Be sure to put in a good gasket, even if it wasn't there. Remove any remaining old gasket or sealant completely.
Signs and causes of failure of heating radiators
Possible causes of damage and breakdown of heating radiators:
- Initially incorrectly selected radiator. Depending on the diameter of the pipes, pressure and temperature of the water in the heating system, different types of radiators are installed.
- Incorrect connection of the radiator to the heating system pipes.
- Severe operating conditions for a centralized heating system. Increased acidity of the coolant and sudden pressure changes lead to electrostatic and electrochemical corrosion of the metal.
- Poor quality coolant in the heating circulation system forms deposits at the joints of sections and at the places where pipes are attached.
- Poor quality coolant clogs sections of the radiator and the radiator as a whole. This makes it necessary to wash them periodically.
- Degradation of intersection gaskets and destruction of threaded nipples. It is necessary to replace the gaskets between the radiator sections at certain intervals.
The main signs of breakdown and damage to heating radiators are as follows:
- During the heating season, the rooms became colder than usual,
- plaque has formed at the joints of sections and at fastening points,
- a leak appeared.
If the heating radiator is very old, it is best to replace it. Modern models are more efficient, have high thermal conductivity - the house will become warmer and heating costs will decrease. In addition, the new batteries are compact and have a beautiful design.
If it is not possible to replace the radiator, it is necessary to fix the damage as soon as possible. The best solution is to contact specialized services or seek the help of professional craftsmen. But you can also try to repair heating radiators yourself.
Repair of side walls of aluminum radiator sections
If a crack has formed on a section, then only argon soldering will help. Cold welding and sealants are powerless here - they will not be able to penetrate deeply and securely fix in the metal.
If you have an individual heating system whose pressure does not exceed 5 bar, you can use automotive radiator sealant. But this is too expensive an option - the sealant is not cheap, and you will have to pour a lot of it into the system.
If there is a pinhole at the leak site, you can use cold welding. The main thing is that it gets inside the radiator. Then, after hardening, the cold weld will form a kind of plug and will hold well. This option is not suitable for small holes.
Hole on the wall of an aluminum radiator. It can be sealed using cold welding.
- Using cold welding, you can seal holes with a diameter of more than 2 mm. Here is the full algorithm of actions:
- Heat a piece of cold weld under hot water (wrap it in plastic to avoid contact with moisture);
- Knead it;
- Apply cold weld to the hole and push it inward;
- When you are sure that part of the weld is in the internal radiator channel, remove the residue from the outside.
Important!
Before applying cold welding, the radiator must be dry and degreased. To do this, pour a little solvent or white spirit into the hole and wait until it dries.
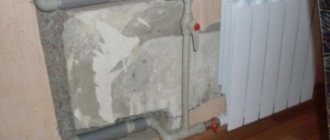
When is the best time to replace batteries?
So, let's start, first let's look at the simplest case when the batteries need to be replaced during apartment renovation. It is best to replace batteries at the stage of finishing the rough finishing, that is, when the walls have been plastered and the screed has been poured. It often happens that an old heating device (convector or cast iron radiator) prevents you from plastering the wall behind it; in this case, you need to plaster wherever possible around the old radiator, so that the radiator installer understands what level the wall is at and installs the radiator as the required distance from the wall and parallel to it. Plaster the space behind the radiator by removing the new radiator after installation.
You should also understand the technological process that first the radiator is installed on the brackets, blanks of new bends are attached to it on the union nut of the ball valve, and only then the bends are welded to the riser. And not vice versa. The reason is the need for clear alignment of the radiator outlets and collectors. An example of a job I reworked that did not follow the required workflow.