Installation of a heated floor requires subsequent long-term and uninterrupted operation of the heating system. In a city apartment, private house or country house, water-heated floors are equally effective and convenient. Such a heating system can be equipped in almost any residential space, but the effectiveness of its use depends on the compliance of the technical characteristics of the equipment with the design features of the room. Correctly calculated and installed heating circuits and professionally performed pressure testing of the underfloor heating system will allow homeowners to forget about the hassle of servicing heating devices for a long time.
Pressure testing procedure for the heating circuit of warm water floors
However, the idyll cannot continue indefinitely - any technology is not eternal and needs repair over time. Heated floors are a complex complex of a wide variety of equipment, the failure of one of the elements of which can lead to failure of the entire heating system.
In some cases, for example, if there are problems with the throughput or tightness of the floor water heating pipe, it is necessary to drain water from the heating circuit when preserving housing.
Let's take a closer look at the cases in which it is necessary to drain liquid from the underfloor heating system, and how this is done.
The main reasons for draining water from a heated floor system
There can be quite a few reasons why you need to drain the water from the heating system pipeline yourself - from the upcoming long absence of residents from the house to replacing the water in the system with antifreeze. In order to do everything correctly and not cause damage to the heating system, we will look in more detail at how to drain the water from a heated floor yourself.
A common reason for the need to drain the coolant is the preservation of the heating system for the winter when using ordinary water in the circuit. Before the onset of cold weather, this event is mainly carried out at dachas and country houses that are not used in winter. To simplify and speed up the draining process, special equipment is used.
Mobile air compressors (electric motor driven)
Important! In seasonal housing, failure to drain water from the heating circuit of underfloor heating before frost sets in can result in the system defrosting, so using antifreeze as a coolant is undoubtedly preferable - in addition to being resistant to low temperatures, these liquids are less subject to wear on pump parts.
Another equally important measure when operating underfloor heating is preventive maintenance on the heating system. Boiler water contains a lot of impurities, which, when heated, precipitate or form layers on the walls of the pipeline. Due to a decrease in the internal clearance of heat pipes, the circulation of the coolant in the system is disrupted and heat transfer is reduced. For this reason, when using water, the coolant must be drained once or twice a year.
A water circuit filled with antifreeze does not suffer from this problem. In this case, the coolant is replaced every 3-5 years - provided that the boiler is operated without overheating (for heated floors, the maximum permissible heating temperature threshold for the coolant is 45-550C).
One type of antifreeze for filling the circuits of underfloor heating systems
Another reason for the need to drain the coolant may be the liquid losing its physical properties. A change in the characteristics of antifreeze occurs after overheating - the solution begins to foam, filling individual sections of the heat pipes with foam, which disrupts the circulation of the coolant in the system and reduces heat transfer.
Failure to comply with the technology for installing heated floors, or the use of materials not intended for contact with chemicals, causes the occurrence of corrosive processes in the heating system, as a result of which the circulation of the coolant is also disrupted and leaks in the water circuit occur.
Naturally, you will have to drain the water from the heated floor pipeline when replacing it with antifreeze - modernization.
These are the main reasons for the need to empty the underfloor heating system and, regardless of the base, the water must be drained in accordance with all the rules, following safety precautions and observing the technological sequence of the component operations.
"Warm floor"
Since its inception, the “warm floor” technology has been used for quite a long time to create an auxiliary heat source. At its core, it was a heat generation system based on electric current, and was installed mainly in bathrooms.
In recent years, heated floors have “evolved” significantly, and are now used for heating rooms along with other heating systems. In addition, its popularity and demand for furnishing both private cottages and apartments in apartment buildings, especially elite ones, has increased significantly.
The popularity of heated floors is explained by their obvious advantages:
- Uniform heating of the entire room area. It became possible to walk barefoot on a warm surface, keeping your head cool, without wasting precious heat on unnecessary heating of the ceiling. Studies have shown that when the floor temperature is set to 25 degrees, at the level of human height the air temperature drops to 23 degrees, and already under the ceiling it drops to 20 degrees or less, depending on the height of the ceiling itself.
- Comfortable for living and rational temperature distribution. The head is at a moderate temperature level, the legs are warm, and everything above is minimally heated.
- Uniform distribution of heating minimizes the occurrence of damp, cool zones that are so favorable for the growth of harmful mold.
- The heating system is completely hidden. This removes all restrictions for the implementation of design ideas in the interior - there is no need to hide and disguise batteries, and useful space is not lost.
- The risk of burns is completely eliminated. This factor comes out to almost the first place in importance when it comes to the safety of young children.
- High energy efficiency. Due to the large area, there is no need for exorbitant power - it is enough to heat the coolant slightly above the temperature of the human body to create comfortable conditions.
Among other things, heated floors are easy to automate and control.
Procedure for draining water from the system
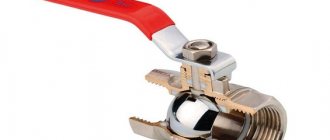
Warm floors are a closed system, so it is necessary to take care of the drain taps at the installation stage. The number of valves must correspond to the number of water circuits.
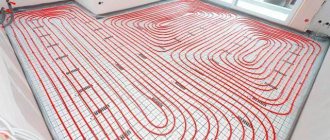
A heated floor is actually a long hose laid into the floor. Installation method - the configuration of the circuits may be different, but the principle of operation of the water circuit is the same - the coolant transfers heat to the surrounding space by heating the floor surface.
Image of the outline of a copper pipe underfloor heating system laid on reinforcing mesh in front of the screed device
Before starting the operation to drain the coolant, the heating system is turned off, after which the time necessary for all its elements to cool completely is waited.
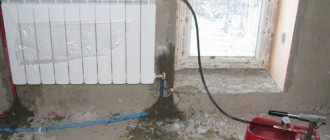
Considering the fact that the water circuit is connected to the main pipeline, and the connection point is located above the floor level, the water is drained forcibly using an air compressor.
Note: the power of a household vacuum cleaner is not enough to empty a heated floor system.
Important! To purge the water circuit, a compressor with an operating pressure of up to 5 bar is used - using a more powerful unit risks destroying the heat pipes.
The pressure gauge needle is at 6 bar - the maximum permissible blowing pressure of the underfloor heating system has been exceeded!
The drainage is carried out through a return line equipped with a drain valve, and the compressor is connected to the manifold on the inlet pipe, so the check valve may create some interference when purging the pipe. After connecting to the manifold, the compressor is turned on to displace the coolant from the circuit, and the air supply pressure is gradually increased - to a value after which liquid begins to flow out at the outlet. It should be remembered that the volume of water in each of the heated floor circuits is insignificant, so an ordinary bucket with a volume of 8-10 liters is sufficient to receive it.
The compressor should operate until air begins to flow continuously from the pipe following the water.
Note: if you do not have a compressor at hand, there is another way to empty the system of water and avoid defrosting the heating system. A hose of suitable diameter 1 m long with a funnel at the end is tightly placed at the inlet of the heat pipe. The end with the funnel is raised higher and liquid for washing car windows is gradually poured into it - “anti-freeze” (it is better to use a brightly colored one). As it is displaced, water will flow out of the return pipe, and then technical fluid - a lengthy but effective process.
Installing a new accumulator membrane
If water is detected in the air compartment, urgent measures are taken to replace the membrane. It serves as a fuse between the two main components of the device, the storage and air chamber. To get to the membrane, unscrew the flange with the water supply fitting. The membrane is removed. The tank is dried and a new part is installed.
During installation, sealants are used.
They coat the area of contact between the flange and the membrane. This allows you to organize the correct operation of the water supply system, protecting the tank from loss of air pressure through an unprotected joint. After all the work has been completed, the hydraulic accumulator is connected to the water supply and drainage pipes. If the membrane is replaced not before the winter period, the device begins operation.
When winter weather sets in, around the end of October, it is imperative to drain all the water from the water supply system of the dacha. If the water is not drained, the system will fail, the taps will burst, and the storage water heater will simply burst.
In all of our plumbing installations, we provide two valves for draining water from indoor pipes, a drain valve on the water heater, and drain valves in the well or borehole.
It will take us a little time to drain the water:
1. It is necessary to de-energize the electrical system by turning off the water pump circuit breaker or unplug the pump from the socket in the well or near the well.
3. Open taps 1,2,3,4 (see diagram below) - if they were closed for any reason and all taps (mixers) on all floors of the cottage or house, wait until all the water from the water supply drains into home.
4. Open the drain screw in the well to drain water from the main line. If you have a drain valve installed, the water will drain automatically when the pressure drops to 0.2 atm.
5. Unscrew the bottom part of the filter (such a transparent flask) after placing a basin or other container of at least 5 liters - it contains water!!! Discard the used internal filter. Install a new one next year. Do not screw the removed flask onto the filter for the winter!
6. To be safe, you need to drain the water from the sink siphon.
7. Don’t forget to drain the water from the toilet tank and the toilet itself.
1. It is very desirable that when draining the water, the water in the tank is cool and not hot. Therefore, the water heater must be disconnected from the electrical network one day before.
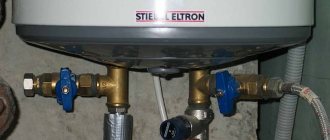
2. During installation, we always install a drain tap (6) and a safety valve (5). If the drain valve (6) does not have a flexible connection (optional), install it. With a flexible hose, it is more convenient to drain water into a container located on the floor. The volume of water drained is equal to the volume of your water heater!
3. Wait until the water is completely drained from the water heater drain tap. Now some water remains in the safety valve (5). To drain water from the valve, turn the lever on the valve up. Note: On some valve models, the tab is held in place by a small screw. The screw must be unscrewed, the water drained and put back in place.
If your country house is designed to freeze during the cold season, then you need to drain all the water from the water supply and all water-containing units every time before leaving the house. The concept of freezing the house in winter has its pros and cons.
to the cons
Constant heating of a seasonal home involves energy and therefore financial costs, the risk of power failures and freezing of un-drained water in the water supply, and the risk of fire of electric heating devices.
The disadvantages of the concept of freezing a house
include increased wear and tear on the house’s structural elements and interior decoration with more frequent crossings of zero, and the need for labor to drain the water every time before leaving.
The advantages of the freezing concept
include cost savings and reduced risk of accidents and fires.
In general, the optimal mode of operation of the house depends on your lifestyle: if you come to the dacha every weekend in winter, then it is more advisable to keep the house heated: +5C using electric floors, for example, as one of the most economical and safe means of heating. Before arriving at the dacha or in severe frosts, you can turn on additional convectors via SMS in advance (if you install the appropriate controller), which will raise the temperature in the house. If you don’t come to your dacha in winter or come a couple of times in half a year, then there is no point in keeping the house heated. To prevent the pipes from freezing, the water from the water supply must be drained.
Draining water before winter
In order to minimize the labor intensity of draining water from the water supply before winter, you need to think through several important details before designing the water supply and sewer system.
What you need to provide for convenient regular drainage of water:
1.
A tee and a drain valve in front of the check valve in the pipe supplying water to the house (in a well or in a well caisson.
2.
In case of emergency freezing or winter operation, pipes must be made of a material that does not break during expansion - for example, low-density polyethylene, polypropylene, etc.
3.
In each branch of the pipe distribution in the house, install a tap at the bottom point to drain the water.
4.
If it is impossible to reach the lowest point of the water supply system (the pipes are sewn into the floor and there is no basement), provide tees for connecting an adapter to a car compressor for purging each branch of the pipeline.
5.
When connecting the water heater, provide a tee and a tap for draining water with a hose attachment to the check valve on the pipe entering the water heater. And the same tee with a tap on the outlet pipe from the water heater for quick air supply when draining water.
6.
When the volume of the water heater is over 50 liters, provide a sewer branch that does not go into the septic tank in order to prevent the death of the septic tank microflora when discharging a large amount of boiling water. Or drain hot water through a hose into the street, but not into the septic tank.
7.
Selection of mixers. If possible, use traditional ceramic or rubber-sealed faucets rather than single-lever faucets, which are sensitive to residual water freezing.
8.
Expansion membrane tank. The amount of residual water in the rubber bulb after draining the water should not cause damage due to freezing. The author tested this on his tank - the tank survived 5 winters, but on the 6th the rubber bulb had to be replaced.
9.
Location of the washing machine. Don't forget to drain the water from washing machines, dishwashers, etc. devices. Unfortunately, simply draining the water is not enough in this case—you will need to manipulate it by turning the washing machine over or blowing it with a compressor. Therefore, when choosing a place for it, ensure easy access to it.
Below is an illustration of how to drain water from a simple temporary water supply system that is not specifically prepared for draining water before winter.
| First step: drain the water from the supply pipe. For this purpose, we have a tee and a tap in front of the check valve in the well (1). Use a long stick (3) to open the tap (2). We hear the gurgling sound and observe air bubbles rising from the tap: the water is drained. | Second step: draining the water heater. It is good to pre-cool the water. If there are no special drain taps, unscrew the safety valve on the supply pipe (on the right) and connect the hose to drain the water. Then we loosen the nut on the outlet pipe - air leaks in and water from the water heater begins to drain into the hose. |
| If there are no special taps for draining water from the water supply system, disconnect the pipe joint at the lowest point and drain the water from the pipeline. | If there is a special tap for draining water, use it. |
| Disconnect the drain and supply hose of the washing machine. We drain the water from them. | Turn the washing machine upside down. This will get rid of any remaining water in the lower points of the drain system. We leave the washing machine in this position for the winter when leaving for a long time. (I'm not kidding!) |
| Draining water from the washing machine. The remaining water is hidden in a corrugated pipe leading from the tank to the pump: we squeeze the tube like a pear and blow out the remaining water - it will come out through the drain hose. | We disconnect the supply pipes of the flexible shower cabin. We drain the remaining water from them. |
| We remove and blow out the rain shower head - there is always water left in it. We put the watering can in place. | Draining water from the shower stall. We begin blowing out the shower taps. Remove the shower head and place the three-way valve (1) in the hand shower position. And alternately open the hot and cold water tap (1), blowing the pipes through the shower hose (for blowing, you can use a compressor, a frog pump, or the power of your lungs). Then we alternately change the position of tap 2 to drain the remaining water in it. |
| The most enjoyable part of the job is draining the water from the toilet: for this you can use any household pump (bicycle pump, sprayer, enema, Janet syringe). Let's scoop everything out clean. If your sewer system tends to emit pleasant odors (my septic tank does not smell), then pour antifreeze into the toilet. In the spring it will also need to be pumped out, and not drained into a septic tank. In addition to the toilet, water will need to be removed from sink siphons and drains in the floor. | Draining water from the filter: Remove the fine filter housing (it is unscrewed clockwise) and the coarse filter housing. Pour out the water and throw away the used cartridge. |
| Draining water from the pumping station: Open the main plug on the pump housing of the pumping station and drain the water into a previously prepared container. | We unscrew the plug on the side of the pump housing and thoroughly blow out the pump, getting rid of any remaining water. If you use a submersible pump in a well or well, then do not worry, the water there will not freeze in normal winter conditions. |
The reasons why it is necessary to drain water from a heated floor may be different. Starting from the planned replacement of the coolant with a new one, when the water is already quite dirty and contains a large amount of rust and other impurities (although we have already considered heated floors without draining the system, so anyone planning to drain the heated floor for this very reason, feel free to follow the link), or when the heating system antifreeze has expired. Finishing due to some emergency situations, when it is deep winter outside with low sub-zero temperatures, and a long period of downtime of the heating system is expected when it is turned off, due to the lack of materials or equipment to repair the system or a long shutdown of heat, gas, and electricity supplies. At this moment, the owner of the house has an idea about how to drain the water from the heated floor so that it does not freeze. At the same time, this must be done quite quickly, especially if the circulation pump or other equipment has failed, in which there is no circulation of coolant through the system. In this situation, cold bridges are formed in the places where the floor adjoins the external walls and the water in the pipes in these places can quickly freeze, which will make it impossible to start the heated floor before the onset of heat. If the heated floor is made of a metal-plastic pipe, defrosting will lead to a rupture of the pipe, and of course to large financial costs for repairs.
The difficulty of draining water from a heated floor is that it does not have a lower point for draining the system, as in a conventional radiator heating system. Therefore, water from the heated floor will not flow by gravity and because of this, you have to resort to other solutions.
Technical subtleties and nuances
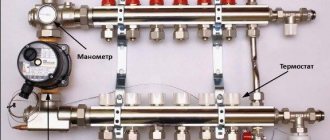
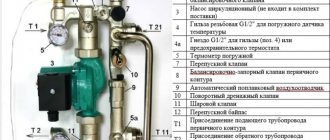
In preparation for draining, it is necessary to study the structure of the collector in order to find and mark on the supply and return the location of the valves, marked as follows:
- servers are red;
- reverse flow - blue.
Connection diagram for a compressor for emptying the circuits of a heated floor system.
If you confuse the supply with the return, the drain system will not work - the check valve will block the pipeline.
If there is no receiving container, then you can connect the drain hose to the return valve and stretch it to the nearest sewerage intake - a toilet, sink or drain.
Collector unit for a warm water floor system
Having finished draining water from one circuit, empty all the others in the same way. When draining a section of the system, the valves of the remaining circuits must be closed, and at the end of each stage, the taps of the emptied pipelines must also be closed.
To completely empty the circuits, the purge procedure can be repeated after an hour - when the moisture from the walls of the heat pipes has drained and accumulated in some area.
Preparing and replacing coolant
In most autonomous heating systems, the coolant is tap water and this is not entirely correct. Untreated water contains a large amount of salts and oxygen, which causes scale deposits and metal corrosion.
The best option for heating systems is collected rainwater. It is possible to use water after treatment with reverse osmosis or boiling. You can also find special inhibitors on sale that block the effects of salts and oxygen, but such products are very specific for use with certain materials of pipes, seals and radiators. In general, a good solution would be to install a simple filter system on the heating feed.
The presence of a hydraulic accumulator in the water supply system of a private house or cottage helps to have an additional supply of water in case of breakdown of the electric pump or power outage. The specialization of this device is aimed at increasing the fluid pressure in the pipes and protecting the pump from water hammer.
Seasonal drainage of water from the accumulator maintains proper operation of the device
To create the right conditions for the operation of the accumulator, seasonally drain the water in its tank. Performing such work is associated with protecting the device from freezing and subsequently ensuring the integrity of the hydraulic tank. It is important to follow a certain sequence of actions when carrying out protective work.