Baxi boiler repair
Baxi are gas water heaters from a manufacturer in Italy. Despite the fact that they are distinguished by a sufficient degree of reliability and durability, sometimes some of them break.
If your boiler is not functioning correctly or not working at all, the first thing you need to do is find the cause of the problem. In most cases, built-in automation will help, which will generate an error code , and the operating manual supplied by the manufacturer describes in detail all error codes and their interpretation. When performing the check, make sure that gas and electricity are available, and water consumption must be checked. You need to carefully inspect the external and internal structure in order to eliminate the possibility of technical breakdowns.
Problems may include:
- the boiler goes out or does not turn on at all ;
- ignition becomes impossible;
- popping noises are heard in the combustion chamber;
- the boiler overheats;
- the highest heating temperature of the coolant decreases;
- during operation of the boiler, an uncharacteristic noise background is emitted;
- Some meter or system component breaks down.
- pressure drops in the heating system
The causes of the problem may be:
- penetration of moisture into the boiler;
- water quality is insufficient;
- there was a difference or decrease in gas pressure;
- voltage drop in the electrical network;
- incorrectly installed heating system.
- heat exchanger burned out
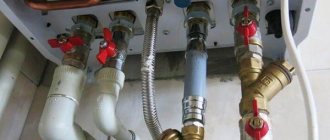
You need to start by turning it off from the electrical network, turn off the gas
valve at the entrance to
the boiler
.
Then you need to wait until the boiler has completely cooled down.
Gas wall-mounted boiler BAXI Fourtech (Installation Guide. Part 3)
- home
- Blog
- Gas wall-mounted boiler BAXI Fourtech (Installation Guide. Part 3)
07.01.2017
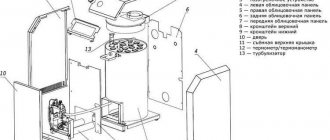
28. Annual maintenance. For correct and reliable operation of the boiler, it is necessary to check annually: • the appearance and tightness of the gaskets of the gas circuit and combustion chamber; • condition and correct position of the ignition electrode and flame sensor electrode; • condition of the burner and its attachment to the aluminum flange; • absence of dirt inside the combustion chamber. Use a vacuum cleaner for cleaning; • correct setting of the gas valve; • pressure in the heating system; • pressure in the expansion tank; • correct operation of the fan; • absence of contamination inside the chimney and air duct. ATTENTION Before carrying out any work, make sure that the boiler is disconnected from the power supply. Upon completion of the technical inspection, set the boiler operating parameters to the initial positions. Be very careful when dismantling the hydraulic group. Do not use sharp tools or use excessive force when removing the retaining clips.
29. Cleaning filters.
The filter at the cold water inlet of the hot water system and the filter at the return of the heating system are located inside special removable cartridges. The heating system filter cartridge is located at the return from the system (Fig. 16 F), the DHW system filter cartridge is located at the cold water inlet (Fig. 16 E). To clean the filters, proceed as follows: • turn off the power supply to the boiler; • close the tap on the supply to the hot water system; • drain the water from the heating system by opening tap A (Fig. 16); • remove the clamp (1-E/F) of the filter as shown in the figure and, acting carefully, without applying excessive force, remove the cartridge (2-E/F) containing the filter; • in order to remove the cartridge with the heating system filter, you must first remove the three-way valve motor (1-2G – Fig. 16); • clean the filters from possible contamination; • insert the filters into the cartridges and install them in their places, carefully securing them with clips; • to replace the NTC sensor of the DHW circuit, see fig. 16D. Caution: When replacing or cleaning the O-rings in the hydraulic block, do not lubricate them with oil. Lubricate them only with special products such as Molykote 111. Attention: Check that parameter F03 = 3 (paragraph 21). ELECTRICAL CONNECTION FOR THREE WAY VALVE MOTOR (Models 1.24 F – 1.24 – 1.14 F – 1.14). The 3-way valve motor and associated wiring are included and shipped together. For detailed instructions on connecting the three-way valve, see the manuals included with the kit.
Rice. 16
30. Cleaning limescale in the DHW system Cleaning the DHW system can be carried out without dismantling the secondary heat exchanger if a special tap (supplied separately) has been installed in advance at the hot sanitary water outlet. To clean the DHW system, you must: • Turn off the tap at the cold water inlet to the DHW system; • Drain the water from the hot water system using a special tap; • Turn off the hot sanitary water outlet valve; • Remove clamp 1E (Fig. 16); • Remove the filter (2E Fig. 16). If a special tap is not available, the secondary heat exchanger must be removed as described in the next paragraph and cleaned separately. We recommend that you also clean the NTC sensor of the DHW system and its location from limescale deposits (Fig. 16 D). To clean the secondary heat exchanger or DHW circuit, we recommend using Cillit FFW-AL and Benckiser HF-AL. 31. Removing the secondary heat exchanger The plate heat exchanger of the DHW system is made of stainless steel and can be easily removed using a screwdriver as follows: • if possible, drain the water only from the boiler through the drain valve; • drain the water from the DHW system; • turn off the tap at the cold water inlet; • unscrew the two screws (directly in front of you) securing the DHW heat exchanger and remove it (Fig. 16B).
32. Functional diagrams
24F
| Rice. 17 | 1 pump with automatic air vent 2 three-way valve 3 three-way valve motor 4 Pressure gauge 5 removable filter on the heating circuit return 6 heating system filling tap 7 removable filter on the DHW circuit inlet 8 DHW circuit priority sensor 9 DHW circuit temperature sensor (NTC type) 10 shut-off valve on automatic bypass 11 hydraulic pressure switch 12 boiler water drain valve 13 relief safety valve (3 bar) 14 plate heat exchanger of the domestic hot water system 15 gas valve 16 gas supply ramp with nozzles 17 temperature sensor (NTC type) of the heating circuit 18 ignition / flame control electrode 19 overheating thermostat 20 primary heat exchanger 21 smoke hood 22 fan 23 Venturi device 24 positive pressure point 25 negative pressure point 26 pneumatic relay - draft sensor 27 burner 28 expansion tank |
24
| Rice. 18 | 1 pump with automatic air vent 2 three-way valve 3 three-way valve motor 4 Pressure gauge 5 removable filter on the heating circuit return 6 heating system filling tap 7 removable filter on the DHW circuit inlet 8 DHW circuit priority sensor 9 DHW circuit temperature sensor (NTC type) 10 shut-off valve on automatic bypass 11 hydraulic pressure switch 12 boiler water drain valve 13 relief safety valve (3 bar) 14 plate heat exchanger of the domestic hot water system 15 gas valve 16 gas supply ramp with nozzles 17 temperature sensor (NTC type) of the heating circuit 18 ignition / flame control electrode 19 overheating thermostat 20 primary heat exchanger 21 smoke hood 22 thermostat - draft sensor 23 burner 24 expansion tank |
Tell friends:
Comments
No comments yet
How to repair the heat exchanger of a BAXI gas boiler
In order to begin repair work on a gas boiler, it is worth disassembling it, the method is as follows:
- After a detailed study of the diagram, we proceed to removing the front cover, it will protect the inside of the boiler. To do this you will need to unscrew 4 bolts, this should not cause any problems.
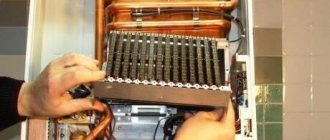
- Unscrew the protection from the firebox.
At this step you will need a vacuum cleaner, thoroughly clean the firebox from dust and debris. - After unscrewing the two screws and removing the wires and terminals, remove the fan.
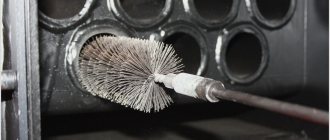
- Wipe the burner with sprayers with a wet cloth; if you notice clogged sprayers, you can use a brush, but not an iron brush, so as not to damage or break burner parts.
- Now you should remove the heat exchanger, it’s very simple. Disconnect all sensors. Remove the clips from the tubes and lift the heat exchanger to the top with gentle rocking.
When the boiler is completely disassembled, we begin to repair it or take preventive measures.
Very often, replacing the heat exchanger makes it possible to solve the problem of incorrect operation.
Flushing the boiler heat exchanger
Washing should be done both in the middle and on the outside.
To do this, pour clean water into a basin, add special agents to it that help fight scale and rust - place a heat exchanger in it for a while. At the end of this time, using pressurized water, remove any remaining scale and rust from the inside and outside of the heat exchanger.
After completing all the described procedures, we begin assembling the gas boiler. Do the described method in reverse order. As you can see, even an inexperienced technician can repair a baxi gas water heater with your own hands, which will serve you for a very long time.
Published 1 opinion
If you have no experience in handling the units or if there are no special tools, it is better to entrust the boiler repair to a competent technician.
wromka › Blog › Flushing the heat exchanger of a BAXI LUNA 3 gas boiler
So and so good afternoon, not cheap TV viewers! Before the New Year, this unpleasant situation happened: hot water stopped flowing from the boiler. The water flows for about ten seconds and then stops. Well, I surfed the Internet and they say the heat exchanger was clogged, looked at approximately how to clean it and began to create a system. First of all, a circular pump was purchased for 990 rubles. 1/2 adapters for it. In order to connect the pump to a container (I used a 20-liter canister as a container), I also purchased a 50 cm hose and a 1/2-inch connection pipe. Next, it was necessary to organize the outlet from the pump and connection to the boiler. Next in the diagram I installed a 3-way valve. This valve does not have a closed position. It pours either back and forth, or in one direction. I connected the return line to the canister to one side of the tap. On the other hand, there is a tee into which a pressure meter and a hose for connection to the boiler are inserted. Two of these hoses are meter. To complete the circuit, you need a return hose from the boiler. We assemble the circuit and cut the pipe for connection into the canister. I hit the 5 liter mark and poured 10 liters of water. I connected one hose from the pump to the outlet of the hot water boiler, and fed the return from the boiler through the inlet hole with a hose into a canister. In other words, I connected it the other way around. If you connect it as in most cases, the heat exchanger becomes clogged and the pump cannot pump. I poured hot water and added a little sulfamic acid. And left the water running for an hour. Eventually there was a black residue on the edges of the canister. Various debris floated in the water mass. If scale was in the heat exchanger, then sulfamic acid dissolved it. She proved her own abilities to me more than once. I checked everything and it doesn't stop working. “You learn from mistakes” If someone decides to assemble such a diagram, I recommend paying great attention to what is written below. A pressure meter is not required in the circuit. If you plan to wash only once, then you don’t even need to buy taps. I plan to pay for the system and will replace the pressure meter with a thermometer. Look in the instructions in which position your pump does not stop working. In the position I assembled it does not work. The motor must be in a horizontal position. Phase and zero do not matter.
Subscribe to my blog, I will soon make a more effective heating scheme.
Do I need an expansion tank for a baxi wall-mounted gas boiler?
The volume of the built-in expansion tank of the baxi boiler is indicated in the characteristics and for the ECOFOUR series it is 6 liters. To answer the question of its necessity in a separate heating system, you need to know the total volume of this system.
Calculating it is not so difficult: the filling volume of the boiler and radiators is in their characteristics, and the filling volume of pipelines can be calculated by knowing their diameter and total length. Water, after heating by 80 degrees Celsius, will increase in volume by approximately 4-5%, therefore, the recommended volume of the expansion tank is 8% of the total volume of the heating system if filled with water and 12% if antifreeze is used as a coolant (thermal coefficient antifreeze expansion is greater). Thus, a standard expansion tank will be sufficient for a heating system with a volume of up to approximately 75 liters when using water and a volume of up to 50 liters when using antifreeze liquid.
These figures are conditional (with a margin) and when selecting the capacity of the expansion tank, you must be guided by the design calculations of a specific heating system, or the manufacturer’s recommendations.
In most cases, the built-in boiler tank is quite sufficient and the decision to use a separate additional tank is made by specialists at the design stage.
Replacing the Baxi main5 24F heat exchanger
Replacing the Baxi main5 24F heat exchanger
Post by Dmitriyup33 » 11 Oct 2021, 10:03
Replacing the Baxi main5 24F heat exchanger
Post by RADAR » 11 Oct 2021, 14:30
Replacing the Baxi main5 24F heat exchanger
Post by Olegbez » 11 Oct 2021, 14:51
Replacing the Baxi main5 24F heat exchanger
Post by BAXI-Ural » 11 Oct 2021, 15:41
Replacing the Baxi main5 24F heat exchanger
Post by Dmitriyup33 » 11 Oct 2021, 16:03
Replacing the Baxi main5 24F heat exchanger
Post by BAXI-Ural » 11 Oct 2021, 16:11
Have you ever tried to heal your teeth?
Release the tubes from below and, together with these tubes, drag the heat exchanger towards you. If you are not convinced of the hint, call a specialist
Replacing the Baxi main5 24F heat exchanger
Post by Dmitriyup33 » 11 Oct 2021, 16:52
BAXI-Ural wrote: Have you tried to heal your teeth?
Release the tubes from below and, together with these tubes, drag the heat exchanger towards you. If you are not convinced of the hint, call a specialist
Replacing the Baxi main5 24F heat exchanger
Posted by garry » Oct 11, 2021 10:45 pm
Replacing the Baxi main5 24F heat exchanger
Post by Olegbez » 12 Oct 2021, 15:36
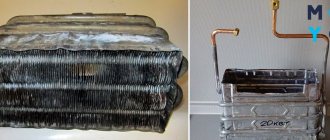
I wasn’t too lazy and took a visual photo comparing two 24 kW heat exchangers. Supply pipes for cold/beautiful mountains of water: 24 Main Four - 22 mm, Main5 -11 mm, Dimensions of the heat exchanger - reduced, working area: 59.5 cm2 - on Main 5, on outdated models - 73 cm2. Even a person far from all this will be able to prove that the 5th series is cut down!
Replacing the Baxi main5 24F heat exchanger
Post by BAXI-Ural » 12 Oct 2021, 15:57
Replacing the Baxi main5 24F heat exchanger
Post by Olegbez » 12 Oct 2021, 16:10
Replacing the Baxi main5 24F heat exchanger
Post by Dmitriyup33 » 18 Oct 2021, 09:36
Inspect the ends with great attention, maybe wash them somewhere. It may immediately seem that you can crawl up to clean the end and the seat of the seal from scale with a very small sandpaper, and clean the tube in your hands. Just don't make deep scratches. As an option, you can use sealant (red automotive sealant), just be careful so that it doesn’t get inside, otherwise that’s the end of it all.
Thanks for the advice. In short, I removed all the scale and this tube began to push further inside. Previously, due to scale, I was not able to push it deeper.
Good afternoon. My Baxi luna 310 fi is almost 10 years old. I noticed a leak from the hole where the rod in the hydraulic toggle switch of the secondary heat exchanger comes out and presses the toggle switch. The code for ordering the assembled DHW PRESSOSTAT is 5629950. Even the office representatives in Samara couldn’t find anything like this, so I decided to repair it piece by piece.
I ordered from them: 128. O-ring seal 2.6 x 1.9 / Code 5405400 127. Hydraulic tumbler membrane fabric / Code 5405330 107. Rod seal assembly / Code 5630250. If anyone repaired it.
Hello. There is a saber boiler , a separate air channel of 80 mm. The voltage is fine, 230V, there is ground. when the neighbors arrive (and only) E42 begins to fall and after it E01. With the front cover open, it does not stop working, but it is noisy enough and this is not the case. Boiler
suffocating?
In the photo the air channels are as they were under the developer, now the boiler has been moved to the side
2 meters to the right + 2 elbows of 90 degrees of rotation.
I pray for help, what should I do? Should we call the gas workers and let them sort it out?