Check at the time of purchase
Warm floors should be checked at the time of purchase. The heating device is accompanied by documentation that specifies the technical characteristics and resistance level.
At the buyer's request, the seller must demonstrate all functions of the equipment. Using a multimeter or tester, you can measure the resistance in insulation; for this, the device is set to high resistance mode. The data obtained must match the information in the technical documentation.
It is recommended to check the heated floors when purchasing, otherwise there is a risk of purchasing equipment that does not work.
Why does a warm floor fail?
The thermostat may also have operational problems. Therefore, repair of the heated floor will be required. In addition, when installing an electric heating cable, it can be damaged. This happens when installing a screed, when installing the top floor covering, during the installation of railings, door stops, and attaching decorative elements. You can accidentally damage the cable (break the insulation, short circuit, break) by drilling for fastening any element. A cable break in one place leads to complete inoperability of the “warm floor”.
As mentioned above, repair of a heated floor may be required in the event of a break in the heating cable, as well as in the event of improper temperature readings due to a malfunction of the temperature sensor, or if the thermostat fails.
According to the rules, the temperature sensor is placed loosely in the cement screed in a plastic corrugation. That is, its replacement should not be problematic (there is no need to open the main coating and cement screed). It is also not difficult for a specialist to replace the thermostat.
The most difficult repair is repairing a broken heating cable. Because first you have to find this break or short circuit. This procedure is carried out using special devices without opening the floors. Measure the resistance in the heating cable circuits and insulation resistance. Sometimes the length of an electrical cable is measured by the reflected signal from its end or break point. Repair of a heated floor will be faster if the layout of the heating cables is known. The cost of searching for a broken heating cable and scanning the floor surface averages 5,000 rubles or more, not counting the work of installing a repair coupling and opening the floor.
Checking the network voltage with a multimeter
If the installed heated floors do not heat, then the first thing you need to check is that there is voltage in the network. For this, there is an indicator on the thermostat. If it lights up, then the temperature setting may be off, or the minimum is indicated.
The lack of light on the indicator indicates that there is no voltage, and you need to check the machine on the dashboard. There are times when the machine is turned off by a protective device - this means that there is a short circuit.
To determine the location of the damage, you need to disconnect the power and the floor cable from the thermostat. Then you need to ring the segment located between the shield and the regulator with a multimeter.
If the multimeter gives zero resistance, then the wiring is damaged in this area. If the equipment shows a higher value, then you need to look for damage elsewhere.
First, you need to find out whether or not there is electric current at the input to the thermostat. If a short circuit is detected during the test, it means that there is a malfunction in the device. Otherwise, problems must be looked for in the power cable.
A multimeter can measure both resistance and voltage in a heated floor.
Do-it-yourself underfloor heating (electric) repair
Cable fix
If the cause of the breakdown is the heating cable, then the steps to detect and eliminate it are as follows:
- Disconnect the cable from the thermostat and the entire system from the power supply.
- A high-voltage generator must be available to allow the location of the rupture to be located. It will create an electric arc at the site of the breakdown.
- If there is no high-voltage generator, you can use an audio detector, which will make a sound similar to a metal detector at the location of the cable break.
- A voltage tester is the easiest and most effective way to check, as it not only shows that there is a cable under the tie, but also where it breaks.
It is difficult and expensive to repair a cable if an electric heated floor has been broken, because it is located under a layer of screed, then troubleshooting must be taken very seriously, starting with measuring the resistance of the heating element to a break.
When the area with the gap is found, you need to:
- Remove the floor covering in this area.
- Carefully break the tie , trying not to hit the cable located under it, so as not to aggravate the breakdown situation. Repairs can only begin if sufficient cable has been released.
- When purchasing a ready-made set of heated cable floors, the consumer receives the “little things” necessary for its repair - special heat-shrinkable sleeves and sleeves. It is enough to strip the wire at the break point, connect it with a sleeve, crimp it with pliers, put a sleeve on the cable and heat it with a hairdryer. Under hot air it will become smaller and the film will insulate the repaired area.
- Before the floor covering is restored, the system is connected and checked for serviceability.
- The screed is made and the finishing coating is put in place.
If you don’t have the necessary tools, it’s cheaper to call specialists who will find the cause of the problem and fix it efficiently and quickly.
Troubleshooting the Sensor
This part of the heated floor is the easiest to repair:
- Since the temperature sensor is installed in a corrugated tube , it will not be difficult to detect it.
- The device must be removed and replaced with a new one , then returning the tube with the sensor to its place.
- The good news is that even if you use a grouted cabling system, you won't have to open the floor because part of the corrugated tubing is in the wall. Just take it out, pull the wire and the sensor will come out.
- In the reverse order, the new device is inserted into the tube , and then the groove in the wall is covered up and returned to its original appearance.
Thermostat malfunction
A common cause of thermostat failure is the terminals that connect the power cord, cable and temperature sensor. They may come loose and tighten them enough to get the floor working again. When turned on, the voltage in the power supply and at the terminals must match.
If this does not help, and the resistance measurement shows a large deviation from the technical indicators, then the thermostat must be replaced.
These are the simplest ways to repair an electric heated floor with your own hands.
How to check a heated floor with a multimeter for a break using a ringer
To test an electric heated floor with a multimeter for a gust, be it a cable, mats or film, be sure to turn on the sound signal. This is done using the icon located near the ohmmeter scale.
When the probes touch each other, a sound is heard - this indicates that the circuit is closed. If you touch the conductors of the heated floor with the probes, a buzzer appears. If it is absent, we come to the conclusion that there has been a tear in the cores.
Measure the degree of resistance of the underfloor heating heater, possibly with a multimeter. The received data is divided by 220 W (voltage level in the network), so you can find out the amount of current flowing through the cable.
This value must be multiplied by the voltage (220), and the power consumption is obtained. It must coincide with that prescribed by the manufacturer, and discrepancies of 5% are acceptable.
Discrepancies on the larger side indicate the presence of malfunctions in the heater.
When installing film heated floors, you can measure the resistance with a multimeter both for the entire system and for each strip separately. If the received data does not correspond to the passport data, then we can say that the problem is in the film. Therefore, it is necessary to check the integrity of the wires and the quality of their connections.
High power consumption
If, when measured, the power consumption significantly exceeds that specified by the manufacturer, this means that a short circuit has occurred. This usually happens when the insulation layer of the wires is damaged.
In this case, one area will heat up strongly, while the other will not heat up at all. Operating in this mode results in high power consumption, and the system will quickly fail.
This problem can be solved if you dismantle the finishing material in the place where the insulation is damaged and repair the defective section of the wire.
The repair consists of insulating the exposed wire strands with insulating tape. If the cable is under a concrete screed, then this is quite difficult to do.
Low power consumption
If the power of the heating floor is significantly lower than the rated value, and the resistance indicator is equal to infinity, then an open circuit has occurred. Continued operation in this mode will lead to cable burnout.
To fix the problem, you need to find the break point. But first, you need to disconnect the system from the network and the regulator. To determine the area of the break, a high-voltage generator or thermal imager is used. By passing them over the surface of the floor covering, you will hear a sound in the place where the gust occurred.
There the trim should be dismantled to gain access to the area of the wire break. Broken wires are protected, connected with a sleeve and clamped with forceps.
The coupling, placed in advance on the area, is heated with a hair dryer, which leads to its compression, thereby sealing the wire. After which, you can lay the finishing material indoors.
Lack of resistance in the system
The resistance is zero - this indicates a short circuit has occurred. If there is no trim or it is easy to remove, then you can find the place of damage by simple inspection. In the place where the circuit shorted, the insulating layer will be damaged (melted, burnt, wires exposed).
Heated floor repair (diagnostics)
Repair work consists of restoring the insulating layer.
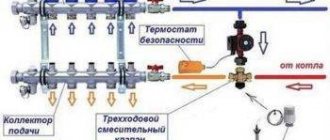
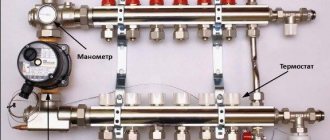
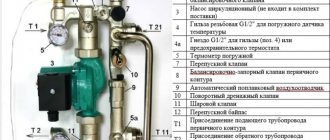
Troubleshooting a heated water floor
When a break in a heated floor is identified, repair work is carried out according to a specific algorithm. The important thing here is that almost all the main elements of the heating system are within reach. The procedure to follow in a situation where it is necessary to eliminate a leak in the water circuit is as follows:
- the water supply to the water circuits stops. For this, all supply valves on the manifold are used (you do not know in which circuit the break occurred);
- if the damage is caused by the operation of the tool, then it’s easier for you, you know where the leak is located;
- the leakage area is cleared of screed and construction debris;
- Remains of concrete should be removed and access to the damaged pipe should be done carefully. You need to work with a hammer drill step by step, breaking off small fragments of the screed within a radius (10-15 cm) of the damaged area.
This concludes the first stage of your actions. Now that you have the location of the damage in front of you, the whole task comes down to pressure testing the water circuit.
For this purpose you will need a hacksaw or metal scissors. The edges of the cut pipe are thoroughly washed to remove dirt, shavings and debris. The edges of the pipes are unfolded using a special reamer. This is done to align the hole and whatever happens after. The fitting did not slip off when put on. Only now can you put a fitting on the cut pipe and press it into place. Next, the other end of the damaged pipe is prepared and pressure tested in a similar manner.
In place of the damaged area, a prepared piece of pipe of identical diameter and size is installed, not much longer than the length of the removed fragment.
Having completed the installation and eliminated the break point, you can begin to introduce water into the pipeline system. If everything is in order and no side effects are observed in the operation of the water circuit, you can begin to restore the screed.
Important! After completing the restoration work, you should draw up a clear plan and diagram, which will indicate the location of opening the screed and installing a new connection. This precaution will allow you to know the location of the break in the event of further maintenance work or during renovation of a residential premises.
In the video you can see how to fix a water circuit leak.
How to check a temperature sensor with a multimeter?
The temperature sensor is resistor equipment, so it has its own resistance, which can also be easily checked with a multimeter. Since the sensor is located between the heating elements, the resistance of its resistor is affected by the temperature of the heated floor. The higher the temperature, the lower the resistance. For example, the floor is heated to 5 degrees - the device will show 22 kOhm, at 40 - 6 kOhm.
Before ringing the temperature sensor, remove the front panel from the regulator and unscrew the installation block. After this, using a multimeter and setting it to ohmmeter mode, the sensor resistance is measured.
It is compared with factory values. A discrepancy of more than 5 kOhm, or a value equal to 0, indicates a breakdown of the device and it needs to be replaced. This is not difficult to do if the installation instructions for the sensor have been followed and it is placed in the corrugation. You can simply remove the device from it and replace it.
How to Check Warm Floors with a Multimeter? How to Check Electric Floor Heating? Check with Tester?
There are modern models of thermostats; their touch screen displays information about sensor failure.
Warmly bright
If the cause of the breakdown is not obvious, measure the supply voltage. It must correspond to the value given in the operating instructions for the thermostat, without deviating from it by more than 5%. If the indication of turning on the heated floor on the thermostat does not work (a light bulb or an icon on the electronic display), you need to check the presence of voltage (220V) at the terminals for connecting to the heating cable with an external temperature sensor connected (if provided). If there is no voltage, the problem may be caused by poor contacts on the thermostat due to poorly tightened fixing screws, as well as a malfunction of the temperature sensor or the thermostat itself.
Floor temperature sensor . In order to check the temperature sensor (remote), you need to disconnect it from the thermostat and check its resistance. There is no need to remove the sensor from the floor for this. The resistance value should be within 5...30 kOhm at room temperature (the exact value can be found in the thermostat instructions). You can read more about checking the resistance of the sensor in the note How to check a heated floor: measuring the resistance of a temperature sensor . If the sensor is faulty, it must be removed from the corrugated tube in which it is placed during installation and replaced. When doing this, make sure that the sensor reaches the end of the tube. To do this, it is better to mark the length of the one you removed on the new sensor. Unfortunately, we often encounter incorrect installation of the sensor, which makes it impossible to replace it. For example, a corrugated tube was not used during installation and the sensor was firmly stuck in the floor screed; there is a tube, but it is laid with such a bend that the sensor cannot be pulled out. The situation is difficult, but solvable. Similar problems and solutions are discussed in detail in our article Warm floor temperature sensor: missing or cannot be removed for replacement . The following recommendation is suitable for a specific situation:
To avoid opening the floor when replacing the sensor, it may be recommended to replace the thermostat with a model that operates in power control mode, such as an OCD4 thermostat . Such regulators allow the heated floor to operate in timer mode (for example, half an hour - operation, 15 minutes - shutdown). This option is not particularly convenient to use, but at the same time it may well be suitable in some cases, because will provide heating of the floor in the room.
When checking the serviceability of the thermostats themselves, it is recommended to disconnect the heating cable from them. If the thermostat breaks down, it can be replaced with an identical one by connecting the old sensor to the new device. If you choose another model, then it is better to also replace the sensor, which is not difficult if the sensor is installed correctly, and the sensor most often comes complete with a new thermostat.
Heating cable . If both the thermostat and the temperature sensor are in good working order, the reason that the system is not working must be looked for in the heating cable. How to check the underfloor heating cable? To do this, measure the cable resistance, insulation resistance, and compare it with the values indicated in the passport or warranty card of the product. During professional installation, these values are always checked and entered after installation. In their absence, which, unfortunately, also happens quite often, the cable resistance can be approximately estimated based on the area and power density of 100-120 W/m2. Most often, we encounter too high resistance values (megaohms), which clearly indicates a cable break, usually caused by mechanical damage. Read more about checking the resistance of a heating cable - How to check a heated floor: measuring the resistance of the heating cable and insulation . Another sign of professional installation is the presence of a cable routing diagram - take a look at it first. As a rule, the floor is drilled for door stops, cabinets, plumbing fixtures, etc.
When a heating cable breaks, the insulation resistance often decreases significantly, incl. resistance between the heating core (or both cores) and the braid. In such cases, to find the location of the break, a special device is used - a high-voltage generator, which often makes it possible to apply high voltage to form a high-voltage arc between the heating core and the cable braid or cores. Then this place can be found using another device - an audio detector, the principle of operation of which is similar to a metal detector.
Sometimes, when the audio detector fails to find the break point, so-called breaks are used to search for it. thermoplates. This method can be used in cases where, after “burning” the cable and cooling it down (within a couple of hours), a conductive path forms between the conductors of the heating cable. When a reduced voltage is applied, part of the cable heats up and the zone of heating and breakage can be determined by applying the plates to the floor. This method can also be applied in those rare cases when the cable resistance is significantly lower than the nominal one, which is possible in cases where the heating conductors come into contact due to damage.
So, the location of the damage has been found (which, unfortunately, even with a high level of professionalism and technical equipment, is not possible in all cases). Now you need to carefully remove part of the heating cable and repair it. The broken wires are connected using sleeves of the appropriate diameter, which are crimped with press pliers. The connection point is insulated using a heat-shrinkable sleeve and a heat gun: the heated sleeve cools down, contracts and seals the damage site.
Please note that searching for cable damage and repairing it are very labor-intensive and complex operations that require high qualifications and special tools.
More on this topic: Warm floors do not heat well: reasons and solutions
"Teplosvetlo" carries out repairs of breakdowns of electric heated floors of any degree of complexity - see the section on the cost of repairing heated floors .
How to check the thermostat and relay
A thermostat is a device that is used to configure the heating system and control its operation. In a thermostat, the relay or capacitor most often breaks down.
Repairing them is expensive, so it makes more sense to simply replace the entire device. Although there is one reason why the floor does not heat - poor contacts of the wires with the regulator terminals. This breakdown is easy to fix yourself. You just need to tighten the screw connections.
When starting to test the thermostat, you must first check that the device is connected correctly according to the diagram. If everything is normal, then you need to disconnect the heating elements from the regulator and check for voltage at the contacts.
To do this, the minimum temperature is set and a voltage of 220 W is supplied. Using a multimeter, you can measure the voltage in the contacts; it should match that at the input - 220.
After that, you need to make sure that the relay is working properly. A step-by-step check consists of the following steps:
- The thermostat is set to the minimum temperature value.
- The voltage is supplied and measured, it should be 220 W.
- The toggle switch is switched to On mode.
- The maximum temperature is set on the device, and a click should sound, that is, the relay switches - if the device is working. At this moment, the pressure on the contacts that goes to the heater should be 220 W.
- The lowest temperature is set again, and again the relay should turn off the voltage supply.
The underfloor heating doesn't heat up? How to determine the cause.
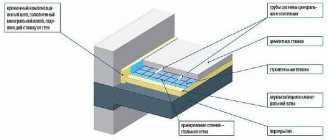
Types of heated floors
Floors are divided according to the type of heating element:
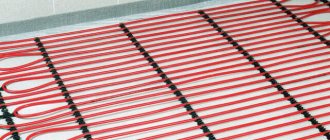
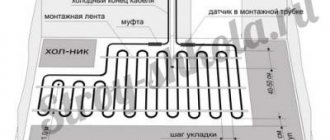
Heating cable. There are two types of this floor: a reel with a wire, which, during installation, is sequentially unwound over the surface of the base, or mats - the cable is already unwound and fixed on the substrate; during installation, the mats themselves are laid and connected to the thermostat.
In the first case, before the finishing coating, the floor is covered with a screed. In the second, the screed device is optional.
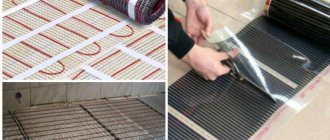
Infrared heating element. There are also two types: a film in which thin carbon plates are built in, and mats with carbon rods. Both can be installed without a tie on top. The rod floor is considered more durable, but it is more expensive.
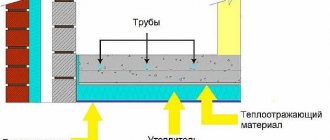
Any floor consists of the following components:
- heating element (see above);
- thermostat (the main unit for controlling the operation of the device);
- temperature sensor - a sensitive device placed together with a heating element under the screed or coating. It monitors the state of the system and transmits data to the thermostat.
We wrote about this in more detail in the article on how to choose a warm electric floor.