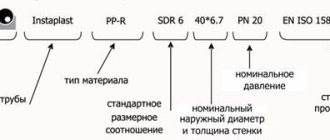
Installation of underfloor heating
Video
The future structure, at a minimum, must be durable, because it will have to withstand pressure from the outside and from the inside. In addition to all this, the blanks in the network must resist corrosive formations.
Based on the above, we can conclude that the following pipes can be used for the floor:
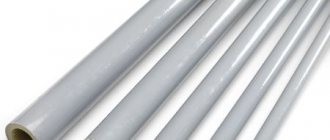
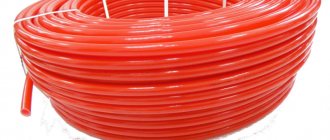
Copper. They are the most expensive. They fully meet all regulatory requirements that arise in the case of hidden installation. Because they do not create oxygen permeability, are not afraid of corrosion, and are highly durable.
Polymer types made of vapor-proof plastic. They tolerate internal and external pressure well and are not at all afraid of the influence of corrosive processes. But they are not very durable. , it plays the role of a protector.
Metal-plastic (composite products consisting of several layers, mainly a combination of polyethylene and aluminum). These pipes are very durable, they have enough hardness, and they are not subject to corrosive formations. With these indicators, this type of pipes for laying heating in the floor compares favorably with a lower price compared to copper analogues
It is worth paying attention to this type of pipe rolling.
The technology for laying heating in the floor is determined based on the type of pipes, their diameter and wall thickness. When working, it is recommended to avoid tapping and other butt fastenings using fittings.
The workpieces are secured to the floor using planks, on which a laying slot is prepared for the required volume of pipes. The most optimal solution is when the pipes are laid directly into the grooves made in the panel ceiling.
Advantages and disadvantages of a hidden heating pipe laying scheme
As for the advantages, there is one, but significant one - aesthetic beauty. When laid hidden, heating pipes in the wall or floor do not disturb the interior of the room
This is important for rooms with panoramic glazing, floor-to-ceiling windows, etc. Decor is also important in rooms with massive furniture; you don’t have to think about damage to products from the heat from the chimney
But the hidden scheme has more disadvantages:
- Hidden installation of heating pipes with your own hands is a difficult task. To reliably hide the outline, it is necessary to comply with regulatory requirements.
- Significant heat loss. Before the coolant warms up the house, it must first heat the screed or wall, then the finishing, and only then the heat enters the room.
- Increased cost of work. To hide the contours, you need to buy pipes made of steel or with reinforcement, sleeves, insulation, insulating materials - all this will require investment.
Before starting work, all the nuances are determined - access to key nodes of the highway, layout taking into account the load on the floor and wall. The optimal cross-sectional size for coolant circulation is also calculated without increasing the linear expansion property of the pipes.
And one more important nuance on which the performance of the circuit during hidden installation depends is the correct slope of the heating pipes. The standard slope is 0.5 cm per meter of highway. You can reduce the figures to 0.2 cm, but only if a good pump is integrated into the system and the circuit is selected with the correct diameter of the internal tunnel.
Features of pipes for hidden installation
Which pipes are best suited for hidden installations - this question is most often asked by owners of private houses
Professionals recommend paying attention to metal-plastic pipes with reinforcement. Plastic parts deteriorate under the influence of UV rays, so they are well suited for installation in a screed, thick wall
As for steel products, they are more difficult to bend, so more fittings must be used in rotating areas. An increased number of connectors increases the risk of leakage. It turns out that PP pipes with reinforcement are the best option for hidden installation of a heating system.
Requirements for hidden communications
The rules for hidden pipe laying are prescribed in regulatory documents. Before choosing a technique for how to groove a wall for pipes, it is worth familiarizing yourself with the SNiPs on this issue. Requirements and prohibitions:
- It is unacceptable to groove load-bearing walls under the pipes, as this work affects the stability of the entire building. Before planning the water supply distribution, it is necessary to familiarize yourself with the design documentation of a specific building.
- Only pipes connected using monolithic welding or soldering techniques are laid into the thickness of the wall. For structures based on collapsible or semi-demountable reinforcement, it is necessary to ensure access to all nodes. This requirement is met by organizing inspection hatches and removable panels.
- When laying water pipes from metal or metal-plastic structures, it is necessary to take into account the layout of electrical networks. Preliminary “ringing” of the walls with special equipment will protect you from unpleasant surprises. During gating in the area of possible passage of cables and hidden wiring, the work area must be de-energized.
- The size of the groove is determined taking into account the direction of wiring and the coefficient of linear expansion of the specific material used. It is minimal for metal pipes and aluminum-reinforced polymer samples. The polypropylene pipe in the groove expands both across and along. The channel must be designed for such an increase. For every 3 meters of communications carrying hot media, one compensating junction must be organized. Such knots are made in “pockets” or a wide groove. In the absence of the necessary space, the expanding pipe will deform the channel wall: the decorative finishing area will quickly become unusable.
- The pipe in the groove is secured with clamps. Even with maximum bending, it should not touch the channel walls: neglect of this point will lead to the appearance of extraneous noise during operation of the system. In order to prevent knocking and to maintain the maximum temperature of the conductive medium, hot water pipes inside the grooves can be wrapped with a heat insulator. Professionals often use Energoflex, which is passive to fungal attack and resistant to moisture.
- When sealing the groove, the material should not fit tightly to the elbow. The groove is sealed to form an air cavity, and is not filled with the composition.
- A layout of the plumbing, which indicates the agreed entry and exit points of the system into public sewers, should be kept in case it is necessary to quickly locate pipes in the thickness of the wall. If the work is done well, it will be impossible to do this visually.
Types of wiring
After choosing the pipe material, you need to think about the wiring diagram of the heating system. Depending on the area of the heated premises, the layout of the building, the type of coolant and the energy source, the engineer must select one or another pipe layout. Experts distinguish several ways to install pipes in a house.
We recommend that you read: How to hide the ventilation pipe from the hood in the kitchen?
Top water filling system (gravity flow)
In such a system, the heating boiler is located at the lowest point of the object, and water circulation is based on natural physical laws (expansion when heating, compression when cooling). When heated, the water increases in volume and flows upward from the boiler through the pipes, filling the risers and heating radiators. Circulating in a closed circuit, the cooled liquid is returned to the boiler, where it is heated again.
The top water filling system is the simplest and most economical in terms of installation and operation. The advantages of this layout include:
- independence from electricity;
- no need to install a circulation pump.
Distribution with top water spill is suitable for a relatively small area of heated premises. The disadvantages of a gravity system include low efficiency and the need to increase the power of boiler equipment. In top filling systems, emergency situations often occur - airing, water boiling - which further reduces the efficiency of heating. When operating the system in rooms further away from the boiler, the temperature of the riser and radiators is usually lower than in other areas.
Bottom water filling system (forced)
In such systems, the coolant circulates through the operation of a special pump, which is installed at the outlet of the manifold connected to the boiler. Thanks to the circulation pump, the system performance is significantly higher compared to gravity heating. Other advantages of this type of wiring are the ability to use thinner plastic pipes and install the pipeline under the floor.
The only drawback of the lower wiring is the dependence on electricity. If there is an unscheduled power outage in the house, the circulation pump stops and the system stops functioning.
There is another classification of heating system wiring:
- single-pipe - installation of the riser is carried out on the basis of one pipe, which extends from the boiler and is connected to one radiator, and from it to the next, and so on;
- tee - several radiators are connected to a common riser at once;
- collector - based on supply and return pipelines, which are connected to the collectors, and radiators are connected to them using separate pipes.
Important! Single-pipe wiring is suitable for small (up to 150 m2) residential buildings. Collector wiring is most often installed in residential buildings and cottages on two or more floors with several rooms, a kitchen, a bathroom, and technical rooms.
Before planning the installation of heating pipes, you also need to take care of purchasing small engineering equipment. This includes all kinds of valves and plugs, condensate drains, control and accounting devices (pressure gauges, thermometers).
We recommend that you read: How to make a high-quality boiler for a bath with your own hands?
Optimal diameter for home heating
. After all, the system will operate effectively only if heat losses are correctly calculated. Without an accurate calculation of the cross-section, your heating system will not cope with its tasks.
When purchasing products for work, you need to consider not only what they are made of
It is also necessary to take into account the length and diameter of the pipeline
When choosing a diameter, it is better to take the following characteristics as a guide:
- Internal volume. This is the main indicator that shows the diameter of the internal section.
- External volume. This indicator is used to classify pipe materials. It can be: small (from 0.5 to 10.2 cm); average (from 10.2 to 40.6 cm); large (exceeding 40.6 cm).
- Conditional volume. Diameter indicator, which is displayed in inches or fractions thereof.
quite a difficult task. For this work, special formulas and tables are used.
At the same time, you can rest assured that the installation of the heating network will be carried out without errors, and nothing will have to be redone. And this will avoid additional financial investments.
Methods for laying heating pipes
When laying hidden pipes, you can cover them, for example, with wooden wall panels
Regardless of the type of pipeline system used (collector, two-pipe, single-pipe), pipe laying can be done in the following ways:
- Open installation carried out along the perimeter of the walls (usually along the baseboard).
- Hidden gasket in the walls.
- Laying heating pipes in the floor.
More often, when choosing a method for laying and connecting pipes to heating devices, the factor of aesthetics plays a big role (the ability to visually monitor the condition of pipes when laid open is less common). On the technical side, if installed correctly, the installation method does not significantly affect the reliability and performance of the system.
There is a dependence of laying technology on the pipe material. For example, the thermal expansion of steel pipes is minimal; they can be practically walled up during installation. The likelihood of their rupture or deformation in the structure is low.
Metal-plastic pipes have completely opposite properties. For safety reasons, they must be protected with sleeves with a diameter larger than the pipe cross-section. This insulation gives the pipe additional space to expand and reduces heat loss.
Open installation is carried out using special clips that secure the pipes to the wall.
Pipes for heating systems
Which pipes to choose to create a heating system is decided in each specific case depending on the overall size of the premises requiring heating, the wishes and financial capabilities of the customer.
The total price (estimate) of the heating system installed in the house directly depends on the material of the pipes intended for use:
- Copper. Durable material - copper pipes can last up to 50 years. It has fairly good technical characteristics, but is quite expensive.
- Cross-linked polyethylene. A material that is used not only for installing a traditional water heating system, but also for installing heated floors.
- Polypropylene. The most popular and affordable material with excellent characteristics, used for heating cottages and houses in most cases.
Other types of pipes in relation to the heating system are considered less relevant today.
You will also need to calculate the diameter of the heating pipes suitable for a particular case. You can find out how to do this in the feature article.
Making your own pipelines
Open gasket type:
- First, you need to install heating devices (boilers, pumps, expansion tank, batteries).
- For a better look, you need to calculate the laying of pipes, for which diagrams are made taking into account the intended interior design.
- There are 3 options for open installation: a) The discharge pipe runs along the very top, and the bottom one is placed on the floor at the level of the baseboards. This option is good when water circulation occurs naturally. b) The location of both pipes is at the bottom. It is better to use this exclusively with forced circulation of the coolant. The wiring is then practically invisible. c) The upper discharge pipe is laid between the radiator plugs under the window sill. The down tube rests on the floor. With this modification, the number of required pipes will be reduced, which is much cheaper. Moreover, it will be possible to connect radiators in series and parallel.
- Having marked the necessary lines on the walls, the main sections of pipes are installed on clips. The entire installation must be carried out exactly in levels. But you need to take into account that these parts of the gasket must be without connecting seams. If plastic pipes are used, then the clips must be installed almost every 1 meter. If the pipes are metal, then one fastener per 2 meters is enough.
- Install the necessary transition fittings for plastic pipes on the heating device. There is no need to save money here. Choosing non-separable installation (it is cheaper in price), this can lead to problems when replacing them.
- Install small parts of pipes to the connecting fittings. To do this, you need to know a little engineering and design in order to make turns and bends very carefully and correctly. In this case, you need to carefully measure the pipes, taking into account the connecting seams before cutting, so that in collapsible joints there is no interference or interference.
- Connect the dismountable structures, check and pressurize the system. It is necessary to close all communications, fill the pipe with water from the water supply, and control the pressure.
Hidden wiring:
- First you need to do the preparatory work: a) Initially understand what type of heating you need. For forced circulation of the coolant, placing pipes in the wall at floor level or under it may be suitable. If the circulation is natural, then the upper pipeline should be installed in the suspended ceiling, the risers should be decorated with boxes or mounted inside the walls. The lower pipe must be recessed into the walls. b) Mark the pipes on the walls and perform gating. The procedure is very complex and requires a lot of concentration, so you need to use any personal protective equipment. Cutting the grooves is done with a grinder.
- Next, the main highways should be laid.
- Pressure testing must take place exclusively under water pressure.
- Walling is carried out, while the pipes are thermally insulated in advance. Decoration can be done in several ways, such as: a) Plaster. To account for various accidents, for quick dismantling, a solution should be used of a lower strength (max 1:6). It is also possible to use gypsum plaster. b) Seal the groove with plasterboard inserts. Cut it into strips and glue it onto the plaster. This type is much faster and can be quickly dismantled if necessary. c) By creating decorative boxes from plasterboard, you can perform hidden wiring without chiselling.
- Moreover, rigid fixation must be done exclusively with the system under pressure in order to simulate its working condition, which will reduce the deformation of the decoration.
The main thing is that a system made independently will be tested. You will know about all its advantages, and you can eliminate the disadvantages yourself without calling a specialist to your home. You will be able to choose for yourself which of the systems is more suitable both for the interior and for economic factors
And what is also important is quality. You will know how well your heating is made
Therefore, there is no need to be afraid to do this work yourself!
Based on materials from: https://trubamaster.ru
Horizontal wiring diagrams
The horizontal heating distribution scheme in a private house with bottom supply is feasible, both with a collector and with a one- and two-pipe system. Horizontal pipelines leading to and from radiators are preferable to risers in terms of aesthetics. They can be laid hidden - under floors or in natural niches at floor level. The option of gravitational circulation of liquid in a circuit with horizontal heating distribution in a house is practically not used due to its inefficiency, so it is necessary to purchase and install a circulation pump.
There are three options for horizontal wiring
- Collector. Was discussed above. The most effective option for heating large areas
- Dead end. Available only in two-wire systems. The heated coolant from the boiler enters the radiator through the supply pipe, and then, having given off thermal energy, flows in the opposite direction. This method is the most economical in terms of pipeline consumption, but the length of the circuit in this case is large (in addition, the length of different circuits is different), which makes it difficult to adjust the system
- Along the way. Unlike the dead-end heating distribution of a private cottage, the working fluid in the supply and return lines does not move in the opposite, but in the same direction. All circulation circuits are the same in length, this greatly facilitates adjustment. But the large total length of pipelines leads to an increase in the cost of the system. This is especially noticeable when it comes to heating large rooms.
Installation requirements
When laying pipes in the wall, it is recommended to use shock-absorbing materials. For example, energyflex, polyurethane foam. These materials will serve as a gap between the wall and the pipe; accordingly, there will be no pressure on the concrete when the pipe expands.
The fewer connections, the better. Connections are the most vulnerable part of polypropylene systems, least protected from leaks and having low pressure resistance.
Pipes must be selected in accordance with the conditions of further operation.
Based on wall thickness, all PPR pipes are divided into categories from PN10 to PN25.
- PN10 pipes are thin-walled, designed for cold water supply or for heated floors and other low-temperature, low-pressure systems.
- PN16 and PN20 are used for water supply with pressure up to 1.5 MPa and heating systems with pressure not exceeding 0.8 MPa.
- PN25 is reinforced with a layer of fiberglass or aluminum, which increases strength and temperature range. Accordingly, the products can be used in central heating systems at pressures up to 1.5 MPa, and in cold water supply up to 2.5 MPa.
Advantages of types of grooves for pipe wiring
In order to increase living space and achieve a neat effect, it is necessary to hide as much as possible in the walls all communications laid inside a house or apartment. There are several ways to disguise pipes:
- behind false walls, ceilings, floors.
- in decorative boxes.
When building a house or remodeling an apartment, you can initially lay pipes inside walls, partitions or in the floor without subsequent gating. In the case of finished buildings without communications laid inside, it is necessary to make special grooves. The process of making such grooves is called gating.
To simplify the process of slitting with your own hands, you need to study the following questions:
- In what areas are furrows allowed to be made?
- What are the features of gating in narrow spaces?
- What can be laid in the walls?
- What's the best way to do this kind of work?
Laying of polypropylene pipelines.
Laying heating pipelines from polypropylene has the same nuances as laying pipelines from other materials. The nuances directly depend on the fact that polypropylene is a specific material that requires knowledge about its behavior in heating systems.
In order not to encounter problems in the future, you need to understand what determines the correct installation of polypropylene pipes. At the dawn of its distribution, polypropylene pipes were divided into reinforced and non-reinforced. Unreinforced polypropylene pipes were used mainly for laying water mains, cold and hot. The use of non-reinforced polypropylene pipes in centralized water supply systems is quite widespread, but includes some nuances, such as the presence of special compensators on the main line itself. These expansion joints are designed to neutralize the linear expansion of pipes. When, for example, hot water passes through an unreinforced polypropylene pipe, there is a significant increase in its longitudinal dimensions. To put it simply, it lengthens. If this extension is difficult to detect by eye, then in a closed volume this linear expansion leads to deformation of the riser, for example, in the lateral direction. To put it even more simply, the pipe was straight, but it became a snake. And it happens even worse. The panacea for such wild deformations was the use of pressure compensators. The compensators themselves have been known for a long time, but we are accustomed to not paying attention to them, since they have become a familiar surrounding landscape in some places. These are huge letters P in places where heating mains pass on the outskirts of the area. And if you look closely, they are located at equal intervals between each other, mainly on long and extended highways.
In the case of polypropylene pipes, everything is not so simple. Convenience and ease of installation of polypropylene pipes are combined with their physical characteristics. But it is quite possible to minimize this impact with conventional installation, as well as by following small rules when marking the passage of highways. In particular, U-shaped expansion joints can be combined with areas where the pipe passes through the wall. To do this, you just need to make a hole a little higher or to the side, depending on the location, and that’s it, the factor is considered taken into account, since the compensator is installed and the holes are carefully drilled. The fact is that drilling a hole in the wall for a pipe directly near the corner is unrealistic without (relatively) large-scale destruction. After such drilling, decorative and finishing work always has to be done.
A reinforced pipe, in turn, does not protect or protect against pipe ruptures, as marketers like to position it. The pipe reinforcement plays a restraining role in matters of linear expansion. But if earlier reinforcement was carried out exclusively on top of the pipe, now pipes with fiberglass reinforcement have become most widespread. They do not contain expansion as effectively as those with metal reinforcement, and they also need to be approached with an understanding of the nuances.
The best method for installing pipelines made of reinforced polypropylene pipes is the one in which, at corners and turns of the pipes, do not bring them two centimeters to the wall. Why is this so - because an unreinforced pipe, after cooling, returns to its original dimensions, while an unreinforced one remains in an expanded state. This is probably due to the fact that the fiberglass used does not shrink back.
2018-07-19T16:17:04+00:00
July 19th, 2018|Installation of heating systems, Polypropylene heating, Errors in the heating system|
Installation of a polypropylene heating system
Preparation for installation
At the preparatory stage, the following work needs to be done:
- Draw up a heating project. Designing a heating system is a complex task that not everyone can do. Based on the calculations, the type of heating system, heating boiler, heating devices, additional equipment and pipeline fittings are selected. An integral part of the project is a specification of materials indicating the length and diameter of pipes, types and number of fittings
- Purchase materials and tools
- Install a homemade heating boiler. radiators and additional equipment
- In the instructions for the soldering iron or reference literature, find out the welding and cooling time of the pipes used, and perform test soldering
- Bring pipes and fittings indoors to allow them to reach room temperature
Pipe laying methods
Pipes can be laid in open and hidden ways.
In the first case, they are attached to the walls on metal or plastic brackets.
In the second, they are laid in grooves (grooves) made in the walls or behind finishing materials (plasterboard, plastic, etc.).
Open installation is less labor intensive and provides access to the pipes for repairs. When laid hidden, the pipes do not spoil the interiors of the rooms, but if necessary, they are difficult to access.
Installation of heating pipes
Work must be carried out at temperatures above +5 degrees. Degrease the soldering iron nozzles, heat the soldering iron to 260 degrees.
Installation is carried out in the following sequence:
- The pipes are cut into pieces of the required length using special scissors or a roller pipe cutter.
- If the foil is located close to the outer surface of the pipe and interferes with soldering, it is removed with a shaver
- The cutter removes burrs and chamfers
- Soldering areas are degreased with alcohol
- Soldering, especially for people without experience, is best done together
- The pipe section and fitting are placed on the soldering iron nozzles, kept for the required time, removed, connected without twisting and fixed for the time required for cooling
- The connected pipes are attached to the walls with clips every 50 - 70 cm
- Individual parts of the pipeline are connected on site using a portable soldering iron
- Sections of the heating system are purged with a pressure testing pump. to make sure there are no plugs (seals), and the finished system is tested with water for the absence of leaks
When installing pipes, adhere to the following rules:
- The design slopes of the pipes are observed (0.02 - 0.06 from the boiler to the last radiator for a straight pipe and the same slope from the last radiator to the boiler for a reverse pipe)
- The return pipe is laid above the inlet pipe of the heating boiler
- To avoid overheating, polypropylene pipes are connected to the boiler through a piece of metal pipe and laid away from heating devices
- Heating appliances are connected to pipes using quick-release connections - “American”
- Pipes are laid in such a way as to reduce the likelihood of mechanical damage and exclude direct sunlight
- The pipes are connected to each other using couplings or “pipe into socket”; in the latter case, the socket is made by expanding one of the ends of the pipe
- Pipes thicker than 40 mm are soldered joint to joint
In order to comply with safety regulations, installation should be carried out in a ventilated area; when working with a soldering iron, hands should be protected with gloves.
It is worth noting that in most cases, private houses are heated with gas. because natural gas is the most affordable and economical fuel for a private home if there is a gas pipeline near the village.
Also, in addition to heating, a private house must have a sewerage system. Read about the features of its arrangement here.
And of course, ventilation is an integral part of a private home. How to properly make a ventilation system is described in this article. Please note that if it is done carelessly, then the rapid appearance of fungus and mold is possible; breathing in their spores is highly not recommended.
Since prices for installation work often exceed the cost of materials, installing polypropylene heating on your own allows you to save significantly.
Experienced specialists will complete this work in one day, but beginners should take their time and carefully follow the recommendations. The result will not be long in coming - in a few days you will have at your disposal an efficient heating system that requires almost no maintenance.
Features of polypropylene pipes
To install the pipeline, high-quality and reliable material is required. This could be, for example, stainless or galvanized steel. Over time, polypropylene replaced these types from the construction industry. The main reason was the combination of useful properties at a reasonable price.
Polypropylene is suitable for hot and cold water supply and heating. The material is durable and does not require maintenance, so you can safely wall up water pipes into the wall.
The main thing is that their use does not exceed the temperature limit of 95 ° C, when the material loses its resistance to pressure and deforms. In residential water pipes and heating systems, such pipelines operate at lower operating temperatures, so no problems should arise.
The disadvantage of the material is thermal expansion, which can directly affect the integrity of the wall into which the pipes are walled. The expansion coefficient of polypropylene is quite high. The linear increase can be up to 10 mm per meter of pipe at a temperature of 70 °C; accordingly, the diameter of the pipe also increases slightly.
The higher the temperature, the more the expansion coefficient of the pipe increases. Therefore, the laying of heating networks, their correct installation, and the selection of types of pipes that suit the conditions deserve special attention.
Selection of heating pipes
Effective heat supply to premises depends not only on the power of the heat source, the number of radiator sections and on how well the heating wiring diagram in a private house is chosen. Much is determined by how correctly the heating lines are selected.
The main criteria by which heating pipelines are selected are:
- The diameter of their cross-section. The larger it is, the higher the throughput of the highways, the less the tensile load on their walls. On the other hand, increasing this parameter leads to an increase in the cost of the system. The most competent approach is to calculate the pipe diameter at the design stage. But if the project was not completed or was not detailed enough, it is worth keeping in mind that the outer diameter of risers and sun loungers for horizontal heating wiring in a private house is 25-32 mm, and the diameter of the inlets to radiators is 16-20 mm
- Boiler power. The higher it is, the higher the temperature of the coolant. Accordingly, it is necessary to select lines that will stably withstand this temperature effect according to their rated values.
- Heated space area
- Type of installation of heating lines in the house - hidden or open
- Wiring option used
- Maximum pressure in the system, the likelihood of water hammer occurring. They most often occur in a centralized heating system. In autonomous systems, it is possible to prevent water hammer by installing a safety group and an expansion tank. However, their possibility cannot be completely excluded.
Characteristics of polypropylene pipe products
Today, such pipes are used, among other things, for laying household pipelines. In addition to completely plastic products, pipe products reinforced with fiberglass or aluminum are popular. It is more durable and less sensitive to temperature changes.
Unreinforced pipes are used exclusively for systems through which cold water moves. To lay a plastic water supply or heating structure, products with a diameter of 20 to 110 millimeters are used. Products with non-standard cross-sectional dimensions are produced exclusively on special orders.
The main characteristic of polypropylene pipes is the wall thickness. Often a table is attached to the products, which reflects the requirements for materials for heating and water supply systems with different ambient temperatures and different loads.
Installation of plastic water supply
To install the system from scratch, in addition to the pipes themselves, you will need:
- fitting;
- plugs;
- tees or crosses if branching is planned;
- clips for fixation.
Scissors for cutting, a shaver for stripping edges and a welding machine are required.
If the question of how to properly wall polypropylene pipes into a wall arises after the entire system has been assembled, the list is reduced to thermal insulation materials, fastening brackets and means for constructing false walls.
Grooves for plastic water pipes in the wall
Requirements for laying plastic water pipes
Fittings, tees and connecting elements are selected in accordance with the diameter of the pipes used. Most often, like the main elbow, they are made of polypropylene. However, they are used only for branching, fastening measuring instruments and redirecting flow: filling fittings and collapsible units with material is prohibited. In the thickness of the wall there can only be a soldered, permanent connection, made with special welding equipment and tested for the tightness of this welding.
In any case, a shock-absorbing “cushion” must be created around the thickly laid wall, allowing the pipe to “walk.”
Technique for masking a polypropylene pipe in a wall
- Marking the direction of the pipeline taking into account the placement of functional exits.
- Calculation of possible deformation coefficient. For a significant length of the system, a formula is used that provides for lengthening the pipe by 1 cm for every meter. The calculation was made for a liquid with a temperature of 70 degrees Celsius. The technique of creating a compensation unit, that is, laying out a small area in the letter P, will correct significant elongation and serve as accident prevention.
- Installation of the pipeline in compliance with all requirements. It is necessary to select polypropylene pipes whose wall thickness corresponds to the planned operating conditions.
- To compensate for casting expansion when laying plastic pipes in the walls of toilets and bathrooms, you can use a corrugated pipe. When laying a channel from a U-profile, it is recommended to additionally place a heat insulator; the same principle applies when laying it in a pre-prepared groove. Energyflex, foamed polyethylene or polyurethane foam can act as a heat insulator and at the same time a material for shock absorption.
- Fixation is based on clamps and supports.
- Is it possible to hide polypropylene pipes in the wall completely? When finishing finishing, a test “idle start” should show it.
- The easiest way to restore a wall is to attach a plasterboard partition.
- After completion of the work, it is advisable to save the pipeline laying diagram, since accidents of such systems often occur due to the fault of craftsmen trying to fix, for example, a mirror in this area and punching a plastic pipe with their own hands.
When wondering whether it is possible to embed polypropylene pipes into the wall, if the structure is ready, craftsmen advise not to take risks and instead of a blank monolithic wall, organize a small “cabinet” with access to the pipe. Firstly, this design is guaranteed not to be destroyed by vibrations of the plastic. Secondly, in the event of an accident there will be access to the pipes. The free space in the cabinet can be used to store household items.
Tools and materials for installation
In addition to pipes and batteries, the choice of which was discussed above, installing a heating system in an apartment requires tools, the set of which is as follows:
- Fittings and taps;
- Silicone sealant or tow;
- Fastening elements for system elements;
- Set of screws and dowels;
- Soldering iron for pipes;
- Pipe cutting shears;
- Set of wrenches;
- Screwdriver;
- Hammer;
- Construction and water level;
- Tape measure and pencil.
This set of tools is sufficient for arranging a heating system. If you are planning a one-time job, then it is advisable to rent specialized tools (like a soldering iron for pipes) rather than buy them - the cost of such devices, especially professional ones, is quite high.
Methods for laying heating pipes
The best option from the point of view of “beauty” is hidden (internal) pipe laying. This installation provides the following options:
- Take advantage of different options for interior design without worrying that pipes will interfere with the design and installation of furniture.
- All communications can be reliably recorded.
- Even with careful insulation of pipes, some of the heat may be lost to warm up the structures.
- Such wiring requires greater consumption of building materials, which leads to a slight increase in price in general.
- Maintenance of such communications becomes impossible, and when making repairs, it will be necessary to dismantle the decorative protective screens.
The easiest, but not as visually “beautiful” as the first, is the external (open) laying of communications. Main advantages:
- Fast and easy pipe laying because communications.
- Easy access to all parts of communications, which in itself significantly makes subsequent repairs easier.
- There is no heat loss, since the pipes do not contact the floor and walls, and the radiated heat warms the room from the inside.
- There is a minimum of required materials for installation, because no extra or extraordinary costs are required for additional building materials, therefore such a heating system can be considered economically profitable.
Each method of pipe installation has negative aspects. As a rule, most choose a method based on external or price factors.
Recommendations and tips
In conclusion, I would like to give a few recommendations that may be useful.
- Installation of piping systems should be carried out taking into account the fact that tension fittings cannot be laid in the floor and walls. If this occurs, a small amount of free space must be left to accommodate the connections.
- Radiators should be within 70% of the window width. Panel radiators can ensure that this condition is met. Changing the thickness of the device allows you to change its overall dimensions, and choosing the best option is not difficult
- Installation of smoke removal systems should not pass through rooms with long-term occupancy. With an external chimney, it should be taken into account that the distance from it to the windows of residential premises must be at least 800 mm
- When using non-freezing antifreeze liquids as a coolant, sectional radiators cannot be installed. After a certain time, nipple connections may leak
- Using a room thermostat with an on-timer allows you to save up to 40% of the energy spent on heating
There are still a huge number of subtleties and nuances. If you do not have experience, knowledge, or working skills, then it is better to entrust the installation of heating systems to a trusted Contractor. The usual cost of work is estimated at 30-40% of the price of equipment and materials.
The best option is to conclude an Agreement with a company that will carry out all the work on a turnkey basis - develop a scheme or carry out a project, complete the equipment and install it. Practice shows that the installation of turnkey heating systems helps the Customer save significantly. It is necessary to pay attention to the fact that all materials and work are provided with a Guarantee.
Read other articles on this topic
| How to heat your home without gas | Heating project for a private house |
| Heating a private house with underfloor heating | Combined heating system for a private house |
| Country house heating system | About heating schemes for a private house with a gas boiler |
| Water heating in a private house | Basic rules for the location of radiators when heating a private house |
| Gas consumption for heating a private house - consumption calculation | Heating options for a frame house |
| Installation of a heating system in a private house | Heating diagram for a two-story house |
| Do-it-yourself heating of a private house made of polypropylene | Heating a private house from metal-plastic pipes |
| How to save on heating a country house | Heating a private house with forced circulation |
| Heating wiring diagrams from a boiler in a private house | Heating a private house with electricity |
| Heating system for a private house using a warm baseboard | Heating your home is the most economical way |
| Heating and water supply of a country house: description of installation technology | Heating system for a private house with natural circulation |
| Infrared heating of houses | Features of heating a country house with electricity |
| Collector heating system for a private house | Autonomous heating of a private house |
| Heating a private house with a heat pump - pros and cons | Heating the house with liquefied gas |
| The best heating for a private home | Heating distribution for a two-story house |
| Heating a private house with convectors | How to heat a private house |
Services on this topic
| Heating design | Turnkey solid fuel heating |
| Turnkey gas heating | Turnkey heating |
| Heating in a turnkey wooden house | Turnkey water heated floor |
| Installation of water heated floor | Heating a two-story house |
| Heating installation in a cottage | Heating a country house: options and prices |
| Heating installation | Heating installation in a private house |
| Installation of plumbing and heating engineering systems | Diesel heating of a country house |
| Autonomous heating on a turnkey basis | Air heating of a country house |
| Prices for heating installation in a private house | Design and installation of heating systems |
| Water heating in a private house | Electric heating of a country house: options and prices |
| Heating in a townhouse | Gas heating design |
| Heating design cost | Heating calculator for a private house |
| Installation of water heated floors in a private house | Price for installing a water heated floor |
| Installation of water heated floors on a wooden floor |
Specifics of work when chipping walls
Answers to questions when making grooves in finished buildings are listed below:
- Various pipelines and cables can be laid in the walls, but only those that do not require constant maintenance.
- Elements installed in the groove should be no more than 30% of the thickness of the structure that does not have reinforcement.
- In block-type houses, all communications in the walls are installed at a depth equal to the location of the internal metal frame (reinforcement) in the panel.
You need to know that in accordance with building codes and regulations, in order to avoid dire consequences, it is strictly forbidden to cut load-bearing walls and ceiling slabs in multi-apartment panel buildings. At the same time, the stability of the building sharply decreases.
Basic rules for safe work when making furrows for laying communication networks with your own hands:
- Disconnect all electrical wires walled up in the walls. You can forget about them forever.
- Study all the diagrams of pipelines laid in buildings. In the absence of such drawings, it is necessary to turn off all communications in order to avoid bitter consequences in the event of possible collisions of a sharp and destructive tool with pipes, thereby avoiding additional costs for unplanned repairs both for yourself and your neighbors.
- To reduce the cost of building materials for finishing work, after organizing the laying of pipes, it is recommended to make recesses corresponding to the size of the masked element.
- It is necessary to strictly follow the rules of labor protection instructions when performing construction work. Use special personal protective equipment (PPE) - eye goggles, respiratory respirators, since the process of crushing brick and concrete is accompanied by a large release of fine dust and the formation of cutting stone fragments.
How to mask pipes in a wall is described below.
Recesses in the wall for water and coolant supply pipes
In this case, it is especially important to maintain the stability of buildings and structures, since such pipes, unlike cables, take up much more space in the wall
Necessary tools for creating pipe grooves:
- Grinder or angle grinder. For deep grooves, a machine with more power is used.
- Hammer.
Procedure for step-by-step gating:
- First of all, using a dark chalk-colored writing object, a pencil, draw a pipeline laying diagram on the wall.
- Deeply cut furrows along the lines of the applied markings using a grinder.
- To remove materials from the future groove, it is necessary to transversely cut the space between the furrows made along the drawn lines with a grinder.
- Using a hammer drill, crush the wall material, brick, concrete, etc., between the cuts made.
For high-quality gouging of stone material, it is recommended to use a special tool for such work - a wall chaser. Such a professional device makes quality gating due to the following features:
- Two working diamond blades are provided.
- The gap between the installed disks is adjusted.
- The design of the device provides for connection to a dust collector of a special vacuum cleaner.
The cost of such a professional tool as a wall chaser is high. Therefore, to reduce the cost of work when gating, experts recommend the usual universal devices: a hammer drill and an angle grinder. If it is not possible to purchase a regular tool, it can be rented from service departments
At the same time, it is important not to damage the rented equipment and avoid overheating and sudden collisions, which can quickly disable the rented equipment.
So, the process of making grooves in the wall for laying pipes is not particularly complicated. But beginners in the construction and repair business should practice and gain experience, for example, on non-permanent country houses.
Heating installation for a private house
- Design
- Installation
- Repair
- Service
- Solutions
has extensive experience in the design, installation and installation of heating systems for private country houses. We guarantee that installing a heating system in a private home with us will bring you only warm emotions and save money. Why this is so, read below!
Thoughtful placement of equipment
We will select the optimal location for the heating boiler, heating radiators, etc.
Our engineers will draw up a layout diagram and pre-approve it with you. We guarantee that the entire house will warm up evenly. The cost of installing heating in a house. Brief price list.
| Name of works | Explanations | Unit change | Cost of work, rub. |
| Installation of a heating device (radiator, floor convector) | Installation of the device, installation of shut-off and control valves, connection of the forward and return pipelines (The linear dimensions of the device do not exceed 2 meters). | PC. | 2 800 |
| Installation of a convector built into the floor | Standard version of the convector. The linear dimensions of the device do not exceed 2 meters. | PC. | 3 740 |
| Installation of radiator heating distribution manifold and manifold cabinet | Connecting pipelines, installing shut-off valves. External or built-in cabinet. The built-in wardrobe is mounted in a finished niche. Niche production is available for an additional fee. | PC. | 5 300 |
| Installation of mains and risers | DN 0-16 (cross-linked polyethylene, polypropylene, metal-plastic). | m.p. | 65 |
| Installation of mains and risers | DN 17-20 (cross-linked polyethylene, polypropylene, metal-plastic). | m.p. | 95 |
| Pressure testing of the building heating system | By heated area. | sq.m. | 15 |
View the full price list for the cost of installation work
Heating a private home using any type of fuel!
- main gas;
- imported gas from a gas tank;
- electricity;
- diesel fuel;
- firewood, coal, peat.
Backup heat sources
You can combine equipment using different types of fuel. For example, by installing diesel and solid fuel boilers. The most popular duplication option among our Customers is the installation, together with a diesel or gas boiler, of a low-power electric boiler to maintain positive temperatures in a country house in the event of the main heat source being turned off.
SRO approval
Certificate of admission to work that affects the safety of capital construction projects No. 0559.03-2011-7718710850-S-069.
Insurance
! The heating system of a private country house usually includes the following equipment:
- Boiler;
- Chimney;
- Pumps;
- Pipes;
- Heating appliances (convectors, radiators, trench convectors);
- Various fittings for connecting pipes;
- Other details.
The most complex and important component of the entire heating system is the equipment, usually located in the boiler room. It is better to entrust the installation of a boiler room in a private house to certified specialists, since the result of the work will have to be submitted to supervisory authorities.
Installation of a boiler room in a private house
A private boiler room can be located in different parts of the house, depending on this there are:
- Built-in boiler rooms (in the basement or on the floors of the building);
- Attached boiler rooms (located in an extension to the building);
- Roof boiler rooms (in the attic or on the roof), etc.
Installing a boiler room in a private house will be more difficult or easier depending on the power of the installed boilers, the number of heating circuits, the location of the boiler room, its area and geometric dimensions. The most important point in the construction of a boiler room is its design. Before installing a boiler room in a country house, it is necessary to calculate all the heat losses of the building and draw up a diagram of the heating system. Proper design will help to avoid financial losses from incorrectly selected heating equipment power and possible errors during its installation.
! Why do you need to calculate thermal loads? Information on the topic.
Installation of heating in a private home requires compliance with building codes and regulations. Otherwise, incorrect installation may endanger the lives of the home owners or their guests. Get advice and order heating installation in a private house by phone.