Main elements of the system
A warm water floor is a whole complex of equipment. It includes:
- Source of warm water or coolant;
- Circulation pump for pumping;
- Distribution manifold;
- Controller or thermostat;
- Emergency system for draining water and venting air from the heated floor;
- Pipes and fasteners;
- Thermal insulation (pie);
- Fittings (taps, valves, couplings, etc.).
Distribution manifold (comb) for a warm water floor.
The following can be used as a source of warm water:
- A gas boiler;
- Central heating system, central heating system;
- Electric water heater;
- Heat pump;
- Solid fuel boiler;
- Indirect heating boiler;
- Solar collectors.
Infrared heating
Heating systems are organized using carbon rods or thermal film, on which the carbon mixture is located in the form of strips. When heated, the mixture emits infrared waves, which heat the floor in the room. How to make a carbon electric heated floor?
- The heating elements are placed on a flat surface. Installation of infrared heated floors is carried out under the laminate. Carbon rods are used under tiles.
- The base is treated with liquid waterproofing material.
- Insulation and a reflective screen are laid on the surface.
- Install carbon mats or thermal film.
- It is necessary to connect the heated floor correctly. All elements are connected in parallel.
- A temperature sensor is placed on the mats or film.
- All conductors are protected with a corrugated tube and connected to the thermostat.
- Connect and test the system.
We recommend: What should be the height of the heated floor?
Carbon mats are covered with tile adhesive or a thin concrete screed. It is recommended to use tiles as flooring. How to lay thermal film? The system does not require additional protection. The substrate and coating are immediately mounted on it.
Thermal film is an ideal warm floor for laminate or parquet. You can connect the heating immediately after completing the installation of the decorative covering.
Water heating can be installed under any floor covering. Cable sections and carbon mats are more often used for tile coverings. The film floor is suitable for laminate or linoleum. Carpeting will not add warmth to the room. It is not chosen as a topcoat.
YouTube responded with an error: The request cannot be completed because you have exceeded your quota.
- Related Posts
- How to install a heated floor in a toilet?
- How does radiant floor heating work?
- How to install electric heated floors under tiles?
- How to connect heated floors in an apartment?
- What are the advantages of Heat plus underfloor heating?
- How much does underfloor heating cost?
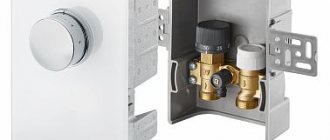
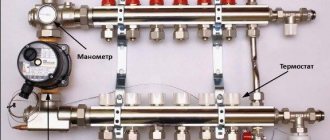
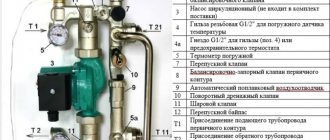
Distribution manifold (comb)
A heated floor comb is a collector that distributes the main flow of water over different circuits. Each circuit can correspond to a separate room, room or part of it.
The collector is usually installed in a separate distribution cabinet (for ease of use). In addition to the comb, it can be installed:
- Controller or thermostat;
- Circulation pump;
- Pressure gauges for monitoring system pressure.
There are ready-made solutions - assembled floor heating distribution manifolds. But to ensure heating of a large number of rooms, the comb is assembled individually. In fact, it’s not that difficult to make a manifold for a heated floor with your own hands.
What mistakes should you avoid?
Be sure to install damper tape
Having found out in detail what is needed for a heated floor, you should know what mistakes are most often made when installing the system, and how to avoid them. They begin to make mistakes already at the stage of the initial, rough screed, which is laid unevenly, leaving a variety of construction debris. Substrates and insulation will not hide unevenness, which can result not only in the curvature of the floor, but also in deformation of the pipes. They forget to lay damper tape between the walls and pipes, and this results in cracks in the concrete. This will also result if it is laid incorrectly, with voids, without appropriate fastening. It should be remembered that the tie will not secure the tape, so it must be secured additionally.
Expanded polystyrene will not only retain heat, but will also help to lay pipes evenly thanks to special grooves
If, when compiling a list of what is needed for a heated floor, you forgot about thermal insulation (expanded polystyrene), then the heat loss will be significant. Your dreams of walking on laminate flooring barefoot in the cold winter will not come true. In this case, significant amounts of money on heating will be wasted. The same thing will happen if you lay too thin a thermal insulation material. It is strictly forbidden to use cheap, fake or metal pipes for water floors. All this will end in leaks, which will lead to repeated significant financial expenses for repairs, including opening the concrete and all subsequent work.
If you have already decided for yourself whether you need a water-heated floor, seriously study the installation diagrams. It is worth remembering that their violation will lead to the appearance of cold zones, that is, you may end up with a “striped” floor: a warm pipe will alternate with a cold one, and this entails a low temperature in the room and, accordingly, large heat losses. Following the pattern and accurately calculating the walking distance is a necessity.
Important! Poor-quality components of the screed, their incorrect proportions and ratios result in a weak concrete layer. And this leads to the destruction of the entire system, the appearance of cracks, bending, and deformation of pipes.
Naturally, in cold regions the question of whether a water heated floor is needed disappears by itself. Of course it is needed. But there is no need to rush to connect it. If you apply heat and the screed has not yet had time to dry, its strength and integrity will be compromised, and cracks, unevenness, and deflections are guaranteed. Be sure to go through again all the possible mistakes made before you, so that your floor works with maximum heat transfer, without interruptions, and serves you for a long time.
Sectional diagram of a water floor
Pipes
There are several options for pipes that are used for underfloor heating systems. Each of them has its own installation and operation features. Pipes with a diameter of 1/2 and 3/4 inches are mainly used. But it all depends on your needs. Let's look at them separately.
Types of pipes for warm water floors: 1- cross-linked polypropylene; 2 - polypropylene; 3 - metal-plastic; 4 - copper; 5 - aluminum; 6 - stainless steel.
Cross-linked polyethylene ( PE- X) – is a flexible polyethylene pipe reinforced with polymer threads and an adhesive base. The most common material for laying heated water floors. Suitable for both dry and wet installation.
Metal-plastic - pipes made of two layers of plastic. Between them there is a reinforcing layer of aluminum, treated on both sides with glue. It gives strength and prevents cracks from thermal deformation. Due to this, the pipe bends poorly; when installing complex shapes, it is necessary to use fittings. High temperature glue is used for connection.
Polypropylene is a solid pipe made entirely of polymer. This is the cheapest option, inferior to others in terms of deformation indicators. They are practically not used for installation in screeds. In terms of service life they are inferior to other options.
Copper - such pipes are resistant to low-quality water and have a service life of up to 50 years. For installation you will need a special tool - a pipe bender. Soldering and special fittings are used for connections. Copper pipes are often used where coolant rather than water circulates in a warm floor.
Aluminum - rarely used for warm water floors. In terms of performance, aluminum pipes are inferior to copper ones. They have lower tensile strength.
Stainless steel - pipes made from this alloy are the most expensive. But the price is compensated by the service life - more than 50 years. They can be supplied in the form of corrugation, which can be bent by hand. Stainless steel pipes can be used for heated floors with aggressive coolant or low-quality water.
You can read more about the characteristics of different types of pipes in the article “Which pipe to choose for a heated floor - expert advice.”
Snail or snake - how to lay a heated floor, length of contours
When creating a warm floor, the question always arises: “How to lay the pipe - with a snail or a snake?” It turns out that there is no fundamental difference which scheme to use... Why?
Why you need to make a heated floor with a snail
- In the “snail” circuit, supply and return alternate. This means that heating of the entire area will be more uniform (the difference in coolant temperatures at the inlet and outlet of the circuit is always noticeable - 5, 10... and even 20 degrees... depending on many factors).
- When laid with a snail, the pipeline turns 90 degrees rather than 180. This means that the hydraulic resistance of the pipe will be less... perhaps this is more useful for the system...
Why does a heated floor pipe need to be laid in a snake pattern?
- The snake allows you to approach the creation of a warm floor more flexibly. You can create areas with increased energy output by placing the feed there. (The problem of heating cold areas is common, since the room will most likely have exterior walls and windows.)
- The snake allows you to create increased resistance in short circuits, without throttle control, by increasing the number of turns of the pipe. This is useful because eliminating unevenness between contours is always required. (the snake can also be laid along the short side, then the number of pipe turns will increase...).
The uneven temperature of the coolant along the length of the pipe in the snake has no practical significance (we will consider it further).
Uneven heating of floors - why it happens
The main reason for uneven temperature on the surface of a heated floor is unequal heat dissipation. And not at all the peculiarities of laying the heating pipeline - like a snake or a snail...
- Under the furniture, the floor temperature increases significantly to +30 – +35 degrees or more, with an average of +26 degrees in open areas.
- Near cold external structures, the floor temperature decreases to +20 – +24 degrees due to cold air blowing.
- The open surface of the floor along the room is blown by convection currents of heated air. They promote faster heat removal from areas with elevated temperatures (greater heat transfer when blowing onto the surface). The measured unevenness in this zone is usually within 1 - 2 degrees.
How to deal with a cold window - radiators and heated floors
The window is the coldest area in the room. Typically, radiators are placed under the windows, which create a powerful convection heat flow. The air moves towards the ceiling, then drops down and moves along the floor to the radiators.
- If there are no radiators, then the cold zone near the window is felt and brings significant discomfort - the air from the window will fall down, move along the heated floor, heating up from it, rise up - air movement in the opposite direction.
There is also a need for radiators to cover heat loss in general. Warm floors at a comfortable temperature cannot compensate for heat loss in our climate, in a normally ventilated room during frosts. The temperature of the floors needs to be raised and go beyond comfort... Why you need to install radiators in a house with heated floors
Uneven surface temperature of the heated floor due to cooling of the coolant
If there were no factors that determine the temperature of the floor surface, namely, convection air flows along the surface, cluttered floors with furniture, cold zones near the outer walls, then the uneven heating of the floor would be minimal. This is not difficult to determine by calculations. Let's assume that we maintain a comfortable floor temperature of 25 - 27 degrees. Then power output from 15 sq. m. (regular room) will not exceed 0.5 kW. Then it is not difficult to calculate that the difference in coolant temperatures will be no more than 4 degrees - it will decrease, say, from 40 degrees to 36.
At the same time, the floor surface at a coolant temperature of 40 degrees will be 27 degrees (assuming). Therefore, in the return zone there will be about 25 degrees according to the proportion. But this will not happen either, given that a hotter area releases heat faster. Thus, we can talk about a temperature difference of only about 1.5 degrees, which is not significant.
But in practice, this difference is generally leveled out by influencing factors - airflow, alternation of cold and warm zones of the room due to the difference in heat removal. It becomes insignificant, not noticeable by a person at all. Therefore, the “problem of cooling the coolant in the coil” does not exist; it is theoretical and has no significance in practice.
Using a snake to heat cold areas
It makes practical sense to supply hot coolant directly to the cold zone. And laying 2 - 3 feed turns along cold walls with a reduced pitch. Here a band with a slightly higher power output will appear to compensate for the effect of cooled air from windows and walls. If the room is equipped with temperature-controlled radiators, which is always recommended in our conditions, then there is no significant need for such installation.
What is the step for laying a heated floor pipe?
In typical underfloor heating designs, when the pipeline is placed in a thick concrete screed, or in metal heat distribution slabs of a light floor, there is no need to take a step less than 20 cm. Laying in increments of 10 - 15 cm only leads to excessive consumption of materials and an increase in the hydraulic resistance of the circuit. But it makes some sense if there is particularly significant heat removal from the surface in this place - the floor is located near a cold enclosing structure and cold air falls on it in this place.
Length of contours and method of installation
Hydraulic resistance is determined by the length of the circuit, the diameter of the pipes and the turns of the pipeline. Roughness can be neglected. The outer diameter is almost always 16 mm. If the contour is short, then its resistance can be slightly increased by applying a snake laying along the short side, with a large number of turns.
If you lay the snake along a long wall, then the number of turns is 90 degrees. it will have an equal number of such turns in the cochlea.
It is recommended to create circuits of approximately the same length, not exceeding 80 m. Then the water flow in the pipelines will be acceptable to transmit a sufficient amount of energy to prevent significant cooling of the liquid... Rooms that are too small can be combined into groups for one circuit, and rooms over 15 sq. m need divided into several circuits. It is also possible to reduce the length of remote circuits by making connections to them in heat insulators with pipes of larger diameter in tunnels...
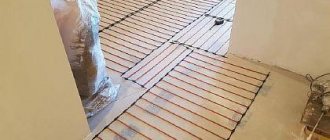
Mounting elements and fasteners
There are two types of installation of heated floors - wet and dry. In the first case, the pipes are installed in a screed. In the second - in a special substrate.
To lay a warm water floor in a screed, a reinforcing grid is used. The pipes are attached to it using:
- Plastic or metal clamps;
- Fasteners made of plastic or metal;
- Mounting tape.
If a heated floor is installed under a raised floor made of wood or other materials, appropriate fasteners are used. These could be clamps for plastic pipes. Metal clamps, etc.
When dry laying, a substrate is used, into the recesses of which the pipes are placed. In this case, additional fasteners are not needed.
Advantages and disadvantages of IR heated floors
Infrared film heated floors under laminate have both supporters and opponents. This is due to the fact that this heating system has many positive and negative qualities. That being said, the strengths are truly impressive.
- The heat transfer features make it possible to heat only those surfaces where people are present: passages, workplaces and recreation areas. In this case, no energy is wasted on heating the bottom of the furniture, which leads to a reduction of up to 20-30% in electrical energy consumption and, consequently, in family finances. Another advantage of this approach to placing IR film is its savings.
- Low cost of materials and installation work when assembling infrared floor heating. A clarification is needed here. The price of a film heating kit is very high when compared with other types of “warm floors”. It starts from 2,000 rubles. for components (includes temperature sensor, temperature regulator, electrical wires, contacts, bitumen tape), plus from 650 rubles. for each m2 of IR film. However, the significant costs of purchasing materials are offset by the low cost of installation work.
- The infrared heating system is not afraid of sub-zero temperatures - manufacturers allow its operation at temperatures down to –70oC. This means that if you stay in unheated rooms for a long time in winter, the system does not lose its functionality. This property is difficult to overestimate when using IR film in country houses where there is no permanent habitation, and in summer cottages.
- There are no restrictions on installation either by type of building or type of premises. The system can be installed in individual houses and apartments, living rooms, children's rooms, kitchens, bathrooms, etc. In this case, there is no risk of flooding neighbors as with a water “warm field”.
- Easy installation and dismantling. Connecting current-carrying elements and connecting to electricity does not require work skills, but attentiveness and pedantry, which allows you to complete the entire cycle of work with your own hands. At the same time, installation is carried out very quickly.
- The spectrum of infrared radiation of carbon elements is completely identical to solar heat.
- No repair required. The failure of one or more emitting strips does not affect the operation of the film as a whole - the connection to the power supply is parallel. If there is a need to replace the film completely, then no problems are foreseen here either - it can be easily dismantled.
- Uniform heating of the room is achieved. At the same time, what is important is that warm layers of air are located at the bottom of the room, and not under the ceiling, as when heating with batteries. This distribution of heat makes it possible in practice to implement one of the optimal conditions for human life - “keep your feet warm and your head cold.”
- The warm-feeling floor allows you to walk barefoot, which is good for health, and also let small children sit on it without fear of them getting cold under the influence of internal drafts.
- The long service life of film floors is ensured even with uninterrupted operation. They do not require any maintenance, technical or otherwise.
- There are no invection and convection movements of air flows inside the room, which gives an unexpected result: there are no internal drafts; practically no dust rises into the air (most of it remains in the places where it forms), which is important for allergy sufferers (they don’t get sick) and housewives (less cleaning work).
So that this article does not look like an advertisement for infrared heating systems, we will also present its disadvantages, which will allow the consumer to receive complete information about this heating method. There are few of them, but they can significantly sway the desire to install infrared heated floors under laminate in an apartment or house.
1. Despite the high efficiency of carbon emitters (more than 80%), the energy consumption of the system is very high, which will cost the owners a tidy sum when paying for electricity. Let's show this with a conditional example.
| Total area of the apartment, m2 | 78 |
| Area of laid film, m2 | 51 |
| Power consumption per m2, W/hour | 200 |
| Power utilization factor (when heated to the required temperature, the system turns off) | 0.6 |
| Electricity consumption per apartment per heating hour, kW/hour (200/1000x0.6x51) | 6.12 |
| Electricity consumption per apartment per day, kW/hour | 146.88 |
| Monthly electricity consumption for heating, kW/hour | 4406.4 |
| Cost of 1 kW/hour, rub. daily rate (3/4) | 3.61 |
| Cost of 1 kW/hour, rub. night rate (1/4) | 2.09 |
| Heating costs per month, rub. | 15124.97 |
| Heating costs per year, rub. | 90749.82 |
As we can see, for people with incomes slightly below the average level, such heating is financially unaffordable. Therefore, we can only talk about an additional source of heating, for example, the floor in a bathroom or toilet, which is turned on when visiting them (the floor surface warms up within ten seconds).
2. Carbon emitters operate on a 220 W network, which leads to several types of risks:
- electric shock;
- short circuit when moisture gets on the film;
- fire.
Judging by the reviews on the forums, the presence of grounding and automatic shutdown in the event of a short circuit do not always provide a 100% guarantee of safe operation of the film.
3. Dependence on electricity supply. With frequent shutdowns, the effect of infrared heating is sharply reduced.
4. It will not be possible to change the arrangement of furniture or add something to the room without changing the layout of the film heaters. You will have to dismantle the floor covering and lay down the film according to the new layout.
The given strengths and weaknesses of IR heaters allow you to weigh the pros and cons and make your own choice. Let us note that with the growing well-being of the population, the popularity of the systems will only grow - they have many tempting advantages.
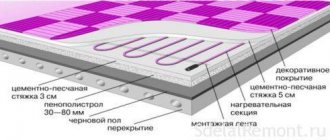
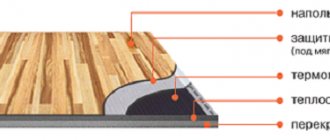
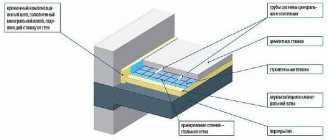
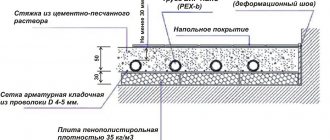
Warm floor pie
When installing a heated floor, multilayer thermal and waterproofing is prepared under it. In common people it is called “pie”. It consists of:
- Waterproofing;
- Thermal reflective material;
- Insulation.
Ordinary polyethylene or special membranes are used as waterproofing. They perform two functions - they protect the insulation from moisture penetration from below and protect the ceilings in case of leaks.
Thermal reflective material is designed to reflect infrared radiation. It represents a metal foil, or a polymer substrate on an aluminum base. The use of heat-reflecting substrates can increase the efficiency of a warm water floor by 20-30%.
The following can be used as insulation:
- Expanded polystyrene;
- Styrofoam;
- Cork;
- Mineral wool;
- Expanded clay;
- Expanded vermiculite.
Warm water floor pie design.
Installation instructions for infrared heated floors
The technology for installing infrared floor heating consists of several independent types of work, performed in strict order:
- planning the power and arrangement of heating elements;
- surface preparation;
- installation work on assembling the heating system;
- connection to electrical networks;
- thermostat connection.
Planning and rules for placing lanes
Before starting installation work, you need to plan the future heating system in detail:
- reflect the location of the furniture;
- calculate the length and width of each strip of film;
- calculate the power of the system (you can contact the sellers for advice);
- draw with a pencil or pen a diagram of the placement of elements emitting IR rays, indicate the location of the temperature sensor, determine the order of connecting the wiring so that they do not cross (you can connect on one side or on both).
In this case, you need to take into account some requirements and observe the existing nuances:
- The length of the film is cut every 20 or 25 cm;
IR film placement plan.
- heating elements must be placed along the room - the number of network connection points is reduced;
- IR film should be located from the walls at a distance of 0.25-0.30 m;
- exclude the placement of the film under the furniture - the heating elements overheat and the carbon strips burn out;
- There should be 5 cm between rows of film;
- the temperature sensor is located in the middle of the film strip, but with the condition that its standard wiring is sufficient to reach the thermostat.
The instructions on how to lay infrared heated floors under laminate do not include the most important stage of work: purchasing the necessary materials, tools and equipment. Therefore, the next step on the path to a warm floor is a trip to a hardware store.
Materials and tools
To assemble infrared floor heating you need to buy:
Firstly, a set of film heated floors, which includes:
- IR film (sold in widths of 0.5 m, 0.6 m, 0.8 m, 1.0 m);
- electric wires;
- fastening clips for fixing infrared film;
- clip contacts;
- bitumen tape.
Set of film heated floors.
And:
- temperature sensor with wire;
- thermostat;
- foil backing;
- polyethylene film for waterproofing the heating system from leakage of water spilled on the floor;
- electrical tape;
- household or masking tape;
- scissors (construction knife);
- pliers;
- roulette;
- ballpoint pen or pencil.
Preparation
The thin film of the heating element reacts very sensitively to the slightest unevenness of the subfloor - it is easily damaged. Therefore, the floor screed must have a flat, dry surface (how to perform floor screed work can be found in the materials “Technology of wet floor screed with expanded clay” and “Dry floor screed with expanded clay”).
Before laying the film:
- the surface of the screed is swept and vacuumed;
- a foil backing (3 mm thick) is laid with the reflective side up so as not to heat the base of the floor;
- the joints of the substrate are glued with foil (painting is allowed) tape;
Laying foil backing.
- a recess for the temperature sensor is cut out in the substrate (a similar operation for the terminals and wires is carried out after connecting the system to the thermostat unit).
Preparing a place for the temperature sensor in the substrate.
Installation
1. In accordance with the developed installation diagram, the installation location of the thermostat unit is marked on the wall. Channels for wiring are installed to it. One to the electric power supply system (panel with circuit breakers), the second - down to the floor, for wires from the film heater.
A thermostat is attached to the wall and wires are connected to it, after which the grooves are sealed with gypsum putty (electricity can also be supplied along the wall surface in plastic channels).
2. The film is cut with scissors strictly along the marked stripes. Here you need to be very careful and careful - accidental damage to conductive or radiating strips leads to rejection of the damaged area.
The film is cut strictly according to the indicated marks.
3. Unused film contacts are insulated with bitumen tape (included in the kit). The insulation must completely cover the silver contact exposed after cutting the film.
Isolation of unused contacts.
4. Heating elements are placed around the room in accordance with the plan with the copper strip down, after which they are attached to each other and to the substrate with household or masking tape.
5. Terminals are installed on the conductive strip of the film. To do this, one part of the contact clip is inserted inside the film (the manufacturer provides a technological cut), the second remains outside, always from below. After this, the clip is crimped.
The terminal is inserted into the film.
Terminal crimping.
6. The lead wires are stripped and inserted into the terminal. Clamping is done using pliers.
Connecting wires to the clamp.
7. The terminal is insulated with bitumen tape - its strips are glued on top and bottom, after which they are tightly connected. To ensure complete sealing of the connecting unit, any air bubbles remaining between the strips of tape are removed.
Isolation of the connection point.
The advantage of bitumen insulation is that when it is first connected to the electrical network, it heats up and, taking the shape of the protected connection, seals it as much as possible.
8. A temperature sensor is attached to the IR film. Before installing it, the unconnected end of the film is freed from the tape with which it is attached to the substrate and rolled up so that the reverse side is accessible.
The meter is attached to it on a black carbon strip (emitter) with bitumen tape, exactly above the cutout in the substrate. Along the entire length of the standard wire from the temperature sensor, a cut is made in the substrate into which the wire is recessed. The film is returned to its place and re-attached to the foil with tape.
Connecting the temperature sensor.
Attaching the sensor to the film with bitumen tape.
9. Recesses are cut in the substrate for wires and terminals. The laid wires are fixed with masking tape (elements of the heating system are not allowed to protrude above the surface of the substrate).
Network connection
The wires from the film are connected through special terminals to the thermostat unit. The system is powered without fail through an automatic device - a special protective device (RCD). If you do not know how to calculate its power, you need to seek help from a specialist. You should avoid twisting the ends of the wires - overheating of the connection point is possible due to poor contact.
Connecting the film with one-sided wires.
Attention: connecting the IR film to a power outlet is strictly prohibited.
Grounding the power supply system will help ensure complete safety.
Connection without crossing electrical wires.
Connecting the thermostat
Self-regulation of the system occurs using a temperature sensor and thermostat. The sensor is connected to the unit with a standard wire, which must not be extended - the signal strength will be distorted. The procedure and connection diagram are located in the instructions supplied with the thermostat unit (they differ from one manufacturer to another).
Upon completion of installation, a test run is carried out. If everything is done correctly, you can begin laying the laminate.
Thermal insulation materials
Expanded polystyrene is the most common insulation for warm water floors. Available in the form of regular and profiled slabs. Conventional slabs are used to insulate the floor under the screed. Profiled – for dry installation of heated floors as a base.
Polystyrene foam - available in the form of slabs. It has different weights, levels of thermal insulation and strength. Used as a substrate for pouring screed. Its main disadvantage is low strength. It can crumple under the heavy weight of screeds and furniture.
Cork is rarely used for laying heated floors, as it is susceptible to rotting. Cork boards are sensitive to moisture, but have good thermal insulation properties.
Mineral wool - most often used for dry installation under raised floors in wooden houses. Produced in the form of rolls or mats. Mineral wool easily wrinkles under weight. Therefore, it is not suitable for laying under screed.
Expanded clay – is a granule with a diameter of 5-40 mm. Has good thermal insulation properties. Used for insulation of wet warm and for thermal insulation of raised floors.
Expanded vermiculite is an insulation material with average thermal insulation properties. It has a granule size of 0.5-3 mm. It is often used in addition to expanded clay - it allows you to fill the gaps between its granules and prevents air convection. Used as insulation under screed and raised floors.
Electric heated floor installation technology
The main condition for installing such floors is strict compliance with standards. First, you need to make sure that the electrical wiring in the house can withstand additional connections, and clarify the maximum permissible load on the machines. When choosing heating systems from 2 kW, experts recommend using a separate machine for connection. A 30 mA RCD should be installed on the electrical panel.
RCD 30 mA
When installing the system in bathrooms and bathrooms, the heating sections must be connected to the grounding conductor.
There are certain restrictions when laying cables: the area of the heated floor must be free of furniture and household appliances, with the exception of furniture with high legs (minimum 15 cm). When marking the surface for installation, you should make a distance of 5-10 cm from the walls, appliances and furniture. The minimum layout step is 8 cm; you cannot lay the electrical cable closer.
Preparatory stage
Laying the electrical cable requires a solid base with as smooth a surface as possible. The presence of cracks, fungus, delamination and other defects that contribute to the rapid destruction of the subfloor is not allowed. If there are differences of more than 5 mm on the screed, it is recommended to use leveling mixtures for leveling.
Self-leveling floor for screed leveling
You need to select and prepare a place in advance for mounting the floor sensor and thermostat. The thermostat should be mounted on the wall, in any convenient place where it will not interfere. The mounting height can be any, but not less than 30 cm from the floor. If installation is carried out in a bathroom or toilet, the thermostat must be moved outside these premises.
Where to install a thermostat for a heated floor thermostat
Having decided on the location, mark a point on the wall and draw a vertical line down. Next, using a drill and a crown drill, a recess is drilled in the wall for the device body and a longitudinal groove for the outgoing ends of the cable and the sensor, which will fit into the corrugation. Electrical wiring should be immediately connected to the location of the thermostat, and the wire cross-section should be selected in accordance with the current strength of the floor system.
Marking the groove position
It is recommended to place the thermostat at a height of more than 30 cm from the floor
Drilling a hole for the thermostat
Grilling
Recommended groove sizes
Having completed laying the cable, sweep away construction debris and dust, and treat the floor surface with a primer. If the floor absorbs liquid strongly, the primer is reapplied after the first layer has dried. Now you need to make markings, marking with lines the places where furniture, household appliances, and plumbing will be installed. You should also make a distance from the walls 5-10 cm wide and at least 10 cm from central heating pipes, radiators, and risers.
Cleaning
Floor priming
Installation of heated floors
For installation you will need:
- insulation;
- waterproofing material;
- mounting tape;
- self-tapping screws;
- drill;
- mounting knife;
- floor screed mixture;
- construction mixer;
- indicator screwdriver.
Step 1. Foil insulation is laid on the floor according to the markings with the reflective coating facing up. The insulation strips laid end to end are secured with tape.
Marking
There should be at least 5 cm from the turns of the wire to the wall
There should be at least 10 cm from the outermost wire to the wall
Laying foil insulation
The insulation strips are fixed with tape
Advice. If there is a cold basement under the ceiling, instead of roll insulation, take polystyrene foam slabs and lay them in a continuous layer from wall to wall.
Step 2. To fix the heating cable, lay the mounting tape, 5-7 cm away from the marking line. It is fixed to the floor using dowel nails, drilling the base through the insulation. The remaining pieces of tape are laid parallel to the first one in increments of 50-100 cm.
Mounting tape location
A dowel is hammered into the hole
Attaching the mounting tape
The photo shows how the master tightens the self-tapping screw
Step 3. Start installing the heated floor. The end of the cable is brought to the groove where the thermostat will be installed and clamped with the tongues of the mounting tape. They stretch the cable across the width of the floor, fixing the tapes in the clamps one by one, then bend it in a loop and lead it in the opposite direction. In this way, the entire cable is laid in the form of a snake.
Laying step
Cable coil
Cable laying pitch
Advice. During the installation process, make sure that the bends of the loops do not have creases, and that there is a distance of at least 50 mm between the cable and the wall.
Step 4: Once installation is complete, ensure that the end sleeves and couplings are on the floor at the connection point. Now the mounting ends of the cable must be brought out to the thermostat and connected.
Step 5. The sensor is inserted into the corrugation so that its wires come out of one end of the tube, and the housing is located at the other end at the outlet. Cover the sensor with a special plug, which will protect the device from penetration of the solution when pouring.
The sensor is inserted into the corrugation
Cover the sensor with a special plug
Step 6. The corrugated tube is led through a groove into the floor at a distance of 50-60 cm from the wall. The tube cannot be bent too much; the minimum bending radius is 50 mm. The end of the tube where the sensor is located is placed in the middle between the turns of the cable and secured in any convenient way. The sensor wires in the corrugation must reach the installation location of the thermostat.
Corrugation bend
Sensor position
The end of the corrugation is fixed
Step 7. Having laid the heating cable and corrugated tube in the groove, carefully seal the groove with a solution. The protruding ends of the wires should be insulated and connected to the thermostat. After this, the connections are checked using an indicator.
Thermostat connection diagram
Having laid the corrugation in the groove, you need to seal the recess with a solution
Step 8. Having installed the device in the wall, check the system. To do this, turn on the voltage supply toggle switch for about 1 minute and use the regulator to set a certain temperature. The LED on the front panel should turn on, and the circuit on the floor will begin to heat up.
Connecting the thermostat
Functionality check
Step 9. After turning off the power, you need to draw a diagram for laying the electrical cable, as specified in the warranty requirements. On the diagram you need to accurately indicate the boundaries of the circuit, the location of the couplings, and the sensor.
Step 10. Prepare a solution for the screed by diluting the dry mixture with water to the desired consistency. The solution is applied over the pipes, carefully leveling it over the surface with a wide spatula. The thickness of the screed varies between 30-50 mm. After pouring, you must wait until the mixture has completely dried, and only then proceed with the installation of the finishing coating. It is impossible to turn on the floor heating during the drying period, so as not to provoke cracking of the screed.
Floor screed
Laying heating mats is carried out using the same technology with minor differences. Due to the fact that the cable is already secured in the section, the process takes less time and there is no need to attach mounting tape. It is even easier to lay a film floor, since it does not need to be filled with screed.
Solid IR film underfloor heating Hi Heat
You can clearly see all the intricacies of this installation by watching the video.
Tools and consumables
To lay the pie you will need:
- Stationery knife;
- Roulette;
- Pliers.
To install fasteners under pipes (depending on the type of fasteners):
- Hammer;
- Drill;
- Screwdriver;
- Crosshead screwdriver.
Installation of metal pipes will require:
- Pipe bender;
- Pipe cutter;
- Low power welding machine;
- Solder;
- Flux;
- Crimping tool;
- Flaring kit (possibly).
To lay plastic pipes you need:
- Pipe cutter;
- Tool for crimping pipes;
- Pipe soldering apparatus (depending on the type of pipe);
- Glue and activator (depending on the type of pipes).
For installation and assembly of the manifold, connection of pressure gauges, controller. Thermostat and pump required:
- Set of wrenches;
- Set of flat and Phillips screwdrivers;
- Fum tape;
- Sealant.