The essence of a heated floor system on the ground
Owners of private houses are given a unique opportunity to reduce their costs of creating the foundation of a building, while creating comfort and coziness in the premises, by installing a warm concrete floor on the ground themselves.
Concrete is a material that allows you to make a high-quality and durable foundation. It will not be difficult to lay a water heated floor on it. The heated floor directly on the ground does not affect the foundation of the house and the external walls, but is located on its own foundation.
The installation work is divided into two stages:
- pouring a concrete foundation;
- installation of a water floor heating circuit.
It is important that this heating method can be chosen as the main heating system, since it is no less effective than traditional means, and is also more aesthetically pleasing. To be more precise, the system is simply not visible in the photo and during visual inspection, unlike heating radiators and massive pipelines.
Choosing a floor covering for water heated floors
Currently, there is a wide choice of flooring, but not all types are compatible with warm water floors. Some can reduce thermal conductivity, while others, on the contrary, can increase the risk of fire. Therefore, for a water system, the best option would be the following floor coverings:
- ceramic tile;
- carpet;
- laminate;
- parquet board.
Using the attached instructions, you can also install the flooring yourself, without the help of specialists.
As you can see, building a heated floor on the ground is not difficult. Having patience when carrying out all the step-by-step work, and following the recommendations of specialists, you can achieve high-quality heating of the entire living space, without additional costs.
AdminAuthor of the article
Did you like the article?
Share with your friends:
Tools and necessary materials
Naturally, it is necessary to carefully prepare for the creation of such a floor by purchasing certain components and components.
This list includes:
- coarse river sand and gravel;
- thermal insulation layer on aluminum foil;
- pipes;
- fasteners for pipes: a special strip for installation, arcs for changing the direction of laying in the circuit, a device for fixing, etc.;
- polyethylene tape (damper);
- mesh for reinforcing the screed or fiber made of polymer substances, which improves the strength characteristics of the mixture for pouring;
- a manifold for underfloor heating and a distribution cabinet for it;
- components for cement-sand screed or self-leveling mixture.
The initial stage of work is divided into two main tasks:
- it is necessary to clear the selected area of soil from excess debris, weeds, etc.;
- the level of the future foundation is set.
Measuring the base level
It is very important to set the level of the future floor before starting work in order to understand exactly what the rough screed for a heated floor on the ground will look like in the proportional ratio of layers. The level is set in full accordance with the height of the coverings in adjacent rooms.
It is necessary to start measurements and calculations starting from the entrance door of the room. The level of the finished floor is marked by stretched cords secured to nails. Next, using a measuring device, each layer being laid is measured.
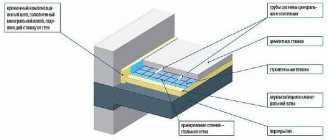
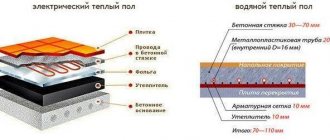
The floors will have the following structure (from top to bottom):
- cladding;
- screed;
- thermal insulation layer;
- waterproofing layer;
- litter;
- priming.
Filling the rough screed
Pouring a rough screed is only a preparatory stage, however, all the work listed below should be performed with the highest possible quality. Otherwise, concrete floors laid on the ground are unlikely to perform to your requirements and provide adequate heating. The following step-by-step instructions will help eliminate any problems in the future:
- First, we mark the ground and draw a control line on the wall surfaces along the entire perimeter of the room. It will help regulate the height of each layer of screed or bedding;
- the next stage of installing the floor on the ground is carefully leveling the soil and compacting it;
- waterproofing, for which either durable polyethylene film or roofing felt can be used;
- preparing the base for the first layer of insulation, making a sand cushion, the height of which should not exceed 2-2.5 centimeters;
- laying expanded clay pillows. It is this material that is used as insulation when laying floors on the ground;
- installation of beacons, which make it possible to pour a perfectly even screed. They are fixed to a cement-sand mortar made with the addition of a small amount of ceramic tile adhesive;
- pouring and leveling the subfloor. It is best to make it reinforced with metal mesh, and for concrete mortar use exclusively river sand and fine crushed stone.
After this, it is better to wait 25-28 days until the screed is completely matured. But if this is not possible, you can begin installing a heated floor on the ground within a week.
Preparatory stage for soil
So, the installation of a subfloor on the ground begins directly with the cultivation of a plot of land. It is important to know the depth of groundwater to eliminate the risk of foundation flooding. To do this, you can prudently install a drainage system that will perform the function of draining water.
Once the groundwater problem has been resolved, the foundation creation process can begin. Coarse-grained river sand and crushed stone with a fraction diameter of about 3 centimeters are used for this. The depth of the layer of these materials should be about 30 centimeters. Once it is backfilled, tamping is done using a large amount of water. It is unacceptable to use black soil or peat instead of sand, as they are susceptible to leaching. This method is often used to make a heated floor in a garage, which has proven itself well.
If the soil under the house is not saturated with moisture and is dry, a bedding layer is laid. Otherwise, it is replaced with a material such as geotextiles to prevent the penetration of groundwater above this layer. A mound of coarse gravel or crushed stone is made on top.
Basic Pie Elements
The design is called a concrete floor pie on the ground
, it is its arrangement that needs to be given special attention. The soil that serves as the basis for the floor covering should be thoroughly compacted. There are several layers of bedding made of crushed stone and sand, each of them has a thickness of 10 cm.
Attention! The bedding will protect the coating from capillary moisture.
It is necessary to use coarse crushed stone (50mm fraction), as well as river sand, and carefully compact the layers of bedding.
The composition of the so-called “pie”
The rough screed is made on top of the bedding, it is placed on the film and has a thickness of 7 cm, its reinforcement is encouraged. Here it is necessary to use fine crushed stone (fraction 10mm) and the same river sand. If there is a low level of groundwater, then filling is done. The bedding is poured with a specially prepared solution, and there is no need to use polyethylene. Waterproofing concrete floor
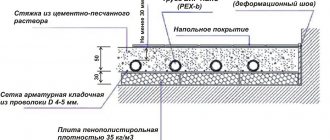
on the ground is done using roofing felt laid in two layers. The floor insulation is made of polystyrene foam; the density of this material must be at least 30 kg/m 3 .
Particular attention is paid to the finishing screed; it has a thickness of up to 10 cm. Fine crushed stone (10mm fraction) and river sand are used here; this layer must be reinforced, since there will be a finishing coating on top of it.
Litter layer
When the thickness of the bedding layer is 4-5 centimeters, it can be considered load-bearing. It is created by pouring a cement-sand screed over a layer of coarse crushed stone using concrete grades B7.5 or B10. This layer will act as a surface level regulator (for more details: “Pouring a heated floor - how to make a screed correctly”).
To prevent the mixture from spreading, the surface is limited using slats. It is necessary to wait until the screed hardens and hardens, while moistening it regularly. A modern alternative to pouring mortar is the use of profiled membranes, the use of which reduces the time for laying the layer.
Waterproofing layer
The traditional installation of heated floors on the ground implies the presence of a waterproofing layer at the lower level of the base. Thick polyethylene, laid with an overlap, has the lowest cost and quality. It is more practical to use polyvinyl chloride and polymer-bitumen membranes, which contain polyester.
When laying waterproofing, it is important to treat the walls of the room, making a spade 15-20 centimeters high. The protruding parts can be removed using a sharp cutting device upon completion of the work.
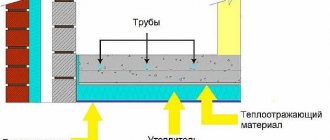
Thermal insulation layer
You can get a base protected from freezing and heat loss by creating a high-quality thermal insulation layer. And the underfloor heating system will be additionally protected from external influences of low temperatures. The functional essence of the design of a heated floor on the ground is that the thermal insulation layer blocks heat leakage (about 20%) and directs it straight upward into the heated room.
A high-quality thermal insulation layer has a number of features:
- low thermal conductivity;
- high strength;
- preservation of basic characteristics at high humidity, etc.
Today, you can choose many types of materials for laying thermal insulation. Particular attention should be paid to polystyrene foam.
There are several options for using this material:
- pure polystyrene foam needs to be coated with polyethylene on both sides;
- expanded polystyrene coated with aluminum foil - the easiest to install and does not require additional fastenings;
- extruded material does not require additional coating.
Warm floor with concrete screed
Using concrete you can make a very strong and reliable foundation. It will be very easy to lay a warm floor on it. The concrete base for underfloor heating does not affect the floor foundation and external walls. It is a separate element.
To prepare a high-quality concrete base, it is advisable to use concrete of a grade not lower than M150. If a concrete base for a heated floor is created in a large industrial room, it is better to use concrete grade M 300 and higher.
Before starting work, you need to take care of purchasing all the necessary components for the future concrete foundation. It is best to use river sand, which contains a minimum amount of various impurities, due to which the created concrete base will be particularly durable. You will also need crushed stone.
We recommend: How does a water heater for underfloor heating work?
A concrete base for heated floors is a classic version of such a heating system. There are relatively many advantages of concrete (wet) screed. By forming a concrete base, the following is simultaneously created:
- High-quality thermal insulation layer that will eliminate large heat losses;
- Maximum smooth surface, demonstrating good resistance to mechanical stress;
- System for uniform distribution of heat energy.
Creating a concrete base
Pouring a reinforced concrete base is required to create a durable, high-quality floor (for more details: “How to make a concrete floor in a private house with your own hands - instructions”). It is best to mark the surface for pouring using slats 5 cm wide and 2 meters long. It is worth keeping a step between them of about 1 meter, which will allow you to fill the solution in stripes. A square meter of reinforced mesh 3 centimeters thick is placed in the center of the room. Along the perimeter of the room, the junction of the base and the walls is taped with damper tape.
This is done in such a way that it protrudes a couple of centimeters above the level of the future concrete screed. It is best to use concrete mixture grade M100. Filling begins from the far corner of the room opposite to where the entrance opening is located. The strips are poured sequentially, and after the mixture has dried, the slats used for marking are removed and the seams are filled with mortar. The screed is covered with polyethylene and regularly moistened for better fixation and achievement of maximum conditions.
As soon as the base is dry, it is cleaned of dust, debris, various stains and priming is carried out. Next, we begin installing a heated concrete floor into our pie, if additional leveling of the base is not required.
Concrete floor base without concrete screed
If we are talking about installing a heated floor without a concrete screed, then the base in this case is ordinary wooden boards or sheets of chipboard and OSB. It is recommended to use products whose thickness starts from 20 mm. Installation of the wooden system is carried out as follows:
- the bearing surface is leveled;
- the waterproofing film is laid out;
- wooden planks are laid out;
- metal plates are laid between the slats;
- the plates are secured with self-tapping screws;
- pipes are laid in the grooves of the plates;
- the plates are covered with a waterproofing film;
- the entire structure is covered with GVL sheets.
We recommend: How to lay heated floors on planks?
It is advisable to use floor structures as a base for heated floors in the following cases:
- the height of the room is limited;
- there are weak overlaps. Even a small concrete screed can weigh several hundred kilograms, which will put strong pressure on the interfloor partitions, which can lead to their collapse;
- For one reason or another, it is impossible to implement a concrete screed at the site.
Pipe selection
Before making a heated floor, you need to select materials. When considering installing a warm water floor on the ground in a pie, you need to decide which pipes will be used for this.
In fact, the material for manufacturing can be anything:
- metal-plastic;
- polyethylene;
- galvanizing;
- copper, etc.
The most popular are polymer materials and metal-plastic. The quality of pipes depends on the density of the material. It is also very important that the integrity of the pipes is maintained throughout the entire circuit. Such a heating system usually occupies from 5 to 15 centimeters of floor thickness.
Various factors influence this indicator: the thickness of the insulation and screed, the power indicators of the equipment, etc. It is unacceptable for the system to have a significant slope. Pipes should not be allowed to be laid on uneven surfaces with an amplitude of more than 5 millimeters.
Installation process
When the concrete floor has been embedded into the pie along the ground, the process of laying the heating circuit can begin.
There are a number of rules:
- In order to prevent excessive heating of the coating, proper placement of pipes should be carried out throughout the entire area of the room. More dense installation is carried out around the perimeter, and in the center the contour should be thinner, and the distance from the walls of the room should be at least 15 centimeters;
- regardless of the installation scheme chosen, it is necessary to maintain an interval between adjacent pipes of 0.3 meters;
- if the pipe is located at the junction of the slab and the ceiling, it should be separated with a special metal sleeve;
- The length of the heating circuit should not be allowed to exceed 100 meters, since in such a system the main parameters of coolant circulation will be reduced (read: “How to make a heated floor with your own hands in a private house”).
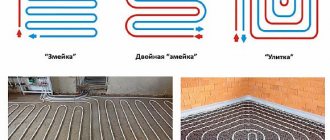
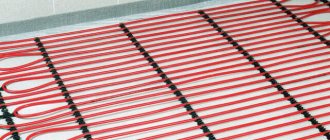
Laying is done in two main ways:
- bifilar - in a spiral
. In this case, uniform heating of the pipes is characteristic due to the alternation of supply and return sections. A low-power pump is used to supply liquid, and laying pipes is very simple by maintaining a 90-degree angle between adjacent sections; - meander - zigzag
. The coolant in such a system cools down as it passes through the circuit, and the surface heats up unevenly. Pipes can turn in the absolutely opposite direction along the way, which affects the complexity of installation. This method is more suitable for rooms with a linear slope, since the coolant will circulate faster and will not have time to cool down. The cabinet with the equipment is installed at the top point of the circuit. Also, this installation method allows you to heat the most spacious rooms.
Regardless of which installation method was chosen, all pipeline branches end in a distribution cabinet located near the room. It is important to take care of the thermal insulation of pipes that pass through neighboring rooms.
Formation of a “warm floor”
On the rough surface, all levels of the “warm floor” begin to be assembled. The screed is protected from moisture and insulation is placed on it. At the same time, some nuances of the use of materials are taken into account.
If roll waterproofing was used for the rough foundation, then mastics are used to prepare the floor heating. They are applied with a roller or brush. Bitumen-based materials are not chosen. When heated, they can release toxic fumes.
The following mixtures are recommended:
- “Ceresit CR66” – based on cement and polymers;
- "Gidromast" - polymer base;
- “KIILTO Fiberpool” – consists of rubber and reinforcing fiber;
- "Knauf Flechendicht" - the main component is latex.
Insulation is laid on the waterproofing. Polystyrene boards with a thickness of 3-5 cm are used. Material with a foil coating is recommended. It will serve as a reflective screen for the heating system.
Ceresit CR66
If thermal insulation does not involve foiling, then use a lavsan-based substrate with a reflective coating. Its thickness is 3 mm. The screen will allow the heat to be directed upward to the floor.
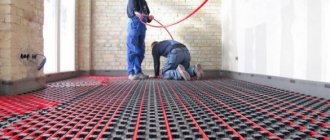
Install a fastening system for the “warm floor”. For the liquid line, reinforced mesh “MAK” is most often used. The pipeline will be easier to lay if the cell size matches the pitch length of the turns.
A mesh with cells of 10*10 or 15*15 cm is recommended. Tires with anchor locks, staples, and mats with a perforated surface are used for fastening.
The highway is laid in a “snail” or “snake” pattern. To calculate the pipe footage and laying pitch, use an online calculator. If the footage exceeds 66 m, then 2 circuits are displayed. They are separately connected to the communication “comb”.
After installation of the heating system, the pipeline is pressure tested. Water is pumped into the main line from plastic pipes under high pressure; the figure exceeds the norm by 2 times. After 12 hours, check the condition of the pipes for ruptures and deformations.
The line is tested for its ability to withstand high temperatures. The coolant is brought to 90 0C and pumped into the circuit. Stand for 30 minutes. After all checks, cold liquid is introduced into the pipeline under normal pressure and a concrete screed is performed.
The contour is covered with concrete mortar. The thickness of the coating is 8 cm. It will not only protect the pipes from mechanical stress, but will also serve as an additional heating device. It is recommended to prepare concrete mortar using liquid plasticizers.
For finishing screed, the following proportions are maintained:
- cement M300 – 1 part;
- river sand – 2.5 hours;
- plasticizer – 1 liter per 1 m3 of mixture;
- water - 200 g per 1 kg of mixture.
It is impossible to install beacons made of slats on the pipeline. They are made from concrete mortar. Prepare small elevations over the entire floor area; step 1.8 m. Leveling is carried out using a level. Fill the floor in small areas. Wait 28 days. They begin laying the floor.
To speed up installation work, use semi-dry screed mixtures. They have high strength and elasticity, but are hygroscopic. The semi-dry solution dries in 2 weeks. The finishing coating is laid after the screed has completely hardened.
Instead of liquid heating, you can use cable heating. The “warm floor” on the ground will have the same levels as when laying the water main.
Reinforced mesh is not used to secure the cable. Sections are installed using contour mats, staples, and anchor locks. Cover the electrical circuit with a screed of no more than 3-5 cm or with tile adhesive of 3-4 cm.
To heat large areas, it is recommended to install a liquid heating system. The soil for it is not soil, but a cushion made of crushed stone and sand.
It is necessary to prepare the rough coating, install the water circuit, and test the system. The highway is covered with concrete mortar using plasticizers.
YouTube responded with an error: The request cannot be completed because you have exceeded your quota.
- Related Posts
- What should a laminate be like for a warm water floor?
- How can you make warm floors?
- How to install a heated floor?
- What are the characteristics of Rehau pipes for underfloor heating?
- How to calculate the power of a heated floor?
- What types of mats are there for warm water floors?
Pressure testing of a heated floor system
Before the screed is poured, which completes the floor layer on the ground with insulation and contains the heating circuit itself, it is necessary to perform pressure testing of the installed equipment and pipes.
This procedure is performed as follows. The pipes connected to the collector must be filled, the air from them must be forced out through the drain valves, and the air vents must be kept closed.
Metal-plastic pipes are tested using cold water, and polyethylene pipes are tested by doubling the pressure in the system. This action is repeated twice and it is checked what the difference was between the pressure for testing and the value after it was reduced. If this range is not very large, then everything is in order. Additionally, the entire circuit is checked for leaks.
A thermal stability test is also performed. The coolant temperature rises to +85 degrees Celsius for half an hour. Then the places where the pipes join and connect to other elements of the system are checked. If everything is in order, then you can start pouring the screed.