Types of brick pipes
There are three types of brick chimney structures, which differ from each other in location.
- Root pipes, they are also attached chimneys. They are built separately from the stove, that is, they are erected next to the heating element, connecting the latter with a chimney outlet (pipe). Typically, such chimney pipes are installed where it is necessary to connect several stoves or fireplaces.
- Mounted option . This is the most common type of chimney. From the name it becomes clear that the structure is installed on top of the stove, as if placed on it.
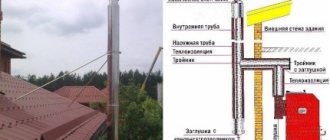
- Wall design . It is built along the outer wall, that is, the structure is located outside the house, and not inside, like the two previous options. In this case, the wall pipe can be either a mounted or a root pipe. This is the simplest option in terms of building a chimney, but it is more expensive, as it requires a large amount of thermal insulation work.
Wall chimney design Source reddit.com
Chimney foundation
This is an essential part of any chimney. The masonry of this element can be made of solid brick or stone, but reinforced concrete is used most often. Usually the foundation is at least 30 cm high and has the shape of a rectangular parallelepiped. The width and length are selected so that it protrudes at least 15 cm beyond the trunk on each side. But the final decision on the size is always made by the designer, depending on the weight of the chimney and the load-bearing capacity of the base. He is also in charge of the amount of required reinforcement and determination of the class of concrete.
Most often, a mesh of ∅12 rods and B15 concrete, located at intervals of 20 cm, is sufficient. An important element is compliance with the parameters of the protective layer of the main reinforcement when constructing the chimney foundation:
- 7 cm if the foundation does not have insulation;
- 5 cm, if moisture insulation is provided and the base is made of lean concrete (class B7.5).
Attention! The base of the foundation of a brick chimney can be 50 cm below the floor level if the brick chimney is located inside the house. If the chimney is located outside, the base of its foundation should be placed below the soil freezing line
Most often, this boundary passes at the depth of the foundation of the house.
Chimney design
In the article we will talk about the attachment model, as the most frequently used in the Russian region. The chimney pipe includes (from the bottom of the stove up):
- Kiln neck . Essentially, it is a pipe made of rectangular brick. The neck area is selected according to the furnace power. The greater the power, the larger the cross-section. A steel damper is installed in the neck, with the help of which the cross-section of the chimney is adjusted. With its help, the air supply is regulated.
- Fluff . This is an extended brickwork, which is erected in the overlap area between the rooms and the attic. Its purpose is to protect the ceiling from high temperatures. In fact, a fluff is still the same pipe, only its walls are thicker.
Chimney fluff Source iobogrev.ru
- Boner . This is the longest part of the chimney that runs through the attic space. Its cross section is the same as that of the furnace neck.
- Otter . Same design as fluff. The purpose is to protect the roof structure from high temperatures emanating from the pipe, plus strengthen the chimney to withstand wind loads.
- The neck of the chimney on the roof is made of brick. This is the part visible from the outside, rising above the roof of the house.
- Header . Its purpose is to protect the pipe neck from leaks that usually occur on vertical surfaces during precipitation. That is, the outer diameter of the head is larger than the diameter of the pipe neck.
- Cap . This element of the chimney structure is usually made of galvanized steel sheet. The purpose is to protect the chimney shaft from precipitation getting inside.
Section of a brick chimney above the roof: pipe neck, head and cap Source pinterest.com
See also: Catalog of companies that specialize in roof design and repair services.
Parameter calculations
The size of the chimney for a brick stove should remain the same along its entire length; its optimal value is selected depending on the dimensions of the heating device.
Sectional size
Suitable device parameters depend on the combustion chamber and furnace power. The inner walls need to be made smooth without sagging mortar or protrusions, then they will remain clean longer.
Most often, brick chimneys of square and rectangular cross-section are used; their masonry is made of 4, 5 or 6 bricks; when calculating the cross-section, one side of the structure is multiplied by the second. The standard dimensions are considered to be: 12.5 × 25 cm. The calculation is carried out according to the internal chimney channel. The indicated parameters refer to a masonry of 4 bricks, the cross-sectional area is 156.25 cm2.
When calculating a cross-section of five bricks, the result is a value equal to 312.5 cm2, and with six - 625 cm2.
When installing a brick chimney on a metal stove, you need to connect its square section to the round outlet hole of the stove. So, for a chimney cross-section with an area of 156.25 cm2, a round pipe with a diameter of 130 mm is suitable, its area is 133 cm2, the next parameter of 150 mm has a greater value than the declared one.
When calculating a circular cross-section, the required radius is taken into account, the area is calculated using the school formula:
S = π×R2, where the number π=3.14
Knowing the diameter of the pipe, you can easily determine the desired parameter.
Calculation depending on power
The internal channel depends on the optimal ratio of pipe sizes and the power of the heating device. Among the guidelines for choosing a suitable section, the size of the opening provided for the blower door is highlighted. The pipe size should be smaller than the hole for the door.
If, when calculating, we take into account the productivity of the furnace, then we can select the cross-section from the tabular data, but they do not take into account the thickness of the seams; they range from 6 to 10 mm.
| Power, kW | Pipe cross-section, in millimeters |
| 3,5 | 130×130 |
| 3,5÷5,2 | 130×190 |
| 5,2÷7,0 | 130×260 |
| 7,0 | 190×260 |
Chimney height
When calculating this parameter, you need to pay attention to the following features:
- if a highly flammable type is used as a roofing material, the chimney must rise above the roof by at least 1.5 meters;
- the height difference between the top point of the head and the grate should not be less than 5 meters;
- if there is a high building near the house, then the pipe should be 0.5 meters higher than its extreme point;
- on roofs with non-combustible coating, the minimum distance to the top of the pipe should be 0.5 meters.
When calculating the height of the pipe, the size of the firebox and the cross-section of the chimney are taken into account. So, if the total area of the combustion window is 0.35 m2, and the cross-sectional area of the channel is 0.04 m2, then a height of 7 meters is suitable for these parameters. To make calculations with other parameters, you need to establish this dependence and select the height.
The height of the chimney pipe affects the draft, so this size of a brick chimney pipe should not be less than 5 meters, otherwise turbulence may begin and all the soot will go inside the house.
How to correctly position the pipe from the roof ridge is shown in the photo below:
General requirements for chimney pipes
Regardless of the type of chimney, there are three strict rules that must be followed when building a chimney:
- Accurate selection of the height of the brick structure.
- What kind of brick should the chimney over the roof be made of?
- masonry mortar to use for this ?
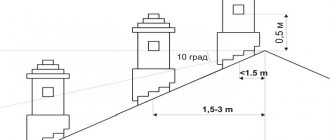
As for the height, this parameter is calculated taking into account the angle of inclination of the roof structure. So that you understand what we are talking about, look at the photo below, which shows the relationship between the size of the roof and the height of the chimney.
The relationship between the height of the chimney pipe and the roof parameters Source kaminbrick.ru
It is important to understand that the correctly selected height of the pipe structure is, first of all, good draft inside the pipe, which guarantees proper operation of the stove. Secondly, it is compliance with fire safety standards and requirements. This mainly applies to roofs made from flammable materials. Because the turbulence of air masses can cause eggs to fall on the roofing. And this often causes a fire.
Now let's move on to the bricks. Everything is simple here.
- Parts of the pipe exposed to high thermal loads must be assembled from fireclay (refractory) bricks. This mainly applies to the neck of the furnace.
- The remaining parts can be raised from M200 red brick. This material easily tolerates temperatures up to +800C.
The neck of the furnace is lined with fireclay bricks Source lv.aviarydecor.com
Why do you need to calculate the height of the chimney?
Calculating the height of the chimney must be done for several reasons:
- To increase the efficiency of the heating device. If the height of the chimney pipe is determined correctly, the equipment will release heat as quickly as possible with minimal fuel consumption.
- For the safety of people's health. If the height of the chimney for a boiler or other equipment is calculated incorrectly, then combustion products harmful to human health will enter the room. To ensure safety, normal chimney draft is required.
The presence of draft determines the possibility of using a heating device
- To eliminate the threat of fires. If the height of the chimney duct is insufficient, hot gases do not have time to cool to the required temperature, which increases the possibility of fire.
Due to the low height of the smoke channel, a fire may occur
Correctly calculating the length of the chimney allows you to save fuel resources and is the key to the health of people around you.
Technology for constructing a brick chimney
So, the laying of a brick pipe on the roof must be provided for at the stage of building a house. This will make it easier to carry out the entire construction process. That is, there will be no need to make holes in the ceilings and roof structure. It should be added that the mounted version rises along with the stove. There is no other option here. The attached (root) or wall-mounted one can be erected after the furnace has been installed, since both structures are free-standing.
In fact, the design of a brick chimney is simple. But the process of its construction itself is complicated, because each row of bricks being laid requires the craftsman to place them exactly where they should be laid, aligning each row horizontally. At the same time, it is very important to achieve the evenness of the vertical planes that form the inner pipe. It is this that is the most important element of the entire structure, because the draft and operating efficiency of the heating equipment depend on it.
There are several schemes for laying bricks in a chimney structure. But the simplest one is shown in the photo below. Please note that the masonry is carried out in half a brick, and this is enough to talk about the effectiveness of the assembled structure. What is important here is not the laying method itself or the installation scheme of the bricks, it is important to observe the cross-sectional area of the inner strip.
Laying a half-brick chimney Source soverthrit.mihanblog.com
That is, it turns out that the trunk of the chimney structure is erected above the stove almost equally along the entire height of the structure. The only deviation is fluff and otter, where the bricks are laid in a more extended position. We invite you to watch the video.
Chimney laying
There is no fundamental difference between the laying of the solid furnace and chimneys. It is carried out on clay-sand mortar using the same tools - a furnace hammer-pick, trowel and plumb line. However, elements such as fluff and otter are laid out using a large number of brick parts measuring 1/8, 1/4, 1/2 and 3/4 of the whole.
To avoid chopping and cleaving, which are accompanied by clouds of brick dust and rarely give the desired result, you should use a grinder with a diamond wheel for ceramics. This guarantees the accuracy of the work, eliminates tedious work and a lot of useless brickwork.
Solution
For masonry up to the roof level, a mixture of sand and clay is used, since it has a coefficient of linear expansion similar to brick, which is a certain guarantee against the appearance of cracks.
Pure clay used as a binder can be either oily or lean. In some places there are deposits where the proportional ratio of the amount of clay to sand is optimal by nature: one to three or four.
When the volumetric part of the clay increases, the solution cracks after drying, and when it decreases, it crumbles. To determine the optimal ratio of volumetric parts, you need to knead the finished solution in your fingers. It should not be noticeably slippery or rough like sandpaper.
The excavated clay is soaked in an iron container for 3–4 days. The result should be a homogeneous clay pulp without stones, similar in consistency to liquid sour cream.
The sand taken from the floodplains of streams and rivers is very fine and dusty. It is not suitable for masonry. It is better to use one that consists of grains of 0.8–1 mm. It feels rough to the touch.
Clay and sand are mixed in volumetric parts in a ratio of one to three or four. Water is added gradually, in small portions. The finished solution should leave marks on the trowel (but not stick to it) and should not drain from it.
To avoid errors in proportions, it is better to buy a ready-made dry clay-sand masonry mixture
Please note that those marked “fireproof” are not suitable for masonry.
Brick
Red solid burnt brick is used.
Its edges should be smooth, without cracks, and the sound produced when it is lightly struck with a furnace hammer should be clear.
The standard size used for masonry is length 250, width 125 and height 75 mm.
Laying the internal chimney
It begins immediately after the damper is installed and the furnace roof is completed. The masonry techniques are the same - applying a layer of mortar, laying the brick, “shaking” it with your hand and lightly tapping it with a pick. Verticality and horizontality are checked after laying each row. They finish it four brick heights before the ceiling.
Laying fluff
The expansion of the thickness of the chimney walls is carried out to comply with the requirement that combustible structures be located at a distance of 250 mm “from the smoke”. The usual thickness of the chimney walls is 125 mm. To double it, you need to fold four rows, each of which moves outward by 1/8 of the width of the brick relative to the bottom one - just the amount that allows the brick to lie without flipping over. The principle of masonry for all three sizes is the same:
- The inner surface (toward the smoke) of the first row is laid out in 1/8 sections. The gaps between the outer bricks are filled in 1/4 sections.
- In the second row, the parts increase, respectively, to 1/4 and 1/2.
- The third row uses 1/2 and 3/4 pieces.
- The outer belt of the fourth row of fluff is laid out with whole bricks.
Having reached the ceiling, it is placed, observing the dressing of the seams, another two or three rows higher. A gap of 2–3 cm is left between the ceiling and it to eliminate pressure from the structure on the masonry. It is covered with mineral wool slabs. Laying up to the roof is carried out in the usual manner - with ligation of vertical seams and control of verticality.
Otter clutch
It begins after the edge of the chimney brick has risen above the roof. It is carried out outside, in compliance with all safety measures when working at height. You can use cement mortar. They start it from the edge that is lower along the slope. The distance from the smoke on each row is equal to 1/8 of the width of the brick. There should be a total of six rows in the otter. After it they put a neck - the usual continuation of the chimney. The gaps between the roof and the chimney are covered with a “collar” made of sheet roofing steel.
Head masonry
This is a chimney deflector that prevents smoke from clogging into the chimney due to air turbulence.
It is laid out in two rows, moving the first from the smoke by 1/8 of the brick, and the second by 1/2.
Its protrusions can be used to hook the clamps of the metal cap, which prevents precipitation from entering the pipe.
Advantages and disadvantages of brick chimneys
Let's start with the advantages of brick chimneys:
- The main one is long service life . There are many examples in which brick chimneys have served for more than 1000 years.
- The thermal conductivity and heat capacity of the brick allows the chimney to act as an additional heating element. This is true in houses with several floors, especially for the attic.
- The aesthetic qualities of brick should also be placed in the category of “pluses” of this type of construction. This building material will fit perfectly into any home interior design.
Brick chimney in the interior of a private house Source orchardo.ru
Dependence of the chimney height on other roof elements
Of great importance is also how close the chimney itself is located to the ridge of the roof, parapet or its other elements:
So, regarding the elevation of chimneys above the roof, there are the following rules:
- No less than 1.2 meters above a flat roof.
- No less than 50 cm above the roof ridge, if the pipe is located up to 1.5 meters from the ridge.
- Not lower than the ridge level if the pipe is located from 1.5 to 3 m from the ridge.
- Not lower than the line that can be drawn from the ridge down to the horizon at an angle of 10 degrees, if the pipe is located more than 3 meters from the ridge.
In this case, the smoke duct must be located at a certain distance from other elements of the building, minimum:
- 150 mm for pipes with insulation;
- 500 mm for pipes without insulation.
The minimum permitted pipe height is 50 cm. But these are too low pipes, which are only allowed to be installed on flat roofs without any protrusions. If the roof has a more complex configuration, you will have to tinker and take into account all the protruding parts.
So, if all these parts are located at a distance of 1.5 meters from the pipe itself, then the pipe only needs to be higher than all these elements. If they are closer than 1.5 meters, then the chimney must exceed their height by at least 59 cm:
Calculation of the chimney cross-section
So, we have decided on the height, now let’s talk about the cross-section, because both indicators are inextricably linked with each other.
Calculation of the chimney cross-section
To begin calculating thrust, we determine the diameter. If we talk about mathematical calculations, they are too complex to attempt without proper training. Therefore, we will focus on the recommendations of experts, without going too deep into the jungle.
- The power of the heating equipment does not exceed 3.5 kW - a chimney with a side section of 14x14 cm will be sufficient.
- If the heating boiler has a power of 4 to 5 kW, the cross-section will be larger - 14x20 cm.
- For power values from 5 to 7 kW, the cross-section is selected to be no less than 14x27 cm.
Chimney for solid fuel boiler
We immediately clarify that the given values are the minimum possible.
Advice! You can use the recommendations given only if you know the power of the device, which is not surprising. In the absence of this data, no matter how you look at it, you will have to perform calculations.
The ratio of the flue area of the chimney to the area of the fireplace portal
Let's try to understand the basic principles of such calculations. To work, you will need to know the following information.
- The amount of fuel that burns in the device in 1 hour of use - you can perform an experiment or still find the technical specifications (B).
- The volume of gases released during fuel combustion - this value can be found from various summary tables, according to the type of fuel (V).
- Gas temperature at the inlet to the chimney . Most often, this value fluctuates between 150-200 degrees Celsius (t). For household stoves, the calculations take a lower value from the specified range, although in fact it can be 130 or 120 degrees, but not lower, otherwise a dew point will appear at the outlet of the chimney and condensation will form.
Gas boiler diagram and flue gas temperature
The process of removing combustion products
Of all the above, the main parameter is the amount of fuel, so without this knowledge you will not be able to obtain accurate calculation results. The remaining values indicated in the list are approximately the same for all boilers, so they do not play a decisive role.
Now that we know what the calculations require, let's try to do them ourselves. To do this, remember that the draft in the chimney is nothing more than the difference in the densities of the exiting gas and air, multiplied by the height of the structure. That is, this is where the fact comes from that the volume of burned fuel directly affects the diameter of the structure.
Why is it important to check chimney draft?
So, all calculations are performed in the following sequence.
- We know what the power of heating equipment is. Using these data, we can accurately determine the volume of gas entering the system: Vg = BxVx(1+t/273)/360, (in m³/sec).
- We also know the speed of gas movement through the chimney. This parameter will help us determine the cross-sectional area of the pipe: (F=πхd²/4)=S (in m²).
- If you remember your school geometry course, then you probably know that there is a formula for calculating the area of a circle, with which we can easily determine the diameter of the pipe: dt = √4xBxVx(1+t/273)/πxωx360 (in meters).
Now we will carry out a test calculation using the specified algorithm for a chimney for domestic use. Let's assume that in the combustion chamber, on the grate, 10 kg of fuel can burn in an hour (maximum value). The fuel used is firewood with a moisture content of 25%. When this fuel is burned, 10 m³/kg of gas will be released. We have all the necessary data, so we can get started.
- So, first we find the volume of gas at the inlet: Vg = 10x10x(1+150/273)/360 = 0.043 m³/sec.
- We find the cross-sectional area of the pipe sufficient to remove such a volume of gas: S = (4x0.043)/3.14x2 = 0.027 m2.
- And we take the formula for calculating the diameter, substituting the resulting values into it: √4x0.34x0.043x(1+150/273)/3.14x10x360=0.165 m.
Calculation of the cross-section and height of the chimney
Great, we know the diameter, now we can move on to calculating the chimney draft.
- We also need the power value - we find it using the established coefficients and the knowledge that 10 kg of fuel burns in an hour: Q = 10x3300x1.16 = 38.28 kW.
- Next is the value of the heat loss of the pipe per 1 meter of length. For this purpose, we use the indicator of heat loss of a pipe per 1 meter of its length, footage and actual heat loss: 0.34/0.196 = 1.73 degrees of loss per meter.
- We know that the minimum pipe length is 5 meters. We remove from here two meters of the height of the stove itself and what remains is 3 m of a clean chimney. We calculate the drop in the temperature of the gases passing through this section: 150 - (1.73x3) = 144.8 degrees - the temperature of the gases at the outlet of the pipe.
- We take as a basis the density indicators at zero temperature 1.2932 and at the resulting 144.8 degrees - 0.8452, we obtain a natural gas pressure of 1.34 mmH2O. This draft will ensure good combustion of wood in the firebox.
Of course, these calculations may seem very complicated, especially since we did not delve into many subformulas when obtaining some coefficients. But if you look at it, everything becomes clear. At the same time, let us remind you that it is better for a master to undertake such calculations, and we provide the information for general information.
Prices for chimney deflectors
Chimney value and smoke draft
Gases rise through the chimney on their own under the influence of several physical forces. The smoke produced during combustion is lighter than air and rises to the top. Its lightness is due to temperature. As you know, the more a gas is heated, the fewer molecules it contains per unit volume and the lighter it is in itself. Light gases always rise to the top.
In addition, the difference in pressure and temperature between the air outside and the gases inside is important. This difference seems to draw gases out of the chimney. This process is called traction. Thrust occurs when there is a pressure difference. From a physical point of view, thrust is a pressure difference.
In chimneys with natural, passive draft, the Archimedes force acts. The air below is extremely rarefied because it has a high temperature. Its density is minimal. The air above, outside the house, is minimally rarefied because it is cold.
Its density is higher. It happens like this: heavy cold air descends down the chimney and squeezes warm, light air up, so the smoke rises through the pipe and is discharged outside. While the heater is running, the air at the bottom of the pipe will be warmer than outside.
It is important! The greater the temperature difference, the higher the thrust. Therefore, for good traction you need a good heating device and cold weather.
However, temperature differences are not the only factor affecting traction.
We recommend that you read: How to lay a pipe yourself and prepare a ditch for drainage
