It's nice to be the happy owner of numerous household appliance gadgets. Delivering many pleasant moments to their owner, they are undemanding and patient. But one day a moment comes when one of them suddenly stops reminding of himself. Here he was, and now he is no longer there. Even if it is an ordinary capacitive water heater, even a small one - 15 liters, the significance of the loss will be felt from the early morning. This feeling will not go away until the problem is completely resolved.
But there is always a solution. In this article we will look at the most common breakdown of Ariston water heaters associated with replacing the heating element.
- 2 Operating principle
- 3 Determine the malfunction
- 4 How to change
- 5 Check
Design
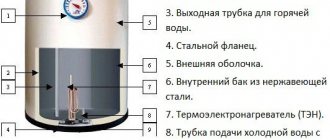
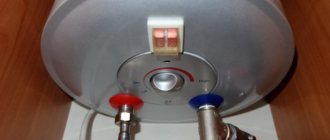
Ariston water heater design.
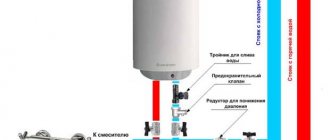
(Click to enlarge) Fundamentally, the design of any water heater (boiler) resembles the design of an electric kettle with the function of maintaining a given temperature. But instead of a lid, this kettle has a safety valve.
This article describes in detail the structure and operating principle of boilers:
Depending on the brand, its copyright holder includes a variety of marketing and technical options in the design. Such options are designed to distinguish the product of this particular brand from another.
The hallmark of Ariston storage water heaters is, among other things, the corrosion-resistant coating of the internal tank containing Ar+ silver ions.
This does not exclude the use of other protective coatings in other products of the company. The Ariston AM50 SH 2.0 Ei3 FE model (horizontal model) uses Ti-enamel as a protective coating.
Structurally, such a device consists of:
- external, heat-insulated housing (tank);
- internal tank with a volume of 15 liters to 200 liters with a corrosion-resistant coating or made of stainless steel;
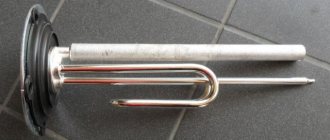
- Heating element – heating element: in a tank with a wet heating element – direct contact with water;
- with a dry heating element – contact with water through a ceramic shell;
Take note: the magnesium anode should be replaced at least 1-2 times a year.
Using this boiler as an example, you can roughly imagine the design of other models of Ariston water heaters and other manufacturers.
Installation and connection methods
“Dry” heating element
The heating element is a device that requires regular maintenance. After a while, it needs to be cleaned or replaced, depending on the efficiency and completeness of the work.
To clean the heating element yourself, you need to follow the instructions:
- Turn off the electric water heater.
- Disconnect the electric heater from the power supply.
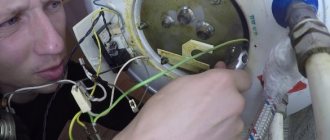
- Open the protective panel by unscrewing the screws.
- Under the panel where the thermostat and colored wires are located, disconnect the cables.
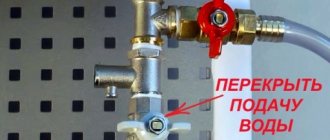
- Shut off the water supply to the water supply and boiler.
- Pull out the thermostat along with the heating element, removing the flange if necessary. At the same time, place a container near the opening in case there is water in the tank. Unscrew the heating element using an adjustable wrench.
- Dissolve two packets of citric acid in two liters of water.
- Immerse the heating element in the resulting solution and leave for at least 12 hours. After some time, the heating element is ready for installation.
- Install in reverse order.
To check the correct installation of the heating element, you will need to turn on the water. If liquid leaks from the tank, the device is not connected correctly.
There are three main ways to connect a heating element for an Ariston water heater. Sequential - the heater power depends on the total power of each element. The disadvantage is that if one heating element breaks down, the functionality of the entire heating system is lost.
Parallel - allows you to maintain the functionality of the unit in the event of failure of one of the heating elements. Combined - usually used if heating elements of the required power are not available.
Principle of operation
The operating principle of a storage water heater.
(Click to enlarge) Structurally, the boiler is two barrels isolated from each other.
One of them (internal) is made of either stainless steel or high-quality steel with an anti-corrosion coating.
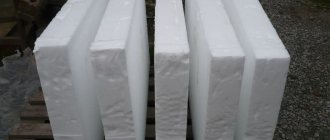
Modern heat-insulating materials are used as insulators.
This can be basalt fiber, polyurethane foam and similar insulators. Such a “thermos” can retain the heat of heated water for up to 3 days.
Expert Recommendation: Schedule your water heater for later hours using a nightly rate.
When it cools below the programmed value, the thermostat supplies voltage to the heating elements (heating elements) and water heating resumes.
To avoid mixing cold and already heated water, the latter is taken from the very top of the device. Cold water, displacing hot water, is always at the bottom.
When using equipment wisely, you should not force it to constantly work at maximum load. Every technology has its own resource.
Expert advice: by adjusting the thermostat to t=600, you can avoid scale deposits, thereby extending the life of the heating elements and the inner barrel. But periodically, once a month, it is useful to turn on the boiler at the highest possible temperature for disinfection purposes.
Filling with water and checking functionality
Hang the electric titanium in place.
Connect the hoses and open the cold water and begin to fill the tank. The hot water tap must also be open to allow air to escape. At the same time, make sure that there are no leaks anywhere. As soon as water comes out of the “hot” tap, the boiler is full. There is no need to close the tap immediately; let all the “slurry” spill out and finally flush the tank and pipes.
Only when clean water comes out do you turn off the mixer.
After this, the water heater must stand for at least half an hour or an hour so that condensation leaves all surfaces and there is confidence that there are no leaks.
You can then apply voltage by plugging the titanium into an outlet. To check the operation of the thermostat, use the control knob to force the adjustment to maximum and minimum.
In this case, the boiler on/off light should light up.
If the boiler operates quietly, without making any sounds, and it is not clear to you whether it is heating or not, you can check the energy consumption using the meter.
At maximum heating power of the heater, the counter will spin or blink much faster. This means that the heating elements work as they should.
So self-repair can save you a significant amount of money, the main thing is not to make some mistakes.
Determining the malfunction
The reliability and quality of water heaters produced under the Ariston brand have not raised the slightest doubt for many years.
It is enough just to follow the technical recommendations for operation prescribed by the manufacturer. But the notorious human factor makes its own adjustments here too. One day the boiler stops working normally - it stops heating the water or does it very slowly.
Most often, the reason for this is problems associated with the electrical part of the device:
- broken switches;
- fuses, various sensors;
- heating units.
But before you start diagnosing and repairing them, you just need to check:
- availability of electricity in the supply network;
- availability of water supply sources;
- make sure that there are no consequences from children's pranks: closed ball valves;
- pulled plugs from electrical sockets;
- Are there any problems with the thermostat?
When all of the above has been checked and the listed reasons are excluded from the list of possible causes, we check the functional state of the heater itself:
- a decrease in its effectiveness due to scale formed;
- short circuit as a result of leakage;
- due to burnout of the spiral itself.
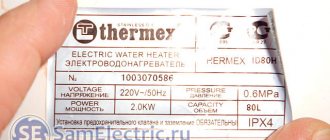
This procedure is most conveniently performed using a tester, by measuring the resistance of the product being tested. The technical data sheet of the boiler indicates the power of the installed heating element. Using the formula P = U2/R, Ohm's law, we determine its resistance.
For a heating element with a power of 2 kW, the resistance is about 27 Ohms. You should also check the possibility of breakdown of the spiral on the body of the water heater.
You may be interested in an article about installing an Ariston gas water heater. Read an article about the features of repairing an Ariston water heater with your own hands here.
Installation and connection methods
“Dry” heating element
A heating element is a device that requires regular maintenance. After a while, it needs to be cleaned or replaced, depending on the efficiency and completeness of the work.
To clean the heating element yourself, you need to follow the instructions:
- Turn off the electric water heater.
- Disconnect the electric heater from the power supply.
- Open the protective panel by unscrewing the screws.
- Under the panel where the thermostat and colored wires are located, disconnect the cables.
- Shut off the water supply to the water supply and boiler.
- Pull out the thermostat along with the heating element, removing the flange if necessary. At the same time, place a container near the opening in case there is water in the tank. Unscrew the heating element using an adjustable wrench.
- Dissolve two packets of citric acid in two liters of water.
- Immerse the heating element in the resulting solution and leave for at least 12 hours. After some time, the heating element is ready for installation.
- Install in reverse order.
To check the correct installation of the heating element, you will need to turn on the water. If liquid leaks from the tank, the device is not connected correctly.
There are three main ways to connect a heating element for an Ariston water heater. Sequential - the heater power depends on the total power of each element. The disadvantage is that if one heating element breaks down, the functionality of the entire heating system is lost.
Parallel - allows you to maintain the functionality of the unit in the event of failure of one of the heating elements. Combined - usually used if heating elements of the required power are not available.
How to change
Whether a malfunction of the heating element has been identified or a decrease in the efficiency of the device is due to the formation of scale, it will have to be dismantled.
It is possible that the heating element will be replaced simultaneously with preventive cleaning of the internal tank. First of all, you need to:
- disconnect the device from the power supply;
- remove the outer protective cover from the assembly;
- check the absence of voltage at the thermostat terminals with a phase meter probe (indicating screwdriver) and free them from the wires, having previously photographed the connection order;
- remove the thermostat with thermostat;
- close the ball valve at the water inlet, remove the check valve;
- remove water from the water heater through a hose from the valve or directly through its own drain system;
- Unscrew the nut securing the heating element to the mounting plate;
- squeeze the heating element with the rubber sealing flange and anode into the tank;
- unfold it inside the tank and pull it out;
- descale the tank and rinse it;
- If the heating element is in good working order, replace the anode and clean the heating element from scale;
- if the heating element is faulty, replace it with a new one recommended by the manufacturer;
- replace the anode with a new one;
- assemble everything in reverse order, using previously taken photographs of connecting the wires to the thermostat.
Please note: before putting the equipment into operation, be sure to check it for leaks. Fill it with water and let it sit for several hours.
If there are no traces of water, you can plug it into the network. Otherwise, you will have to replace the gasket.
You may also be interested in an article about Termex storage water heaters. Read the article on how to change the heating element in a Termex water heater here.
Filling with water and checking functionality
Hang the electric titanium in place.
Connect the hoses and open the cold water and begin to fill the tank. The hot water tap must also be open to allow air to escape. At the same time, make sure that there are no leaks anywhere. As soon as water comes out of the “hot” tap, the boiler is full. There is no need to close the tap immediately; let all the “slurry” spill out and finally flush the tank and pipes.
Only when clean water comes out do you turn off the mixer.
After this, the water heater must stand for at least half an hour or an hour so that condensation leaves all surfaces and there is confidence that there are no leaks.
You can then apply voltage by plugging the titanium into an outlet. To check the operation of the thermostat, use the control knob to force the adjustment to maximum and minimum.
In this case, the boiler on/off light should light up.
If the boiler operates quietly, without making any sounds, and it is not clear to you whether it is heating or not, you can check the energy consumption using the meter.
At maximum heating power of the heater, the counter will spin or blink much faster. This means that the heating elements work as they should. The entire repair with the purchase of spare parts will cost you around 1500-2000 rubles. In any workshop that calls a plumber to your home, they will ask for at least 3,000-5,000 rubles for such work, and this does not include materials.
So self-repair can save you a significant amount of money, the main thing is not to make some mistakes.