How to install a ventilation pipe with your own hands
For a comfortable microclimate in a city apartment or private house, it is necessary to create suitable living conditions, including temperature and humidity. A technically competent installation of a ventilation pipe will ensure effective air circulation in the room and will allow it to maintain its parameters within the established limits.
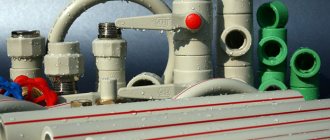
Option for installing a ventilation pipe using ready-made elements
The construction of air ducts is quite accessible even with minimal skills and a standard set of tools. The main thing is to choose the right type and size of the ventilation pipe, the method of its installation and strictly follow the installation technology.
Installation of ventilation pipelines
A design ventilation scheme is preliminarily developed, and the parameters of the future system are calculated based on the amount of air and the speed of its movement in the channels. The specifics of equipment and components are determined, and purchases are made. Installation of ventilation pipes is carried out after marking the route and in accordance with the rules SP 60.13330 and 73.13330.2012 regarding ventilation and air conditioning.
When assembling pipelines, the following provisions must be observed:
- stretch corrugated sleeves completely;
- avoid sagging, because otherwise the pressure in the ventilation system is lost;
- be sure to ground the air ducts to avoid the accumulation of static charges;
- install only rigid pipes if the vertical distance is larger than 2 floors (this requirement applies to basements, concrete structures and places where air ducts adjoin the ground);
- set a radius for turns of ≥2Ø of the pipe;
- use special metal adapters and sleeves in passages through walls.
Care must be taken when working, and in case of accidental damage, the section must be replaced. The air ducts are fastened to the walls and ceiling. In this case, the parallelism of the axial line of the pipes with respect to the bearing surface is maintained. Compliance with the rules of installation and operation of the ventilation system will ensure a comfortable microclimate in any room.
Features of choosing air ducts
According to the provisions of SNiP, ventilation pipes must ensure unhindered air removal, for which their length and diameter are calculated depending on the area and purpose of the premises.
The material and design features of the air ducts matter. For the manufacture of pipes use:
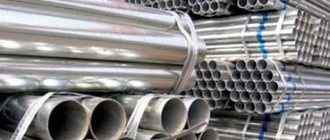
- galvanized or stainless steel;
- various types of plastic;
- aluminum;
- brick.
Rectangular steel ventilation pipe
Each type has its own advantages and disadvantages, and the choice is determined by the following criteria:
- strength;
- durability;
- resistance to atmospheric and climate influences;
- the ratio of the weight of the air ducts and the maximum possible load on the supporting structures;
- complexity of installation and subsequent maintenance.
The design features of air ducts do not have a significant impact on the technology of their installation. Therefore, the installation of round or rectangular ventilation pipes differs only in the shape of the hole that must be cut in the wall or roof and ceiling.
Types and characteristics of ventilation pipes
Air ducts for domestic use are often made of plastic or metal. But there are many more options: traditional brick and asbestos-cement pipes, ceramic and sandwich pipes, fabric pipes made from technical textiles. The characteristics of some types are worth considering in more detail.
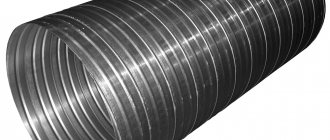
Metal hoods
They have a number of advantages: strength and long service life, a smooth internal surface on which soot and dust deposits do not accumulate, immunity to high temperatures and the aggressive effects of moving gases. They are made from different alloys - black steel, galvanized and stainless steel. The usual thickness of products is 0.5−1.2 mm, the maximum is 5.
We recommend that you read: Installing and connecting an exhaust fan with your own hands
Sheet aluminum is rarely used; foil is more often used. Straight sections of air ducts with a diameter of up to 50 cm and a wall of 0.55 mm are made from tin, and for large sections the thickness is 0.7 or more millimeters.
Each of the subtypes of metal ventilation pipes has its own characteristics:
- Welded air ducts made of black steel are installed in smoke removal systems with a possible temperature jump. The cross-section can be round or rectangular with dimensions Ø10−160 cm, square 100 x 100 mm and above. Wall thickness - 1-2 mm, length of sections - 1.25-2.5 m, connection - flange. All shaped and straight parts are coated with anti-corrosion primer GF-021. Automatic electric arc welding guarantees the airtightness of the seam.
- Galvanized pipes, compared to previous products, have better protection against the aggressive effects of transported gas mixtures and are not afraid of contact with moisture. Round air ducts are made straight-seam or spiral-wound. In other respects, the characteristics coincide with those of black iron pipes.
- Stainless steel hoods are used to give an object an aesthetic appearance, hygienic properties and to move highly toxic and aggressive gas environments. In production, they use the techniques already mentioned, as well as the technology for the production of corrugated sleeves from multilayer foil with a size of 0.12–1.0 mm. In addition to flange connections, it is possible to join sections into a socket, lock fastening and welding with a special heat gun. Compared to other metal air ducts, stainless steel ones are tougher and can withstand higher temperatures - up to 900ºC.
All steel chimneys have a long service life and high strength. They operate at temperatures ≥140 degrees and rarely clog due to their perfectly smooth surface.
Plastic channels
These ducts are only a partial alternative to metal air ducts (the use of plastics in heating hoods is prohibited).
Polymer pipes are made of round, rectangular and oval sections and the following materials are used:
- PP - propylene: does not react to organic matter, acids and alkaline solutions;
- HDPE or HDPE is a malleable polyethylene with ordinary properties;
- PVDF is a fluoroplastic material that is resistant to all acids and designed to work in conditions of negative (from -40º) and hot (up to +140ºС) temperatures;
- PVC - heat-resistant smooth vinyl pipes, can be rigid or in the form of flexible corrugation, can withstand up to 80ºC and are not afraid of ultraviolet rays.
The sections are connected to each other by means of a socket, and are attached to fans and heaters using flanges. The cross-sections of the air ducts are standard, round diameters vary between 100-1250 mm.
Polymer hoods have many advantages over metal sections: they can be sawed with a regular hacksaw and joined by heating the ends. Light weight, lack of seams and smooth surface - all these properties allow you to choose lower power fans. There is no noise from air movement inside the plastic channel. The length of the lashes is 3−12 m.
We recommend that you read: Photocatalytic air purifier
Combined sandwich pipe system
This design is a pipe of a smaller diameter inserted into a channel of a larger cross-section. The space between them is filled with a heat-insulating layer - non-flammable basalt wool. Both shells are made of stainless steel. Cheaper options - the outer pipe is galvanized, the inner pipe is made of black iron. Other combinations of metals are possible.
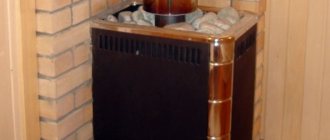
Insulated air ducts are installed to extract flue gases from a stove, fireplace or heating boiler. The device has a high degree of fire safety.
Advantages of sandwich pipes:
- the versatility of the design allows installation inside and outside the building;
- ease of assembly - even an inexperienced craftsman can install a chimney from sandwich sections;
- the smoothness of the surface and the insulating layer reduce to zero the possibility of condensation and soot accumulation inside the pipe;
- the lightness of the structure makes it possible to ensure its stability without erecting an additional foundation, which speeds up installation and reduces costs;
- an attractive look that can decorate the design of a building or a specific room.
The air duct sections are connected using the socket method. Sandwich pipes have two disadvantages: high cost and relatively short service life - up to 15 years.
Ventilation pipe installation technology
The installation of air ducts can be carried out both at the construction stage of the building and after the house is put into operation.
Construction of a brick ventilation duct
Brick ventilation pipe
Most often, ventilation is constructed in this way in multi-story buildings, but this technique can also be used in the construction of large private houses with a height of two floors or higher. Brick ventilation ducts are installed in main walls during their construction.
The height of the pipe must be at least 50 cm from the level of the roof ridge, otherwise, due to turbulence on the roof surface, the draft will be disrupted and it will become impossible to ensure air circulation.
For effective operation, the ventilation duct is located approximately in the middle of the house or at an equal distance if there are several of them.
To reduce the likelihood of severe cooling in winter, install a ventilation pipe with walls of at least 2.5 bricks. The unhindered movement of air masses will be ensured by the presence of overflow holes or gaps between the door leaf and the floor, about 2 cm in size.
Installation of pipes for ventilation after commissioning of the house
For the construction of air ducts in already constructed buildings, steel or polymer pipes are usually used. They can be installed through a hole in the wall or with a connection to the roof.
The second option is more labor-intensive, since it requires not only careful removal of part of the roofing material, but also careful sealing of all layers of the structure. The complexity of the work can be reduced by using ready-made passage units, which are made from durable plastic.
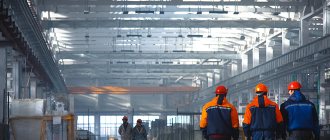
Industrial ventilation pipe passage assembly
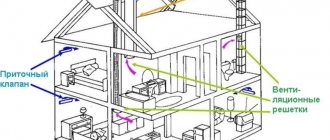
Pipes are routed through the roof and ceilings for:
- ventilation of the attic space;
- ventilation structures in the interior of a residential or administrative building;
- installation of sewer system ventilation.
Before you begin installing the air duct, you need to prepare tools, the list of which is largely determined by the material of the roof and ceiling. How to make a ventilation pipe if it needs to be routed through the roof?
Ventilation pipe outlet through the roof
The technology for performing the work consists of performing the following operations:
- choose the location of the air duct taking into account its design features and in accordance with the requirements of SNiP;
- outline the passage of the ventilation pipe, depending on the shape of its section;
- a hole of the required size is cut out in the ceiling along the marked lines;
- a hole of the same shape is made in the insulation, waterproofing and roofing, choosing tools suitable for a certain type of material;
- Using the finished template, mark the location of the passage unit and make several holes for its fastening with self-tapping screws or self-tapping screws;
- the sealing gasket is placed in the intended place, having previously applied a layer of sealant to its lower surface;
- the pass-through unit is installed on a waterproofing gasket and secured with self-tapping screws;
- a ventilation pipe is inserted into the prepared structure;
- check the vertical position of the air duct and fix it with screws.
Installation of an air duct with an exit through the roof using a silicone cuff
If it is impossible to install an air duct with an outlet through the roof, then it is done through a hole in the wall. How to install the ventilation pipe in this case?
First, a hole is marked on the surface, the size of which should be slightly larger than the cross-section of the air duct, and then the following actions are performed:
- cut out the contours according to the markings, holding the punch horizontally;
- remove the cut material using a chisel and hammer, carefully removing it in parts;
- place the pipe in the finished hole;
- seal the remaining cracks using polyurethane foam;
- after drying, the excess foam that appears is cut off with a knife;
- putty the junction with façade plaster from the outside and starting plaster from the inside;
- Plastic grilles are installed on both sides of the pipe, secured with self-tapping screws.
Installation of a ventilation pipe with outlet through the wall
If necessary, the air duct is increased to the required size, attaching it to the wall with clamps.
Accurate calculation and implementation of installation work in accordance with the technology will ensure long-term operation of the ventilation pipe.
Source
How to install ventilation pipes: installation technologies for attaching to walls and ceilings
Air ducts are the transport networks of the ventilation system. Their design and installation are regulated by strict regulations and technological maps. Compliance with regulatory requirements during construction is a guarantee of flawless operation of the network, ensuring stable air exchange.
We will tell you how to install ventilation pipes in accordance with building requirements. Every developer must know the basic rules for laying and fastening air ducts. The information will also be useful for owners to understand the cause of the problem and decide how to fix it.
Features of types of fixation
Most often in a professional environment they use a combination of a bracket and a stud to secure parts. The fastening option is especially suitable if the weight of the system parts is significant. Thanks to the use of a bracket, a significant part of the load is removed from the fastening elements.
If it is necessary to install a rigid air exchanger, then the involvement of third-party specialists will be required. A metal pin is used to secure it to the wall. The thickness of the fastening pin is calculated based on parameters such as pipe length and stud material. This installation method can be used for both round and square pipes. To effectively support the parts, special clamps made of metal are used. The joints of components and structural parts are strengthened using special tightening bolts.
It is more convenient to use flexible fragments for DIY installation. To install them, you do not need to have special knowledge; all the necessary steps are easy to perform. You just need to take into account the direction of air flow during assembly. It is much easier to mount such structures in hard-to-reach places, such as ceilings and shafts, which can often be unsuitable for analogues made of hard materials.
The cost of elements for a flexible ventilation system and fastening air ducts to the wall will be much cheaper than steel analogues. If it is necessary to install an air exchanger at a high altitude, then it is necessary to seek the help of industrial climbers with experience in carrying out such work.
Connection options when assembling ventilation ducts
Air ducts are assembled from individual parts. Docking is carried out using flanges or other connecting elements.
Angular flanges are installed at the ends of the sections being connected. Holes for mounting bolts are drilled on them. Sealing gaskets are placed between the flanges.
To ensure the strength of the flange connections, the bolts are carefully tightened using nuts and a suitable wrench. The nuts are on one side of the connection. When installing vertical pipes, the nuts are located on the side of the lower flange.
The disadvantages of such a connection are the significant weight of the structure, high consumption of metal, and high labor intensity of the work.
Lighter flanges are made from galvanized profile strip. The Z-shaped flanges are connected using a C-shaped rail and a seal.
The connecting rail resembles a collapsible flange. It is made of a galvanized metal profile in the shape of the letter G. The length of the larger side is from 20 to 30 mm. The kit includes a seal and a corner. The advantages include low labor intensity and low financial costs.
Among the wafer connections used for assembling round air ducts, the most commonly used are:
The thickness of the nipple should not be less than the thickness of the pipes.
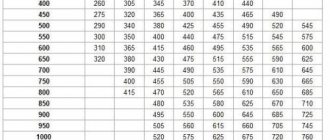
The nipple is inserted inside or put on top of the joining elements so that its width covers both sides of equal length for the pipe diameters:
- 100 – 315 mm – not less than 50 mm;
- 355 – 800 mm – not less than 80 mm;
- 900 – 1250 mm – not less than 1000 mm.
Instead of the name nipple, the term coupling is often used.
The bandage connection is considered a connection with a high degree of strength and reliability. The edges of the straight and shaped parts of the air ducts are folded back and combined. Then a bandage filled with sealant is applied to the pipes at the seam and tightened.
When connecting air ducts, the seams are sealed:
- elastoplastic tapes such as “Guerlain” at temperatures up to 40 degrees;
- non-hardening mastic based on synthetic rubber (for example, Buteprol), silicone and other sealants that can withstand heating up to 70 o C.
The seam of the pipe or box is located at the top.
When moving an air mixture with a temperature above 70 o C, elastic strands made of polyisobutylene, bitumen mastic (PMZ) and other fire-resistant non-combustible materials are used as a seal.
Before joining the channel elements with thermal insulation, carefully bend the insulation at both ends. The sections are hermetically connected and the insulating layer is returned to its place. The seam in the thermal insulation is sealed with aluminum tape or clamps.
Air duct fastening methods
Air hoses are most often attached to the ceiling or walls of the room, and the mounting technology depends on their size and configuration.
According to their cross-sectional profile, they are divided into rectangular and round bends. Different fastening methods are used for them.
For fastening rectangular channels, technology is used using:
- Studs and profiles in Z and L shapes.
- Studs and traverse.
These methods are used when installing heavy structures.
For circular channels the following is used:
- Clamp and pin.
- Punched tape and clamp.
Similar fastening methods are common when assembling small systems.
Types of connection of metal air ducts
Round bends are mounted on the following connections:
- Flanged.
- Nipple.
- Muftovs.
- Bandage.
For rectangular channels the following are used:
- Bus connections.
- Rack and pinion.
- Flanged.
Along with them, classic connections with socket and welding are used.
Eurobus mounting rail
As a rule, rectangular air ducts and fittings are joined with flange connections created on the basis of a mounting rail. Other names for this unique design are “euro tire”, tire rack.
It is an L-shaped profile, thanks to which the sides of the box are rigidly fixed in the flange.
The product is produced in widths of 20 and 30 mm. To create a flange, the tire rail is cut to size into four parts, assembled using angles, inserted into the outlet and attached to it with self-tapping screws or bolts.
The joints of the mating flanges along the perimeter are laid with a sealant or lubricated with sealant. Adjacent flanges are connected to each other with bolts. To provide additional tightness, clamps are installed every 50 cm around the perimeter of the assembly.
Mounting bars provide a tight connection and create additional rigidity in the ventilation structure.
Nipple and coupling
These types of connections are used when working with round ventilation pipes in straight sections.
A nipple is a piece of pipe, the middle of which is surrounded by a convex rib.
The part is inserted into the pipe, where it is fixed by this protrusion. The next segment of the ventilation system is put on it. The docking point is covered with aluminum tape.
The main requirement for the connector is that the dimensions and material match the parameters of the ventilation being assembled.
The coupling is essentially an external nipple and differs from it only in the side protruding inward and in the cross-sectional size: it is larger than the diameter of the pipeline. Accordingly, the coupling is put on the abutting elbows from the outside and covers the mating point.
Coupling connection diagram
Rack and pinion
The rack joining method is used when installing rectangular air ducts, the sides of which are 40 cm or less in length.
The adjacent ends of the channels with the bends of the sides are connected, a rail is inserted into the bends and driven along the entire length of the sides. Then the joint is compacted with a hammer. The method is in demand in places limited by height.
The disadvantage of slatted joints is air leakage through them. To improve the tightness of the assembly, sealing materials made of rubber or polymer are used.
Method of connecting rectangular bends on a rail
Bandage
Another wafer-free connection method is joining channels with a bandage. It is made of thin galvanized steel and is intended for the assembly of round air ducts of small and medium diameter.
The connector is placed on the flanged ends of the pipes to be connected, having first filled its recess with sealant. The ends of the bandage, to which the angles are welded, are tightened with a clamp or a special device. Then the bandage is secured to the bends with a bolted connection.
Bandage installation diagram: a - connector, b - docking unit; 1 — bandage, 2 — air ducts
Bell-shaped
The easiest and fastest way to install air ducts. The vents are manufactured in a slightly conical shape and are assembled into a single ventilation system by inserting the next vent into the previous element.
A sealant is used for sealing.
Used when installing round air ducts, assembling sandwich chimneys, suitable for equipping a natural ventilation exhaust duct.
Video: stainless steel pipes, connection methods
Attaching ventilation pipes to the wall and ceiling
Metal air ducts without insulation with banded connections are attached to ceilings and walls using various structures: supports, brackets, hangers, clamps.
Features of installing rigid ventilation ducts
The distances between fasteners are strictly standardized:
- for round pipelines with a diameter of less than 400 mm - no more than 4 meters;
- for diameters equal to or greater than 400 mm - no more than 3 meters;
- for boxes with a cross-sectional side of less than 400 mm - no more than 4 meters;
- with a cross-sectional side equal to or greater than 400 mm - no more than 3 meters.
To remove the condensate that forms, horizontal sections of air ducts are laid with a slope of 0.01 - 0.015. Water drops roll down an inclined surface into drainage receptacles.
Laying a ventilation pipe with a diameter of up to 630 mm with flange and coupling (nipple) connections in a horizontal position is carried out using various fasteners. The distance between them does not exceed 6 meters.
The procedure and methods for installing air ducts
Before installation of the ventilation system begins, a work plan is developed. It outlines the individual stages of assembling large units. Depending on the dimensions of the structures, their masses, installation methods and the sequence of steps are chosen. Mark the fasteners and check their completeness. In the graphic part of the PPR, parking places for lifting mechanisms: winches, blocks, etc. are marked.
Only rigid ventilation lines are installed in basement and ground floors.
To pass through walls and partitions, special inserts and metal cartridges are used.
In order to minimize speed losses, the turning angles of the route are rounded with a circle radius of at least 2 diameters of the air duct.
Safety precautions during work
Most installation work is carried out at height. Lifting mechanisms are required. It is mandatory for installers to undergo safety training.
For the successful outcome of the work at height phase, it is required that:
- Work was carried out only by trained, qualified installers.
- The work site was fenced, and the passage of people near the site was limited.
- To reduce the degree of danger of installation at height, all preparatory processes were carried out at the zero level.
When performing work in private homes, reliable, strong scaffolding and inventory scaffolding are used. Work on laying ventilation pipes with thermal insulation is carried out wearing protective gloves and goggles.
The following article will introduce you to the specifics of arranging the passage of ventilation pipes through a roofing pie, which we recommend reading.