Selecting an instantaneous water heater
Nowadays, analogues of instantaneous (wall-mounted) water heaters are safe and relatively easy to operate (previously, this type of unit was known as a geyser).
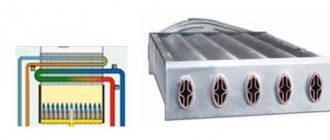
Diagram of a flow-through boiler running on gas, where:
- 1 – box;
- 2 – combustion chamber;
- 3 – coil;
- 4 – radiator;
- 5 – device that interrupts traction;
- 6 – burner;
- 7 – pressure regulating valve;
- 8 – block tap;
- 9 – pipeline with hot water;
- 10 – gas valve;
- 11 – gas supply pipe;
- 12 – pipeline with cold water;
- 13 – igniter handle;
- 14 – burner handle.
Installation steps
As mentioned above, the installation of an open chamber gas water heater must comply with all current regulations. All safety precautions must be strictly observed. If you decide to start the installation from scratch and without outside help, keep in mind that this will be very difficult to do, since the base requires connection to gas and water lines. The water heater is installed in the kitchen (but in no case above the gas stove) or in the bathroom
It is very important that a hood is installed in the room.
It will be much easier to replace the old water heater with a new one, since all the rules have been followed previously. To do this, you will need to connect it to a gas pipe, water supply and install a hood.
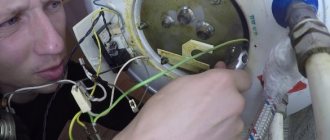
How to remove gas and water connections? In order to get rid of the old water heater, you will need to disconnect the water and gas using valves and unscrew the nut of the gas hose (or pipe). To do this, use an adjustable wrench. If you encounter a gas pipe, be careful, otherwise you may damage it. After unscrewing the hose (pipe), disconnect it from the column. Check the hose for strength; you may not have to replace it with a new one, but keep in mind that you must be confident in its quality and reliability. Next, do the same steps with the water supply column.
How to disconnect the chimney? Now you have to remove the pipe that connects to the chimney. Remove the old unit from the hooks. The fasteners can also be left the same (but check if they are suitable for the new water heater).
The nuances of installing a speaker: before you start hanging a speaker, please note that there are points that need to be taken into account: this is the height of the room from ceiling to floor. If it does not exceed 2 m, then the chimney pipe should not be less than 50 cm
If the ceiling height is more than 2 m (for example 2.7 m), the pipe must be at least 25 cm.
How to connect the boiler? So, you have hung the column, now you need to connect it to the water supply and gas pipeline systems. After connecting the hose to the plumbing system, adjust the nuts on the hose so that the faucets do not leak.
Gas leaks can be checked in this way: when the hose is connected, soap it with a regular soap solution. If no bubbles appear after turning on the gas, consider that you have completed this task.
Connection to the gas main
The process of connecting a gas boiler to a gas pipeline must be carried out exclusively by qualified specialists from the gas service or another organization licensed to carry out this type of work. Independent connection to the gas main is illegal and, at best, threatens the owner of the premises with a considerable fine, and at worst, it can lead to tragedy.
The first stage in the process of gasification of a facility is contacting the gas service. After submitting all the necessary documents, individual technical conditions (TS) will be developed for you, the fulfillment of which is necessary to connect to the gas main.
Once you have the specifications in your hands, you can safely start looking for a certified specialist who, in accordance with the requirements of regulatory authorities, will design a gas pipeline and connect your heating boiler to it.
Photo 5: Connecting a wall-mounted boiler to the gas main
Gasification of the premises can be carried out using underground and above-ground methods. For the underground section, corrosion-resistant polyethylene pipes are used, and the above-ground part is made of steel pipes, which enter the room directly at the location of the gas heating boiler, at a distance of 1.2-1.5 m from the floor.
Attention! When using several heating devices, gas supply to each of them is carried out separately. Laying gas lines indoors is strictly prohibited
When accepting installation work, you should pay special attention to the fact that all connections must be sealed using tow or paint. The use of sealing tape or FUM is not allowed due to the low degree of tightness of the connection
A gas filter must be installed on the shut-off valve to protect the heating boiler from small debris and condensate. It is recommended to connect the gas boiler directly to the shut-off valves using steel pipes. It is possible to use a special corrugated stainless steel hose, but pipes are still preferable, since their use does not reduce the cross-section of the gas channel.
For more information about connecting and piping wall-mounted gas boilers, see the following video:
Its service life, operating efficiency, and the safety of its owner depend on how correctly the wall-mounted gas boiler is connected. We hope that our short overview of the main stages of connection and strapping was useful to you.
Boiler installation
TOP 15 best electric storage water heaters
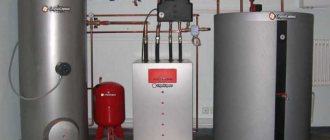
Gas storage water heaters and boilers are most often installed in private homes, in specially equipped boiler rooms. The volume of a gas boiler can be from 20 to 200 liters. The biggest advantage of a boiler over a gas water heater is that you can get a large amount of water at once and supply it to different points. It is clear that the larger the volume of the boiler, the more water can be heated.
Gas boilers operate at any gas and water pressure. If you have low water or gas pressure, then you only need to buy a boiler.
Compared to an electric one, the water in such a boiler heats up twice as fast. But a prerequisite is the presence of a chimney.
Storage gas water heater - boiler
The gas connection diagram for the boiler is the same as for the gas water heater. A shut-off valve and filter are installed in front of the water heater to prevent contaminants from entering the burner. If the boiler runs on liquefied gas, then a reducer is installed to normalize the pressure.
The most important thing to remember when installing and repairing a gas water heater is increased safety measures.
Source: domogreev.ru
Connecting the boiler to radiators and hot water supply
This process is performed in the following sequence:
- They do the installation of ball valves on the boiler pipes with their own hands. To ensure sealing, tow, fum tape or thread are wound around the threads on the pipes. It is worth adding that before fixing shut-off valves or filters, you should always wind one of these elements onto the threads of metal pipes. If you plan to use polypropylene or metal-plastic pipes, you will have to solder and use special fittings. The features of these processes can be found in various videos.
- A pipe is connected to one tap to supply coolant to the heating system installed in the house.
- If necessary, install a security group.
- An expansion tank is placed on the return pipe of the heating system (of course, if there is a need for it).
- Installation of a ball valve and a water purification filter. The latter must be mounted on a horizontal section of the pipeline. It is also possible for a vertical pipe, however, in this case you will have to use a special filter option. It is installed in such a position that the direction of the arrow shown on it coincides with the direction of movement of the coolant.
- A second ball valve is installed after the filter. These taps are necessary to facilitate filter cleaning. They are blocked with your own hands and the filter is cleaned.
- Connect the return pipe from the heating system to the boiler.
- Connect the “hot” DHW pipe to the tap located on the desired pipe.
- A water pipe is inserted into the return line from the hot water supply. Of course, a ball valve is installed at the beginning of this pipe. It will stop the flow of cold water after it has filled the entire heating system and hot water supply installed in a private house.
- A ball valve, a water purification filter, a magnetic filter and a ball valve are placed on the return pipe from the hot water supply before entering the boiler.
There was no mention of a circulation pump here. Wall-mounted double-circuit boilers always have it. For floor-standing boilers designed for natural coolant circulation, it is not needed. If a device for natural circulation was previously installed. and then I wanted to force the movement of the coolant, I would have to install two circulation pumps: one on the return line of the heating system, the other on the return line of the hot water supply.
Installation
Advantages and disadvantages of water heaters with dry heating elements
Required:
- Impact drill or hammer drill and a set of 8-10 mm drills;
- A set of fastenings (self-tapping screws with a hook, anchors). The size and type of fastenings are determined in accordance with the requirements of the speaker manufacturer;
- Bubble or laser level.
To access the speaker mounts, remove the front panel. According to the markings of the geyser fastenings, mark on the wall places for installing hooks or anchors. Be sure to check the position of the marks according to the level. Using a drill or hammer drill, two (four) holes are drilled into which dowels or anchors are inserted.
Most modern gas instantaneous water heaters have a mounting plate. It is this that is attached to the wall, and then the column is attached to it using latches. The task in this case is simplified; it is enough to attach the plate to the wall, level it and mark the places of fastenings along it.
Drill one hole at the required height and secure the plate, then, aligning it level, drill the remaining holes directly through the holes for the remaining fasteners and complete the installation.
All that remains is to fix the column in its place. It is too early to reattach the front panel, so carefully set it aside so as not to scratch or damage it.
The chimney for a column with an atmospheric burner can be a corrugated steel pipe of 110-120 mm, laid from the outlet of the column to the entrance of the common chimney. The pipe should fit tightly to the sockets; if this is not the case, then additionally crimp it with a metal clamp.
For columns with a closed combustion chamber, orient the outlet inside the column in the desired direction and lay a coaxial chimney to the nearest wall in contact with the street. The maximum permissible length is indicated in the instructions.
The wall is passed through with a hammer drill, after which the chimney is inserted. The gap between the pipe and the wall is foamed or filled with non-flammable insulation, such as basalt wool.
Connection to the gas pipeline and installation of the chimney
The first process must be done by specialists from the company that supplies gas. They must first check that the boiler is installed correctly and that all requirements are met. Afterwards, they connect the device and issue a document that allows you to use the gas unit.
This need is dictated by the fact that all gas-powered devices are dangerous, and if installed incorrectly, an explosive situation may arise in the future.
To connect to the gas pipeline you need to prepare:
- Tap.
- Mesh filter. It will clean the gas, so the burner will not clog and will be able to function for a very long time.
The chimney has already been partially mentioned. They talked about a coaxial chimney. It is typical for boilers with a closed chamber (mostly wall-mounted options). Floor-standing units also have such a chamber. However, most of them are equipped with an open camera. This means that air enters the combustion chamber from the room, and good draft is in demand for the removal of carbon monoxide. And for this you need to make a high chimney with your own hands.
The chimney is installed like this:
- Install a vertical stainless steel pipe. fixing it with a special fastener. Its height should be such that the upper end protrudes 0.5 m above the roof ridge. At the same time, try to make as few turns and horizontal sections as possible. If you cannot do without the latter, then they cannot be made longer than 1 m.
- Connect this pipe to the boiler.
- All parts of the chimney that will come into contact with cold air are thermally insulated. For this it is better to use basalt wool.
- A special umbrella is placed at the top.
Installing a solid fuel boiler Connecting a solid fuel boiler and a gas boiler into one system Selecting and installing a gas fireplace Installing a heating boiler in a private house
Internal organization
TOP 11 best water heaters for home according to customer reviews
Water flows through a heated heat exchanger. The burning gas heats the heat exchanger, which heats the water. In fact, an instantaneous water heater is a type of wall-mounted gas heating boiler, only there is no built-in circulation pump in the column. In addition, the boiler heat exchanger has filters that protect the device from the ingress of solid mechanical particles from tap water. Speakers usually do not have such protection.
Therefore, it is important that preliminary and fine water purification filters are installed on the supply water supply.
Device diagram
gas water heater GWH 265 ERN NanoPlus from Electrolux.
Click image for a larger view.
1. Rear panel 2. Draft cap (baffle) 3. Copper heat exchanger 4. Gas burner 5. Ignition electrodes 6. Gas supply valve 7. Water supply valve 8. Electronic circuit (for ignition and flame control using an ionization sensor) 9. Battery compartment 10. Control device for the removal of gas combustion products 11. Hole for the casing fastening screw
Connection to the water supply system
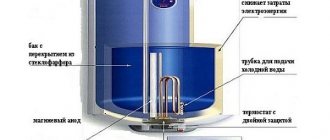
The drain hole for this type of heater, regardless of the model, is usually located at the bottom. First, you should assemble and install a so-called security group. This is a set of valves and fittings designed to prevent various emergency situations that may arise during operation of the device.
An adapter is installed at the top, which is often called “American”. Next, screw on the bronze tee. A check valve is attached to its lower part, which prevents water from flowing back into the plumbing system. Another tee is connected to the side branch of the tee.
The diagram shows in detail the connection of a storage water heater: hot and cold water risers, water taps (1 and 2); shut-off valves (3 and 4); check valve (5); drain valve (6)
A 6 bar safety valve is attached to it to provide the ability to automatically reduce the pressure inside the container if it has reached a critical level.
A special compression fitting for the water pipe is attached to the same tee. If there is excess pressure, it will drain some of the water from the storage tank into the sewer system.
Storage water heater safety group diagram. This set of devices prevents dangerous emptying of the device’s container and removes excess water if the pressure inside exceeds the norm
After installing the device, be sure to make sure that the pressure valve hole remains open, otherwise the device simply will not work.
All threaded connections should be sealed and sealed. Experts recommend allowing the sealant to dry for at least four hours.
The photo clearly shows and labels the elements of the storage water heater safety group
When installing the device, it is important to strictly follow the sequence of their connections
. To connect the device to the cold water riser, you can use steel, copper, plastic or metal-plastic pipes
When doing the installation yourself, they are most often used, since soldering them is relatively easy.
To connect the device to the cold water riser, you can use steel, copper, plastic or metal-plastic pipes. When doing the installation yourself, they are most often used, since soldering them is relatively easy.
Some use flexible hoses for these purposes, but this solution does not justify itself. As practice has shown, such elements wear out quickly.
The individual elements of the storage water heater safety group are connected using threads. In accordance with the standards, these places should be sealed and treated with sealant
It is clear that before inserting pipes, hot and cold water entering the apartment should be turned off. A shut-off valve should be installed between the cold water riser and the heater so that, if necessary, you can turn off the water flowing to the device. All connections are carefully sealed.
Now you need to install another pipe that will connect the heater to the hot water supply system in the apartment. In this area you will need another shut-off valve: between the hot water riser and the heater.
This tap must always be turned off so that the heated water from the boiler does not enter the common hot riser of the house. Again, you need to ensure that all connections are sealed and sealed.
The shut-off valve for cold water between the heating device and the risers must be installed in such a way that, when closed, it does not impede the flow of water to other consumers, cutting off only the heater.
And the connection to the hot water supply system must be made in such a way that, if necessary, the supply of hot water from the common riser to the system in the apartment can be restored.
At this point, the connection to the water supply system can be considered complete. Some experts at this stage recommend performing a preliminary check: fill the container with water, then drain it and see if there is a leak. This check can only be done after the sealant has completely dried on all connections.
How does a stratified heating boiler work, when is it used?
A layer-by-layer heating boiler is a relatively new element for hot water supply systems in which heating is carried out using a flow-through method. A gas water heater or a double-circuit boiler, as well as an electric flow-through heater, can heat water using the flow method - it heats up as it passes through the device. It can be supplied immediately to the consumer, then the system turns out to be extremely cheap and simple - “heater-tap”.
Why do you need to supplement it with another expensive device - a layer-by-layer heating boiler? But most users of such systems believe that they simply cannot do without such a boiler...
Flow heating has many disadvantages
If a gas water heater or a double-circuit boiler is used, they will turn on every time the tap opens. With normal water use – quite often. The water temperature at start-up will be unpredictable, depending on the flow rate.
In addition to the high wear and tear of equipment, gas flow heating is also characterized by:
- It takes a long time to wait for hot water to flow, because the boiler is always not too close to the tap. Excessive water consumption. At a distance of more than 5 meters, the feasibility of the system is generally questionable.
- The water temperature will be changeable, taking a shower, as a rule, is not comfortable, hot water often flows, depending on pressure surges in the network. The boiler can cycle on and off at low flow rates.
With electric heating, frequent switching on of the equipment becomes unimportant, but it adds:
- The power is too low for 220 V heaters; you will only get a very thin stream of warm water.
However, even with 25-kilowatt gas or electric heaters, the resulting stream of water cannot be called powerful. You will have to wait quite a long time for a bath set.
- Conclusions: flow heating itself is too uncomfortable and needs improvement, so users go to new expenses just to get rid of the shortcomings.
What a layered boiler can do
In a stratified boiler, water is arranged in layers - hot at the top, cold at the bottom.
- Hot water is supplied to the taps from the top of the tank. The cold one enters the lower one.
- Heating is provided by moving water through the boiler from the bottom to the top using an additional pump, which can also be built into the boiler.
In this case, the layer of cold water decreases and disappears, while the layer of hot water increases. The pump turns on automatically when there is a sufficiently thick layer of cold water.
But there were no boilers designed to work with low-power electric heaters. They are impractical, since it is better to replace this entire system with a conventional, cheaper electric boiler with a 2-kilowatt heater.
How does a stratified heating boiler work?
In order to distribute the layers inside the tank, its design contains tubes that end at different heights. Accordingly, at the top there are pipes for water intake and supply of bitter water from the boiler, and at the bottom - for supplying water from the water supply to the tank and taking it to the boiler.
The water supply to the tap can be either from the pressure of the water supply (water accumulator of a private house), or using a separate pump that turns on when the tap is opened (pressure drops).
- In addition, with a layer-by-layer heating boiler, a system of constant circulation of water through the water supply can be created. Then the principle is implemented - “open the tap - hot water immediately flows.”
Features of boiler equipment
- The tank contains an anode, which deteriorates gradually, and which must be inspected during annual maintenance and replaced if necessary. Failure to promptly replace the anode will damage this equipment.
- The tank may contain a circulation pump in a unit with automation. For example, the companies Vaillant, Buderus and others supply their double-circuit gas boilers with similar storage boilers.
What to prefer, an indirect boiler with a single-circuit boiler or a layer-by-layer one...
The classic scheme for creating a comfortable hot water supply in a private house or apartment is a single-circuit boiler and an indirect heating boiler. Hot water heats up in 10 -15 minutes, depending on the power of the boiler and the volume of the boiler. Powerful boilers with such a boiler are capable of providing virtually endless supply of hot water, since the indirect heat exchanger itself is made at 25 kW or more.
About the same is achievable with a powerful double-circuit boiler. But it also creates:
- Hot water still reaches the taps faster if the boiler was cold. There is no time period for general warming up.
If the water intake is too large and for a long time, the water temperature will not gradually decrease. It will drop abruptly as soon as the entire hot layer has drained and the boiler does not have time to replenish the hot one.
- The water temperature in a layered boiler cannot be set at any rate; it is determined by the actual performance of the pump, as well as the ability of the boiler to modulate power in this mode... With an indirect boiler, the water temperature is set by the heating time, i.e. determined by the accuracy of the thermal relay, it can be determined to the nearest degree.
The cost of the systems is comparable.
Another limitation on the use of a layer-by-layer flow machine is increased water hardness, over 140 mg / liter. Salts fall out when heated to 54 degrees and clog... It is necessary to use an anti-scale filter, which only increases the cost and complicates the system.
We can say that a layer-by-layer heating boiler is currently more of a forced solution to avoid the problems of flow-through heating. Heating by indirect means remains the main one.
Preparatory work
Where to place it.
Depends on the type of water heater. Storage systems are quite bulky, so if possible, it is better to place the tank in the basement or utility room. Instantaneous gas water heaters require strict compliance with exhaust and air access standards. They need good water pressure, otherwise the burner will go out. There is also a combined option, when a storage heater is installed, for example, in the bathroom, and a flow heater is installed in the kitchen. This allows you to have simultaneous access to hot water in both rooms without losing comfort.
What to do with smoke?
Gas water heaters come with a closed and open combustion chamber; their installation rules differ significantly. Thus, installing a water heater with a closed chamber is recommended in rooms with sealed windows and doors. Air for gas combustion comes from the street, and gas and fumes are discharged through a coaxial chimney outside the house (the outlet should not be located next to a window and not lower than 2.5 m from the ground). Such a system is safer than an open one, where air enters the chamber from the room. The chimney should not narrow throughout. It is advisable that it be made of acid-resistant steel - this will protect against corrosion.
Natural or liquefied?
Installing a water heater has its own nuances depending on whether it will operate on natural or liquefied gas. For liquefied gas you need a different burner and a special pressure reducer.
Volume matters.
How comfortable it will be for you to use a storage water heater depends on the volume of the tank and the technical characteristics of the unit - take this into account when fitting it into the interior. Storage water heaters can be vertical and horizontal, mounted (usually small in size) and floor-mounted.
In the photo: Logalux PNR 500 water heater from Buderus.
Bureaucracy
Before performing installation work, you must obtain all the necessary papers and permits, the number of which varies depending on whether you are only replacing the device or installing it from scratch:
Documents required when replacing equipment
If you already had a water heater and you simply want to change it to a newer and more efficient model, then all you need to do is visit the gas service to write the following statements:
- For permission to replace equipment at the same location;
- On carrying out dismantling and installation work on gas and water mains.
Documents required when installing equipment from scratch
But here a lot of difficulties arise. You will need the following list of documents, without which installation of a geyser is impossible, or rather strictly prohibited by law:
- A certified certificate from the ventilation and smoke duct control service , indicating the satisfactory condition of your chimney;
- Technical data sheet of the new water heater;
If the equipment has not yet been purchased, but you have already decided on the exact model, then you can simply indicate it in the project at GORGAZ.
- Installation project with technical specifications . Ordered from GORGAZ;
- Application for reconstruction with the personal signature of the apartment owner . Submitted to the city administration;
- Application for installation work . Also submitted to GORGAZ, but only after receiving the project;
- Act from the fire service;
- Certificate from technical supervision;
- Certificate of acceptance of the device into operation.
Also, the placement of the column must be entered in the BTI.
In fact, I don’t recommend taking on the task of installing a gas water heater from scratch at all. Not only will you have to worry about obtaining all the listed documents, but you should also not forget about the need to connect gas pipes to the place where it is located, and this means additional expense and effort. For example, installing the same boiler in a similar situation with your own hands will be much easier and cheaper.
Installing new equipment instead of old
Experts advise purchasing a new water heater of the same type that was already installed in your apartment or house. First of all, we are talking about the type of energy carrier. It is better to replace old electrical systems with similar water heaters, and install a boiler instead of a gas water heater. This will at least partially avoid lengthy approvals with the relevant authorities.
Remember that the connection diagram for storage water heaters is different from that required for installing a gas boiler. Therefore, when installing, it is wiser to use the manual written by the equipment manufacturer. As a rule, detailed recommendations are in the technical documentation that comes with the water heater.
Installation of a gas water heater consists of 3 stages:
Diagram of connecting the boiler to the water supply.
- connecting the boiler to the gas pipeline;
- connection to the water supply main;
- installation of the hood.
First you need to dismantle the old gas water heater. To do this, you need to shut off the gas and water pipes using shut-off valves. Using an adjustable wrench, unscrew the gas hose nut. If a metal pipe is installed instead of a hose, then the connection must be dismantled extremely carefully so as not to damage the gas supply pipe. First, the liner is disconnected from the gas pipeline, then from the old column. The hose must be carefully inspected.
If its condition is satisfactory, then it can be used to connect a new boiler. But it makes more sense to establish a completely new connection. Remember that rubber hoses cannot be used to connect the water heater to the gas supply system. It is better to purchase a flexible corrugated liner made of stainless steel.
Lastly, the chimney pipe is disconnected and the old boiler is removed from its mountings. They also need to be checked. If the brackets are securely fastened to the wall, then the new water heater can be installed on them. Otherwise, new fastenings will need to be made.
Installation of new equipment
Diagram of a chimney in a building.
Please note that the connection diagram for the gas boiler is the same as for the gas water heater. Actually, there are no big differences between these units, of course, unless we are talking about large water heaters, which are usually installed in private houses or boiler rooms specially equipped for this
The volume of a gas water heater can be from 20 to 500 liters. Using such a device, you can immediately obtain a large volume of hot water and supply it to several points (taps). This way you will provide hot water to your entire home, regardless of its size.
The volume of prepared water does not directly depend on the volume of equipment, as with storage water heaters. Remember that gas boilers can operate at any water and gas pressure. They are an ideal solution for those people in whose homes the pressure in the mains is low. In any case, they will heat water almost 2 times faster than electric systems.
It is necessary to install a coarse filter and a faucet in front of the water heater to prevent dirt and rust particles from entering the burner. A reducer for normalizing pressure is installed only on equipment that runs on liquefied gas.
Diagram of a chimney outside the building.
When installing a new water heater, you must remember the requirements imposed by safety regulations. The ceiling height in the room in which the boiler is installed must be at least 2 m, and the vertical of the chimney pipe must exceed 50 cm.
Before starting installation work, the boiler must be installed in its designated place. The water heater is connected to the water supply system using PVC hoses and pipes. After connecting, you should check all components and make sure there are no leaks
The flexible hose nuts must be tightened tightly, but carefully so as not to strip the threads.
Next, the water heater is connected to the gas supply system, lubricating the joints with gas lubricant. After all connections are crimped, lubricate them thickly with soapy water. If soap bubbles do not appear when gas is supplied, then the connection is made correctly and reliably.
Installation of equipment at a new location
When installing a gas water heater in a new location, it is necessary to additionally equip the room in which it will be located. The wall on which the boiler is installed must be made of non-combustible materials or equipped with a heat-insulating gasket that protects the floors from overheating. The device itself is mounted on remote brackets so that a distance of at least 15 cm is maintained between it and the wall. A more detailed description of existing standards can be found in the regulatory documents.
Elements for connecting the boiler to the water supply.
The ideal option when installing a boiler in a private house is to have a fireplace or stove chimney. Then the boiler hood is mounted in the main duct. Otherwise, a hole of the required size is made in the roof. An asbestos pipe with a total length of at least 2 meters is inserted into it. The outlet of the chimney pipe from the ceiling into the room with the water heater can be decorated using special ceiling rosettes. It makes the most sense to install the hood near one of the internal walls, which is made of non-combustible materials. If there is no exhaust duct, then use an attachment pipe for a gas water heater, which usually comes with the equipment. Remember that no more than 2 gas appliances can be connected to one pipe.
Secure the boiler in its designated place. Using a flexible corrugation, connect the water heater to the chimney pipe. In this case, one end of the corrugation is attached to the boiler, and the other is placed under a decorative ceiling rosette.
You need to cut a tee into the gas pipe. It is better not to carry out such work on your own, even if the gas is reliably shut off. It is wiser to use the services of professionals. A gas valve is connected to the tee. To secure the gas pipe to the wall, install special fasteners in the form of snap-on clips. The gas supply pipe is attached to the column using a union nut and fitting.
A tee is cut into the water supply, and the water pipe itself is fixed to the wall using clip fasteners. A magnesium filter is installed next to the water heater, which will protect the equipment from scale.
The operating principle of various types of water heating devices
Cumulative
In the case of the accumulative principle of operation, water is heated in a water tank. This type of device for providing hot water is the most common. Their popularity is explained by the attractive price and the lack of specific requirements for electrical wiring.
//www.youtube.com/embed/riDnpWhuKD8
Flow-through
In a flow-through heater, water is heated as it is passed through a special flask equipped with an electric heating element. Such a device is placed directly on the tap with water that comes from the water supply. With this operating principle, the water heats up to approximately 30⁰C. The disadvantages include the fact that a flow-through heater requires a large amount of energy, which is not always possible for old buildings. Based on the power consumed, devices are divided into single-phase and three-phase. In addition, one of the determining factors is the heating element: a spiral or a heating element. If the water in your home or country house is hard, then a spiral heating element is preferable. It is worth noting that the heating element consumes 10–20% less electricity than a device with a spiral.
Video: a little about choosing a water heater
Progress
On the surface of the wall, checking the design, make markings for fasteners. Calculate the height of the fasteners; the vertical chimney must have a length of at least 30 centimeters. There is also a little trick - the pipe to the chimney is laid at a certain angle according to a certain diagram.
After taking measurements, transfer them to the wall surface using a tape measure and level. Use a hammer drill to drill holes and insert dowels or hook brackets.
Hang the device on hooks. We return the water supply hoses to the drain and inlet pipes. We check the tightness of the hoses - turn on the water and carefully inspect the place of consumption. Next, the chimney pipe is fixed according to a special scheme; it is possible to use corrugation.
The last step is connecting the gas pipe. But this is the work of a specialist who knows his business. He also issues the HSV registration certificate. And now the process of connecting the equipment is completed.
To summarize, we can conclude the following - the connection of gas appliances is carried out by specialists and is controlled by standards.
The option of self-installation is possible, but up to a certain stage - connecting to the main line. On the Internet you can find many instructions and photos of installing gas equipment. Everything a home handyman needs. But if you are not confident in your abilities, then use the services of specialized representatives.
Option A: installation of a storage water heater
Step 1: Attaching the Heater
The step-by-step instructions for installing a storage water heater are simple and doable:
- On the selected wall, mark the location for mounting the unit. Using a tape measure, measure the distance between the holes of the device anchors;
- Mark the holes on the wall. Using a hammer drill, drill holes (2 or 4 depending on the design);
- Insert dowels and hammer or screw in hooks.
Important note for attaching the device: you need to measure the distance from the holes in the anchors to the highest point of the device. To put it on the hooks, the same distance on the wall must be maintained: from the dowels to the ceiling plus a small margin
Step 2: connecting the device to the water supply
When the device is already mounted on the wall, you can begin connecting the water heater. The simplest and easiest conditions for carrying out this procedure are when the connection points are identified. All that remains is to connect them to the input and output of the device using pipes or flexible hoses. The tightness of the connection using flexible hoses is ensured by a sealing rubber gasket. The cold water inlet into the heating device is indicated in blue and a special valve is installed on it, which allows you to relieve excess pressure. For comfortable maintenance, it is recommended to install an additional tee in front of the shut-off valve and connect it. In the future, it will allow water to be drained from the tank. It is important to ensure tightness - wrap fum tape or threads with paste around all places where connections were made.
Standard connection diagram for a storage water heater:
The hot water outlet on the device is indicated in red. It must be connected to a hot water tap. After this, you should open the cold and hot water valves, wait until all the air comes out of the hot water tap and water flows. At the same time, monitor whether there are any leaks in the joints.
//www.youtube.com/embed/i7Tt_zqVh7Y
Step 3: Power Supply
The next stage is connecting the water heater to the power supply, where the method is determined only by the preferences of the new owner of the water heater. The contacts on the terminals of the device are designated as follows:
- A – phase (brown wire);
- N – zero (blue wire color);
- Grounding (yellow or any other color in a three-wire cable).
After connection, voltage should be applied. As a result, the activity indicator light on the device will light up. Then, according to the manufacturer's instructions, you need to adjust the temperature. The storage type water heating device is installed and ready for use.