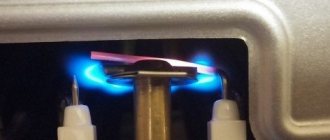
The main advantage of instantaneous water heaters is their compactness. But at the same time, these household appliances consume a large amount of electricity. This consumption is due to the high power, sometimes reaching up to 15 kW. Instantaneous water heaters belong to the class of reliable and durable devices; breakdowns rarely occur (sometimes due to manufacturing defects). You should know that you can repair a instantaneous water heater with your own hands; you just need to know the search algorithm and purchase the necessary tools.
DIY water heater repair
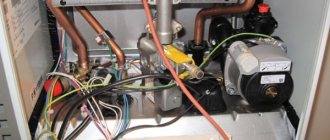
Basic control systems for instantaneous water heaters
Before you start repairing an instantaneous water heater with your own hands, you should understand its structure and operating principle. Main elements of an instantaneous water heater:
- Heating element – heating element.
- Pressure switch.
- Temperature sensor.
In addition, the circuit necessarily contains wires with different markings, as well as a button to turn on the device and adjust the water temperature (in more expensive models). Manufacturers of water heaters very often use a standard control scheme, incorporating new elements into it.
2 water heater control schemes
Above are diagrams of the devices of different models of instantaneous water heaters. As you can see, these water heaters have heating elements to which electric current passes through a temperature control relay, a pressure switch and a switch. Both relays in the circuit have a protective function and disconnect the network if any parameters do not correspond to the norm. The switch is used to adjust the operating power of the device.
The lower circuit is additionally equipped with an electronic board that controls the device. Both circuits have a residual current device
In addition to the phase and neutral wires, a grounding connection is also provided here. The circuit is simple; you can connect it yourself, using an indicator screwdriver to determine the incoming phase and zero.
Thermex water heater control circuit
The above diagram is practically no different from the previous one. The arrangement of the elements is slightly different, but the functionality remains the same. 2 heating elements allow you to heat the liquid more or less. A relay is responsible for their operation, the signal to which is sent by the previously installed thermostat.
An additional element in this circuit is a reading sensor, which is connected to the relay. The heating elements can be switched on automatically.
Troubleshooting algorithm
Before you can fix a problem, you must first find it. Troubleshooting involves supplying electricity to some parts of the circuit, so all work must be carried out carefully, wearing appropriate protective equipment (gloves, safety glasses).
Troubleshooting algorithm and eliminating the cause:
- Make sure that internal damage is not mechanical in nature. For example, a common problem is low fluid outlet pressure. This can happen due to a simple clogging of the watering can, which is installed on the water tap. Fluid inlet and outlet pipes may also become clogged. They must be cleaned with a special solution at least once every six months.
- If the mechanical part is working properly, then you should start with the input voltage. To do this, you need to purchase a multimeter - a device that allows you to make electrical measurements. Having set the appropriate value on the device (alternating voltage), one probe must be placed on a phase in the terminal box, the second - on zero. A value of 220 V should appear on the multimeter screen. The tolerance is a value greater or less than 10 V.
Inexpensive multimeter for repairing household appliances
In this way, you can check the incoming voltage on any component of the device.
- To check the temperature sensor, it is necessary to measure the voltage at the output of the device and simultaneously monitor the temperature of the liquid. If the temperature rises above the set value and the sensor does not break the circuit, then the element is faulty. If voltage comes to the input of the sensor, but does not come out of it (even when the water has not yet warmed up), this also means that the element is faulty.
- The next element in the circuit is a relay that switches the power supply from one heating element to another. It is enough to forcefully apply operating voltage to its input, and the relay will pass it through itself. If there is no voltage at the output of the element, this means the relay is faulty.
- The last and most important element of the water heater electrical circuit is the heating element. The heating element is a curved tube with a metal spiral inside, on top of a ceramic body. An electric current flows through the spiral, it heats up and transfers some of the heat to the liquid. To check the heating element, it must be removed and checked for resistance. Too much resistance means breakdown of the element and, accordingly, its replacement.
1500 W heating element
Sometimes the best and most reliable way to determine a malfunction is a visual inspection of a household appliance. For example, the cause of a drop in pressure may be a simple tank leak caused by a long service life and poor quality water.
Basic rules for servicing an electric heater
For long-term and trouble-free operation of the water heater, it is important to follow the rules of its operation and maintenance. Otherwise, breakdowns are inevitable.
The fact that problems have arisen in the operation of the device may be indicated by some changes in its operating mode:
- increasing the time for heating water to a given temperature;
- the appearance of unusual sounds accompanying the operation of the device;
- the appearance of foreign impurities in tap water, changes in its color, smell or taste.
If at least one of these signs is observed, you should immediately clean the water heater.
To do this you will have to perform the following operations:
- Disconnect the device from the power supply.
- Remove the protective cover.
- Disconnect the contacts of the electrical wires.
- Shut off the cold water supply.
- Use a hose to remove any remaining water from the tank.
- Unscrew the bolts that hold the heating element.
- Remove the heating element and descale it.
- Clean the inside of the drive from dirt and scale particles.
- Rinse the device thoroughly.
- Check the serviceability of the magnesium anode.
- If necessary, replace this element immediately.
- Wait for the cleaned tank to dry completely.
- Reinstall the heating element.
- Reassemble the device.
- Check the reliability of all fastenings.
- Connect the water heater to the power supply.
- Check for grounding.
The heating element should be removed from the tank carefully; the bolts may be too stubborn; sometimes the heating element is difficult to remove due to too much scale.
The heating element is cleaned by mechanical or chemical means, as is the removal of contaminants from the tank. If a large amount of scale is found inside the device, you should consider reviewing the operating mode of the water heater.
This phenomenon is often observed when the device operates at maximum power for a long time. It is recommended to set the maximum heating temperature no higher than 60 degrees to increase the life of the device and reduce the number of breakdowns.
If the body of the heating device receives an electric current, the heating element may be deformed and ruptured, or there may be a breakdown in the control system.
What is thermal protection in an instantaneous water heater
Instantaneous water heaters are equipped with thermal protection elements - temperature control sensors. If the sensor malfunctions, the water in the device quickly reaches a high temperature, and the pressure increases accordingly. Both the water heater itself and the heating elements - heating elements - can be damaged.
Example of a temperature sensor for a boiler
The operation of the temperature control sensor is to interrupt the electrical circuit when a certain water temperature is reached. The most common overheat sensor (both electric and gas) is triggered at 60ºC. After which the water cools down, the sensor turns on the electrical circuit, and heating of the liquid begins again.
In addition to the main sensor that controls the temperature, an additional one is also installed. It has the function of back-up circuit shutdown if the main sensor does not work. The backup element will open the circuit at 90ºС. It should be remembered that the backup sensor must be turned on manually, since it does not work in automatic mode. Usually it is turned on by replacing the main one.
How to replace a temperature sensor
The temperature sensor is usually installed as close as possible to the water outlet. Attached to the body with four bolts or hexagon screws. Some models of temperature sensors have a collapsible housing, which allows you not to buy a new sensor, but to restore the old one yourself.
Procedure for replacing the temperature sensor:
- Drain the water.
- Remove four bolts or screws. For screws, you must use a hexagon or a shaped screwdriver, for bolts, an appropriate wrench.
- Remove the wires, having previously marked them with a marker. The wire is attached to the sensor terminals using screws. It should be remembered that before starting work, the water heater must be disconnected from the network.
- Remove the old sensor and install a new one in its place, secure with bolts or screws. It is necessary to purchase exactly the same element, otherwise the mounting locations may not match.
- Connect the wires and carefully tighten the contact points.
- Fill with water and turn on the water heater. Check its operation.
Finding the cause of the breakdown
Before you begin repairs, you need to find out what is causing the problem.
This can be understood in advance without disassembling the device itself.
The main malfunctions of electric water heaters are:
- the device does not turn on;
- short circuit protection (RCD) is triggered;
- the water heater does not heat water or does not comply with heating standards;
- boiler leaked.
If a leak appears, you need to find out where the leak is. If it is the heating element gasket that has leaked, then such a defect can be easily eliminated. You just need to replace it with a new one, especially since they cost pennies.
It is worth noting: if water drips from the body of the water heater itself, then it will probably be easier to buy a new device, because such a defect is practically irreparable. In water heaters, the first thing that fails is the water heating elements - heating elements, since they are the main working element of the design .
You can first understand that it is the heating element that has failed by the following indirect signs:
- automatic protection is triggered;
- knocks out the machine on the meter;
- the water does not heat up, or the device does not heat well;
- the hissing of the water heater and the release of water with a cloudy consistency and an unpleasant odor.
With such symptoms, the heating element is most likely to fail. This can also be determined by the appearance of the heating element itself - the shell is damaged.
Sometimes heating elements burn out without visible damage to the shell, then this can be determined using a tester.
If the ohmmeter shows infinity at the terminals, then the nichrome spiral is broken.
If it is zero, then there is a short circuit somewhere. In any case, such an element needs replacement.
In some cases, the heating element fails for the following reasons:
- The heating element has served its term;
- the unit was turned on without water;
- the water heater was turned off for a long time, but the water was not drained;
- sudden changes in voltage in the network.
In any case, the heating element needs to be changed. Of course, the easiest way is to use the services of a specialist, but it is quite possible to change the heating element yourself. It is necessary to warn that repairs must be done in a certain sequence to avoid confusion. This is an important key to successful repairs.
Table: the most common causes of boiler malfunctions
| Malfunction | Possible reasons |
| The equipment does not turn on |
|
| Poor or long water heating |
|
| Overheating and sudden shutdown after a few minutes of operation |
|
| Boiler leak |
|
| Boiler check valve stopped working |
|
| The water heater emits current through the water |
|
| Presence of air in the boiler |
|
| There is no water flowing into the equipment |
|
| Rapid waste of hot water in the boiler |
|
| The water heater turns on and off |
|
| The whistle of a gas water heater heating water |
|
| Black tap water |
|
| Bloating of the water heater, which can result in an explosion of the equipment |
|
| The boiler thermostat does not make a click when the temperature changes |
|
| Knocks out the thermal relay |
|
In an extremely dangerous situation, when a pipe breaks off a water heater, a faulty emergency pressure release valve or a broken thermostat should be blamed. In some cases, a pipe breaks off from a boiler due to the fact that both metal and plastic pipes were not used when installing the equipment.
The most common breakdowns and how to fix them
Instantaneous water heaters are quite simple in design if they do not have additional electronic control units. If any malfunction occurs, you can simply seek help from the list in which they are all listed. The list of faults also includes methods for eliminating them.
Failure No. 1: burnt-out heating element
The most common breakdown in which a household appliance continues to function even when the warning light is on, since the electric current reaches the heating element, but does not pass through it.
Burnt water heater heating element
We repair the heating element in the following order:
1. Disconnect the water heater from the electrical network and drain the water from it.
2. Remove the heating element. To do this, you need to unscrew several bolts securing it to the body of the water heater.
3. Attach the working probes of the multimeter to the two main terminals of the heating element, having previously set the resistance measurement. The operating resistance of the heating element is 32-35 Ohms. If the multimeter shows one, this means that the heating element is damaged.
Installation of the element occurs in the reverse order. Also, do not forget about the rubber gasket under the heating element. If the gasket has become unusable, it should be replaced.
Failure No. 2: clogged household appliance
The consequence of a clogged water heater may be too low water pressure at the outlet. An incomprehensible noise is also heard, similar to the passage of large debris through the pipes of the system.
In case of such a breakdown, all working elements of the electrical circuit remain intact, so troubleshooting can take a lot of time. A clogged water heater does not require repair; it only needs to be thoroughly cleaned.
Water heater clogged
The procedure for cleaning an instantaneous water heater:
1. The device should be de-energized and all water drained from the system.
2. It is necessary to remove 2 wires from the heating element: phase and neutral. Then unplug the heating device and rinse it thoroughly in hot water. It is prohibited to use hard objects to remove scale and rust, as this can damage the body of the element.
3. Rinse the water intake and discharge pipes under low pressure. For the best effect, it is allowed to use household chemicals with a mild effect, without active elements.
4. Install the heating element in the reverse order. Turn on the device and check its functionality.
Failure No. 3: power switch does not work
Multi-stage power switches are installed mainly on the latest generation boiler models. This allows you to accurately regulate the water temperature and save on electricity. The consequence of a breakdown of the power regulator: the device does not respond in any way to the rotation of the operating mode switching handle. The outlet may contain slightly heated liquid, but the pressure remains normal.
Standard power switch
Most often, the power switch is a variable rheostat, which can be checked using a multimeter. It is necessary to connect probes to the terminals of the element and smoothly rotate the adjusting knob. If the resistance changes, then the rheostat is working; if not, then it should be replaced. When replacing, it is necessary to mark the wires and connect them to the corresponding switch terminals. It is better to buy an original switch rather than a cheaper analogue.
Failure No. 4: the external tank is broken
Over a long period of use, the water heater tank may become leaky. The integrity of the material is also affected by the quality of the heated liquid - very often, after several months of operation, scale forms on the surface of the heating element.
Damage to external tank
If the housing is broken, the liquid pressure at the outlet drops sharply, and the device body may be covered with liquid leaks. This malfunction is determined quickly through visual inspection.
Another reason for water leakage can be a worn-out rubber gasket under the heating element - the so-called flange. To replace the gasket, simply drain the water, disconnect the water heater from the mains and remove the heating element. Having taken out the old gasket, you need to put a new one in its place and reassemble the device in the reverse order.
Disassembling the water heater
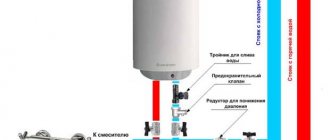
It is recommended to follow one simple rule: if the boiler shows the slightest signs of malfunction, it is better to perform a complete disassembly and a comprehensive inspection. To do this, you need to drain the water through the cold water supply pipe, opening the “hot” tap to suck in air. With proper hydraulic piping of the boiler, this possibility is always provided. Unpack the connection fittings and loosen the anchor nuts to lift the tank up and away from the wall.
Classically shaped water heaters are serviced from the bottom. First you need to remove the protective cover of the control unit by unscrewing several screws and unfastening the latches. The task is quite delicate: not only can some fastening screws be hidden under stickers, a regulator knob or a nameplate, but also the fragile clips are located far from obvious places.
Inside the block there is electrical wiring: the red and blue wires, terminated with terminals, are removed from the contacts of the heating element, the yellow-green one is disconnected by twisting the grounding nut onto the housing. Next, we disconnect the wires of the thermostat and temperature controller, remove the thermal conductor, which is sometimes made in the form of an ordinary single-wire copper wire.
Having separated the tank and the electrical part, we tighten the nuts securing the technical flange. After removing them, you need to put some effort and tear the flange off the neck; it can become completely stuck. The tank must be in an inverted position to prevent any remaining water from leaking onto the floor.
When the flange, along with the devices attached to it, is removed, you will be able to clearly assess the quality of tap water. Scrape off the bulk of the dirt from the functional elements directly into the tank and set it aside for the time being; we’ll return to the heating element and anode a little later.
For stylish and modern tanks, the lower part of the body plays the role of a protective casing. Indication and control panels and a built-in thermometer are auxiliary equipment that is not directly related to operation; if they fail, they are replaced modularly.