Basic requirements for the premises
Gas boilers belong to a special class of fire hazard equipment, therefore, when installing them, it is imperative to comply with the established requirements for the room and chimneys.
As a rule, state standards for premises in which gas equipment will be located are taken into account at the stage of developing a building design. But even in an already erected building, in which this possibility was not initially provided, it is possible to make a separate boiler room.
Installation of gas equipment in residential premises is not permitted. In an apartment building, it is permitted to place a wall-mounted boiler in the kitchen of a separate apartment, but under special conditions.
Rules and regulations:
- in the rooms allocated for the boiler room, the ceiling height must be at least 2.2 m;
- when installing the boiler in the kitchen - at least 2.5 m;
- the boiler room must have electricity, cold water and gas;
- mains voltage – 220 Volts;
- One boiler must have at least 4 sq. m. premises;
- the floor and walls must be made of fireproof materials;
- door opening (both in an apartment and in a boiler room in a private house) - at least 80 cm in width;
- the boiler room must have a window, the area of which is calculated using the following formula: 0.3 sq. m. per 10 cubic meters premises.
Climate
19 votes
+
Vote for!
—
Vote against!
Today, gas boilers and water heaters are used everywhere both for heating water and for heating houses. For the most part, separate single-circuit boilers or one single-circuit boiler and an indirect heating boiler are used for heating and hot water supply, which creates certain inconveniences in their placement. Therefore, in houses and apartments with low hot water consumption, the installation of double-circuit gas boilers, which combine water heating for both household needs and heating, is becoming increasingly popular. The installation of gas boilers is associated with a number of specific difficulties, related more to compliance with the norms and requirements for boilers than to the process of their installation.
- Double-circuit boiler design
- Standards and requirements for the installation of gas boilers
- Coordination of installation with authorities
- Installation of a double-circuit gas boiler
Double-circuit boiler design
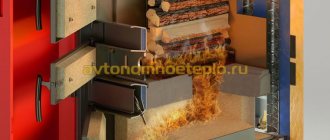
The design of double-circuit gas boilers is essentially similar to the design of a conventional single-circuit boiler, where a gas burner heats a heat exchanger with a coolant. The main difference is the ability of double-circuit boilers to simultaneously heat water for heating the house and for household needs. This is achieved through the combined placement of pipes for heating and hot water supply in the heat exchanger.
At first glance, the heat exchanger of a double-circuit boiler looks like an ordinary coil with a radiator grille. But it is necessary to note the following: the coil of a double-circuit boiler is most often a combination of 2 in 1 pipes. Inside the main pipe through which water for heating flows, there is another one for hot water supply. At the same time, one more very important point should be noted. Water in such a double heat exchanger circulates in opposite directions in each of the circuits. This was done specifically to improve heat transfer and this must be taken into account when designing and connecting the water supply and heating system to a double-circuit boiler.
The presence of two heating circuits at once also affected the number of connected pipes. In contrast to the single-circuit one, where there were only three pipes, supplying and discharging water and one supplying gas. There are five such pipes in a double-circuit boiler. The diagram depicting a double-circuit gas boiler shows the following (from right to left):
- pipe with incoming coolant for heating;
- supply pipe for hot water supply;
- gas supply pipe;
- pipe with outgoing hot water for water supply;
- pipe with outgoing coolant for heating.
Important! Before using the above diagram when connecting your own boiler, carefully study the manual for it. It is quite possible that your boiler will be connected slightly differently. For example, both inlet pipes are on the right side, and both outgoing pipes are on the left.
It is also worth noting that today on the market you can find a double-circuit gas boiler, both wall-mounted and floor-standing. In addition to the installation method, the difference between them is that the floor-mounted one requires a separate room - a boiler room, while the wall-mounted one can be installed in the kitchen or in a place reserved for the boiler. We will look further at where exactly and how to install gas heating boilers.
Standards and requirements for the installation of gas boilers
It should be noted right away that the installation and connection of a double-circuit gas boiler can only be carried out by specialized organizations that have permission and a license for this activity. Self-installation and connection is fraught with fairly high fines. But still, you will have to do some work on preparing to connect the boiler and obtaining the necessary permits yourself.
The following recommendations and rules are excerpts from the main regulatory documents, such as SNiP 42-01-2002 “Gas distribution systems”, as well as SNiP II-35-76 “Boiler installations”, Code of rules for the design of autonomous heat supply systems SP-41-104 -2000. These regulatory documents describe in detail what can and cannot be done when installing gas equipment. We will consider the main most important requirements for installing gas boilers.
1. The room where the gas boiler will be installed must be at least 4 m2 with ceilings not lower than 2.5 m;
2. The doorway in the room must be at least 80 cm wide;
3. The room must have a window opening. The size of the window is calculated based on the following requirements: for 10 m2 of area, a window with an area of 0.3 m2;
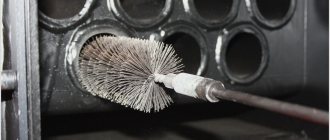
4. It is necessary to have high-quality ventilation in the room to ensure constant gas combustion. The hole area should be 8 cm2 per 1 kW of boiler power. This also applies to boilers with a closed combustion chamber, for which coaxial chimneys are used, combining the functions of removing combustion products and supplying air to the boiler;
5. The diameter of the chimney is selected according to the power of the boiler itself and is calculated using a special formula. In general, boilers from 30 kW to 40 kW are most often used for heating a house. Accordingly, chimneys with a diameter of 130 mm and 170 mm are installed;
6. The upper end of the chimney should protrude 50 cm above the roof ridge. If a coaxial chimney is used, its outlet end should protrude from the air intake by at least 20 cm;
7. The gas pipeline in the house must be made of metal pipes. But to connect the boiler to the main line, you can use flexible corrugated pipes;
8. The boiler must be equipped with a special automatic current and thermal protection;
9. The room with the boiler must be equipped with a gas analyzer;
10. Installation of gas boilers in basements is permitted only for private houses. For apartment buildings, installation of gas boilers is permitted only in the kitchen or in specially designated boiler rooms;
11. Each boiler must be equipped with a gas meter;
12. The room must have a cold water pipeline;
13. In the room where the boiler will be installed, the walls must be leveled and plastered;
14. Boilers cannot be installed on combustible surfaces, in corridors, in the bathroom, in a dormitory, on a balcony, in rooms without windows or vents, in the basements of apartment buildings;
15. The boiler must be placed at least 15 cm from the wall. There should be at least 20 cm from the top edge of the chimney to the ceiling. The outer part of the chimney should protrude 30 cm from the wall of the house. The installation height of a wall-hung boiler should be 0.8 - 1 m from the floor, and a heat-insulating panel should be placed between the wall and the boiler.
Important! If the boiler is a double-circuit boiler with a closed combustion chamber, then the presence of windows in the room is not necessary.
By following these simple rules, you can easily obtain permission to install a double-circuit boiler at home. Of course, it would not be amiss to become more familiar with SNiP, since the above rules are general and certain restrictions are possible for each specific case.
Coordination of installation with authorities
When installing double-circuit boilers, compliance with SNiPs is only a small part of the hassle that you have to face. The most time will be required to obtain the necessary permits and approval of installation. To obtain permission you must do the following:
1. To connect a private house or apartment to the city gas supply, you must obtain technical conditions for the connection. To do this, we write an application to the city gas service. The application must indicate the estimated volume of gas consumed per hour. It will take 1 to 2 weeks for your application to be processed. After which you will be given technical installation specifications.
2. Having received the technical conditions, it is necessary to develop a gas supply project. In essence, this is a diagram for installing a boiler, laying a gas pipeline and connection points. In a private house, this also includes a diagram for laying gas communications around the site. The project is developed in a specialized bureau by design engineers with a license for the design of gas communications. Contacts of companies performing design can be easily found in Gorgaz.
3. After creating and finalizing the project, it is sent to Gorgaz or another competent service (Raigaz, Oblgaz, Mingaz). Project approval may take from 1 week to 3 months. The approval period depends on the complexity of the project itself. Along with the project, it is also necessary to submit a number of related documents:
- boiler technical certificate;
- instructions for its use;
- certificate of compliance with technical and sanitary requirements;
- conclusions of the examination on the boiler’s compliance with all necessary requirements.
These documents are included with the boiler from the manufacturer, so it is important to check their availability when purchasing the boiler.
Of course, it is possible to reject the project. In this case, you should receive an official document with the refusal and reasons for the refusal, as well as a list of changes for the project. After making changes and resubmitting for approval, you will receive permission to install the boiler.
Installation of a double-circuit gas boiler
Having decided on the installation location of the double-circuit gas boiler, as well as connecting all communications from the hot water supply (hot water supply) and heating to it, you can begin installing the boiler itself. It is necessary to immediately make a reservation that, regardless of whether it is a wall-mounted or floor-standing boiler, the same materials and components will be required for its installation and piping. Below is a general list of what is required for reliable operation:
- Ball Valves;
- coarse filter;
- magnetic filter;
- mesh filter;
- gas filter;
- sweeps;
- flexible corrugated hose;
- pressure gauge;
- thermostat;
- coaxial chimney;
- safety valve 3 bar.
Important! The quantity and configuration of related materials depends on the connection diagram of the gas boiler.
A double-circuit wall-mounted gas boiler can be installed in almost any room permitted for it. You can install it yourself, but the direct connection of gas equipment is carried out by a specialist who has the appropriate certificate to perform this type of work. Connecting the boiler yourself will entail fines.
Connecting a double-circuit gas boiler begins with preparing the site for its installation. First of all, this concerns the supply of pipes for hot water and heating, as well as preparing the opening for the chimney and lining the wall with fireproof material. As soon as everything is ready, we begin installation of the boiler:
1. The first step is to flush the boiler pipe system to remove any dirt particles from the system that may have entered during the boiler assembly at the factory. Then we put the previously removed plugs on them.
2. The wall-mounted boiler is mounted on special strips that are included in the kit. The installation height of a wall-mounted boiler should be 0.8 - 1 m from the floor. We drill holes in the wall for the planks and secure them to the wall with self-tapping screws. For reliability, anchors can be used instead of self-tapping screws.
Important! It is necessary to monitor the horizon of the installed slats. The correct placement of the boiler itself depends on this. The slightest misalignment can lead to rapid failure of the boiler heating system.
3. Install the boiler on the mounting strips. Let's check how level it is. If necessary, we correct and fix it.
4. We find the incoming pipes and first attach ball valves to them, and then filters for coarse or fine water purification. This will allow, if necessary, to shut off the entire system for washing and cleaning the filters.
5. Next, connect the ball valves at the inlet and outlet. Their presence is mandatory, as this greatly facilitates the maintenance and repair of the boiler, hot water supply and heating system.
6. The next step is to install the squeegees. They are the ones that will connect the boiler with pipes from the hot water supply to the heating.
Important! We do not touch the gas supply pipe of the boiler. The installation of the meter, valves, as well as its connection and pressure testing will be carried out by a specialist from the gas company who has permission to carry out this type of work.
7. Let's move on to connecting the heating system. If you are connecting the boiler to an old system, you must first rinse it several times to remove scale and salts from it.
8. We connect the squeegee to the heating pipe connected to the boiler. If necessary, a circulation pump can be installed between the outlet and the pipe.
Important! We make sure that the arrows on the taps, drains and filters point in the direction of movement of water from the system to the boiler.
8. We complete the heating connection procedure by connecting the outgoing pipe from the boiler to the heating system. At the same time, we make sure that the direction of water movement on the fittings corresponds to the real one.
9. Connect the hot water supply. All work is essentially identical to connecting the heating, with the difference that instead of a coarse filter, a fine filter or magnetic filter is installed.
10. Attach the chimney to the boiler. To do this, a chimney pipe is inserted into the previously prepared hole and then connected through an elbow to the chimney fitting in the boiler itself.
Important! If you bought a boiler with an open combustion chamber, then the chimney pipe must meet the following conditions:
- the pipe must be made of metal resistant to acidic environments;
- the chimney is installed above the ridge of the house;
- a cleaning hatch must be installed in the chimney itself;
- the chimney itself should consist of no more than three elbows;
- parts of the chimney from the boiler to the exit to the street should not exceed 25 cm.
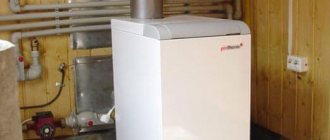
A double-circuit floor-standing gas boiler is also installed in the manner described. The key difference in installing a floor-standing boiler is the allocation of a special room for the boiler, where fire protection is installed on the floor and walls. In addition, the boiler itself is not attached to the wall with brackets, but is most often fixed to the floor.
Upon completion of the installation of the double-circuit boiler, all that remains is to wait until it is connected to the gas pipe and put into operation. This stage of boiler installation is carried out by a specialist from the gas company. It should be noted that if you have never performed this type of work before, it would be better to seek help from the experts. Of course, all the work will cost a pretty penny, but the safety and reliability of the connected boiler will also be much higher.
Features of installing a floor-standing boiler
When installing a floor-standing boiler, it is difficult to make any mistakes, since from the technical side it is quite simple to do.
Unlike a wall-mounted boiler, a floor-standing double-circuit boiler can only be installed in a separate room (boiler room). This is due to the fact that the equipment itself takes up quite a lot of space.
Sequence of actions when connecting:
- connect the boiler to the chimney;
- connect to the water supply;
- connect to the heating network;
- connect the boiler to the gas pipeline.
Installation diagram for a floor-standing gas boiler
Additionally, it is necessary to make a small threshold above the floor at the boiler installation site and install a chimney. The floor must be level and the area where the equipment is installed must be covered with a sheet of iron.
Single-circuit and double-circuit boilers. Differences
A double-circuit gas boiler is a type of heating equipment that provides a home not only with heat, but also with hot water. This is its main difference from its single-level counterpart. The coolant moves in such a boiler along two lines: one is responsible for heating, and the other for hot water supply. Otherwise, the single- and double-circuit devices are not much different: both designs are a model consisting of a gas burner, a circulation pump and a combustion chamber.
The differences also include the greater complexity of connecting a double-circuit gas boiler. There is also a difference in price, but in this case the cost indicator is very relative. Despite the fact that a double-circuit device is more expensive than a single-circuit device, the latter will have to additionally purchase an indirect heating boiler, which in total will hit the wallet more.
Ultimately, the differences between double-circuit and single-circuit boilers become important when determining the purpose of the equipment. If the living space only needs heating (for example, the house already has a hot water supply), then it makes no sense to overpay for connecting a double-circuit boiler. A rational buyer who does not pour a lot of water and is focused on saving energy will like a double-circuit boiler, which turns on when hot water is needed, while a single-level boiler starts up when it cools down.
How to install and connect a wall-mounted boiler
Before proceeding with installation, it is necessary to make horizontal markings on the surface, along which the fastenings for the boiler will be mounted. Special brackets for fastening the boiler and the necessary screws are included in the delivery of gas equipment.
READ ALSO: How to piping a heating boiler with polypropylene
Next, you should mark the location for the chimney.
If the boiler model is turbocharged, then the chimney should be installed in the wall. In all other cases, the chimney can be built into both the wall and the ceiling.
Required Tools
If you have not yet decided on the boiler model, it’s time to study the rating of wall-mounted gas boilers compiled by our experts, flavored with tips for buyers.
What you will need for work:
- measuring and marking tools (building level, tape measure, scriber, core);
- hammer drill (impact drill);
- hacksaw for metal and hacksaw for wood;
- pliers;
- screwdriver;
- anchor bolts (hooks);
- set of gas adjustable wrenches.
- metal-plastic pipes for connecting the water supply and heating circuit to the boiler.
Connection diagram for a wall-mounted double-circuit boiler
Video: DIY installation process
The boiler is suspended on a specially designed bracket, which is included in the heating equipment kit. Further connection of the boiler is carried out in accordance with the instructions, which are also included in the delivery package.
The gas boiler must be hung on a flat wall . If the wall is uneven, it must be leveled in advance, which will allow the boiler to be fixed in a level position. https://youtu.be/lN7xaZYVeOA
Connecting the heating circuit
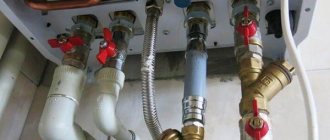
In almost all gas boilers, the location of the pipes for connecting the water supply, heating circuit and gas is identical:
- at the base of the boiler, exactly in the middle, there is a small piece of pipe for the gas pipeline;
- to the left and right of it there are half-inch pipes for supplying hot and cold water;
- closer to the edges of the boiler there are heating pipes, with the water supply on the left and the return on the right.
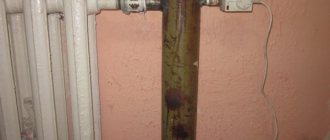
To prevent debris from entering the boiler, which is formed in abundance as a result of the interaction of metal and water in the batteries, a coarse coolant (water) filter should be installed on the return pipe. If you neglect this point, the boiler will soon fail. The filter is screwed directly onto the return pipe with the arrow pointing towards the boiler.
Next, the return and water supply connections should be equipped with shut-off valves. This is necessary so that in the event of a breakdown of the heating equipment, it is not necessary to drain all the liquid from the heating system and completely air it out.
The fact is that the remaining water and air in the pipes can quickly ruin the batteries, especially if steel convectors are installed in the house.
Features of the wall-mounted model
First you need to make connections to the heating system, water supply and electrical network, if the device has control and regulation elements. Connection to the gas main is carried out by an employee of the relevant service or a licensed company. The home owner only needs to buy a meter and a gas filter.
What products and materials will be needed during the work process:
- 3 ball valves with American sizes 1/2″ and 4 of the same size 3/4″;
- 2 mud traps (mechanical or self-flushing) - installed on the cold water supply and return of the heating pipe;
- gas filter;
- expansion tank (if its volume is not enough for a large pipeline network, a membrane tank is also needed);
- fittings for pipelines - elbows, tees;
- three-core cable (brand VVG, cross-section 2.5 mm 2);
- automatic two-pole switch 20 A.
This list is suitable for heat generators of simple design with an open combustion chamber. Expensive models are equipped with an expansion tank and a gas filter.
If the water pressure is less than 1 atm, it is worth installing a pressure booster station. It is useless if the water pressure is constant within 2-3 atm.
Next, we hang the boiler on the wall, determining the optimal height. You shouldn’t hang it from the ceiling - ease of use is important. The minimum distance from the ceiling to the outlet pipe is 15 cm, from the floor - 80 cm, from the wall - 20 cm.
To mount the device you will need two special brackets, which are supplied in the kit. They are attached to the wall with plastic dowels and screws. To set them correctly, it is recommended to use a level and plumb line.
Stage #1 - connection to the heating system
All ball valves for shutting off the pipeline are installed more for servicing the system than taking into account its possible cutting and dismantling during operation. Heating equipment is characterized by reliability. Example: a shut-off valve on the heating return is designed to clean the filter without draining the coolant.
Recommendations for connection:
- Half-inch taps are installed on water fittings and gas supply. And DN20 are mounted on pipes with coolant.
- The fittings must be screwed with the pipes down.
- The filters are attached horizontally, with the “spouts” facing the floor. In this position it is convenient to clean them.
- The external expansion tank is connected to the return line using additional fittings.
- The drain pipe is installed at the lowest point of the system.
If you plan to fill the system with non-freezing antifreeze as a coolant, to be on the safe side, additional valves for supply and return should be added to the circuit. This makes it possible to dismantle the boiler without draining the antifreeze.
Stage #2 - connecting the boiler to the electrical network
There are usually no difficulties with supplying electricity - just plug the device into an outlet. But there are also rules and safety requirements.
The main requirement when connecting the device to the network is grounding and the presence of a circuit breaker. The latter is located so that in case of an emergency water does not get on it.
- You need a wire connected to the ground loop. If such a cord is not included in the kit, the conductor is connected to the body of the device itself.
- It is prohibited to use steel pipes of the hot water supply system as grounding conductors.
- The cable is laid in a protective “corrugation”.
We supply water
Water supply based on a double-circuit boiler
Connecting a water supply circuit is practically no different from connecting a heating circuit - the only difference is in the diameter of the taps and pipes used .
The cold water supply must be equipped with a cleaning filter.
Taps for cutting off the water supply circuit must have detachable connections (the so-called “American ones”).
The cold water inlet is located on the left side of the boiler, and the hot water outlet is on the right.
We connect the boiler to the gas pipeline
This is the most important connection for a double-circuit gas boiler, since deviation from the instructions may cause an explosion. During the process you should be extremely careful, and after completing the work you need to carefully check all connections.
In the center of the boiler there is a section of pipe for connecting gas, as well as a branch of the gas pipeline on which the tap is installed. These points must be connected to each other, and you should start from the gas tap.
READ ALSO: How to piping a heating boiler with polypropylene
Gas filter
also recommended to install a special filter on the gas shut-off valve to protect the boiler from small debris. On gas pipelines, sealing of threaded connections is carried out exclusively with paint and tow!
After the cleaning filter, a flexible connection can be used.
Recently, gas supply organizations have prohibited the use of rubber hoses, since over time the rubber dries out and begins to burst.
A flexible corrugated stainless steel hose is best suited for this purpose. The connection of such a hose is carried out through union nuts using sealing paranit gaskets.
After connection, you do not need to immediately turn on the boiler! Make sure that everything is done correctly: there are no water leaks at the connections, the gas pipeline is connected tightly.
How double-circuit gas boilers work in winter and summer mode. Design features of wall and floor models.
Features of tying a floor-standing and wall-mounted boiler with polypropylene. Two schemes for systems with natural and forced coolant circulation
Connecting a double-circuit gas boiler
Connecting a double-circuit gas boiler implies:
- connection to the heating system;
- connection to water supply;
- gas main supply;
- connection to power supply;
- connection to the chimney.
…
Connection to the heating system and water supply
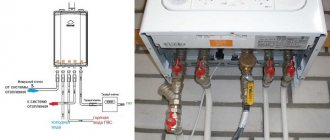
In most cases, consumers choose wall-mounted double-circuit gas boilers, so we will consider in detail the principle of connecting them to heating and water supply systems. At the bottom of the attachments, which have two circuits, there are 5 pipes :
- the first is for supplying heated coolant from the boiler to the heating system;
- the second is for supplying heated water when the consumer opens the tap;
- the third – for supplying gas from the central pipeline;
- the fourth - for the entry of cold water from the pipeline;
- the fifth is for supplying cooled coolant from the heating system.
The location of the pipes on different models of gas boilers is the same. As mentioned earlier, the connection to the gas main should only be carried out by a gas service specialist.
To connect a double-circuit gas boiler to heating and water supply yourself, you will need the following materials: ball valves with American ½ and ¾ inch sizes, mesh filters for installation on the inlet pipes of the cold water supply and return pipes of the heating system, a gas filter, and pipeline fittings.
Note! If the heating system is too large and the volume of the built-in expansion tank is not enough, you should purchase and install an additional tank.
The connection is made according to the following scheme :
- Taps with a size of ½ inch are installed on the gas, cold water supply and hot water outlet pipes with American downwards.
- ¾-inch valves are mounted on the return fittings of the heating system in front of the filter. This is necessary to be able to drain the coolant from the heating system without removing the boiler.
- Filters are installed on the heating return and cold water inlet horizontally with the “spout” down.
- If there is an additional expansion tank, it is connected to the heating return pipe in front of the valve that cuts off the filter and gas boiler from the radiator system.
All connections must be carefully sealed. To do this, use tow, fum tape or special sealants. Pipes supplying heating and water supply can be metal or polypropylene.
…
Electrical connection
The requirements for connecting the power supply are quite simple:
- the socket should be located near the heating device in a place where it will not get wet;
- grounding should be arranged;
- The cable must be laid in a protective sleeve.
Note! Most manufacturers of gas boilers require the installation of a voltage stabilizer to maintain warranty service.
If you live in a region where power is often cut off, you will have to purchase an uninterruptible power supply generator. Otherwise, after turning off the electricity and until it turns on, you will be left without heating and hot water supply.
Gas line connection
The gas boiler is designed for connection to a pipeline, the gas of which complies with GOST 5542. The pressure in the pipeline should be in the range of 0.0013 - 0.0020 MPa. A filter is installed at the inlet of the unit to protect against debris, as well as a flare ignition control valve. With the help of the latter, stable gas pressure is maintained. This allows the unit to operate with high efficiency even with fluctuations in fuel pressure.
Before connecting the gas pipeline to the boiler, the supplied area should be cleared of foreign contaminants and impurities. This is especially true for a system that has already been used.
The pipe supplying gas to the heating device must be made of metal, such as steel or copper. Connection using a flexible stainless steel hose is also possible. This is possible if:
- the tube material is resistant to gases;
- certain operating parameters are maintained: pressure and temperature.
The flexible hose should have a diameter of 20 mm and no more than 1.5 m in length. Such a tube is also suitable for supplying bottled fuel to a gas boiler. To seal the gas duct, it is allowed to use only a paronite gasket.