Types of kitchen hoods with ventilation outlet
The devices are installed directly above the stove. They differ in the method of fastening and installation location.
Island
Another name for the products is hanging. Such instances are used if the stove is not against the wall, but in the center of the room. Then the equipment is suspended from the ceiling above it. Such models look very stylish and original, but they are only suitable for large kitchens.
Original and stylish island hood
Mounted
One of the most popular devices. They are mounted on the wall, in many cases under the kitchen shelf. They allow you to save space, which is convenient for small rooms. Installation of such installations does not cause any particular difficulties. They look attractive, are inexpensive and do their job perfectly. They have a low noise level.
The mounted option is one of the most popular. Interesting! Attachments can be flat or dome. Recently, manufacturers have begun to produce inclined models that fold and unfold when necessary.
Built-in
This option is the most convenient and visually attractive - specimens look advantageous in any interior, even in the smallest kitchen. When choosing, special attention should be paid to the dimensions; the hood must fit into the dimensions of the kitchen unit and correspond to the dimensions of the stove. Typically, the depth of the exhaust system is 60 cm; many products are produced with a sliding visor, which allows for even more space saving.
Built-in model
Fireplace
They are expensive, but they look incredibly beautiful and luxurious. They are installed in designer luxury kitchens, where every detail is thought out to the smallest detail. For the device to operate effectively, a high-quality modern ventilation system is necessary, and complex installation requires the participation of specialists. The equipment is able to cope with large volumes of contaminants.
The fireplace hood looks luxurious
Oblique
A modern option for compact spaces. Takes up little space and looks very stylish. Fits perfectly into a designer interior. She copes well with her duties and is not picky in her care.
An inclined hood is suitable for a compact room
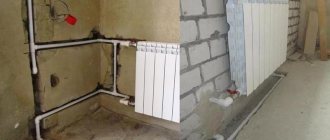
Corner
Designed to be placed in the corner of the kitchen. Mounted to the wall, they come in various shapes - T-shaped or dome. The angular location of the stove is a non-standard solution that allows you to intelligently manage the space of a small room. They require installation near ventilation due to the design features.
Corner hoodHelpful! The corner hood must match the dimensions of the slab or exceed its dimensions. This will make it possible to effectively and quickly remove dirty air and unpleasant odors from the room. In stores there are models with sizes from 50 to 90 cm.
Types and differences of air ducts for hoods
The exhaust duct can be divided according to the following characteristics:
- According to the material from which the channel is made: plastic or metal.
- Shape: round or rectangular.
- By rigidity: flexible or rigid.
Features and advantages of metal (corrugated) air ducts
Corrugated metal (or rather, aluminum) pipe is the most popular option for creating an air duct. You can read more about the selection and installation of corrugations for the hood separately. Let's look at this option briefly below.
Corrugated air duct in the kitchen interior
- Diameter 100 mm: about 90 rubles per meter.
- Diameter 120 mm: about 120-130 rubles per meter.
- Diameter 150 mm: about 135 rubles per meter.
The advantages of such an air duct include:
- flexibility (the corrugation can be easily bent to give the air duct the desired shape);
- the ability to stretch and fold (and therefore the ability to adjust the length of the channel);
- ease of connection (for corrugation there is no need to separately purchase and install adapters and connecting elements).
Of the minuses:
- relatively high noise level (however, the noise of the motor of a running hood will still cover the noise from the air passing through the duct);
- faster contamination (than with PVC products);
- unsightly appearance (corrugation spoils any interior, so the metal air duct is almost always covered, which means you need to spend additional time and money on creating a “cover”).
Features and advantages of plastic air ducts
A plastic pipe is a rigid product that does not bend. The cross-sectional shape can be either round, rectangular or square.
Rectangular plastic duct for exhaust hood
The main advantages of plastic (compared to metal):
- noiselessness (a smooth, flat surface does not contribute to noise);
- ease of maintenance (smooth surfaces become dirty much more slowly and are easier to clean);
- aesthetic appearance: in the interior, a plastic pipe looks much neater than corrugated pipe.
The most successful solution is to use a rectangular duct. It is easy to run such a pipe along the wall, saving space. On the other hand, such a channel requires an adapter with which the rectangular pipe will be connected to the round openings of the hood and shaft. You will also need connecting elements to hold together a system of several sections.
Of the minuses:
- more complex installation;
- higher cost than corrugated pipes (both the pipes themselves are more expensive, and in addition you will need to buy additional adapters and elbows);
- inability to bend, stretch or compress the pipe.
More complex installation is the most serious disadvantage of plastic. The corrugated metal sleeve is flexible, it bends, stretches and folds easily. Even if you made a mistake in the calculation, it can be adjusted to the required conditions without any problems. But this will not work with a plastic air duct: it needs to be measured and planned as accurately as possible.
Plastic Air Duct Parts
- Plastic adapter from a rectangular channel 60x120 mm to a round hole with a diameter of 120 mm: about 150 rubles.
- Flat air duct, cross-section 110x55 mm: about 260 rubles per 1 meter.
- Round air duct, diameter 100 mm: about 250-270 rubles per 1 meter.
Which option is better?
The question of which air duct to choose (corrugated or plastic) is not critical. If it is correctly calculated and laid, the hood will work normally.
Minor differences include several points:
- Exterior to interior. Here plastic clearly wins. However, air ducts are often decorated, so the corrugation will still not be noticeable.
- Ease of installation. In this regard, it is clearly easier to take corrugation.
- Air duct price. Corrugation will cost a little less.
How to hide a pipe from a kitchen hood: disguise options ↑
The ventilation pipe for a kitchen hood is not able to fit organically into most interiors. For this reason, you will have to take care to disguise it. And there are several options here.
Option No. 1 is to install a decorative box in which you can hide not only the air duct, but also the hood itself. To begin with, make a frame from metal profiles. It is securely fixed to the wall, and, if necessary, fixed to the ceiling. Angles and screws are used as fastening elements.
The finished frame is sheathed with sheets of moisture-resistant plasterboard. The advantage of this solution is that you have the opportunity to design this box so that it becomes an aesthetic and appropriate item in the kitchen interior. Painting or plastering to match the walls, wallpapering, applied decorative elements - there are a lot of options.
Decorative box for hood and air duct
Option No. 2 - masking the air duct behind plastic panels. All work is carried out according to the scheme discussed above, but instead of sheets of drywall, plastic panels are used. This solution is relevant in cases where the ceiling is sheathed with them.
Note! On sale you can find ready-made boxes for that part of the pipe that goes directly from the hood pipe. They are distinguished by their ease, variety of solutions and aesthetics.
Hood with decorative box (casing) in the same style
Option No. 3 – painting the ventilation pipe. This option is only appropriate when installing a plastic structure.
Option No. 4 – installation of a furniture canopy. If you have not yet purchased kitchen furniture, then consider having a so-called canopy at the top. The pipe laid between it and the ceilings will be almost invisible.
However, if desired, a similar canopy can be ordered for a ready-made furniture set.
The plastic pipe is practically hidden by the illuminated furniture canopy
Option No. 5 - masking the air duct in the protruding part of the suspended ceiling. Effective, but if you need to get to the pipe, you will have to disassemble and reinstall the ceiling. Not without the help of specialists who will need to be paid.
Masking a ventilation pipe in a suspended structure
Option No. 6 – laying the pipe from the hood inside the wall cabinet. In this case it should have a greater height.
Plastic air duct in kitchen cabinet
Option No. 7 – non-standard solution:
As you can see, the selection and installation of a ventilation pipe for an exhaust hood can be done independently. The main thing is an attentive and responsible approach. But if you are not confident in your abilities, invite craftsmen with experience in relevant work. After all, the quality of the air duct installation determines what you will breathe in the kitchen.
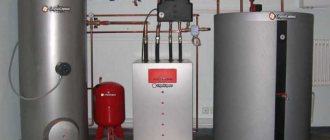
The use of ventilation pipes for kitchen hoods
The key to a beautiful and cozy kitchen is its impeccable cleanliness. Regular cleaning and clean air are important. Ordinary ventilation is not enough here, since during cooking, moisture and combustion elements are released, which settle on the walls, ceiling, floor and furniture. A ventilation hood will help solve this problem to a large extent. This device requires proper installation, especially at the connection to the ventilation duct. By choosing the right exhaust pipe, you can significantly increase the efficiency of ventilation.
A correctly selected and installed pipe increases the efficiency of the kitchen hood
Any residential building must be equipped with an exhaust hood. This is the most important condition not only for comfortable, but also safe living, since people themselves emit carbon dioxide and moisture when breathing. In addition, decomposition products such as soot, fat, gases and moisture appear during cooking.
As a result, moisture settles on furniture and walls, forming mold, fumes and soot that contaminate surfaces, and combustion elements such as carbon dioxide lead to fatigue, irritability of the respiratory system, poor health and decreased performance. Carcinogens released during frying can cause poisoning. That is why it is important to install a hood, the efficiency of which is greatly influenced by correctly selected pipes.
The evolution and development of air ducts for kitchen hoods
In high-rise buildings built during Soviet times, apartments had a small area. Ventilation in such rooms took not only harmful substances from the kitchen and bathroom, but also air from living rooms. Ventilation ducts were then built directly into the walls of buildings. In individual houses, ventilation was not provided at all, and residents were saved from the harmful effects of carbon dioxide by an ordinary chimney built into the home stove. The products of fuel combustion and decay elements formed during cooking evaporated there.
As a rule, the exhaust duct is not enough, so an additional hood with an air duct is installed
Fresh air entered old houses and apartments mainly through loosely fitting doors and windows, and soot and soot gradually accumulated on the walls and ceiling, so whitewashing was required every year. In some apartments, ventilation ducts were provided - prototypes of kitchen hoods; the same ventilation was installed in bathrooms and toilets.
In modern apartments, in addition to the hood, an additional ventilation system is installed. It can be exhaust or supply and exhaust. In energy-efficient houses, installation of a supply and exhaust system with heat recovery is a prerequisite.
Advantages and disadvantages of angular slab placement
If you plan to install the stove in the corner of the kitchen, then you should consider the pros and cons of this location.
The advantages of the L-shaped layout are obvious:
- The kitchen becomes more cozy, since the stove in the corner and the hood above it evoke associations with a fireplace in a country house.
- A slab in the corner is an ideal base for creating a work triangle. Cooking will be as convenient as possible, since both the refrigerator and the sink are in close proximity. If the kitchen area is several square meters, a kitchen design with a corner stove will be the best option for creating a full-fledged functional space.
- A stove moved into a corner will allow you to create a comfortable, full-fledged work area and organize additional storage spaces, which are never superfluous.
- The stove is convenient to use, however, this arrangement will require special care when preparing food. Fat flying around will stain two adjacent walls and both countertops that are closely adjacent to the cooking equipment.
The disadvantages of this layout include:
- Installing a stationary slab and eliminating unnecessary gaps will require a strongly beveled corner. Then the hood, the size of which will correspond to the parameters of the slab, will easily fit onto the beveled ledge. A beveled corner is a loss of precious centimeters, for the sake of which an angular layout of furniture equipment is chosen.
- Giving a special shape to the countertop covering the adjacent cabinets so that it fits closely with the cooking equipment. But before that you need to prepare the corner, then install and connect the stove, and only after that order the furniture. All this increases the time it takes to arrange the described space and causes certain difficulties.
- When purchasing a panel instead of a slab, it will be easier to install a corner. It is made both beveled and straight, but beveled will allow you to install a hood of any shape, any model. We repeat: it is irrational to mow a corner in a small kitchen.
- To install a hob, you will have to order furniture with sloping countertops. Otherwise, the cooking equipment simply will not fit in the corner. In situations where furniture is customized to fit the existing design features of the layout, kitchen equipment is more expensive than purchasing standard sets.
https://www.youtube.com/watch?v=5d-dE7xItAE
Corrugated pipes
Corrugated pipes are common in everyday life because their installation is much simpler than that of a rigid air duct. It is enough to secure the corrugation on the ventilation hole and the neck of the exhaust device. You don’t have to choose the length so carefully: the corrugation stretches, and if the sleeve is 2-3 cm shorter or longer than needed, this will not interfere with assembly.
Characteristics
As with rigid elements, an important characteristic of a corrugated hose is its diameter. Used in everyday life sizes 3, 8, 10, 12.5, 15 cm
Larger hose diameters (20-30 cm) are intended for industrial air ducts. To accurately determine the required size, study the hood's passport. You can also measure the diameter of the outlet neck yourself.
The sleeve length is calculated as follows: the entire route of the ventilation duct is measured. It is necessary to add a small margin (about 1/10) to the resulting value to avoid unpleasant surprises.
When to use
It is recommended to choose corrugation if:
- Funding is limited. Laying corrugations does not require connecting elements, which saves money.
- The route for laying the ventilation duct has many angles and turns.
- There is no equipment for connecting plastic pipes, or there is no desire to tinker with it.
If the pipe is of good quality, the ventilation will serve no worse than plastic.
Types of exhaust pipes
The pipes that connect the exhaust device to the ventilation shaft are presented on the market in various versions, which are classified according to several parameters:
- by material: plastic or metal;
- by size - exhaust pipes are available in three standard sizes, the choice depends on the power of the exhaust device (110x55 - for weaker ones; 120x60 - for medium ones; 206x60 - for powerful ones);
- in shape - rectangular or round pipes;
- according to plasticity - smooth or corrugated.
Note! The rectangular design takes up less space, but round-shaped air ducts work most efficiently; due to their low resistance, they do a better job of removing unpleasant odors and smoke.
Plastic
Plastic pipes are made of HDPE, PVC, fluoroplastic or polypropylene:
| Material | Advantages | Flaws |
| Polypropylene pipes | PP is a good dielectric and is resistant to aggressive chemical environments. | Max heating temperature - up to 850°C |
| HDPE | Does not crack, successfully withstands low air temperatures. | Heat resistance not higher than 800°C |
| Fluoroplastic | The most durable of all plastic pipes, their stability can compete even with noble metals, they operate from +40 to + 1400°C, and are inert to alkalis and acids. | High cost and high gas permeability. |
| PVC | The most popular type of products for arranging household ventilation, they are durable and airtight, resistant to thermal loads up to 1600°C (according to standards, no more than 1200°C, because at the maximum heating temperature they release chlorine). | Not resistant to extremely low temperatures. In the cold they crack and become deformed. |
We recommend that you read: Is it possible to build ventilation in a private house from plastic sewer pipes?
Plastic pipes should be chosen if the following are important:
- insignificant degree of noise from ventilation operation;
- long service life (more than 10 years), deposits do not accumulate on the even and smooth surface of the pipe;
- the air duct does not require additional maintenance and is easy to install;
- Due to their low weight, plastic pipes do not exert any physical stress on the exhaust device.
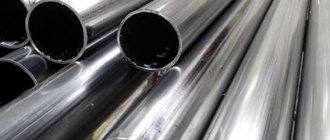
Metal pipes
Pipes used for air ducts are also made from galvanized steel or stainless steel. Steel pipes have a smooth surface, so deposits and dirt do not accumulate on the walls, and air flows are not delayed when moving through the pipes. The metal pipe can withstand high temperature loads. Low cost is another advantage of the products.
However, it is quite heavy, so special fastenings are required to support its weight. When installing air ducts of complex configuration, it is necessary to install a pipe from several sections, and this significantly reduces the efficiency of the system. In addition, steel pipes have poor sound insulation.
A more preferable option is flexible corrugated pipes. They are easy to install, easy to cut, and flexible. The corrugation does not allow resonant noise to pass through and is quite affordable. There are no sharp corners in the corrugated air duct, which increases the efficiency of removing polluted air: the more corners, the worse the air circulation. Among the disadvantages is the unaesthetic design: not everyone will like the metal corrugation in the room; to hide it, the construction of boxes or the search for other interior solutions for decoration is required.
Do-it-yourself pipe masking
Work on the construction of a protective box begins with the development of a diagram and calculation of the required amount of material. It should be taken into account that the distance between the walls and the pipe must be at least 10 centimeters.
Materials and tools
In addition to drywall, to carry out the work you need to prepare:
- tape measure and pencil;
- drywall hacksaw (“Fox”);
- screwdriver;
- hammer;
- galvanized screws;
- “quick installation” dowels (size 6x40);
- UD – profile with holes for fasteners.
It is also necessary to take care of eye and respiratory protection from concrete dust generated during drilling.
Work progress
https://youtube.com/watch?v=MsDV9Sicjwg
First, markings are applied to the wall and ceiling in the places where the guide rails will be fixed.
The workpiece is a structure of vertical and horizontal slats connected to each other using self-tapping screws. The distance between the vertical “stiffening ribs” is set to no more than 50 centimeters.
The drywall sheet must be cut according to the required dimensions. This operation is not at all difficult to perform, since the material is thick cardboard, laid in two layers, between which there is plaster.
The sheet is installed vertically, leaning against the wall. First, it is cut along the top cardboard layer with a knife, then the plaster is broken and the cutter is passed along the fold line.
The finished frame is sheathed on top with prepared sheets, screwing them onto self-tapping screws. The joints between the walls are reinforced with an angular profile. The finished box is finished in a suitable way so that it does not stand out against the general background.
Drywall can be plastered, wallpapered, or painted to match the color of the ceiling. Before this, the structure is puttied and coated with a moisture-repellent primer.
Common mistakes
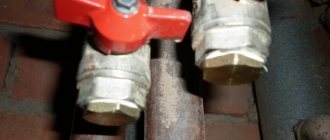
Often, apartment owners, having set themselves the goal of masking communications, wall them up tightly. Meanwhile, gas workers may well consider this a violation if a gas pipe turns out to be hidden.
In the event of a leak, methane will accumulate in a closed space, which can lead to an explosion and fire. Therefore, it is better to hide gas pipes behind single panels attached to the wall.
About flat duct connections
When installing sections longer than 2.5 m, the question arises of how to connect a round and flat, flat and flat ventilation pipe. For this purpose, standard shaped parts are used.
Important! There is no increase in the linear size of the section taking into account the length of the connector, which must be taken into account when installing the air duct.
For connecting purposes, elbows are used, with which you can rotate the air duct by 45 or 90 degrees. When mounting rectangular boxes, you can rotate the line not only horizontally, but also vertically. It happens that the turn is not a multiple of the angle of 45⁰. In such cases, a different-angle elbow is used, and the unnecessary side of the connecting part is cut off.
Important! To ensure absolute tightness, the joints are sealed with sealant.
When converting a rectangular box into a round one, or vice versa, special transition elements are used.
The following details are used most often:
- section 110x55 mm to diameter 100 mm;
- section 10x60 mm to diameter 100 mm;
- section 204x60 mm to diameter 125 mm.
When moving to another section of the same rectangular shape, reducers are used.
More complex designs require the presence of tees, with the use of which it becomes possible to connect air flows from many exhaust systems. Most often, such systems are combined, the designs of which provide for the presence of round, rectangular, oval, and square sections.
Important! When fastening flat rectangular duct elements of different sizes, it must be taken into account that the external parameters of the risers must correspond to the internal cross-section of the duct.
The holders hold the duct elements well on the walls, since the ventilation system is lightweight.
The hole from the ventilation shaft is closed with a grille, which may have additional slots designed for natural ventilation.
You can buy all the elements of air ducts at any construction supermarket.
Installation features
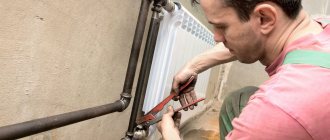
You need to start installation by measuring all distances and drawing up a project. The corrugated tube is easier to install. A plug is attached to the ventilation hole (it is located on the wall or in the ceiling of the kitchen in the apartment). The pipe is pulled over the outlet neck of the hood and secured with a clamp. The sleeve is stretched to the end cap, attached to the walls using mounting brackets. The sleeve is also secured to the plug with a clamp.
For rigid boxes and pipes you will need a set of shaped elements, so at the design stage it is very important to determine their exact nomenclature and quantity. Installation of a rigid pipe is more difficult
To make it easier, remove the exhaust device from the wall or the set and then re-attach it, attaching it to the assembled channel.
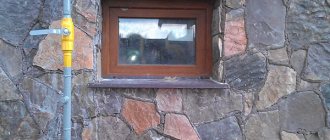
In a private house, it is easier to install the outlet end of the air duct on a separate hole in the outer wall. It is easy to do in wooden buildings. The advantage of this solution is that there is no load on natural ventilation. The downside is heat loss.
Installing an air duct for a kitchen hood
| Author | Share | Rate |
| Victor Samolin |
Interesting on the topic:
Operating principle and production of ventilation deflectors
Do-it-yourself tsag deflectors
Which exhaust technology to choose for your home
Comments on this article
Kins This was my first time installing an air duct in a kitchen.
Following your recommendations, I purchased a plastic air duct. Regular sealant, a hacksaw and a little ingenuity are all that was required. 06/01/2016 at 14:48
Choosing a hood
Dimensions play an important role when choosing, that is, width, height and depth. To achieve optimal efficiency from the operation of the exhaust unit, it is required to position it as accurately as possible over the gas stove. Naturally, the size of the hood should match the area of the hob or, to achieve an even greater effect, be 15 cm wider.
It should be noted that built-in models are equipped with a retractable part, which helps to increase the working surface area of the unit; this additional function is an advantageous difference from classic options that do not have such properties. In cases with corner, dome and island hoods, when using non-standard installation methods, the size of the working surface area plays a significant role.
It is very important to determine the desired hood height before purchasing. It is selected taking into account the height of the ceiling, so as not to violate the standards of safe operation, which regulate the minimum distance between the device providing filtration and the hob of 75 cm
You should not try to reduce the distance on your own initiative in order to avoid unpleasant consequences in the form of fire or damage to the device. It is also not recommended to exceed it, so as not to reduce work efficiency.
Correspondence of dimensions of electric stoves and hoods
It is believed that the larger the surface area from which the hood collects air, the more efficiently it works. However, one should not blindly strive for maximum figures: it often happens that the power turns out to be excessive for specific conditions. There will be no benefit in this case. There is an overpayment for a higher power of the device, and extra space is taken up when installing equipment.
As a general rule, the air purifier should be wider than the surface of the stove, or at least the same width. If the hood is narrow or offset to the side so that only part of it is above the hob, the efficiency of the hood is reduced. If the width is insufficient, the following unpleasant moments arise:
- When operating the unit at standard power, food odors may be detected. Smoke, grease, soot particles, and water vapor enter the kitchen area.
- By operating the air purifier at high power, it may be possible to avoid deterioration in the air quality in the kitchen, but under extreme operating conditions, the exhaust mechanism mechanisms will wear out faster. When the fan operates at high speeds, noise is heard.
The dimensions of electric stoves also correspond to the general size range. Minimum width 30 cm for electric hobs. It is designed for models with one burner. For such a stove, an air purifier with a width of 30 cm is required.
If you have not purchased the stove yet, you can use the dimensions of the module designed to integrate the hood into the unit.
Tip 2: How to choose a hood
Hood design
Hoods, which consist of four main components: a fan unit, an air intake, filters and a housing, differ in appearance from each other. The simplest ones are flat devices. They come in two types: built-in and wall-mounted. The latter are mounted on the wall or bottom of the cabinet above the stove. Built-in units are mounted inside a wall-mounted kitchen cabinet, so before purchasing you need to make sure that a certain model will fit into the cabinet and that the corresponding hole can be prepared in it.
The most common today are fireplace hoods, the name of which goes back to the shape of the devices. They are mounted on the wall above the stove. These models are more productive; most of them are capable of operating in air exhaust and recirculation modes. The range of many companies already includes island hoods, which are attached to the ceiling above the kitchen “island”, and corner appliances, designed for mounting in the corner of the kitchen. To decorate hoods, tempered glass, wood coated with protective varnish, artificial stone and hand-painted metal elements are used.
The most popular hoods are made of stainless steel and aluminum. Models made of polished stainless steel look quite impressive. This surface is easy to clean, but should not be cleaned with abrasives. The disadvantage of this material is that fingerprints remain on it, and manufacturers recommend caring for such products using special compounds. Aluminum units are good because their surface “adjusts” to the color of kitchen items, fitting well into the interior. In addition, aluminum hoods do not leave fingerprints.
Principle of operation
When choosing a hood, you need to decide for yourself how it will remove unpleasant odors - through air exhaust or air recirculation. Both options have their advantages and disadvantages. Most modern devices are designed in such a way that they can operate in both modes, however, if an air duct is not installed, the device can only be operated in recirculation mode.
When recirculating, the fan draws air under the umbrella and, passing it through filters, returns it back to the kitchen clean. Housewives praise such hoods for their low price and ease of installation, but they are often dissatisfied with the low performance and the need to periodically change the carbon filter. For proper operation of the hood, make sure that the air ducts purchased in the store are installed correctly.
In the exhaust mode, air is also taken in by a fan and passed through a grease filter, but does not return back, but is discharged into the ventilation shaft or outside through a special channel. This method of combating odors is more effective, but installation of the air duct is quite labor-intensive. It must be well sealed and have a special valve at the outlet that prevents cold air from entering the room from the street.
How is a hood different from ventilation?
If the apartment does not have an exhaust device, but only a ventilation duct, then only natural ventilation functions.
In apartments that were built according to old designs, such ventilation was sufficient. The warm air in the kitchen is less dense than the cold air outside, so it rushes upward, enters the ventilation shaft and is discharged outside. Clean air naturally flows into the kitchen from cracks in windows and doors.
Today, most often in apartments they prefer to install airtight plastic windows and tight doors, which prevent the penetration of fresh air from the street, and natural ventilation is no longer enough to clean the room.
We recommend that you read: How to ensure sealing of a chimney on a corrugated roof
The situation can be partially corrected by supply valves, which are mounted in a plastic window. But the best solution is still a stove hood.
Sanitary standards regulate the presence in each room of ventilation ducts for the circulation of air masses.
Note! Ventilation serves for natural air exchange, but it is not able to eliminate strong odors and fumes. It is to remove exhaust air and combustion products that an exhaust device is required, which guarantees their local removal.
The hood is installed in places where large quantities of vapors and odors accumulate, which are removed outside through a ventilation pipe connected to the hood.
Installation
It is quite possible to install the air duct yourself. Corrugated options are considered the simplest in these matters. You just need to cut it into pieces of the required sizes, and then connect it with the corresponding parts of the hood and shaft in the kitchen. It is better to replace a simple ventilation grille with a special one - which has a built-in connecting pipe. For fastening in this case, special crimp clamps are usually used. For maximum reliability, the joints are treated with a sealing compound.
Air ducts made from PVC raw materials are installed in the same way. The pipe is cut using a hacksaw into separate pieces of the required size, after which it is attached to the hood parts using adapters. The pipe should go 50 mm (approximately) into the pipe. The fastening areas must be coated with silicone compound.
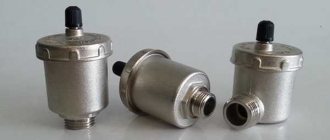
If you have installed a high-power hood in the kitchen, the reverse draft effect may make itself felt. Simply put, there will be odors in the room coming from the ventilation shaft. This applies to particularly powerful units, the performance level of which ranges from 600 to 700 cubic meters of air per hour. To avoid this problem, it is worth fixing the check valve.
These devices are available in two main variations:
- filmy appearance;
- in the form of a plastic disk on an axis.
How to hide equipment?
Plastic parts fit into various interiors much more easily, especially when compared with metal ones. However, they can also ruin the appearance of the kitchen ensemble. That is why most owners prefer to simply close such elements. There are different ways to do this correctly.
Let's look at the most common of them.
- It is permissible to hide the air duct pipes under a suspended or multi-level ceiling. For this purpose, you need to assemble a box from sheets of plasterboard - it will perfectly hide the entire system. However, this method can be used only if a major renovation is planned in the kitchen with a complete replacement of the ceiling base. If the hood is installed after finishing work is completed, then it will hardly be possible to hide it under these structures.
- To disguise the air duct, they often buy a special box made of polyvinyl chloride (sometimes other materials are used). Such designs will play a decorative role, so they are usually selected to match the decoration of the room. You can also add spotlights into these boxes.
- The hood can be hidden in the furniture in the kitchen if it is made to order. To do this, you need to notify the master of your preferences.
Basic rules and nuances of installation
Installation rules vary depending on what material the air duct is made of:
- Corrugated. This is the simplest type of installation. Corrugated aluminum is sold in pieces that can be stretched. Flexibility provides ample opportunity to perform a wide variety of bends. The clamps that are on both sides of the corrugation should be connected to the elements of the hood and ventilation grille in the kitchen. All this can be done with home tools;
- Plastic. And in this case the installation is very simple. The air duct can be cut with a hand saw and quickly assembled. To increase the insulation of the system, adhesive sealant is used. Special adapters will allow you to connect products with a round and rectangular cross-section, if required;
- Metal. Installation of such products is more complicated. They overlap. To ensure tightness, the connections are treated with adhesives. To insert fasteners, you need to make a hole in the walls, however, if you are satisfied with a little strength, you can fasten the elements using sealant.
Metal air duct for kitchen
To prevent the air duct from being too noticeable in the kitchen, you can cover it with hanging cabinets if the structure is vertical. If it is horizontal, you can hang the products directly on the top of the furniture. This will hide the structure. However, other schemes are often used for camouflage.