Repairing brickwork and eliminating cracks in the furnace
A more complex type of repair is eliminating cracks in the masonry and replacing burnt bricks with new ones. The following factors may be the causes of cracks:
- overheating the furnace;
- foundation shrinkage;
- reducing the volume of masonry during drying;
- errors in installing doors;
- incorrect ratio of sand and clay in masonry mortar;
- non-compliance with masonry technology.
Cracks that appear in the masonry cannot be ignored, since not only does heat loss occur through them, but their presence also leads to a disruption in draft and the leakage of flue gases into the room. Therefore, if you notice a crack, you should take timely measures to eliminate it.
It is not always advisable to replace bricks where cracks appear. If they are not burnt out, have sufficient strength and can still serve, they can be left, but the gap that appears will need to be sealed. To seal gaps in the masonry, it is recommended to use a similar composition that was used when laying the entire stove, so that the coefficient of thermal expansion of the masonry and the composition that will be used to seal the leaks was, if possible, the same. This will avoid the appearance of new cracking as a result of uneven expansion of the masonry during heating. Typically, a clay mortar for masonry mixed with high-quality clay and quarry sand in the required proportion (1:1-1:3) or purchased mixtures for laying stoves and sealing are used for this. cracks in stoves and fireplaces.
You can also use special high-temperature mastics for stoves and fireplaces, the composition of which has good plasticity, does not crack after drying and can withstand multiple heating/cooling cycles of masonry without damage. The photo below shows Bolars KaminFix universal mastic for fireplaces, tiles and natural stone:
With this composition you can seal the heating surfaces of a brick oven without fear that the seams will separate after heating. To seal a crack in a mortar joint, you need to use tools to select the cracked mortar to a depth of 2-3 cm and replace it with oven putty, which, after hardening, will ensure the necessary tightness of the masonry .
Minor repairs
If smoke comes out through a crack, it is extremely dangerous for those living in the house
. Even minor problems require some preparation. In accordance with the work plan, consumables are purchased, the availability of the necessary tools and replacement attachments is checked. It is recommended to do a general inspection to identify other deficiencies. You should familiarize yourself with the technologies for minor repairs of a brick stove with your own hands, together with methods for recognizing defects.
Sealing cracks
Violation of the tightness is accompanied by a noticeable deterioration in the composition of the atmosphere in the room, with characteristic traces of soot. Troubleshoot problems as follows:
- clean the damaged area, remove poorly attached fragments of plaster, deepen the cracks by 1.5-2 cm;
- create a working solution according to proportions (in parts): sand (10), cement (1), clay (3);
- moisten the crack with water and rub in the prepared solution;
- level the surface.
To accurately localize damage, the oven should be pre-heated. It is necessary to prepare the appropriate materials (tools) in advance if you plan to restore the decorative coating.
Replacing hearth bricks
The firebox is made of red brick - this is a violation of technology, it needs to be replaced.
The damaged structural element is removed completely, and the old mortar is removed around the perimeter of the hole. Select a suitable brick, check that the dimensions match and that there are sufficient gaps for correct installation. For installation, use a liquid solution. It must be prepared by analogy with the original mixture that was used in the construction of the furnace.
Replacing individual bricks
Ensure that the bricks and mortar composition are consistent with the components of the overall structure. At the same time, the stability of neighboring elements is checked.
Replacing the grate
Over time, the grates burn out, so they are replaced with a solid grate.
Do-it-yourself repairs to a brick oven take into account the uneven expansion of individual elements when heated. The purchased grate is mounted with gaps at the ends. A technological gap (4-6 mm) is left around the perimeter, which is filled with sand. Taking into account the features of a certain design, they ensure the normal position of the installed part and control slopes.
Relining the lining
In this case, preliminary dismantling of the furnace is necessary. Next, take out the bricks, remove the mortar, and clean the work surfaces. Restore the masonry according to the original drawings.
Hog repair
According to the standard scheme, this structural element is located in the attic, so good lighting must be provided before starting work. When checking, pay special attention to the L-shaped transition to the horizontal section. If large cracks (1.5-2 cm) are found, minor repairs will not work. In this situation, the corresponding part or the entire hog is repositioned.
The door can be installed with heat-resistant glass to observe the flames
Replacing or securing the fire door
Algorithm of actions:
- completely dismantle the fastening elements;
- clean the work area;
- holes are drilled using an electric drill;
- install wire holders and a door;
- the protruding parts of the wire fasteners are bent into seams to ensure a 1.5-2.5 cm deepening into the structure of the building structure.
When placing the door, as in the example with the grate, be sure to create a technological gap (4-6 mm) to compensate for the thermal expansion of metal parts.
Protective screens near or around the oven
Such a system will need to be implemented when installing a potbelly stove in the corner of the room. You can mount or lay out several screens from brick, installed at a short distance from each other. In this case:
- The first screen protects a person from touching the iron stove and getting burned. It is usually made of refractory or fireclay bricks;
- To protect walls made of flammable material, a second layer of protection is provided. It can be made of brick or covered with a barrier made of sheet steel with a mirror-like front surface. In this case, heat waves will be reflected from the mirror and spread faster throughout the room;
- if the foundation is insufficient in size or it is impossible to manufacture it, it will be necessary to lay a protective screen made of durable fire-resistant material on the wooden floor. This can be a sheet of steel or a decorative layer of heat-resistant clinker tiles or porcelain stoneware. The surface will first have to be covered with a layer of thermal insulation.
Installation of metal screens
This is the easiest way to make surface protection. It is better to use sheets with a polished front surface. Before fastening, the wall surface at the required level along the height of the screen is covered with a layer of thermal insulation. In this way, we protect the surface of the walls from the effects of heat.
You can lay a layer of thermal insulation or fasten the metal with self-tapping screws with inserted ceramic spacers. But it is better to attach the screen to strips or a metal profile treated with a layer of protection. In this option, the air gap will not allow heat to pass freely to the walls, and reliable insulation of the stove from the wooden wall is ensured.
A special gap is made at the bottom of the wall for the passage of cold air, ventilation of the wall and screen. When arranging a wall with a layer of thermal insulation, a number of longitudinal guides are installed on the surface. The space between them is filled with a layer of mineral wool or other material. Then sheets of metal are installed and screwed to the sheathing with self-tapping screws.
In this design, there is no need to leave a gap at the bottom. The air will not be able to pass through calmly, but the wall will be reliably protected from high temperatures. To protect the floor of the house, a slab made of non-flammable durable material can be used.
Brick screens
This protection option is usually installed near the stove. Thus, you can protect not only the wall, but also the person from burns. By installing a brick wall, you can reduce the distance from the stove to the wall. For laying, it is better to use ceramic or fire-resistant bricks.
The work is carried out in several stages:
- you will need to make a small foundation or remove boards from the floor along the marking lines for laying the screen and, by drilling holes in the concrete of the base of the building, insert metal rods to fasten the bottom of the wall and the foundation;
- Having leveled the floor surface, lay out a layer of mortar and lay the first row of bricks; you need to place the bricks in the same plane without distortions. This determines how level your entire wall will be. Do not forget to make small grooves for ventilation; for this you can move several bricks of the bottom row.
- checking the level and pulling the twine for laying each subsequent row, all bricks are laid on a mortar of clay and sand. Having raised the wall to the required height, the top is sealed with a layer of mortar or covered with a board. This way you can make a shelf for decorative ornaments and all sorts of little things.
The brick is laid no higher than the top of the furnace at a distance of at least 40-100 mm from it.
Using both types of protective screens, you can reduce the distance from the oven to 500 mm.
Examples of installation of protective brick screens in the photo:
Photo 1
Photo 2
Photo 3
Serious problems
Sometimes the damage to the brickwork is so serious that in order to restore the functionality of the heating system, individual parts will have to be completely replaced. Most often, craftsmen have to change the lining of the firebox, which consists of fireclay bricks.
If there are serious faults, you should entrust the repair to specialists
If the damage is not global in nature, then you can cope with the task directly through the firebox window. For restoration you need to use a fireproof mixture. All defective areas are carefully covered with it.
In case of serious damage, some of the bricks will have to be replaced. This must be done in the following sequence:
- Prepare the repair mixture in advance.
- Soak and remove the old mortar in the area where the brick will be replaced.
- Remove damaged lining elements.
- Thoroughly clean the vacated areas, moisten them with water and lubricate them with the repair mixture.
- Install new fireclay bricks and carefully seal the seams with refractory mortar.
When replacing individual lining elements, you need to ensure that the new brick is homogeneous with the old one. Otherwise, due to the difference in thermal expansion, the destruction of the furnace protection will continue.
It is possible to completely replace fireclay bricks in a firebox only by completely disassembling the wall. This is a difficult job that should not be performed without experience, as there is a risk of serious damage to the underlying masonry.
Serious repairs also include repairing the chimney and switching the brick stove to a different type of fuel. In the first case, you will have to go through the masonry and re-plaster it. In the second, you will need to completely redo the firebox.
Average defects
For more serious damage, more effort will have to be made to repair the stove. It may be necessary to strengthen individual structural elements.
Gaps around the firebox
This element is constantly exposed to physical stress and temperature changes. Over time, cracks appear around it, dangerous because carbon monoxide from the firebox can begin to penetrate into the room. To prevent trouble from happening, it is important to repair the brick oven in a timely manner. We are talking about compacting damaged areas.
The cracks must be sealed as quickly as possible to prevent carbon monoxide from entering the room.
You need to act in the following order:
- Thoroughly clean the surface around the door.
- Remove all old solution.
- Prime the cleaned surface with heat-resistant glue.
- Lay asbestos cord around the door. It will act as a thermal protector and prevent the destruction of the clay solution in the future.
- Seal the cracks with repair mortar.
After restoration, the stove cannot be used for 24 hours. After this, you need to heat it thoroughly and check that the door is securely fastened.
Using exactly the same principle, gaps around the hob are eliminated. The only difference is that the asbestos cord can be replaced with other fire-resistant materials.
Strengthening the frame and replacing the grate
If cracks appear around the entire perimeter of the oven, its walls will need to be strengthened. The most reliable way is to completely go through the masonry, but for many people this work is beyond their capabilities, so you can resort to tightening the frame with metal wire.
The screed is carried out as follows:
- Horizontal channels with a depth of no more than 20 mm are cut into the outer walls of the furnace.
- Wire is pulled along the grooves.
- The required quality of the screed is ensured by the beard. You need to act carefully so as not to damage the wire.
After the work is completed, the wall is plastered or improved in any other way.
After completion of the repair, the stove can be plastered or tiled to suit your taste.
When replacing the grate, you should pay attention to the fact that you need to leave a gap between it and the walls of the oven . The new element should not differ in size from the old one. After installing the grate, the gap between it and the brick walls must be filled with sand.
General progress of capital repair work
To carry out independent repairs of brick kilns, it is necessary to carry out a general course of work, usually capital work. Among them:
- A visual inspection that reveals the reasons for the malfunction of the structure, the further progress of the repair, i.e. partial restoration of individual elements or complete replacement of its main parts.
- Elimination of everything unnecessary, for example, what was installed incorrectly (in case of a serious defect).
- Adding the necessary elements that will help the furnace operate with higher efficiency, i.e. upgrading the existing design to the extent possible.
- The need to restore or resurface brickwork by covering it with new clinker tiles.
- Cleaning the chimney on the roof and the stove pipe itself inside the house. If desired, the part of the chimney that is located in the room can be lined with porcelain stoneware to obtain a pleasant visual effect.
- Installation of useful accessories (for example, a new hob, firebox door or blower), if necessary or present when repairing the stove.
Your own summer cottage outside the city is a place where you want to come at any time of the year, including in winter. Therefore, try not to skimp on heating and repairing the housing located on it.
//www.youtube.com/watch?v=dISTLMZCMvU
Major renovation
A major overhaul of a brick stove involves repairing the chimney and thoroughly repairing the stove. This implies a complete restoration of functionality, replacement of broken parts and the creation of new, improved ones. It is difficult to do this on your own, but it is possible.
Furnace overhaul
To achieve this, a number of measures are taken:
- The destroyed brickwork is removed and a new one is installed in its place.
- All non-functioning or poorly functioning elements are replaced.
- The chimney and the stove itself are plastered.
- If desired, the stove is covered with decorative elements (tiles, etc.).
- Functionality is checked.
Recommendations for repairing a Swedish stove
If you have not repaired your stove before, you may have to complete all the steps again. Therefore, the last point is mandatory. Please note that the most difficult work is the installation of brickwork. Often stove repairs take a long time at this stage.
Types of faults and their repair
Let's look at the most common cases when furnace repair is simply necessary:
- The appearance of smoke and carbon monoxide in the room. Smoke in brickwork can be attributed to minor repairs. In order to “patch up” the stove, use rich red clay or a special mixture that is sold in construction stores. It is necessary to coat the oven when it has cooled down to allow the clay to dry evenly.
- A crack on one of the furnace walls. This situation can be corrected by rebuilding the entire furnace structure. Furnace repair should begin with dismantling the upper part of the structure. After you have disassembled the top, look at the base: if it is not cracked and has a smooth structure, does not bend, without changes, then you can leave it. For temporary use, secure the stove with a metal belt and seal the gap with mortar. Just remember that such a belt cannot be adjacent closely, as the metal may burst when heated.
- No traction. The case is rare and is explained by a bend or the appearance of cracks in the chimney pipe. The pipe must be moved slightly at an incline. If you have 2 stoves with one pipe for removing soot, then you need to make a “bridge”.
Please note: good draft is ensured by proper construction of the stove, as well as compliance with all construction standards.
- The fire in the new stove goes out. This phenomenon indicates that the oven is not properly dried. It is necessary to open all the doors and ventilate it. Then you should begin gradually calcining the stove, increasing the temperature and the amount of firewood.
- The brick inside the firebox cracked. This indicates that the brick in the combustion chamber was heated unevenly or that there was a sharp temperature difference. Correct the situation by sealing the chips with a clay solution and then drying thoroughly.
- A door or other metal part has broken off. As a rule, metal parts are “fitted” into the furnace structure with pins, even at the construction stage, and it is almost impossible to get them with minimal losses. The door can only be replaced by completely disassembling the oven (use a respirator to protect yourself from dust getting into your respiratory tract).
The costs for repairing a furnace include the following items:
- dismantling the old stove;
- purchase of new bricks, metal parts (if it is impossible to use old ones);
- acquisition of all related tools (construction level, tape measure, small hammer, trowel for laying mortar, trough for mixing mortar);
- delivery and unloading of construction materials.
Repairing an old
stove with your own hands is much cheaper than building a new one, because you will save on paying a specialist.
It is important to know: you need to take care of good lighting in advance. Use a table lamp or spotlight, as well as an extension cord
You will have to change position often and move a lot. It is best if the light passes at a slightly angle - this way you will see all the irregularities along the base of the masonry.
Any stove can be remodeled and made more functional - it all depends on your wishes.
The ideal option is a small baby stove with a hob and a combination of a heating system with a stove bench, or you can also make a fireplace stove.
A wood-burning stove can be made both in a private wooden house and in a bathhouse. Sometimes a compact muffle stove is used to heat a bathhouse, designed to heat a small room. It does not have a special decorative appearance, but the walls hold the temperature well for a long time.
Please note: before choosing bricks, be sure to check that the seller has quality certificates. Carefully inspect the product for defects: smooth edges, uniform texture, absence of lumps and humps, ringing sound when tapped - all this indicates the excellent quality of the raw materials from which it is made.
Watch the video in which an experienced master shares his own experience in repairing a brick stove:
Minor problems
Heating systems should be inspected regularly. This will allow you to detect minor defects in time and timely repair the stove in the house, without waiting for serious damage. There are several types of small problems. You can handle all of them yourself. To do this, you will need tools - a trowel, hammers, a plumb line, a tape measure, a level, a container for preparing repair mixtures.
Lack of traction
Such a defect can occur for various reasons. Most often, traction is lost due to violation of operating rules. For example, the stove has not been used for a long time, and a plug of cold air has formed in the chimney.
Interesting video of restoring an old stove with your own hands:
Failure may also be caused by:
- Insufficient air flow. If there is a lack of oxygen, the wood will not burn.
- There is too much wind outside, causing reverse draft.
- The chimney is thoroughly clogged with soot.
If there is no draft, you can try to solve the problem using simple methods or clean the chimney.
Getting rid of an air lock is very simple. You just need to light the firewood not with paper, but with rubber or dry fuel. Until the defect is eliminated, it is prohibited to use special ignition fluids.
If the chimney is clogged, the firebox is first lit, and then a handful of coarse salt is thrown into it.
It is important to remember to close the damper immediately. After this, lumps of soot will fly out into the chimney. See also: review of cleaning products for chimneys and chimneys.
If this method is ineffective, you will have to clean the chimney manually using knockout bricks. They can be identified by their special location - they always protrude slightly from the general masonry.
Violation of seam tightness
Detecting a defect is as easy as shelling pears: smoke enters the room, and soot stains appear on the masonry. Stove repair begins with identifying the exact location of the defect. To do this, you need to thoroughly heat it and mark the places of damage.
If the room is filled with smoke, this may indicate cracks in the walls
Repair activities are carried out in the following order:
- The seams are soaked with ordinary water and cleared to a depth of several centimeters.
- The walls around the defect are thoroughly washed with a brush. The water needs to be changed several times during the cleaning process.
- A solution is prepared from sand, clay, salt and asbestos fiber. The resulting mass should have medium viscosity. You don’t have to make the solution, but purchase it ready-to-use.
- The seams are filled with the prepared mixture and sealed. It is important to fill in all existing voids.
After repair, the seams need to dry. The oven must not be used during this time. After drying, the walls of the structure can be plastered or tiled.
Laying fallen bricks yourself is not particularly difficult.
In old heating devices, bricks often fall out or burn out. The damage appears severe, but repairing the brick kiln will not be difficult. The problem area is cleaned, moistened and covered with a clay cake. Then a new brick is prepared. It is also wetted and coated with the same solution as for repairing seams. The new block is placed in place of the old one and securely fixed.
.
Redecoration and decoration
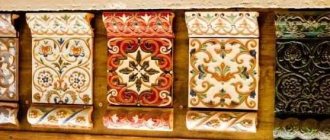
The following materials are usually used for the exterior design of the stove:
- Heat-resistant tiles. Before laying this material, prepare the base of the walls: they must be cleaned and level. For ease of installation, it is recommended to use construction crosses for the seams. The tile combines well with various bas-relief edgings and frescoes. The advantages of this material are ease of care, durability and external beauty.
- Special enamel paint. To decorate the walls of the stove, you can use white paint, which can withstand significant temperature fluctuations. This fireproof paint will last quite a long time. Additional images of a different color are often applied on top of the main background. To do this, you can use ready-made stencils, or paint the oven with aerosols. You need to be prepared for the fact that the first time heating a stove with painted enamel will be accompanied by the appearance of an unpleasant odor.
Whitewash or lime. To make your stove snow-white and shiny, add salt to the aqueous solution of lime. The advantages of whitewash and lime are that these natural antiseptics have a beneficial effect on human health. As the whitewashed stove operates, no harmful toxins will be released.
Main problems and how to fix them
Minor problems
- Abrasions that appeared on the firebox sheet. They can cause serious problems and even fire. To solve the problem, the worn sheet is replaced with a new one. To do this, we dismantle the deteriorated metal, protect the floor covering with an asbestos sheet and attach a new sheet of metal of the required size on top.
- Replacing the grate from the grate.
- Lack of traction. If the draft is lost, most likely you are faced with a clogged chimney or lack of air flow. Once a year, inspect your chimney for dirt, debris, and foreign objects. Chemicals are used to clean the canals.
Cleaning the chimney with chemicals
To clean the chimney from soot, you will need to prepare:
- Firewood
- Trowel with sharp edges
- Soot scraper
- Clay mortar for masonry
- Lime and plaster for whitewashing
The entire work process comes down to heating the stove with wood. It is better to use alder or aspen firewood, as they burn out quickly, produce good draft, and burn out soot. Sprinkling salt on your firewood can help clear soot from your chimney and chimney. This procedure is recommended to be carried out every three months.
Replacing the grate comes down to:
- Removing old grates
- Carrying out repair work on masonry and ashlars if necessary
- Laying a new grate, remembering to leave 5 mm gaps
- Filling gaps with sand or ash
Attention: the new grate from the grate must strictly match the old one in size. It must be placed in its original place without using a solution.
Medium difficulty problems
- Loose fire door
- Damaged chimney pipe
- Repair and refurbishment of the firebox
Medium repair work also includes updating masonry joints. They not only spoil the appearance of the structure, but also allow harmful gases into the room. To identify problem areas, it is recommended to heat it. To solve the problem you need:
- Clean out the seams.
- Wash the walls with water using a brush.
- Fill noticeable cracks and defects in the brickwork with a new clay solution.
To prevent the clay from cracking after drying, add a little table salt to it. For one bucket of clay, it will be enough to add 300 grams of salt. If the cracks in the masonry are large and deep, they should be sealed using a fire-resistant cord.
A loose fire door can be strengthened. If you notice that cracks have formed around the doors, and it is very wobbly, it’s time to repair it:
- We clean the repair area down to the brick and rinse it with water
- Prime the surface
- We put sealant in all cracks
- Seal it with mortar
To prepare the solution we will need to take:
- Fireclay clay
- Heat resistant glue
- Portland cement
- Sand
The prepared composition should be similar in consistency to sour cream.
After strengthening the fire door, after 24 hours, you should heat the structure with a small amount of firewood.
Capital works
- Complete replacement of the lining
- Converting a stove from one type of fuel to another
- Repair and re-laying of brickwork
Repair without disassembling the stove
If you need to replace burnt bricks without disassembling the stove, prepare the following materials and tools:
- Brick
- Hammer
- Masonry mortar
- Water
- Scraper and trowel
Instead of old burnt bricks, it is necessary to lay new material, having previously moistened them with water. Next, apply the solution to the masonry.
Attention: with the prepared solution you must thoroughly lubricate the area of the fallen brick. The new material is placed in its original place, pressed and sealed.
How to move the firebox
It also happens that the refractory brick from which the masonry is laid collapses and becomes unusable. In this case, it is necessary to repair it through the combustion door. If the damage is small, clay mortar will help to cope with it. If only a few bricks are destroyed, it is recommended to replace them by removing the old mortar.
To complete the work you will need to prepare:
- Spatula, hammer and chisel
- Solution
- Water
- Fire brick
The old mortar is removed with a construction tool, the area is moistened with water, and new bricks are laid on top.
When repairing the firebox, it is advisable to use the same solution that was used during construction. After repairing the firebox, you will be able to use the stove only after a week.
How to restore a stove
If you want to restore an old brick stove and restore its aesthetic appearance, you should stock up on the following materials:
- Heat resistant tiles
- paint
- Whitewash or lime
When decorating a stove with tiles, it must be laid on a prepared and flat surface. Be sure to use bas-relief edgings and frescoes. The advantages of this material include:
- Ease of care
- Presentable appearance
- Durability
If you want to paint the stove, pay attention to the material that can withstand temperature changes. To give the product originality, use a stencil to paint designs and ornaments.
Whitewashing the stove is the most common option. To give a snow-white shine to the lime, add salt.
Safety precautions when repairing furnaces
Before you start repairing a brick kiln, be sure to take care of safety precautions:
- To prevent wooden surfaces from heating up and catching fire, use insulating materials adjacent to the heated part.
- Choose your supplies carefully. They must be of high quality and without visible defects.
- To prepare the solution, it is recommended to use fatty clay and heat-resistant glue.
- Before starting work, place a steel sheet in front of the vent.
To summarize, it is worth noting that timely preventive maintenance and repair of minor problems will significantly extend the life of a brick kiln. Keep in mind that repair work must be carried out with full responsibility, since not only the performance of the structure and its appearance, but also the safety of your home depends on it.
Useful tips
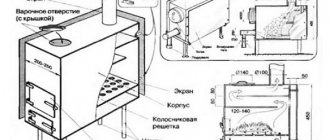
Laying of the furnace of an improved (with a stove in a hearth) Russian stove: a - general view of the stove; b - 1st row, c - 2nd row; d - 7th row; 1, 3 — pads; 2—1st row of main chimney; 4—stove ash pan; 5—stops.
We offer you some tips to help ensure high-quality maintenance of the furnace with your own hands:
- Any DIY repair, from filling cracks to replacing bricks, should only be started when the stove is warm. That is, the stove should be heated a little beforehand.
- You can check the plasticity of clay in the following way if, after rubbing it between your fingers, you still cannot determine anything. The mixture of clay and water must be stirred with a wooden plank. If the layer of clay on it is thick, then you need to add another portion of sand to the solution.
- If the appearance of cracks and deterioration of the masonry is associated with external reasons, then the stove requires not routine, but major repairs in order to avoid repeated problems. Major repairs can also be done with your own hands, or you can seek help from a specialist.
- The location of the blockage in the chimney can be determined by heating the stove or by passing a wire through the doors to clean out the soot. Current repairs are unlikely to help you in this case.
- To ensure that the ceramic heat-resistant cord does not burn out during the first use, check its fire resistance at the time of purchase. Feel free to ask the seller to check it for you.
Since ancient times, there have been recipes for preparing good mortar for bricklaying. To make it flexible and lay down evenly, add a chicken egg and a little liquid dishwashing detergent to the prepared solution. The consistency of the solution should resemble thick sour cream and be without lumps.
The solution should be laid in an even layer, without bald spots or voids, since hot air entering such an “air pocket” can contribute to the appearance of cracks.
What to do if cravings worsen?
Good stable draft is necessary to maintain the correct combustion mode, which requires the supply of the required amount of oxygen to the firebox and the unhindered removal of combustion products - smoke, soot, soot, as well as gases formed during the combustion of fuel.
During the construction of the furnace, gas ducts (chimneys) of the required size are installed, capable of passing the amount of smoke that is generated during the combustion of fuel. But, over time, a thick layer of soot accumulates on the walls of the flues, which reduces the cross-section of the chimney and prevents the free passage of exhaust flue gases, creating additional resistance to their movement.
As a rule, the appearance of a large amount of soot is associated with the use of firewood containing a large amount of resinous substances, which do not have time to burn completely and fall out on the walls in the form of layers of soot. Damp firewood also produces a large amount of soot.
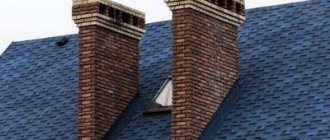
To improve draft in this case, cleaning the pipe that removes smoke from the firebox will help. You can read how to do this in the article “How to clean a bathhouse chimney.” Also, the draft may be disrupted due to leaks in the stove lining, cracks in the walls and in the masonry of the chimney. Moreover, destruction of the masonry can occur not only within the heated room, but also outside the building - if the pipe masonry on the roof cracks and collapses, the draft will also be disrupted. How to eliminate cracks that appear, read below.
How to eliminate gaps and cracks in stove masonry
ATTENTION! The formation of cracks in the plaster and masonry of the stove, and adjacent walls or partitions, is caused by ignorance of the fact that when placing the stove in the wall, you MUST leave a gap between them
(the so-called
“cuts” and “steps”
), which is filled with asbestos cord.
"Retreat"
- the space between the outer surface
of a stove, chimney or smoke duct and a wall, partition
or other building structure, made of non-combustible and low-combustible materials (stone, brick).
Dimensions of “cuts” of furnaces and smoke ducts
Taking into account the thickness of the furnace wall, the following should be done:
- at a distance of 500 mm
- to building structures made of flammable materials; - at a distance of 380 mm
- to structures protected from fire.
Requirements for “derogations” for heating stoves
according to SNiP 2.04.05-91 - are given in table 1:
Table 1: Dimensions of grooves and offsets for stoves and chimney ducts.
| p/p | Furnace wall thickness, mm | Form of withdrawal | Distance from the outer surface of the stove or smoke duct (pipe) to the wall or partition, mm | |
| not protected from fire | protected from fire | |||
| 1 | 2 | 3 | 4 | 5 |
| 1 | 120 | open | 260 | 200 |
| 2 | 120 | closed | 320 | 260 |
| 3 | 65 | open | 320 | 260 |
| 4 | 65 | closed | 500 | 380 |
| Note: 1. For walls with a fire resistance limit of 1 hour or more and a flame spread limit of 0 cm distance from the outer surface of the stove or smoke duct (pipes) to the partition wall not standardized . 2. Protection of | ||||
NOTE: In the walls
closing the “recess”
,
openings with gratings with a
clear cross-sectional area of at least 150 cm²
should be provided above the floor and above the ceiling The floor in a closed setback
should be made of non-combustible materials (most often
brick and plaster
) and placed
70 mm above the floor
of the room.
NOTE: Wall thickness of chimneys or flue ducts
at the point where they adjoin
metal or reinforced concrete beams
(lintels), 130 mm should be taken
.
“Cutting” stoves and chimneys
installed in openings of walls and partitions
made of flammable materials
(wood, adobe), should be provided for the entire height of the stove or chimney within the room.
In this case, the thickness of the “cut”
should be no less than the thickness of the specified wall or partition.
ATTENTION! Gaps between floors, walls, partitions
and
“cuts”
should be filled with non-flammable (
asbestos
) materials.
If a gap
is not left, then
either the wall or the stove will crack
(Fig. 4).
In cases where
deep cavities, porous or cracked brick and mortar, voids, gaps and spaces in the mating elements that are not filled with mortar are found
in the structure of the heating furnace they are backfilled with bricks and the masonry is cemented
.
Repair work boils down to the fact that the destroyed place in the masonry of the stoves
disassembled, cleaned and replaced with new material.
ATTENTION! Particular attention when repairing defects in furnace masonry
pay attention to the density of the brick mass in the upper zones
of heating stoves
and in the upper part of the heating shields of
heating and cooking stoves
.
If in these areas of masonry
at least small cracks will be left,
carbon monoxide
will escape through them into the heated room even with satisfactory draft in the smoke duct.
Cracks in the masonry of stoves
when embedding them, they are first cleared to a depth of at least
20 mm
and a width of up to
3-4 mm
.
Thin cracks in the masonry of stoves and on the plastered surface of the stove can be easily eliminated by grouting with a clay mortar with the addition of asbestos and salt
.
Deep through cracks in furnace walls
Most often they are eliminated by replacing cracked bricks with new ones. See below for the procedure for performing the work.
How to prevent cracks in your cooktop
In heating and cooking stove designs, the “sore spot” is the cast iron hob. Cracks in the panel themselves do not interfere with the operation of the stove. If it is folded correctly, it has good traction and cracks do not cause any inconvenience. But - for the time being. If the design of the stove is broken or there are errors in the masonry, then carbon monoxide can leak through these cracks. And this is a big threat to the lives of people who are in the room.
As a rule, high-quality cast iron panels almost never crack. But it's better to be safe.
In order to prevent cracks from appearing on the panel, the first heating of the stove with a new hob is done carefully, warmed up slowly, without loading the entire firebox. To distribute heat evenly over the panel, pour a thick layer of sand on it, or lay out a brick
Remove the sand or remove the brick from the panel only after it has completely cooled. A uniformly loaded panel will “sit down” without distortions, which means there will be no “stress” cracks in it.
Heating in the house
The heating system can have several types:
- The room is heated only by a small stove with a hob. This option is suitable for a small space, as well as in cases where you rarely visit the dacha.
- Heating using a heating system in the form of pipes passing through the furnace. In this option, heat is accumulated and distributed through pipes filled with antifreeze or water. The option is perfect for heating a room of 40 m2, but you should take into account the features and costs (you need to purchase a pressure meter, a pump, supply water to the house, etc.).
- Heating the room using a fireplace. The fireplace gives off heat well during the burning of wood, but does not retain it. This option is suitable for quickly warming up a room to room temperature, but it is not profitable to use it all the time.
- An ordinary stove is rough or potbelly stove. This type of stove does not take up much space and is the most economical option for a summer resident. The efficiency of this type of furnace is very high - this is due to its structure and the presence of many passages.
All about do-it-yourself mortar for masonry and grouting cracks
What mortar should I use for laying stoves?
Stages of removing old whitewash: a – moistening with a roller; b – removing the whitewash layer with a spatula.
For ovens, it is necessary to use a clay solution. It is perfect not only for cleaning cracks, but also for laying bricks. The proportions of the solution should be calculated as follows. Depending on the fat content of the clay, 1-3 volumes of sand are required per volume of clay, and you will also need water.
A day before starting work, the clay needs to be soaked, then add as much water until you get a consistency similar to a creamy mass. All light impurities will float to the surface, so the solution must be filtered through a special sieve. Only after this can sand be added to the clay and mixed until all the puddles disappear.
You should not add the entire volume of sand at once; it is better to add it in small portions. A good oven mortar should not eventually crack.
How to strengthen furnace and blower doors
Furnace devices include combustion and blower doors
. They differ from each other only in size - a large door is used for the firebox, and a smaller one for the blower.
From time to time, due to improper or prolonged use, the doors move away from the stove masonry
, or even come off completely - therefore, they either need to
be replaced or reinstalled after repairing the masonry
around the entrance hole with the door.
To repair or reinstall a door
preparatory work needs to be done:
- beat off the plaster around the frame of the firebox (or blower) door
to the brickwork; - disassemble the jumper above the door frame and remove the frame with the door
from the stove masonry; - thoroughly clean the old masonry in the hole under the door from soot and carbon
, - select crumbled bricks to whole bricks;
- then moisten the old masonry with water and coat it with liquid clay mortar
.
NOTE: Otherwise, greasy soot deposits
will not allow
the mortar to connect the new masonry
(replaced bricks) with the old masonry.
So that when heating the door
does not disturb the masonry again, a gap (about 5 mm) is left between the door and the masonry for an asbestos cord - a heat insulator.
READ ALSO: The most popular Chinese online store
Frame
with the legs,
they must be wrapped with corded asbestos
(so that the hot frame does not destroy the joint between it and the masonry), tightly pushed into the nest of the masonry opening and
the gaps are coated with mortar
.
Secure the frame
using special metal tabs, which
are inserted into the masonry seams
and clamped with brick and mortar (Fig. 3).
Laying new individual bricks
performed with ligation of sutures.
The mortar for the masonry
is distributed over the entire surface of the bricks manually with the palm of your hand - this way various impurities (pebbles, lumps) can be easily felt and removed.
The thickness of the masonry seam
should be minimal - no more than 5 mm.
Ordinary clay red brick
Before laying, you need to immerse it in water for 10-15 minutes so that it does not take water from the masonry mortar.
ATTENTION! DO NOT lay bricks with a hewn surface inside the firebox, as they will crumble again after a while.
Completing the masonry
, you must first make sure that
the top shelf of the door frame
lies flush with the rows of bricks on both sides. Then the cracks are rubbed with a solution.
The solution is applied to the heated surface of the oven
in two steps:
- the first layer is liquid;
- the second is thicker (layer thickness no more than 5 mm
).
ATTENTION! Plastering the stove
only after the
brickwork of the oven
.
Plastering or grouting the stove (to avoid peeling of the solution) is carried out on previously washed and heated
surfaces.
Plastering the stove
— depending on the purpose and humidity of the room, it is produced
with clay-sand, lime-clay-sand, lime-alabaster-sand or cement-clay-sand mortar
.
ATTENTION! Start heating the stove
without allowing it to dry well and evenly, IT IS PROHIBITED.
The new stove
is heated with care, little by little, using only wood for a week, and then switching to coal.
After complete drying
brickwork and plaster, the stove is painted with water-based or casein paints or lime.
Stove appliances
, metal cases of stoves and pipes are painted with heat-resistant paints.