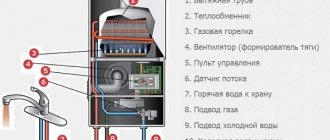
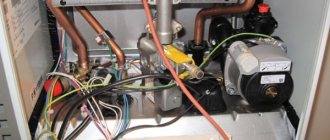
The functioning of the gas water heater is ensured not only by the burner, but also by the presence of a heat exchanger. It is designed to transfer heat from the gas burning in the body of the water heater to the coolant flowing through copper tubes. If this component fails, the entire column will malfunction.
Before you start soldering the column heat exchanger, it’s worth figuring out whether it’s profitable. If you do the math, the cost of a new heat exchanger, including delivery and replacement work, will still be lower than a complete replacement of a geyser. In addition, you can solder the heat exchanger yourself.
Preliminary preparation
During the work you will need the following tools and materials:
- soldering iron with a power of more than 100 W;
- fine sandpaper or metal brush;
- lead-tin alloy solder;
- flux - rosin or crushed aspirin will be enough.
After this, you can proceed to inspect the gas water heater to determine the location of the leak. Do not rush to turn off the water supply.
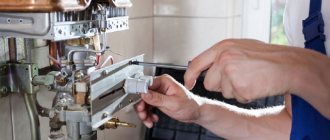
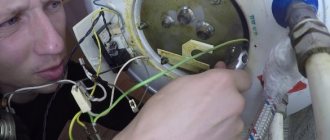
First, remove the outer casing from the device; if necessary, unscrew the bolts. Open the water and inspect the heat exchange element of the column to identify the location of the leak. If the hole (fistula) is easy to reach, then the heat exchanger can be soldered right on the spot without removing the entire gas column.
To work in a hard-to-reach place, you will need to dismantle the water heater, so turn off the tap on the gas pipe, drain all the coolant from the heat exchanger of the column by opening the hot tap and unscrewing the nut on the cold water pipe. It is even easier to drain water from modern models of dispensers with plugs - you need to open the plug so that the water flows out by gravity.
Please note that before moving on to the work of soldering the fistulas, the heat exchanger should be dried - you can use a vacuum cleaner or compressor. Otherwise, the brazed heat exchanger will soon start leaking again as the leak will soon recur.
The area of the heat exchanger where a leak was discovered should be cleaned with a metal brush or fine sandpaper. Often, characteristic green spots appear on damaged areas, indicating copper oxidation.
Stripping must be done carefully as the thin copper tubes are easily damaged. Upon completion of this procedure, the work area should be degreased with a special alcohol-based composition or any other.
How to clean a gas water heater at home. Why does soot appear?
Caring for the speaker primarily involves cleaning it from soot. You can perform the procedure yourself, using a cleaning product and following simple rules, or contact a specialist. Clogged nozzle holes can be easily pierced with a wire brush or thin wire.
The column needs to be cleaned regularly - according to reviews, the nozzles in most models clog quickly, and the igniter also requires regular maintenance. Regular cleaning of the igniter of a Bosch and other brands of gas water heater will avoid costly repairs in the future, since this procedure extends the life of the unit.
Every equipment owner should know how to clean the burner in a gas water heater, since problems with igniters occur in models. But if the device constantly goes out, for unknown reasons, nothing helps, it would be better to contact the service.
Soot may appear due to leaks in the gas supply pipe. With a minimal release of gas masses, there will be practically no odor, and the user will not understand anything. You can check the system like this - apply a soap solution to the pipe connection areas with a brush, turn on the column and see how it behaves. If bubbles appear, there is a problem. Options for how to clean a gas water heater at home will not help here - call a gas technician.
The next potential problem area is a clogged radiator. It often causes increased accumulation of soot. The easiest way to clean a speaker radiator is with a vacuum cleaner; any model will do.
Turn off the gas supply, remove the casing from the column, and remove the soot. If this still doesn’t help, check the draft by turning off the gas and holding a lighter or candle. Normally, the flame should deflect or go out. If the candle burns as if nothing had happened, the chimney needs cleaning. When the device has a forced draft fan, such problems do not arise in principle.
Soldering methods
There are three main ways to solder a heat exchanger in a gas water heater. They differ in the tools they use.
Using a soldering iron
In this case, for soldering you will need a good soldering iron with a power of more than 100 W, solder and flux.
First of all, flux is applied to the soldering site - a special paste, rosin or aspirin. This component allows you to clean the surface of oxide so that the solder is distributed more evenly.
Next, the copper tube is heated with a soldering iron and solder is gradually applied to it. It is desirable that the solder melts from the hot surface of the pipe, and not when it comes into contact with the soldering iron.
The solder layer must reach 1-2 mm so that the soldering area can withstand the coolant pressure in the circuit.
Gas-burner
To solder holes in the heat exchanger in this way, you will need a torch, a liquefied gas cylinder, solder and flux. After connecting the burner, ignite it, adjust the intensity of the flame - it should not be high, so as not to damage the coolant elements of the gas water heater during soldering.
The fistula in the copper pipe is dried with a torch to remove any remaining moisture. Flux is applied (usually borax powder). Then they begin to gradually warm up the pipe itself so that the solder applied further begins to melt.
Upon completion of soldering, the remaining flux is carefully removed so that it does not corrode the surface of the heat exchanger pipe.
Cold welding
When using a chemical soldering method using cold welding, it is advisable to use a material that will retain strength and will not melt when in contact with hot water. Otherwise, a fistula will form again in the brazed plate heat exchanger, and work will have to start all over again.
When working with cold welding, gloves are required to protect your hands. A small amount of the substance should be kneaded in your hands for about 3 minutes. When the weld begins to harden, the patch is applied to the leak and pressed tightly until it sets completely.
In cases where the heat exchanger has leaked in several places at once, or the fistulas are very large, it is advisable to solder a patch from a copper plate or a piece of copper tube.
Flushing the boiler without removing it
There are several ways to descale your boiler. It is impossible to say which one is more effective - it all depends on the quality of the water and the substances it contains. You may have to try them all. These methods will also help to flush an indirect heating boiler.
Method No. 1 - citric acid
You will need a large amount of citric acid, at the rate of one 20-gram sachet per liter of boiler volume. For example, a 50-liter water heater will require 0.8 kg of citric acid.
Actually, the procedure:
- Dilute citric acid in a ratio of 1 to 3 with water;
- Pour the resulting mixture into the boiler through the water supply hose;
- Connect the hose to the water pipe;
- Turn on the boiler and wait until it is completely filled;
- Set the maximum temperature and wait until the water heats up;
- Drain the water.
Method number 2 - vinegar
To clean, you will need vinegar or 70% vinegar essence. If you use regular 9% vinegar, you will need 100 ml for each liter of boiler volume.
If you use 70% essence, then you need 13 ml for each liter of boiler volume. For a 50-liter bottle you need to take 650 ml of essence. But before use, dilute it in 2-25 liters of plain water.
How to descale a boiler with vinegar:
- Pour vinegar or essence solution through the water supply hose;
- Connect the hose to the water supply and completely fill the boiler;
- Turn it on to maximum temperature;
- Wait until it warms up completely and leave it like that for 30-35 minutes;
- Drain the water.
Method number 3 - baking soda
To descale your water heater, you will need baking soda (NaHCO3) in the amount of 25 grams per 1 liter of tank volume. It must be completely diluted in water in a ratio of 1 to 12 at a temperature not exceeding 55 degrees. If the baking soda gets hotter, it will decompose.
Usage:
- Pour the soda solution into the boiler through the water supply hose;
- Turn on the water heater, wait until it fills;
- Set the temperature on the regulator to 55 degrees and wait for the water to heat up;
- After the water has warmed up, leave the boiler on for an hour;
- Drain the water.
By professional means
This method is less effective than the mechanical one, but it is easier to use and does not involve the risk of element breakage. Before starting descaling work, it is recommended to remove the water heater from the wall and clean the inside of the tank. The container is filled with a special solution containing a chemical.
For water passing through rusty water pipes, products containing phosphoric acid are recommended. Experts recommend getting rid of scale that destroys the water heater using:
- Cillit ZN/I;
- Aipakon;
- AlphaPhos;
- Thermagent Active.
For equipment that has served for more than 2-3 years, descaling agents based on other acids are not recommended.
You can clean the inside of the water heater using a surfactant-based product. Steeltex and Alumtex are considered the best in this segment.
Carefully read the instructions on how to clean your water heater from scale deposits! The manufacturer indicates the exposure time of the solution on the packaging!
In most cases, you should prepare a solution: mix the product with water in the required concentration. Open the cold water supply to the boiler, drain hot water by 2/3. Using the reverse connection of the water heater, it is necessary to pour the solution inside the tank. Leave for 5-6 hours, drain through a hot running tap.
Mechanical method
When you finally have a heating element in your hands, you can evaluate the quality of your tap water. Don't wait for it to dry. Carefully remove the wet layer of scale with a wire brush.
If you don’t have such a tool on your household, you can clean it with a wooden spatula or knife. After the operation to remove plaque, polish the heating element with sandpaper. Remember, the cleaner the surface, the less electricity the water heater will consume.
How to check for leaks
After soldering the geysers, you need to check the tightness of all pipes.
To do this, they are carefully examined to see even the smallest fistulas - their presence is indicated by small green spots. To avoid re-disassembling the column in the near future, these defects are also cleaned and soldered. After this, you need to connect water to the gas water heater with a soldered heat exchanger and open the tap.
Water is supplied slowly and gradually so that it displaces the air from the column. Once the entire heating system has been filled, the tap can be opened to full capacity. In this way, the strength of soldering joints is checked under maximum water pressure. At the same time, the soldered joints are re-inspected for water leaks.
At the very end, the boiler with a gas water heater is turned on to check its performance when in contact with hot water. In this case, the soldered areas can be wiped with a dry cloth to detect the slightest signs of moisture.
What is more profitable - repair or replacement?
If you take into account the cost of a new heat exchanger and the work to replace it, and then compare it with the price of a new column, not forgetting about the costs of its delivery and installation, you can clearly see that such repairs are more profitable than replacing the entire column. On average, a new part costs 3,000-5,000 rubles, and you need to pay about 3,000 rubles for installation. At the same time, you will have to pay 8,000 rubles or more for a new speaker, and then also pay for its connection.
Related article: Installation of Armstrong suspended ceiling
Flange repair
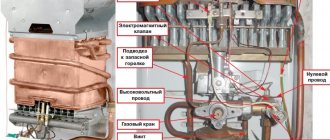
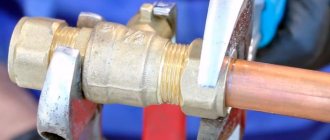
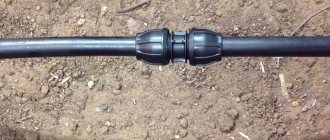
Sometimes soldering may be required for copper pipes located at the junction of the water supply with the outlet pipe of the heat exchanger. In this case, you can use pieces of copper pipe with flanges and American union nuts - they are usually used for installing a water supply system from copper pipes.
If you have straight pieces of pipe, there is no need to modify them, but curved pieces need to be cut off. At the bend site, a piece of pipe with a flange is cut off. The extended section of the pipe located on the other side also needs to be sawed off. It will be used later as a connecting ring.
Now you need to cut off the cracked flange from the pipe on the gas water heater. Its length must correspond to the pre-prepared tube with a new flange.
Before starting further joining, you should make sure that the elements fit together freely - the heat exchanger pipe fits into the ring with some clearance.
To improve adhesion, before soldering, it is recommended to sand the surface of the tube and ring with fine sandpaper until the oxide layer is completely removed. A thin layer of solder is applied over the prepared areas with a soldering iron with a power of 60-100 W; you can use tin-lead POS-61. The flux in this case can be either hydrochloric acid quenched with zinc, rosin or aspirin.
When starting to solder a tube to a flange, make sure that the junction of the two pipes is located in the center of the connecting ring. In cases where, after applying a layer of solder to the surface of the tubes, they will not fit into the ring, the surface should be heated with a soldering iron to melt the solder. Make sure that the union nut is placed on the tube before soldering begins.
When the joining of the elements is completed and they are positioned properly, the soldering of the heat exchanger is completed. To do this, the gaps between the elements are filled with molten solder.
Model differences
Please note that different models of geysers may differ significantly in their design - this must be taken into account if you plan to independently repair the water heater. So, Chinese geysers of the Vector brand are not worth soldering at all. The fact is that the radiators in them are formed from very thin copper tubes, in which new fistulas are formed during the soldering process. Thus, if you have a cheap column, it is best to replace the heat exchanger in it with a new one rather than repair it.
From the point of view of reliability and quality, among the best representatives of speakers are Oasis brand products from a German manufacturer. They are equipped with heat exchangers that have a long service life. Since the components for such equipment are quite expensive, repairs will be advisable. Soldering leaks on the heat exchanger of the Oasis column will allow you to use it for a long time.
In the middle price segment there are gas water heaters from the Swedish company Electrolux and domestic Niva. In such products, heat exchangers with anti-corrosion protection are installed, the soldering of which will significantly extend their service life.
The nature of geyser pollution
Next you will learn how to clean a gas water heater yourself, but for now let’s figure out where the problem actually comes from.
The main reason for contamination is the design and operating principle of the device. The device uses gas to heat water, so the appearance of soot and soot cannot be avoided. The ignition element itself can also become dirty - it collects soot on the wick. But the main problems begin when a thick layer of scale forms in the pipes of the water heating device. It prevents the equipment from working normally and can completely damage the installation or clog the water supply network.
The presence of scale inside the heat exchanger is especially dangerous. The heat exchanger in the water heating column is represented by a set of tubes that are located above the burner. Water must flow through them without obstacles, otherwise it will heat unevenly. Any accumulation of contaminants leads to the device operating intermittently.